Estimated reading time: 17 minutes(s) For some music lovers (music lovers) and connoisseurs of high-quality sound, upgrading acoustics is becoming a lifestyle! Today about this.
There is a category of car owners who constantly invest money, and quite a lot, in refining their “faithful horses”. But often, such auto modifications can reach the point of complete absurdity and the investment budget can be several times higher than the cost of even a new car.
Just like some car enthusiasts, some audiophiles put so much effort and money into upgrading their speaker systems! They “know” their speakers both inside and out, and not only their own. They change everything in acoustics that can be changed and improve everything that can be improved. It is also possible that “understanding comes” - “I did everything I could and nothing else will help.” Often, this is expressed in complete disappointment in this acoustics. And sometimes, disappointment occurs in your actions to improve, but this is much less common.
But according to the experience of many experts, there is an opinion that not all acoustic systems need to be brought to perfection. Very often there are acoustic models that just beg for improvement! And it is quite possible, at minimal cost, to achieve maximum improvement in the sound quality of your acoustics.
Do-it-yourself acoustics modification.
Modifying the acoustics with your own hands is a very real option! With some fairly simple techniques for modifying speakers, you can achieve a significant increase in sound quality. Improvements to parameters can be achieved with a fairly small budget. But to do this, you need to understand what awaits you during the revision process.
There is an option that if you buy acoustics of the “wrong model”, you can waste time, effort and money - in vain. Sometimes, in such models, the manufacturer has squeezed out all the maximum. But somehow it happened that some speakers initially turned out to be deprived of good characteristics and after reworking they may remain ordinary “average” or outright “losers”.
Not every fan of “listening to high-quality music” on their speakers for 300 evergreens will want to get into their acoustics for modifications. Others, having acoustics for 10-100 units, do not even think about any intervention. This is understandable; everyone can and wants to dispose of their property according to their own understanding. This is also understandable.
But it is worth considering the fact that correct modification of acoustics is more than justified! And many simple, inexpensive speakers begin to sound 2-3 times more expensive! Despite the fact that the investment may not be very large, especially if the entire process was done with your own hands.
The speakers began to play quietly
Over time, any equipment can break down and not carry out its work fully.
Of course, if a sufficiently long service life has passed and the device is already outdated, you can easily part with it. In this case, you can go to the store and purchase modern models with improved characteristics and software. But if very little time has passed since the purchase and the equipment is expensive, you should think about repairing it. In our article we will talk about a device that is indispensable for watching movies and listening to music. We will talk about speakers connected to various phones, tablets, computers... We will look at possible causes of problems with sound output and share ways to solve this problem. So, why did the speakers start playing very quietly?
Reasons why acoustics modifications begin.
You live in peace, listen to music on your speakers, bought in the music department of the supermarket (there is nothing special about this). And you don’t worry too much - “How well your speakers play!” But one day, by chance, while visiting, after listening to a friend’s acoustics, you realize that your speakers somehow don’t play right, you can say that “they’re not a fountain!” But in reality, this feeling may be wrong. We’ll talk about what affects the sound quality of acoustics another time.
Are you starting to look for something better to buy instead of your “old ones”? You study the topic a little. A certain concept appears - what to look for and why. And here it is - the announcement of your dreams! Having bought, at a very good price (and sometimes even very expensive), speakers that you like in appearance, after a while you begin to think and understand - “But they could sound better!” What to do in this case?
There are several options:
- forget about your friend’s “good acoustics” and be content with what you have;
- buy new ones, more expensive ones, and hope that these are “the acoustics” that satisfy you;
- improve existing ones.
Which option is yours? Which option is better to prefer?
Which acoustics is best to upgrade?
It is better to modify the acoustics in which the manufacturer included some hidden potential. The “mid-price” acoustics have the greatest potential for improvement. The sound quality of such acoustics can be called quite decent.
Another thing is that it makes virtually no sense to modify expensive, high-quality acoustic systems. This is due to the fact that replacing a component, or changing some of its properties, will require replacing and making changes to other components. In other words, it would just as well be better to start assembling an acoustic system of this level from scratch.
Without a doubt, something can be improved in expensive acoustics. But there will be no noticeable improvement in hearing. Although a noticeable increase in quality characteristics for an oscilloscope can still be achieved.
At the moment, the best and most common option remains the modification of Soviet acoustics. There are a lot of examples of improvements to the acoustics of those times, and the most “favorite” modified speakers are the S-90 and S-30. In this price category, acoustics of this class are of the greatest interest for modifications.
There are a huge number of similar systems in this category. A lot of work has already been done on this. The Orbita 35ac acoustic speakers, as well as the Vega 50ac, have been modified many times. Quite budget acoustics from the Japanese brand “Technics” from the 90s can also be modified and they begin to sound differently, here’s a funny case with such acoustics.
But technology does not stand still. Nowadays, modern acoustic systems, which can also be classified as “average”, can easily be modified. For example, we have already considered the modification of Polk audio and Eltax Hollywood acoustics.
Repeating what was said above is a summary.
If you have small plastic speakers from a music center, then there is no point in modifying them, from the word - “not at all!” To begin with, to start studying and gain practical skills, you should think about a speaker system for 60-100 dollars, so that you can try to get the most out of them, or at least some significant improvements.
How to solve a problem?
From the list of reasons it is clear that problems are divided into mechanical damage and malfunctions in the system. To troubleshoot problems, you need to accurately diagnose the equipment and identify the source:
IMPORTANT: Keep the warranty, with its help you can contact the technical support center and have the equipment replaced or repaired free of charge. Do not perform any repairs yourself to maintain the validity of the warranty card.
Source
Where does acoustics modification begin?
Before you start refining, you should weigh all the pros and cons, you need to understand for yourself - should you do the modification yourself or should you turn to a specialist?
This is the most important question. A quick hint to answer this question: without the appropriate equipment, as well as without experience and knowledge, you can get a result, but only by using some ready-made method that has already been tested by someone. Especially if this example was offered by some sufficiently qualified specialist in this field.
But if you really want to try yourself in this area, then in some cases, you can experiment a little with the well-known method of “scientific poking”. But it is worth understanding that the scope of permissible “interference” will be very narrow.
You can try to modify the case itself, for example, slightly increase the volume of the case. You can try to experiment with replacing any filter components, but to do this you need to have a very good understanding of how the filter is designed and why there are such parts with certain parameters. In any case, it won’t be easy.
Trying to modify “advanced” acoustics in the absence of experience and knowledge is extremely inappropriate. This was mentioned a little higher. Firstly, it may not always be possible to return “everything to its place.” Secondly, the cost of alteration can discourage the very desire to modify anything, because the components that can and should be installed in good acoustics are not cheap, and often expensive.
Therefore, we will further analyze what can be improved in acoustics.
How to make a speaker louder
Speakers are one of the most important accessories that are used along with a computer. Most often, they are connected to this particular device - this way it is convenient not only to listen to music, but also to watch movies or TV series with the whole family, as well as communicate with loved ones using special programs. But sometimes, after purchasing new speakers, the user remains dissatisfied with the result - the sound is amplified very poorly, audio tracks are played quietly, so there is a need to either change the accessory or try to make the sound louder yourself. What is needed for this and what methods exist?
What can be improved in acoustics?
Refinement of the filter.
Accessories.
This point can be considered one of the main ones. The fact is that the filter (crossover) is a very important part of the speaker system and the sound depends on its filtering quality and the quality of the components themselves. But in our case, we, at a minimum, want to make modifications to the filter ourselves. Here, it makes sense to do everything in the simplest form: it is worth replacing the standard elements with higher quality ones of the same denominations.
Very often, even well-advertised brands “play around” by installing electrolytic capacitors in filters. But all self-respecting acoustics manufacturers know that installing electrolytic capacitors in acoustics is “bad form.” But this happens. In this case, it is worth replacing all electrolytic capacitors with film, metal-film or metal-paper capacitors.
Filter wires.
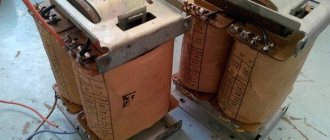
Any acoustic filter (crossover) contains coils (they are often called a choke). They must be made of copper wire and have a certain resistance and, most importantly, a certain inductance. It is rare to see coils that are made using “good tone” technology, that is, made from high-quality material and made using “quality sound technology”.
In inexpensive acoustics, almost always, the filter coils are made of thin wire and with a metal core. All this is done to reduce the size and weight of the filter itself. It is better to replace such chokes with homemade or purchased ones, with similar electrical parameters, but without a core and wound with thick copper wire with a cross-section of at least 1 mm2. The ideal option would be to use a 1.5 - 2 mm2 wire, as in the example in the picture below.
It also makes sense to replace the wires running inside the speaker cabinets (from the crossover to the speakers and to the terminals). This is also a controversial issue, but replacing thin (up to 1 mm2) with thick copper wires from 1 to 2.5 mm2 is worth it anyway. You can use wires up to 1.5 mm2 in small acoustics, this will be enough. For powerful speakers, it’s better to play it safe (it certainly won’t get worse) and replace all connecting wires with thick ones - from 1.5 to 2.5 mm2.
There is a possibility that replacing the wires will definitely not do anything, since the remaining components will not allow for an increase in quality. But this can only be verified by listening to slightly modified speakers.
But even with such minor modifications to the filter, you can achieve better sound.
Speaker wire.
There is an opinion that it is also worth replacing the wires that go from the amplifier to the speakers. There are our thoughts and small studies about this. And you shouldn’t neglect this point either.
Refinement of the acoustic housing.
Okay, we don’t understand anything about electricity and electronics, what should we do? How to take your speakers to the next level? How to improve the acoustics without getting into the electrical part?
You can start refining the acoustic housings themselves.
Small clarification. If you have a 2.1 or 5.1 system (satellites and subwoofer), then it makes no sense to modify the satellites. You can try to work only with the subwoofer.
Why is that? The housings of small speakers, ideally, should be sealed and fairly rigid. Fortunately, they must be correctly calculated for the specific speaker being used. But in fact, many cases of popular, inexpensive systems do not meet any of the criteria.
For this reason, almost all small-sized systems that use a subwoofer hum and drone. The speakers themselves easily resonate and thereby introduce significant distortion into the sound. Speakers that are poorly secured in the housing also introduce distortion. If you try to eliminate these shortcomings, you can achieve an improvement in the sound characteristics of the acoustics.
Refinement of the acoustic housing should ensure the rigidity of the housing itself. It is likely that spacers or ties will need to be installed inside. If the column has a volume of more than ten liters, then it is advisable to install more than one spacer.
You can install wooden blocks in the column as spacers, gluing them to the walls and tightening them with screws. Accordingly, they must be installed spaced apart. In this way, detonation of the walls of the housing itself can be reduced.
It happens that it is not possible to install spacers in a speaker, since the dimensions or design of the acoustics are super-special. But even here you can try to increase the rigidity of the hull by installing bars along the ribs of the hull. This will also help give a little more rigidity to the acoustic body, albeit only slightly. Better than nothing!
Housing sealing.
It’s very good that we managed to strengthen the speaker housing! Now, there is one more point in finalizing the case, which should not be excluded from the options. You need to carefully seal the case. What it is and how it’s done has already been described using the example of upgrading Eltax Hollywood acoustics. Recommended for familiarization and study. Surely, many questions simply will not arise, and the process itself will be clear.
But I’ll repeat myself a little. Carefully remove all the speakers, not forgetting the crossover and wires. Examine how and whether any absorber is installed at all. If there is already a padding polyester there, then it is better to remove it too.
After that, it would be good to seal the inside of the body with some kind of viscous sealant. It is better to buy a material specially designed for this in a car audio store - a rubber-based vibration absorber. Such materials are used to improve acoustics in a car. You can consider the option of a well-known manufacturer - Shumoff (not advertising).
It is highly discouraged to use cheap materials, most of which, after some time, lose their elasticity, become brittle, and fall off the walls due to vibration and begin to rattle.
After gluing with some kind of vibrating material, you can also glue it with padding polyester. If there was quite a lot of it “in the factory version,” then use it. Otherwise, buy a sufficient quantity and glue all the walls with Moment glue. It is not recommended to use padding polyester thicker than 1.5 centimeters. Here is an example of what the inside of the housing might look like after gluing the padding polyester.
It would be nice to improve the seats of the speakers themselves and the terminals (connectors for connecting speaker wires from the amplifier). You can buy special material for this at a car audio store, but you can also find something suitable - soft and elastic. Glue the seats of the speakers and terminals with this material. Thus, we will not have to use silicone or sealant - all parts will be securely in place and sound “leakage” through these places will be excluded.
Increasing the volume of acoustics.
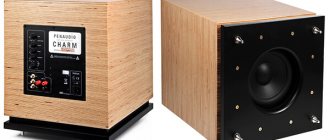
Just a question. Is it even possible to increase the volume of the acoustic body? Yes, it is quite possible, within certain limits. You've probably seen photos like this or seen this with your own eyes...
Bookshelf acoustics.
There may be a problem when the speakers initially “hum”, produce not very pleasant bass, or there is simply no bass - you can increase the volume of the acoustics. This can slightly improve the characteristics of the speakers by slightly increasing the internal volume of the speaker. It is not possible to greatly increase this parameter; there are physical limitations, but the virtual volume can be increased.
This is not about physically enlarging the body (there is no need to cut it and add additional cavities). Everything is quite simple - you need to place a little fluffy cotton wool in the body itself. But how much is a little?
To begin with, it is worth freeing the body from all the padding polyester that may already have been inside the body. And then, a little calculations.
Approximately 25 grams of padding polyester is calculated per liter of column volume. Not enough? You can also add cotton wool, fluff it well first. 10-15 grams of cotton wool per liter of column volume can be considered normal. If the “humming” effect of the acoustics remains, then you can add more cotton wool. But there is a good chance that some low-frequency spectrum will be lost.
Attention! This method describes the modification of speakers that “buzz”. Typically, these are small home theater satellites that do not have any sound insulation.
There is another way, but not so effective. The bare walls of the case, inside, can be covered with felt or batting (generally the cheapest modification option). But you shouldn’t expect great results either. This allows you to slightly reduce the number of reflected sound waves inside the housing, which will lead to a reduction in the distortion introduced by the housing into the sound.
A little simpler. You need to imagine yourself in an empty room, clap your hands. How long can you hear the echo of a clap? This is facilitated by reflected waves.
But you need to imagine a room richly furnished with furniture and carpets (carpet on the floor, on the wall) and a large sofa and thick curtains on the windows. Now how long can you hear the bang? It’s practically inaudible, as if you’re wearing headphones. The sound is muffled.
Likewise, in an empty speaker housing, sound propagates from the speaker - with an increase in amplitude, with a delay. Eventually the sound comes out, but we hear all these reflected waves.
Floor acoustics.
It is not considered advisable to further increase the volume of floor acoustics. During manufacturing at the factory, all parameters of the speakers (the main parameters are resonant frequency, speaker quality factor, sensitivity) are taken into account, and the housing is calculated in accordance with them.
Therefore, further increasing the volume of the column will not lead to anything good. But there are exceptions. For these exceptions, you need to know: how to measure dynamics, how to calculate volume, how to add it all into one whole. It is not so easy. Akin to creating new speaker systems with the speakers you want to use.
Third question. Electrical work
You are not going to make new crossovers for your speakers. Then things will be simpler. You can carry out some manipulations with the existing crossover and you can try to improve the sound without making specially designed and sophisticated crossovers.
There is no one hundred percent guarantee that the result will be audible. But many note that even a simple replacement of “standard” electrolytic capacitors with “good” ones already gives tangible advantages in sound. By filming the frequency response “before” and “after”, this can be seen more clearly.
If there is a diagram of your “native” crossovers, then everything is simpler - just replace the existing components with more expensive and high-quality ones. If you want to experiment, then bringing it to fruition can take many weeks and months. But even a simple replacement with high-quality components can give an effect greater than expected. Such an alignment is possible, the effect of replacing the amplifier.
In your crossover you did not see a filter for the low-frequency speaker - this should be alarming. It is likely that the circuit will have to be redone, and this is already engineering work - can you handle it? In addition, these works already go beyond the scope of a “tweak” for everyone.
About capacitors
If you decide to change capacitors, then there is a certain generally accepted list. A little about him.
Suitable capacitor types for coupling filters:
- from domestic ones: you can try the K78 series for an operating voltage of more than 100V. You can immediately forget about K73-16, K73-17, but if you choose from K73, then with an operating voltage of at least 400V.
- from imported ones: Mundorf, Audyn Cap, Solen, Jantzen, Multicap, Visaton. The main thing is that finances allow it. The difference in class will be noticeable - more expensive capacitors give better sound. This is noted by professionals by hearing and devices by characteristics.
Such a simple replacement of capacitors will certainly give new details in the sound. The “porridge” will decrease, sounds will begin to sound more clearly. The sound stage will expand, both in width and depth. Detail will improve. The sound from your speakers can become “richer” (meaning the sound component) and “more expensive” (feeling, sound – like from cool speakers).
But it should be noted with regret that some disappointments will be possible here. They will become noticeable (this is, of course, a matter of chance, depending on your luck), previously unheard “shoals” will “come out”. It’s hard to come to terms with this, but the sound will amaze you so much that you’ll hardly want to return everything back.
Recommendation. After replacing the capacitors, you need to “break in” them, “warm them up” for 5-10 hours at decent power. Immediately, all day, all 10 hours, you don’t need to do this - listen only to “warm up”. This will happen in a week or two, during the audition process. It’s only after these hours of operation of the capacitors that you can try to “listen” to the modified acoustics. All professionals note this.
This is probably audible, but purely from “electrical considerations” it is so. It's like a new battery. In order for it to work “to the maximum”, it is first recommended to “drive it” - charge it completely and discharge it completely. And then put it on recharge - how convenient it is, at least with 50% charge, at least more. The capacity of the battery will be the same and it will work more productively.
But if you have no idea what a crossover is and how to make one, then you shouldn’t do it yourself. This will require some knowledge that is so specific that not every person who likes to solder wires will be able to figure it out.
Summary, but no such luck!
Like any tuning, modification - this process very often drags on for a long time, and then it can turn into a permanent activity - “useful with pleasure”. This is true! Carrying out a second revision of my acoustics (because the first one didn’t seem to be enough), it becomes interesting. Another interest awakens - is it possible to “squeeze” more out of these acoustics?
The refinement of acoustics will be deeper and will be even more individual. There will be a desire and need for an even more thorough refinement of each of the previously mentioned levels of the system. This revision will require even more time and money, and will also require even more in-depth knowledge and experience.
In addition, you will need a professional approach to assessing the sound quality by ear, since you will need to compare excellent sound with super excellent (almost ideal).
It will be necessary to understand the source material on which value judgments about the improvements made will be made. You will need the ability to work with programs that can be used to judge sound quality and frequency response characteristics.
Why do the speakers play quietly - how to find the reason?
Before you start repairing equipment yourself, you should understand the level of complexity and find the source of the problem.
In some cases, you should entrust the work to professionals so as not to damage the equipment. In addition, working with electrical appliances requires extensive experience in this field, skills and special education. We will only tell you about some options that you can fix yourself. The most common reasons for poor sound are:
IMPORTANT: Some reasons cannot be noticed without the use of special equipment. Internal damage can only be detected by a specialist when disassembling the case.