Equalizer Windows 7 and 10
To get to the settings you're looking for and enable the equalizer in Windows:
- We go along the path “Start/Control Panel/Hardware and Sound/Sound”. A window with connected audio devices will appear on the screen. We are interested in the “Speakers” item - double-click on it.
- In the “Properties” menu that opens, select the “Enhancements” tab (in the screenshot “Enhancements”). Check the box next to the “Equalizer” parameter and click on “MoreSetting”.
- The user gets a simple equalizer at his disposal. It also comes with preset configuration profiles.
Using the same principle, you can open the equalizer in Windows 10. Its appearance is no different from the above panel on the “seven”.
Individual equalizers with ROOT
Viper4Android
This equalizer is a real living legend among all Android equalizers. Ever since Android 2.3, this application has delighted users with a truly large amount of functionality and convenient operation. Like Wavelet, you can enable audio to be applied to the entire system, and it automatically switches profiles. In addition, the application has a huge amount of functionality, starting with a simple 10-band equalizer, and ending with a convolver (a function that allows you to apply pulses) and spectrum expansion (raising the bitrate with algorithms). Unfortunately, the main developers abandoned their creation a long time ago, so now on the latest versions of Android you have to be content with somehow working mods from enthusiasts.
Features of Viper4Android:
- a large amount of functionality, including atypical ones;
- the settings apply to the entire system.
JamesDSP
JamesDSP is conceived as a more modern and efficient analogue of Viper4Android. Essentially, this equalizer has almost the same functionality, with the exception of a few functions, such as spectrum expansion. At the same time, some of them are implemented better technically and their use causes less distortion of the audio stream in the end.
Features of JamesDSP:
- normal operation on the latest versions of Android;
- better implementation of functions than V4A.
Configuring Sound Settings Fhd Samsung UE32F5300AK
Page: 108 of 194
Adjusting sound settings
Sound effects change the way the TV produces sound. These options are only available if the parameter
Creates a sound effect like in a cinema or concert hall.
Improves speech intelligibility in dialogues by increasing voice volume.
Adjusts speaker balance and adjusts frequency response. To reset settings, select
Due to differences in the broadcast environment of different stations, the sound volume may vary when changing channels. Auto Volume automatically adjusts the channel volume, increasing or decreasing the audio output. When you select the option
the volume is set to normal, and when
the volume is set slightly lower than when selecting
Suitable for watching TV at night. To be able to use the volume control of the connected source, turn off the Auto Volume function. When using the Auto Volume function with a connected source, the volume control may not work properly.
TV installation type
TV installation type
The TV may sound slightly different depending on the position. Select
This TV provides deeper sound when watching 3D video. When watching a 3D video, open the menu
, and select 3D sound.
Restore factory settings for all sound parameters.
Source
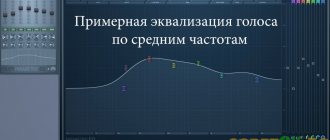
What sound frequencies are responsible for bass?
| Frequency range name | Sound frequency in Hertz |
| Low Bass | 20-40 |
| Mid Bass | 40-80 |
| Upper Bass | 80-160 |
| Low mids | 160-320 |
| Mid Mids | 320-640 |
| Upper mids | 640-1280 |
| Low Treble | 1280-2560 |
| Mid high frequencies | 2560-5120 |
| High treble | 5120-10200 |
| Upper octave | 10200-20400 |
As you can see from the table, we are interested in sound frequencies from 20 to 160 Hz, depending on what kind of bass you want to increase.
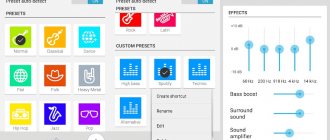
FxSound Enhancer
FxSound Enhancer is a small utility for adjusting the sound on your computer. The application has a built-in 9-band equalizer, the ability to apply various effects and ready-made templates for quickly customizing the sound.
The program is compatible with the Windows operating system (32/64 bit) and has an interface in English. The utility is shareware, the full licensed version costs $50, but there is a trial period for 7 days.
To start adjusting the equalizer, you need to go to the “EQ” section. There is a 9-band equalizer with a level range from 12 to -12 dB.
The “Reset” button is used to reset user settings, the “Power” button allows you to disable the equalizer, and in the “Presets” menu section there are ready-made templates for adjusting the sound quality on your computer. The available presets are divided by musical genre.
Users can save their own equalizer settings and add them to the template library. To do this, go to the “Presets” menu section and select “Save”.
Advantages of FxSound Enhancer:
- there is a built-in library of presets;
- the ability to use effects to improve the sound;
- simple and convenient interface.
Flaws:
- You cannot set the required number of equalizer bands.
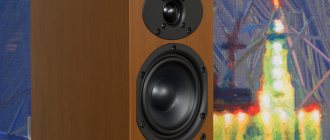
Adjusting the sound using standard “tens” tools
Windows has standard equalizers that adjust the sound for the entire system as a whole. Their disadvantage is poor functionality and only 10 bands. However, even this will be enough for a novice user to adjust the sound.
Setting up speakers in the Properties window
One of the standard equalizers can be found in your speaker settings. Follow the instructions:
- On the right side of the “Taskbar” (Windows tray) we find an icon in the form of a loudspeaker to the left of the time and date. Its name is “Speakers”. We click on it with the right mouse button. In a small menu on a dark background, select the second option “Open sound settings”.
Select "Open Sound Options" from the menu - In the new large “Settings” window, immediately click on the “Device Properties” link.
Click on the "Device Properties" link to open an additional window - Another window will open on top of the main window - “Properties: Speakers”. Go to the third tab “Improvements”.
Go to the third tab "Improvements" - We look to see if the checkbox is checked in the list to the left of the “Equalizer” item. If it doesn't exist, install it.
In the list, check the box next to “Equalizer” - Left-click on the same item to highlight it. Music styles will appear in the drop-down menu - complete equalizer settings that are most suitable for a particular genre. If you don't know how to adjust the equalizer yourself, styles are your solution.
From the list of styles, select the appropriate direction for your audio recordings - To open the equalizer itself for manual adjustment, click on the button with three dots located to the right of the drop-down menu. Here you can lower or raise the sliders on the vertical bars to adjust the sound. Before setting up, play the audio file.
Move the sliders to adjust the sound quality of the audio file - We move the sliders a little at a time and carefully observe the changes in the sound. You shouldn’t immediately raise it to the maximum or lower it to the minimum. If you want to make bass instruments sound more powerful, raise the frequency to 80 Hertz. To more clearly distinguish the words in a song, raise the sliders on the 2000 – 4000 Hertz bands. If you raise the areas from 60 to 100, the drums in the songs will sound louder.
- In this window we can enable the same settings for a specific genre of music. When you choose a style, the sliders will immediately take the desired position.
The same list of music genres is available in a small window for quickly adjusting the equalizer to a specific style - After making all changes, click on “Save”, and then on “Apply” and OK in “Properties”.
- If the changes made are not suitable, click on the “Reset” button.
Video: setting up the equalizer in speaker properties
Using the Realtek driver
You will find a similar equalizer in the standard Realtek Manager utility. It is installed along with the drivers for the sound card of the same name. If you cannot find the manager on your PC, update your sound card drivers in the Device Manager window or manually download the update from the official website of your device manufacturer. To launch Realtek Manager, follow the instructions:
- Click on the magnifying glass icon on the “Taskbar”, which should be located to the right of the “Start” button. In the line below, enter the request “Realtek Manager”. It should show up results immediately. To launch the window, click once on the item.
In “Windows Search” write the query “Realtek Manager” and open the window with one click on the item - Another method of launching the manager is through the Control Panel window. It is more complex, but it will suit you if there is no magnifying glass icon or search bar on the “Taskbar”. To launch the specified window, hold down on the keyboard a combination consisting of two keys Win and R
- In the small “Run” window, write the short control code and click on the OK button to execute it. You can also press Enter.
In the “Open” field, enter the control command and click OK - In the panel window, set the value on the right to “Small icons”. In the first column you will immediately see “Realtek HD Manager”. Let's click on it.
In the Control Panel window, find the Realtek HD Manager item. - In the manager, switch directly to the “Sound Effect” tab, where the standard Windows equalizer is located.
In the manager window, go to the “Sound Effect” tab - In the corresponding section, the same drop-down menu with a list of music genres is available as in the “Properties” window. If necessary, select a style. First we launch some audio file to hear the changes.
To quickly adjust the equalizer, select a music style from the drop-down menu - The most popular genres are displayed as tiles under the menu. To configure it yourself, click on the button on the right “On.” graphic equalizer."
Click on the “On” button. graphic equalizer" - We adjust the sound using the sliders. In the top menu, you can customize the environment as desired.
Adjust the equalizer yourself by moving the sliders up or down, and then click “Save” - After setting, click on “Save”. Close the window by clicking OK or the cross in the upper right corner.
Video: how to use the equalizer
Setting the equalizer on the car radio
Equalizer - sound settings. If you have a simple budget radio, then it looks something like this:
- Setting up the equalizer in your car starts with adjusting the balance between the front and rear speakers so that the front speakers predominate.
- Adjust the correct balance between the left and right speakers, otherwise the sound will “go away” to the side.
- On devices with a built-in high-pass filter, it is better to activate it: “cut off” the sound below 100-125 Hz. This will help you get a clearer sound without unpleasant wheezing.
Differences between HDMI ARC and eARC
Most TVs pre-compress the audio signal before it is sent over HDMI cables. eARC (Enhanced Audio Return Channel) allows you to transmit the original audio signal in full resolution through an HDMI cable and reproduce better sound without compromising quality. eARC is a feature implemented in the latest HDMI 2.1 specification. The biggest benefit is that it greatly improves throughput and speed. This allows you to stream high-quality audio from your TV to your soundbar or A/V receiver and is compatible with Dolby Atmos and DTS high-bitrate formats.
eARC is also often referred to as Next Generation ARC. It demonstrates support for higher bandwidth and faster speeds. This way, you can stream higher quality audio from your HDTV to your soundbar or audio receiver.
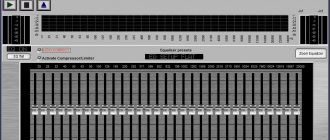
Equalizer APO
Equalizer APO is an application for adjusting sound on a computer. The program works with all current sound cards; two types of graphic equalizers are available: 15 and 31 bands. Users can save personal settings in a separate file, and there is a built-in sound enhancement tool.
The utility is free, works on all modern versions of Windows (32/64 bit), but the interface is in English.
The main application window contains the main tools for regulating the sound on your computer. One of the main features of Equalizer APO is the graphic equalizer. You can choose a 15 or 31 band equalizer. The available level range is from 100 to -100 dB. There is also a third equalizer mode - “variable”. When you select this mode, you can set the number of stripes manually.
You can change frequency parameters in several ways:
- using a graphic controller - moving the graph of a given frequency up (to increase) and down (to decrease);
- by setting exact dB values for each of the available equalizer frequencies.
The program has the ability to save ready-made equalizer settings using the “Export” tool. If necessary, you can load ready-made settings, for which you need to use the “Import” function.
Benefits of Equalizer APO:
- free distribution model;
- user-friendly interface;
- the ability to set the required number of bands for the equalizer manually;
- sound amplification tool;
- import and export of equalizer settings;
- application of various filters to improve sound quality.
Flaws:
- there is no official support for the Russian language.
Shelving EQ
Shelving EQ dampens or boosts frequencies above or below specified cutoff points. There are 2 types of shelving equalizers - high-frequency and low-frequency. Some fully parametric equalizers have a feature that allows you to switch the high-pass and low-pass controls into high-cut filter mode.
The low-cut filter passes all frequencies below the one we have selected, muting everything above. The high-pass filter does the opposite - it passes everything above the specified frequency, muting everything below.
Differences between HDMI ARC and eARC
Most TVs pre-compress the audio signal before it is sent over HDMI cables. eARC (Enhanced Audio Return Channel) allows you to transmit the original audio signal in full resolution through an HDMI cable and reproduce better sound without compromising quality. eARC is a feature implemented in the latest HDMI 2.1 specification. The biggest benefit is that it greatly improves throughput and speed. This allows you to stream high-quality audio from your TV to your soundbar or A/V receiver and is compatible with Dolby Atmos and DTS high-bitrate formats.
eARC is also often referred to as Next Generation ARC. It demonstrates support for higher bandwidth and faster speeds. This way, you can stream higher quality audio from your HDTV to your soundbar or audio receiver.
High data rate and object-oriented up to 192 kHz, 23-bit
(eg Dolby Atmos, DTS:X)
eARC-enabled models
- TVs: UHD TU7000 and later models.
- Soundbar: Q70T and later models.
- Audio Format: Supports the latest high-bitrate audio formats, including DTS Master, DTS:X, Dolby TrueHD, Dolby Atmos and more.
- You must use an HDMI cable that supports eARC. (HEAC or HEC)
- Anynet+ (HDMI-CEC) must be enabled on your TV.
- If you use a non-certified cable, an error may occur.
Will a soundbar really improve the sound quality over TV speakers?
Easy answer: yes! The speakers built into TVs today are better than those they had 5 years ago. However, they still leave much to be desired. Soundbars provide enhanced sound, which is one of the main reasons for their popularity.
Cheaper than traditional surround sound and convenient, soundbars go beyond your TV's capabilities to deliver quality sound. Often simple in style, they can be mounted on a wall or installed in an entertainment center without taking up much space.
You can invest in an expensive home theater if you want to seriously upgrade your cinematic experience. However, a soundbar provides many of the same benefits without breaking the bank. If you decide to upgrade to a full home theater system, the highest-end sound bars often play an important role in these setups as well.
Recording source: https://thehometheaterdiy.com
Let's use the equalizer that comes with the drivers for the sound card
In conclusion, we cannot help but talk about the equalizer that comes with the sound card. If you are using a built-in sound card, then with an 80% chance it will be an audio chip made by Realtek.
the Realtek HD Manager is also installed in the kit . When you click on its tray icon, a window will open in which you can configure both the equalizer and apply other sound effects.
The sound settings will apply to absolutely all sound that is played on the computer.
Voxengo Marvel GEQ
Voxengo Marvel GEQ is an equalizer program that supports multi-channel audio processing. Using the utility, you can adjust the sound at 16 frequencies. To obtain high quality sound, a linear-phase filter is used, it supports work on any sound cards and there are built-in presets for quickly setting up sound on a PC.
The application is free, runs on Windows (32/64 bit), but is not translated into Russian (the interface is in English).
In the main window of the utility there are 16 dedicated frequencies for sound control. Users can increase bass, bass and treble, enhance the sound. Volume adjustment is performed at frequencies in the range of 12 dC. The delay time during audio processing is 7-9 milliseconds.
At the top of the utility interface there is a “Presets” section. Here are ready-made templates for customizing sound. Users can save personal settings and add them to the template catalog.
At the bottom of the interface you can select the sound processing mode: MID - mono signal processing is activated; SIDE - stereo audio signal processing. To reset all user settings, click the “Reset” button.
Advantages of Voxengo Marvel GEQ:
- ability to adjust sound at 16 frequencies;
- free distribution model;
- processing of the incoming signal in 64-bit;
- a tool for comparing two sound settings;
- built-in library of presets;
- minimal delay when processing the channel;
- linear-phase equalization;
- simple and convenient interface;
- Tooltips to help you use the Voxengo Marvel GEQ app.
Flaws:
- there is no official support for the Russian language;
- There is no built-in library of filters to improve sound quality.
PC Equalizer
PC Equalizer is an equalizer program with which you can adjust the sound on your computer. The utility has the ability to create personal effects, a ready-made library of presets is available, and the ability to control the right and left playback channels separately.
The utility runs on the Windows operating system (32/64 bit), is translated into Russian and is distributed free of charge.
To adjust the sound, the application uses a 10-band equalizer. The level range is from 15 to -15 dB. The equalizer allows you to adjust high and low frequencies, and you can enhance the sound.
To the right of the equalizer is the Preamp slider. It is used to configure the signal preamplifier. The BW Oct slider allows you to adjust the audio bandwidth in octaves.
The “Preset” line contains a list of ready-made templates for adjusting the equalizer. All available options are divided by musical direction. Users can save personal settings and add a template to the list of presets.
On the right side of the interface is the “Enable” function. It allows you to disable and enable the equalizer. Users can enable audio processing mode (Process) and delay (Delay). The delay can be set from 0.1 to 5,000 ms.
Advantages of PC Equalizer:
- the ability to use the equalizer for free;
- built-in library of ready-made presets;
- delay adjustment tool;
- adjusting the audio preamplifier.
Flaws:
- There is no Russian interface language:
- You cannot set the number of equalizer bands manually.