Against
- Nothing
The Planar 3 has been in the Rega range in one form or another since the late seventies. The current version is not very different in appearance from the original, but each of its elements has been modified more than once to obtain better sound.
Perfectly combining tradition and innovation, Planar 3 outperforms its competitors in every way.
In this case, the differences between generations were significant. The stylish, high-gloss desk is made stronger by a pair of phenolic polymer spacers on the top and bottom planes, reinforcing the area between the tonearm and the copper bearing. Increasing the rigidity in this area has a good effect on the sound.
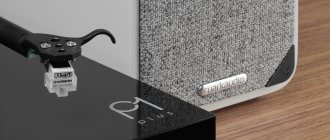
The bearing has been modified for greater clutch precision; The support platter and substrate, motor control unit and legs were also changed. Most of the modifications have been made to improve the sound, but the high-gloss desk finish and polished side surface of the 12mm Optiwhite glass platter give the Planar 3 a more stylish look than ever before.
The familiar Rega tonearm is now called the RB330 and sports a new bearing housing as well as an updated tube. All these changes contribute to increased rigidity, controlled resonances and reduced friction. The new tonearm also has better quality wires and plugs.
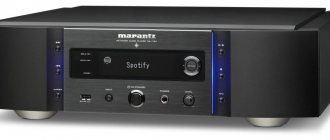
Despite the scale of the upgrades, Planar 3 retains its simplicity, classy design and emphasis on sound quality. You can buy it for 61,110 rubles. without a cartridge, but we recommend not saving and choosing the option with a pre-installed excellent Elys 2 MM cartridge. Time-tested, it perfectly matches the musical character of the player.
As soon as you start listening, it's immediately clear that all of Rega's efforts have paid off: the Planar 3's sound is much cleaner than its talented predecessor, and transparency and detail have also increased.
Grand orchestral works, such as Beethoven's Fifth Symphony, demonstrate the organizational talents of Planar 3. All instrument parts are placed exactly in the right places, no matter how complex the arrangement. The music sounds very big and convincing.
PASSION FOR UPGRADE OF REGA TURNABLE, Op. 2 (Part I Rega Planar 3) There is also a video version!
Dear friends, lovers of decent and correct sound, we have repeatedly convinced ourselves that only better players, amplifiers, phono stages, etc. can be better than the products of the English company Rega. from the same company Rega. At the same time, we also certainly understand that any more advanced component will cost significantly more. From here, the simplest upgrade may look like this: we sell the old device, add money and buy a new one.
But what if your head is bright, your hands are growing out of nowhere, and you don’t have much money, but you want to listen to the sound with a feeling of deep satisfaction? The solution will not be the simplest in terms of time and labor costs, but it will provide a creative and skillful person with an extremely emotional life, filled with rosin smoke and groans through clenched jaws when the drill is fed incorrectly. So, let's talk about upgrading Rega vinyl players again.
The very first player with which we had an intimate acquaintance was the 1995 Planar 3 from the first official delivery of the company’s components to Russia in the same distant year. The Elys head was replaced with an Exact towards the end of the nineties. Otherwise, the player remained unchanged and pleased the ear to this day. But with the advent of a tonearm assembled from spare parts for the RB1000 and RB2000, and a restored Apheta 2 head, a natural itch provoked an upgrade of both existing turntables: the aforementioned Planar 3 and the YouTub star Rega Queen, which had already undergone a deep modernization. But first things first. Let's start with Planar 3.
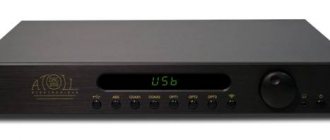
The plan has matured as follows: 1. We replace the 220 V AC synchronous motor with the same one, but with an operating voltage of 24 V. You remember that Rega offers an appropriate kit for replacing the motor, which also allows you to power it with a cleaned sine wave from the external Neo PSU unit.
- We install the RB-303 three-support tonearm instead of the RB-300, which is tightened with a nut from below (fashion from the 70s and 80s). The 303 does a much better job of suppressing unnecessary resonances, and the internal wiring sounds more transparent. We solder only more modern Reg phono cables.
- We are replacing the entire main bearing and sub-disc assembly from plastic with a completely metal one from RP6. We change the black belt to a white one (fortunately we still have it in our personal supplies).
Technically speaking, for a more attractive look, it was decided to apply some kind of pattern to the right side of the table and attach aluminum spacers for the support legs. Let me immediately make a reservation: this cosmetics does not affect the sound in any way, even the legs.
We started with a drawing. My satanic friend and colleague, also an excellent artist and industrial designer, who drew amplifiers on blotting pads back in the sixth grade of a secondary school, Vigen proposed a stylized image of the coat of arms of the county of Essex, where the company has a factory. Accepted and done. How it turned out - judge for yourself from the photos. For industrial printing, the player was completely disassembled.
This is how it turned out, it became more fun - here the player is already fully assembled
Now replacing the tonearm - let's look at this in detail.
There are nuances here. First you need to drill holes up to 1 cm deep for self-tapping screws around the old mounting hole in the table.
I almost forgot to mention the most important thing: the entire geometry of turntables from the last millennium has not changed in the 21st century. The effective length of the tonearm remains equal to 222 mm, and its effective weight is just under 10 g. The offset is the same, height, etc. Moreover, this is true for the entire line of turntables from the company. The simplest conclusion follows from this: Rega players made several decades ago can be upgraded; no significant alterations are required. This trend, in modern terms, continues today and the company does not yet plan to replace it with another approach. Rega stays with you for centuries, unless of course you so wish.
I marked it and of course missed, I had to repair everything and drill again
So, I attached the stencil that came with the tonearm, marked the table for future holes and, after checking everything seven times, drilled. There is a caveat: the stencil must be applied and combined with the existing mounting holes before installing the new motor, it will interfere - there is a chance of missing. In this case, a displacement of 1 mm will inevitably affect the sound; distortions will appear, albeit barely, but still barely audible and therefore crushing the brain until you lose your pulse. Then everything is simple, glue... a new motor. It is in this sequence, because It will be much easier to do this without a tonearm. This process was discussed in detail earlier in relation to Rega Queen, so it does not deserve attention.
The old motor with elastic suspension on the left and the new one on the right
But there are nuances here too. Before installing the motor, we will attach a cup with a spring-loaded steel ball to its lower bearing to prevent chaotic reciprocating movement of the motor shaft during operation, this is simply not the case. Without fanaticism, we bring thick lubricant into the cup, for example, Litol-24, the main thing is that such a lubricant does not corrode this cup over time, insert a spring, put a ball on it and glue the whole thing to the motor body with ordinary instant glue, having previously degreased the gluing area.
All described stages of manipulation to upgrade the motor
And only now we mount a new tonearm with already soldered phono cables and fasten it with self-tapping screws with a force of 40 Nm (manufacturer’s specifications). Overtightening threaded connections in vinyl cases is just as harmful to the sound as undertightening them. In the first case, the sound becomes dry and compressed, in the second, sloppily flabby and unfocused. We take the bracket for fastening the phono cables from the RB303 kit, because the old one from the archive player with one screw will not cover the thicker new wires.
Now it's time to replace the drive disk. In this case, the main support bearing cup does not need to be changed if it is not worn out. If desired, it is recommended to clean it well with alcohol to remove old grease. Add no more than three drops of new lubricant (hypoid oil W80 or similar) into the bearing housing shaft. We insert the pin of the new disk into the shaft and tighten the disk. It should very slowly drop to a ball, which you remember to remove, wipe well and throw to the bottom of the shaft.
We put on a white belt, seal the old holes, set the correct clamping force and listen
Since the record cannot be played decently on a drive disc, be sure to remember to install a new double-layer glass disc. A faceplate made of two types of glass, and even with an adhesive layer between them - a real triplex, being a composite, is practically devoid of its own resonances. This is exactly what we need. A felt mat made from natural English sheep's wool is supplied with the disc.
All you have to do is connect it to the system. That's what we do in our office. We get the sound using the Brio amplifier and AperturA Swing speakers. We accept it and try to prove to our loved ones that a delicious dinner at home is somewhat delayed. The task is difficult, but this is exactly the case when spiritual food clearly takes precedence over the usual traditional one. The machine played significantly better than its original condition. Air, natural sound, nuance – it’s all there. For example, you can easily notice the difference in the interpretation of the Concerto for trio and orchestra, Op. 56, performed by David Oistrakh, Lev Oborin and Svyatoslav Knushevitsky and a version with the same David Oistrakh, Mstislav Rostropovich and Svyatoslav Richter. What else is needed for complete happiness? Take my word for it - nothing!
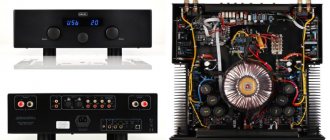
But there is always a BUT. In this case, BUT is due to the material and design of the turntable body. And this noticeably affects the sound, which, if equal, and in some ways somewhat surpassed the sound of the P3 from this day, but clearly did not reach the P6, despite the fact that the head, as already mentioned, was installed with an Exact instead of an Elys 2, and the block power supply was used by Neo PSU - the motor now allows 24 V AC. The body of the modern six is made of polyurethane foam, laminated with hard plastic and reinforced with two plates, one of which is made of aluminum. This design gives the table incredible rigidity while reducing weight. They didn't do that in 1995. Although Roy Gandhi, being an experienced mechanic and electronics engineer, understood perfectly well from the very founding of the company, i.e. from the first half of the 70s, that the table should be as light and rigid as possible, and the disc material should have a sufficiently high specific density with the highest possible recovery coefficient. This canonical ratio was achieved exclusively by modern materials and technologies.
All other conclusions in the article Passion for upgrading the Rega turntable, Op. 2 (Part II Rega Queen).
Excellent work
Pleasant tonal balance is combined with sound density. Powerful changes in dynamics are reproduced boldly, the most subtle ones are reproduced very carefully. Some competitors have a more nuanced and analytical sound, but you won't get as much pleasure from any other model in this category.
Rega has spent decades fine-tuning the Planar 3, resulting in increased precision and detail added to the musicality. Looking for the best record player in terms of price and quality? You found it.