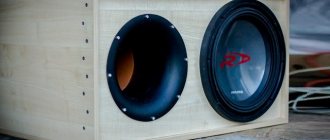
Many radio amateurs who make homemade acoustic systems with their own hands, in addition to technical difficulties, also encounter design difficulties. Many people are interested in how to make speaker grids with their own hands. Decorative mesh should look beautiful, be strong enough and not interfere with the normal passage of sound waves. If you can use a special fabric for household speakers, then for car speaker systems you will need meshes that are reliable and do not absorb dust. Sometimes car owners are not satisfied with the existing design of car speakers, and sometimes the old coatings simply break.
Take self-tapping screws and screw them into the corners.
After all these twists, paint the entire wooden frame with matte black acrylic.
You take the fabric and stretch it over the grill - the main thing is that the fabric is acoustically transparent. They pulled it on, cut it off as much as necessary and that’s it.
Take an industrial stapler in your hands and start nailing it to the first frame, stretching the fabric a little so that it doesn’t bulge.
But when you start nailing to the second frame, you need to tighten it, but not too much, otherwise you will tear the fabric.
It's better to do it together. You nail it, straighten it, and your grill for acoustics is ready.
Working with material
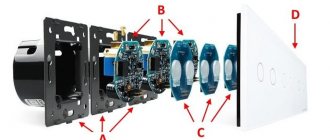
Now let's move on to the most interesting part - working with the material. We will need to cut out the shape along the contour. This can be done with a jigsaw or an engraver - your choice. I’ll warn you right away: thin plexiglass is a very fragile material, so don’t overdo it. You can immediately process everything with a file, and where necessary - with a file and, of course, go over it with fine sandpaper, because It is more convenient to hold the processed item in your hand. In addition, you can immediately see how it will be located on the fan.
Grill shape cut from plexiglass
Now, in order to carve out the internal design, we drill a hole and cut out all the excess with a jigsaw. Personally, I cut with an engraver, but there is some difficulty here: the higher the speed, the greater the chance of making a mistake. To avoid this, you can use a specially made low-speed engraver with a “mill” type attachment. How to do it - read at the end of the article. Personally, I used a flexible shaft engraver. The engraver himself mounted it on a suspension, because... this smoothes out vibration. I took the following attachment for work.
Nozzle for the engraver, which I used to cut out excess plexi
The width of the nozzle is only 2 mm - accordingly, things can be done with great precision. To be honest, I used it to drill the original hole.
Internal grill pattern cut out
Now that the inner pattern is roughly cut out, we begin to straighten the edge, for which a low-speed engraver/motor with a collet chuck and a sharpening stone with a small diameter will come in handy (although you can do without it). Needle files and various types of sandpaper will also come in handy.
Next we will make holes for the mounting bolts. To do this, first mark the centers of the holes with an awl, a thin drill or a heated needle. Then we drill a hole with a drill with a smaller diameter than necessary. And after that - with a drill that is equal to the diameter of the hole for the bolts on the fan itself.
Primary hole with smaller diameter
Ready-made mounting hole of the required diameter
Ask - why so much perversion? In fact, this is necessary in order to make even holes. It is also better to drill at low speeds (a low-speed engraver/motor or a drill with smooth speed control is suitable). When everything is almost ready, take some fine sandpaper and sand the grill to remove scratches. And one more thing: do not even think about erasing lines drawn with a marker with alcohol, because... the workpiece will be instantly damaged - it will crack as soon as the alcohol begins to evaporate. If you like a matte surface, we’ll leave it that way; besides, when backlit, there will be a certain optical effect—light scattering. But if you wish, you can polish the grill until completely transparent using a felt attachment.
Tell us about your sound system, audio-video equipment, construction, setup, etc. for the competition.
Send text, photos, diagrams marked for the competition by email, if you don’t know where to start, how to write, then write, we will help you, we will send you a list of ready-made interview questions.
Don't be afraid of me and add to VK, YouTube, Odnoklassniki
If you want to know more about this topic and stay updated, please subscribe to our website.
Don't forget to bookmark us! (CTRL+SHiFT+D) Subscribe, comment, share on social networks. I wish you good luck in finding your exact sound!
On our website Zvukomania there is useful information on sound and video that is useful for everyone, and for every day, we update the Zvukomania website constantly and try to search and write only excellent, verified and necessary information.
Source
Examples of finished grills
In conclusion of the first part of the guide, I would like to show grills made by hand.
Grill made by Archangel. View without backlight.
The same grill mounted on a fan with lighting
The grill that made Fill. View without backlight.
The same grill mounted on a fan with lighting
Good luck to everyone in creating their own custom grills and modding projects!
Since I often referred in this guide to the use of a low-speed engraver, I decided at the same time to talk about how you can make one yourself if you could not find a similar thing on sale.
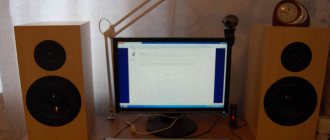
How to make acoustically transparent grills to keep cats out?
To listen to music on weekends, I take off the grills - like in the photo, but because of the cats (they sleep on the speakers - they can damage the speakers by jumping on them), I constantly have to put them back on afterwards. I take pictures because they resonate.
I would like to hear your suggestions on what can be used to protect speakers from damage; perhaps you have experience making protective nets for acoustics with your own hands.
If possible, attach a photo.
I will not break or retighten the original grills.
I respect cats and I won’t forbid them to sleep on the speaker!)
Answers
The protective grill on the speakers is made of a special acoustically transparent fabric, evenly stretched over the frame, which has magnetic or mechanical latches that allow them to be secured to the front panels of the speakers. Apparently, due to frequent opening and closing of the AC grills, some of the latches on the AC grills have either broken or their fixation in the sockets has weakened.
You can, of course, try to “pin” some kind of external metal mesh to protect the speakers and speakers from cats, but I think this will cost a pretty penny, and given the level of your speakers, it will be cheaper to order a cat-damaged (grill) or speaker, if that’s what you like your animals and allow them to climb wherever they want. )))
Contact a cabinetmaker or furniture manufacturer. There they will be able to make frames for grills from thick laminated plywood. You can buy fasteners for grills at Audiomania or on Ali. Next to a car repair shop that specializes in audio preparation. There they will make a lattice from a sheet of mesh using a punch and perhaps help you with attaching the lattice to the frames. The whole thing will cost between five and seven thousand. This is what my friend did; he has exactly the same speakers and three cats. I'll ask you to send photos, but he doesn't really like to shine the equipment. But I'll try anyway :))
Sketching a Grill
First, of course, we need to make a sketch of our future custom modding grill. You can do it in two fairly simple ways:
First way
: make a drawing in CorelDraw and print it. Either on a printer or on a plotter, which is preferable, because... The plotter follows the dimensions of the drawing more accurately than the printer. Then cut out what happened - you get a template. For convenience, it is better to do it on thick paper or cardboard.
Second way
: we remember the lessons of engineering graphics and, accordingly, make a sketch with our own pens, using drawing tools (compasses, rulers, etc.). Of course, before making a sketch, you need to make all the necessary measurements of the fan: outer radius, distance between the centers of the bolt holes, etc. Once the template is ready, take a marker and trace along the outline. If you don't like the marker, you can scribble it with an awl.
To watch online, click on the video ⤵
Homemade grills for speakers designed by Alexey Alexandrov 8851 Read more
DIY stands and grills for acoustics Read more
Grill for acoustics (full version) More details
Grill for acoustics Read more
How to make protective grilles for speakers Speaker grills Read more
Do-it-yourself grills for acoustics, and a pillow with cotton wool Read more
Reupholstery and restoration of acoustic grills for vintage Japanese acoustics Victor SX-5II More details
How to make Hi-Fi acoustics in 10 minutes!) Read more
DIY Hi-Fi acoustics 8851 Read more
Grid for advanced speakers Read more
loud front on Priora part 2 (lighting in grills) More details
Grill stretching with Audiocore 1001A fabric More details
We repair the acoustic grill, reupholster the fabric. More details
The most unusual DIY acoustics part 2 Read more
Source
DIY speaker nets
Many radio amateurs who make homemade acoustic systems with their own hands, in addition to technical difficulties, also encounter design difficulties. Many people are interested in how to make speaker grids with their own hands. Decorative mesh should look beautiful, be strong enough and not interfere with the normal passage of sound waves. If you can use a special fabric for household speakers, then for car speaker systems you will need meshes that are reliable and do not absorb dust. Sometimes car owners are not satisfied with the existing design of car speakers, and sometimes the old coatings simply break.
DIY speaker grill
Decorative grilles for loudspeakers can be made from any suitable material. Despite its apparent simplicity, this work requires attention and patience. Some craftsmen make protection for speaker systems from thin sheet metal or plastic. To do this, you need to very carefully mark the sheet of material, and then, using a drill and a thin drill, drill small holes according to the markings.
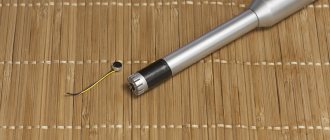
This method is suitable if the protective mesh is made for small loudspeakers such as tweeters. It is much more difficult to make protective nets for speakers with your own hands for speaker systems with several speakers. The slightest mistake and the workpiece will be damaged. You can make protective nets for speakers with your own hands from tinned copper wire. To do this you will need 1-2 mm wire, soft solder and a soldering iron. The work is painstaking and delicate, but the result can be quite decent. To hide minor defects, the finished mesh is coated in several layers with black enamel.
Necessary for creating a grill
To complete this guide we will need the following tools:
- Engraver (aka Dremel). Preferably a low-speed (approximately 1500 rpm) engraver/motor with collets + a sharpening stone with a small diameter (such an attachment)
- Drawing supplies (if necessary)
- Jigsaw
- Awl
- Drill
- Files
- Milling cutter
- Sandpaper
- A lot of time and patience
- Hands – one pair, preferably straight
In addition to tools, we will need the following materials:
- Plexiglas (aka plexiglass) with a thickness of at least 2 mm
DIY speaker grilles
Homemade production of protective nets for speaker systems requires accuracy and perseverance. It is much easier to use ready-made meshes, which are intended for other purposes, but are quite suitable for the decorative design of acoustic systems. If you need a grille with a small diameter, you can use a protective mesh from a fan that is installed on the computer power supply. Grilles from old units can be found at any radio market. They are made of chrome-plated wire and have a diameter of 12 cm. If necessary, the mesh can be painted black.
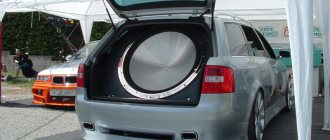
The air filter grill of trucks is used as a decorative grille for side speakers. Such filters are used in KAMAZ, MAZ or GAZ vehicles. The mesh has a completely marketable appearance and is suitable for the external design of acoustics. The best material for making a protective coating for speakers is a decorative mesh used for tuning passenger cars. It can have holes of any shape. They are round, triangular or hexagonal. Designer grilles are made of stainless steel and look very impressive. Simpler types are made of durable plastic.
The decorative grille can be flat or have an original relief. It is easy to cut decorative frames for speakers on car sound systems from such material. When purchasing a mesh for acoustics, it is better to choose a product made of thicker metal. Firstly, such a coating will more reliably protect car speakers, and secondly, it will eliminate possible rattling at high volume levels.
Source
Manufacturing a low-speed “engraver”
Such a device can now be bought in a store, but when this mod was conceived, such things were not yet on sale - we had to pervert it. A DC electric motor (U = 12-27 V) was purchased from a radio parts store. It cost about 100 rubles. For switching, it was decided to use an ordinary 4-pin molex connector.
Here's an engine...
An additional collet chuck was purchased for the engine, which allows the use of nozzles with an axis diameter from 0.5 to 3.5 mm. Just right for our purposes.
Collet
Collet chuck mounted on an electric motor
The operating voltage of the electric motor is 27 volts, and since I didn’t want to look for (let alone buy) a special power source, it was decided to use an ATX standard power supply that turned up, because it is capable of delivering the required current along the +12 V and –12 V branches (all is determined by the –12 V branch, since +12 V is designed for high currents), which gives us a total of 24 V (I won’t remind you about the potential difference - every modder with even a little self-respect should know this). Thus, we will receive the required nutrition. If there is some kind of power supply for 24-27 V and suitable for currents, then it will be easier to use it.