Articles
Shielded cable for acoustics
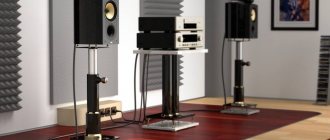
Probably every motorist has thought about having a full-fledged sound system in the cabin of his car. But without a good cable, there’s no point in thinking about any acoustics. Shielded speaker cable is the most common, and in this article we will look at all its advantages. The shielded speaker cable is ideal for installing a stereo system in a car.
Interconnect shielded cable
As you know, there is also an interconnect cable. The choice is a little different from the choice of speaker cable for speakers. In particular, if it is recommended to choose a short one, the interblock one, on the contrary, the longer, the better. Adviсe:
- Again, the copper interconnect cable, designated as PRPPM, has proven itself better so far.
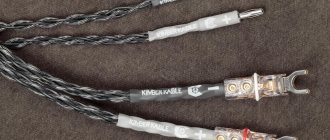
- The marking of this cable is important and must be applied to the surface of the wire. The marking should consist of the manufacturer's name, cross-sectional value and confirmation that this is an acoustic cable.
Markings known today
This:
- AHpsc 16 GA – which means a high-quality speaker cable with a cross-section of 1.29-1.31 mm.
- SSs HI END SPC 2×2.5 mm2 – cable made using silver. Very expensive, but recommended for great sound.
- EMT OFC sc 2×1.2 mm J standard is a Japanese-made cable made of oxygen-free copper. It has proven itself well and is very popular.
In general, as mentioned above, copper cable is very popular, but the quality of the copper itself can vary. Types of copper cables:
- OFC - as mentioned, is made from highly purified oxygen-free copper. The Japanese know how to make it like no one else and the purity of copper in their products reaches 99, 999... percent, which is super pure.
- OCC is already monocrystalline copper used in the cable.
- Composite cable - contains not only copper, but also other metals, such as silver or tin. Often such wires are tinning.
- Combined cable – copper with carbon additives.
- Twisted pair speaker cable - this is described in detail below.
Twisted pair cable
This cable deserves a separate paragraph due to the fact that it has several varieties:
- UTP twisted pair speaker cable is an unshielded cable.
- FTP is a shielded cable with foil.
- STP - each pair has its own screen and, in addition, one whole common mesh screen.
- SF/FTP is a double shield made of foil and mesh, but the twisted pair cable itself is not protected by anything.
- S/FTP is a copper twisted pair, which is the actual screen of such a cable (in addition, such a cable also has foil protection).
How to make an interconnect cable with your own hands? Here's a quick guide:
1. Buy the necessary components:
— RCA connectors (aka “tulips”).
- the interconnect cable itself.
- heat shrink tube of different sizes, - corrugation or cable braid.
You need two RCA connectors for each channel. That is, if a 2-channel amplifier is connected to the head unit, and the distance between them is 1 meter, then 2 meters of microphone cable and 4 RCA connectors are needed.
Good results can be obtained by purchasing a microphone cable from Canare and Klotz.
RCA connectors - from Neutric or any other brand known for its quality.
The microphone cable must be taken with a small margin, remembering that each amplification channel must have a separate cable.
2. Prepare tools and materials for soldering, as well as a workplace with good lighting. Standard tools:
- soldering iron,
- flux,
- solder.
You will also need a sharp knife, a hot air gun or a regular lighter.
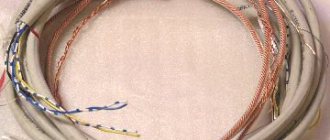
3. First you need to strip the ends of the cable. To do this, you need to carefully cut the insulation and remove it. There will be a shielding braid underneath. There is no need to cut it off, but rather unravel it a little and collect it into a separate twist. Then you need to remove the insulation from the two central cores.
4. Before soldering the RCA connectors, you need to put a braid or corrugation on the cable (if you will use it), as well as heat shrink, otherwise it will be too late to do this later.
Heat-shrinkable tubes may require two or three pieces, depending on the design of the connector. For example, two pieces - for the central cores, and another, slightly thicker - for the external insulation and RCA connector.
5. Then you need to tin the copper wires. To do this, use rosin or flux, and then solder.
6. After this, you need to solder one of the central cores to the connector core. The second central core, together with a twist of shielding braid, is soldered to the “skirt” of the RCA connector, which is the “ground”.
The procedure should be repeated on the other side of the cable. Only in this case there is no need to solder the “screen” to the “ground”. Of course, you don’t have to solder it at all, but this procedure can significantly reduce the amount of interference.
7. The last stage is putting on the heat-shrinkable tubes, shrinking them using a hair dryer or lighter, and screwing on the caps of the RCA connectors. That's it, the interconnect cable is ready!