Let's consider a technique for self-manufacturing an interconnect cable oriented for use as part of a high-class sound reproduction path. A cable made using the method below may well save you from the need to purchase an expensive industrial interconnect. If you follow the recommendations of this technique, the cable you make can easily compete with its industrially manufactured counterparts, which cost $200 or more.
What is better - buy an interconnect cable or make it yourself?
Of course, the easiest way is to go to the store and buy a ready-made interconnect cable . But in reality, a person, after purchasing speakers, amplifiers and other car audio equipment, usually does not have much money left. Therefore, sometimes even the purchase of an average “interconnect” goes beyond the budget.
If you buy a cheap cable, especially one that is sold in kits for connecting amplifiers, its quality may be lower than acceptable. In addition, ready-made cables have several standard length options, which is not always suitable for a particular vehicle.
There are many advantages to making your own interconnect cable. First of all, it is of higher quality compared to ready-made options from the store. At the same time, the price of such a cable will be significantly lower. If you use the highest quality components for manufacturing, you can get a cable comparable to an expensive hi-fi or hi-end. In addition, by making the “interblock” yourself, you can make it exactly the length that you need.
Selecting conductor material
Let's start with a copper monocore. To do this, we will have to go to one of the linear communication shops (present in any city) and make an acquaintance with a person who will agree to present us with a section of the main telephone cable in a lead sheath for a certain bribe. This person needs to be explained that a piece of gas-filled cable in a lead sheath is needed, inside which there are copper single-core conductors with a diameter of 0.7-0.9 mm (there are various models of cables of this design) in paper insulation. It is highly desirable that the cable be older (70-80 years of manufacture). In fact, for our purposes, it is enough to take several cores, which are usually in abundance in a linear workshop. It is very important that all the conductors we inherit retain their mutual orientation, the same as inside the lead sheath, i.e. there is no need to rotate individual of them 180 degrees relative to each other. This principle must be observed until the final moment of manufacturing the finished cable, i.e. we need to mark any side of the conductors with which we will work. The length of the cores required for our purposes is calculated by the formula: “length of the monocore” = (“length of the finished cable”/0.86) -2cm.
As the best option, I would recommend the F-YAY cable from Meinhart Kabel Gmbh, which I personally prefer, but I'm afraid it will not be available to you.
See – https://www.meinhart.at/kataloge/produkte/file117.htm
If you have no way to find solid copper core from communication cables, then as an alternative you can use conductors from the cables listed below:
1) cable brand JY(ST)Y with a monocore diameter of 0.8 mm produced by LAPP Kabel. There are varieties - 1x2x0.8mm, 2x2x0.8mm, 4x2x0.8mm, 6x2x0.8mm, 10x2x0.8mm, 20x2x0.8mm. see https://www.lapprussia.ru/perl-bin/index.cgi?card=39366&razdel=6&lang=ru ; 2) Helukabel brand JY(St)Y Lg, single core diameter 0.8 mm. see – https://www.abn.ru/catalog/helukabel/j-ysty.shtml ; 3) Helukabel brand A-2Y(L)2Y, monocore diameter 0.8 mm. see – https://www.abn.ru/catalog/helukabel/a-2yl2y.shtml ; 4) Helukabel brand A-2YF(L)2Y Bd, monocore diameter 0.8 mm. see – https://www.abn.ru/catalog/helukabel/a-2yfl2y.shtml.
These cables are used for wiring sensors and fire alarm devices, or a telephone network, so there are many who sell them (in Moscow this is not a problem at all), just make a request in Yandex: for example, “JY(ST)Y”.
Klotz cables are well suited for our purposes:
1) model J01... with 0.8mm monocore - see https://1-cable.ru/model.php?gid=10902-01 ; 2) model JE1800. – see https://1-cable.ru/model.php?gid=10903-01 ; 3) model JE28... – see https://1-cable.ru/model.php?gid=10903-02 ; 4) model JE5800. – see https://1-cable.ru/model.php?gid=10903-03 ; 5) model JE68... – see https://1-cable.ru/model.php?gid=10903-04.
A spare, but quite high-quality option from a domestic manufacturer:
1) KMVV 1x2x0.75mm or 2x2x0.75mm; 2) KMVEV 1x2x0.75mm or 2x2x0.75mm; 3) KPSVV 2x2x0.75mm or 2x2x0.75mm; 4) KPSVEV 2x2x0.75mm or 2x2x0.75mm.
These cables are easy to find at fire alarm companies. See – https://www.elsvik.ru/articles/kmvv.html.
However, you can experiment with the selection of copper monocore yourself, but in any case you need to choose cables made of oxygen-free copper (OFC, OF-OK, OFE-OK, domestic copper grades M00, M0B, M0) with the smoothest possible surface (without scratches or damage ).
How to make an interconnect cable with your own hands? Here's a quick guide:
1. Buy the necessary components:
— RCA connectors (aka “tulips”).
- the interconnect cable itself.
- heat shrink tube of different sizes, - corrugation or cable braid.
You need two RCA connectors for each channel. That is, if a 2-channel amplifier is connected to the head unit, and the distance between them is 1 meter, then 2 meters of microphone cable and 4 RCA connectors are needed.
Good results can be obtained by purchasing a microphone cable from Canare and Klotz.
RCA connectors - from Neutric or any other brand known for its quality.
The microphone cable must be taken with a small margin, remembering that each amplification channel must have a separate cable.
2. Prepare tools and materials for soldering, as well as a workplace with good lighting. Standard tools:
- soldering iron,
- flux,
- solder.
You will also need a sharp knife, a hot air gun or a regular lighter.
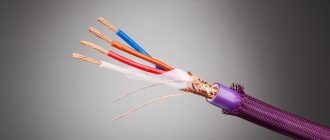
3. First you need to strip the ends of the cable. To do this, you need to carefully cut the insulation and remove it. There will be a shielding braid underneath. There is no need to cut it off, but rather unravel it a little and collect it into a separate twist. Then you need to remove the insulation from the two central cores.
4. Before soldering the RCA connectors, you need to put a braid or corrugation on the cable (if you will use it), as well as heat shrink, otherwise it will be too late to do this later.
Heat-shrinkable tubes may require two or three pieces, depending on the design of the connector. For example, two pieces - for the central cores, and another, slightly thicker - for the external insulation and RCA connector.
5. Then you need to tin the copper wires. To do this, use rosin or flux, and then solder.
6. After this, you need to solder one of the central cores to the connector core. The second central core, together with a twist of shielding braid, is soldered to the “skirt” of the RCA connector, which is the “ground”.
The procedure should be repeated on the other side of the cable. Only in this case there is no need to solder the “screen” to the “ground”. Of course, you don’t have to solder it at all, but this procedure can significantly reduce the amount of interference.
7. The last stage is putting on the heat-shrinkable tubes, shrinking them using a hair dryer or lighter, and screwing on the caps of the RCA connectors. That's it, the interconnect cable is ready!
Homemade audio cable Jack - RCA. HI-END for $5?
Continuing the previous review about audio cables. Designed for an NOT prepared reader. Briefly, it does its job, looks great, I recommend it for purchase. Budget 2 x $2.5
.
For professional use in the previous topic Comrade.
trautwein recommended Neutrik, Amfenol, Switchcraft connectors, I fully support them. In the store on the photos there are inscriptions
“R Connector”
and
“Rich Tech”
.
Jack $1.71 for 1 piece https://aliexpress.ru/item/item/4000102982133.html RCA $1.71 for 2 pieces https://aliexpress.ru/item/item/32848452683.html
Added: in the comments, many people wrote that the interconnect cable should have a screen (I googled the article), I went to the store and bought SOMMER CABLE - SC-STAGE 22 (2 x 0.22mm sq. with screen) $1.3/meter.
The only thing is that I won’t re-solder today, it’s Friday) so if anyone wants to repeat my experience, use a cable with a shield
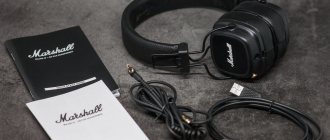
The packaging is a regular bubble wrap, with a branded bag inside. The parcel arrived for about a month.
The price turned out to be $3.02
with an Ali coupon ($2) and a penny discount ($0.05) from the seller.
On Ali, several different sellers sell this “brand” and their prices are slightly different; if you buy as a set, they sometimes also come across cheaper ones. Well, it makes sense to catch coupons.
There are many reviews and they are mostly positive. Outwardly they look very cool, at home mini-discos with karaoke they look very stylish (checkers, yes!).
Added: my MT108T multimeter measured the finished cable to have a resistance of 0.0 Ohm and a capacitance of 0.055 nF
Performance characteristics (description):
- Material - stated simply as alloy (alloy), usually it is aluminum with something, gold plated is indicated in the description. — The dimensions are quite standard for these types of connectors. — The central contact is barely magnetic. - Solders very easily.
copper-plated aluminum. The cross section measured using a bushing is 1.77 mm2 13 mV per 1 m length at 0.45 A R=U/I=13/0.45=29 mOhm. Cross section in terms of pure copper S real = 0.64 mm2
I also measured the capacitance (20m coil) to be 1,260 nF, and the resistance to be 0.3 Ohm.
Regarding the fact that the non-oxygen-free copper was upset, not much, but there is a little, I added “buy a normal cable” to the list of future purchases and I will re-solder this one or, most likely, I will buy more connectors and make more (to have them, I have such a bad habit ). In principle, as I wrote in the previous topic, in a blind test I don’t hear the difference between different cables, so for me personally, all these “better”, “worse”, “hi fi” and “hi end” are nothing more than mystical experiences and sensations .
I have a strong opinion that you won’t hear the difference with the technology that is available to most buyers.
, if it can be heard at all.
BoBateny threw in a link that says that “in 2007, a $1,000,000 prize was offered to anyone who could tell a good cable from a very good one by ear. No one came to claim the prize.”
So, the soldering process is as follows (for those who have either never soldered or solder once a year (like me))
Solder used S-Sn60Pb40 SW26/3/2.5% (already with flux), bought on the market, price up to $1 1.
Carefully strip the wire so as not to cut the wires and immediately apply heat shrink.
2.
We service and at the same time apply a little solder to all soldering areas.
3.
We solder the central contact (RCA is not very convenient, Jack is easier), insulate it with heat shrink.
4.
We trim the second wire a little and measure the required length for stripping.
5.
We slightly bend the outer contact and solder it, crimping the wire with paws.
6.
We put on heat shrink (not necessary, since the kit includes a translucent protective casing, but I used heat shrink to add additional rigidity at the point where the cable exits the connector).
7.
Assembling the connector.
8.
We put on the connector cap, casing, heat shrink in reverse order and repeat the whole process with another connector (observe the polarity!!! I plugged and resoldered for the first time).
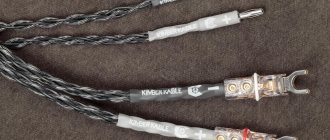
The result is a cable like this (I soldered for exactly a couple of hours, because I took photos along the way, got distracted and resoldered a couple of times... but I’m sure you can do it in 20-30 minutes)))
Considering that the process uses a soldering iron, and the correct cables need to be warmed up for 500 hours:
Warmth everyone)
BONUS! Maximus warms up the cable)))
Neutral and active fluxes.
You can use any rosin as a flux, including: pine, violin, stage rosin, etc.
A solution of rosin in ethyl alcohol turns rosin into a liquid flux. Liquid flux not only allows you to get more beautiful soldering, but also removes heat from the elements in contact with the soldering area.
Rosin-based flux is neutral. It does not require subsequent flushing and cannot cause leaks in electrical circuits.
You can make liquid flux based on rosin yourself. To do this, you need to dissolve 2-3 grams of rosin in 20-30 grams of ethyl alcohol. It is better to use powdered rosin. A piece of rosin can be broken with a hammer, first wrapped in cloth.
Alcohol is extremely volatile, so liquid flux should be stored in a tightly closed container. You can use a bottle of nail polish, which also has a brush.
The use of so-called active fluxes is recommended only in extreme cases. Most often, this need arises when budget nickel-plated plugs are used. Moreover, this coating is also applied to the contacts intended for soldering.
After soldering using active flux, the soldering area should be thoroughly washed and then dried.
You can wash the soldering area with either an alcohol-gasoline mixture or ordinary water. If this is not done, then after some time problems may arise caused by oxidation of parts and leaks in electrical circuits.
That's all
Now you can connect the cable and listen to what happened. The only thing is that when connecting cables, you need to connect them (right and left) in one direction in accordance with the markers we installed. It is advisable to listen to the sound of the path when the cables are connected in the forward and reverse direction and choose the one that is most preferable for you. It should be borne in mind that final conclusions about the “sound” of your product can be made only after 20-30 hours of its exposure to an electrical signal (after approximately 1.5 weeks of operation with 2 hours of daily use).
Good luck in your endeavors. And remember that the result depends entirely on the careful adherence to the above procedures, although there may be an element of creativity in everything. :)
© AMUR, 2005, 2006