Connecting a 5.1 speaker system to a computer
Many connoisseurs of music and high-quality sound prefer to use a 5.1 speaker system to listen to songs and watch high-quality films. This kind of acoustics essentially consists of six channels to which their own speakers are connected - a subwoofer (low-frequency speaker), two front speakers (left and right), a central front speaker and a pair of rear speakers (also left and right). We'll talk about how to connect 5.1 speakers to a computer below.
Speaker placement
The speaker system must be positioned correctly. Only in this case will there be a surround sound effect. When arranging all the elements, you need to adhere to general rules that can be adjusted to suit your preferences.
Central emitter
placed opposite the place where the viewer will sit.
As a rule, it is located under the TV. The two front speakers
should be located to the right and left of the TV at a short distance. They are rotated so that they are located at an angle of approximately 30 degrees.
Rear acoustic elements
installed in the opposite part of the room on both sides of the user. They should be slightly behind him if possible. The speakers are rotated so that the speakers face the center of the room.
Subwoofer
installed on the right or left side of the room at some distance from the center. It should be approximately in line with the center column or slightly ahead of it.
Assembly and installation of a 5.1 speaker system
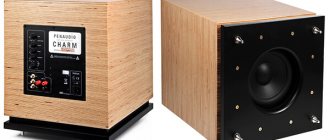
The subwoofer is traditionally installed on the floor and houses an amplifier with a power supply, to which all other components of the system are connected. But there are exceptions when the receiver is made separately, and all the acoustics are connected to it. The terminals for connecting each speaker are marked. The symbols used to identify the front speakers are FR (Front Right) and FL (Front Left), CEN (Center), RR (Rear Right) and RL (Rear Left). If the subwoofer is passive, that is, it does not include an amplifier, then it is also connected to the receiver itself, which has the corresponding SW marking. According to this marking, the first step is to connect all the speakers and place them in the appropriate order in the room.
Speaker connectors [ edit | edit code ]
A polarized, two-pin, unshielded connector designed to connect a loudspeaker to an audio power amplifier (or other device; many of the early portable tape recorders used such connectors) is known as the DIN 41529 loudspeaker connector. It comes in panel-mounted receptacle and wire-mounted receptacle/plug versions. The plug has a flat center contact and an off-center round contact. The round contact must be connected to the positive pole (red), and the flat contact to the negative pole (black) [4].
In the Soviet Union and now in Russia, it is unofficially called the “dot-dash connector” [5].
This connector can now be found mainly on older equipment such as 16mm film projectors and the Becker radio found in many Mercedes-Benz vehicles. The same connector is used to connect some halogen lamps to a power source, as well as in Soviet Hi-Fi amplifiers and German vintage acoustics and amplifiers/receivers.
While all other versions of DIN plugs are quite reliable, this two-pin DIN plug is listed in second place - due to the lack of an external shield, it is much easier to accidentally pull out the plug. It’s easier to bend or move the contacts. Also, the plug does not sit so firmly in the socket - used copies are known for their unreliability. It is often enough to push them slightly, and the contact is broken.
There are also three- and four-pin versions of this connector, used, for example, by Bang & Olufsen.
Connecting speakers to a computer
To connect a 5.1 speaker system to a computer, you must have a sound card installed on it that allows you to reproduce sound in 5.1. This can be either a sound card integrated into the motherboard or a sound card installed separately in the PCI slot.
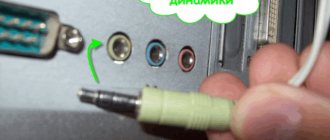
The 5.1 system is connected by three pairs of cables, which have a mini-jack on one side for connecting directly to a computer, and on the other side “tulips” (stereo RCA) for connecting to the receiver’s inputs (Audio Input). Here you should pay attention to the fact that to connect speakers to the receiver (subwoofer), “tulip” type connectors with the designation Audio Output and speaker markings (FR, FL, etc.) are also used. You cannot plug computer cables into these connectors!
Correctly connecting the computer's audio outputs to the correct inputs of the receiver will allow you to quickly set up the system and enjoy high-quality sound. So, the front channel (front speakers) should be connected to the green jack, the rear channel (rear speakers) should usually be connected to the black jack, and the subwoofer and center speaker channel to the orange jack. To ensure that everything is completed without errors, you should first carefully study the manual for your motherboard or sound card, which should indicate which socket is responsible for which channel.
AT keyboard pinout
Colors among PC manufacturers are not unified. For example, some may have a purple keyboard connector, while others may have a red or gray one. Therefore, pay attention to the special symbols that mark the connectors. These connectors are used to connect a mouse (light green connector) and a keyboard (lilac connector). There are cases when there is only one connector, half painted light green, the other half lilac - then you can connect both a mouse and a keyboard to it.
Setting up 5.1 sound in Windows 7/10
After all the cables are connected, you should proceed to setting up 5.1 acoustics in the Windows 7 or 10 operating system itself. Open the “Control Panel” and go to the “Sound” section. Here, go to the “Playback” tab, where select “Speakers” from the list.
Next, click the “Customize” button at the bottom of the window and select “5.1 surround sound” in the window that opens. At this stage, you can check that the speakers are connected correctly by clicking on one or another speaker and checking that the speakers match the diagram. If necessary, check that the speakers and audio outputs from the computer are connected correctly. Complete the 5.1 audio setup by following the steps to the end.
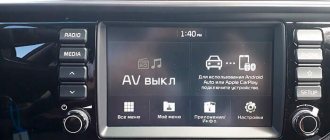
As a rule, no further action is required from you; the only thing you should pay attention to is the system operating mode switch on the receiver (subwoofer). On many models, in addition to 5.1, there are other operating modes, such as stereo and, if there is a digital input, SPDIF. When connecting using the above method, the switch must be set to position 5.1. If your sound card does not support five-channel sound, then you can play regular stereo sound on a 5.1 system by simply moving the corresponding switch to the desired position. Of course, in this case you will not be able to enjoy truly five-channel sound. The same applies to the audio files themselves, which are recorded as stereo. Even when using a 5.1 sound card, they will sound like stereo, only on 5 pairs of speakers.
User Misconceptions:
Misconception #1
. When you are finished playing you should switch everything back for correct operation. If you keep one of the on-the-fly encoding technologies always on, you will not be able to view and listen to files with multi-channel audio, since they are already encoded and require output directly to S/PDIF.
Solution:
you don’t need to switch anything, watch a movie in stereo - it’s laid out at 5.1, watch a video with a DTS or Dolby track - the sound is perfectly laid out across channels. This can be seen even on a player that can switch audio tracks, for example, The KMPlayer.
Misconception #2
. On-the-fly encoding of stereo sound from an mp3 file using Dolby Digital Live or DTS Connect will be several times inferior to hardware decomposition of such sound on speakers or a receiver.
Solution:
If acoustics of similar quality are connected to the receiver, the difference will not be so significant. The main thing in the settings of THX Studio Pro (or a similar “improver” of the sound card) is not to forget to disable the options that create various effects: for example, it makes the voice stand out from the general sound background. Much depends on the sound card; Creative Titanium HD copes with this with a bang.
Setting up 5.1 sound in Windows 7 and Daum PotPlayer
So, you have become the proud owner of 5.1-channel computer speakers (AC/acoustic system/acoustics) and have correctly connected them to the sound card. What's next? In this article, I will tell you in detail and “pictures” point by point how to correctly and quickly configure sound in Windows 7 using the Control Panel and
the
Realtek HD
.
In the last paragraph I will also mention the rated South Korean media player PotPlayer .
For those who are interested, read further after the button of the same name. 1.
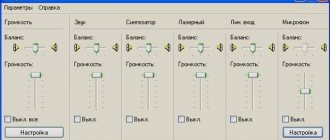
We’ll start our short delving into the settings by calling the “windowed” control panel ("Start" → "Control Panel"). Let's find and open the parameter (applet) "Sound" → then, on the main tab "Playback" designate the playback device "Speakers" → at the bottom left click on the button "Configure" (screenshot).
In the window that opens, in the “Sound Channels” list, select “ Surround Sound 5.1”
“, after which we don’t forget to click on the “Check” button (of course, all speakers should produce sound). After passing the test, we will move on to the next settings, where you need to specify which speakers will be wideband, rear, etc.
2.
Having properly configured the speakers and clicking on “Done”, we will return to our multi-tab window “Sound” → highlighting “Speakers” again, look at “Properties” → in the “Properties: Speakers” window on the “Enhancements” tab, check the box next to the “Environment” item , confirming the change with the “OK” button. This completes our manipulations with the “Sound” applet.
Via Bluetooth
If your computer has a Bluetooth adapter, then you can choose the convenient “wireless” option. To do this you just need to follow a few steps:
- Click on the button to turn on the speakers. Usually, their successful launch is indicated by a lit light on the speaker housing;
- Next, activate the Bluetooth adapter on the computer and wait until the search for Bluetooth equipment is completed;
- Then in the list of devices, click on the name of the speakers and click “connect”;
- Ready. If everything is done correctly, then the light on the speakers usually begins to blink or it changes color.
Of course, it will be a little more difficult for owners of more advanced speaker systems with many speakers, for example, 5.1 or 7.1. At the same time, just one standard linear input to a PC is no longer enough.
In simple words, if you plan to use 5.1 equipment, then in addition to the green connector, there should be two more: orange and black. And if you have 7.1, you will have to purchase an external audio card.
But the connection algorithm will be almost the same, the main thing is that after making a wired connection between the speakers and with the PC sound card, do not forget to supply power to the speakers through the outlet and turn them on by pressing the special button.
Need help setting up 5.1 sound on Windows 10
I really need your help, I’m sure many of you have encountered this problem.
I installed Windows 10 x64 LTSB version and a problem appeared with the sound. I have a 5.1 system, when checked using standard Windows 10 tools, all speakers work, everything is turned on, but all audio and video players only provide sound to 2 speakers.
Previously, I had the Realter driver and the HD VDeck program, through which I turned on all the speakers. HD VDeck is not installed on the new OS.
We managed to find out that HD VDeck has a glitch in which the installation program installs the 32-bit version on any OS.
Whatever I did - all kinds of drivers, and replaced the HD VDeck files with 64s from the installer, and reinstalled everything a hundred times, the result was the same -
Are there any options to solve this problem? If anyone has encountered this, please share your experience?
Download the driver from the Riltek website, not the one that came with Windows.
Change the player. It can't work correctly in 5.1
Turn off all unused audio devices.
I downloaded it from the Realtek website - no results.
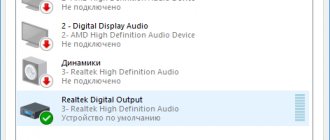
Unused devices - is that what they are?
I see that this post is well indexed, + the problem is very large-scale.
Just in case, I’ll leave a screenshot with all the settings on which 5.1 works for me.
— “Stereo 5.1” is selected in the sound settings
— In the driver settings “stereo expansion”
— And since I have a headphone jack on the front, it is imperative to disable auto-detection of the connected headphone, that is, the computer must output sound simultaneously to all speakers and headphones (even if they are not connected).
I’m writing this comment because after a year and a half I messed something up in the settings and the sound came out to one channel again. I searched for the reason for a long time and found it: it turns out that in the speaker settings (in the windows control panel) you need to enable channel routing.
And I remind you that I use Windows 10 LSTB OS and sound drivers from Windows 8!
And in order for Windows to allow you to install non-native firewood, you need to prohibit the automatic installation of drivers (via gpedit.msc-computer configuration-administrative templates-system-device installation-restrictions on device installation), then remove the driver, start installing the desired driver and at the last moment remove the ban in the same gpedit.msc
But what to do if the sound settings are only “stereo”. no 5.1 or 7.1
you need a program that creates 5.1 from a regular stereo in the realtek sound driver there is an option to enable dolby prologic ii, look for the unlocked realtek driver
If it's about channel mapping, then there is Equalizer APO. By default, stereo does not go to 5 channels - this should be handled by the program.
If the program doesn't do it, then no one does it. As far as I know, only in XP this happened. In the seven, in the driver settings there was a checkbox for “virtual environment” or something like that.
Sorry I came across this post very late. There is a shareware program called voicemeeter (VB-audio). She can throw well at 5.1. At seven she saves me.
There's something I can't figure out about it. Please help me.
As far as I remember, it’s not difficult. In the program, select the sound source. Select "Stereo Repeat"
In Voicemeeter Input audio settings by default. Well, in properties 5.1 of course. Possibly in reverse order. The program is intended for something else. But this is its side feature. The only thing is that if the sound is single-channel (recorded from a phone), it may be absent; if you switch to “Mix Down”, then it will play on the front ones. This doesn't happen often. Well, I don’t understand games, since I don’t play often. It's easier to turn it off.
In general, the problem was solved by two options - either a separate equalizer or installing drivers from Windows 8
I faced the same problem. The most sensible comment, I gave it an 8. Thank you.
I don’t want to be like forums where “thank you all, I solved the problem.”
@moderator, can you add to my post below that I solved the problem by installing the sound card driver from Windows 8? And indicate that Windows 10 will not allow you to do this, so before deleting the driver you need to disable the automatic installation of drivers via gpedit.msc-computer configuration-administrative templates-system-device installation-restrictions on device installation
Sorry, but posts no older than 3 days can be edited. I think that those who find your post will also find comments