Setting up sound in a car is a complicated process. Only an experienced acoustics specialist can quickly achieve ideal sound quality. However, with the desire and enough time, even a beginner can cope. Correct tuning implies a balance in which it is impossible to determine the location of the speakers. The sound completely fills the car, appearing as if out of thin air.
Simply put, setting up music in a car involves uniform sound from the front and rear speakers. If there are speakers on the sides of the machine, they should also participate in the final balance. The customizer adjusts the equalizer options, achieving ideal correction with filters and additional parameters. At the same time, the sound setting depends on whether there is a subwoofer in the car.
A subwoofer, or simply subwoofer, is an acoustic system whose task is to convert low-frequency sound waves. The sub gives them sufficient volume and specific resonance. Those same “tut-tut-tut” sounds from the windows of passing cars, which make the alarms go off and the glass rattle, form subwoofers. With their help, heavy bass and powerful special effects appear in all their glory. True, even from particularly zealous neighbors you can quickly get an answer to the question: “Is it possible to listen to music loudly in a car” in particularly colorful terms and more. But that's not what this is about.
With a subwoofer, setting up music in the car involves additional steps to install it. Without a subwoofer, the task becomes a little easier. It is also possible to adjust the sound in the car using a smartphone. We invite you to look at all three options!
The audio system does not work. Possible causes and solutions to the problem
Before you begin restoring and repairing your audio system, you should understand the cause and nature of the failure. Problems can occur at both the software and hardware levels.
First, check if the speakers are connected correctly. The speaker connection diagram can be found using the image below:
At the first stage of diagnosis, you should try to connect other speakers to the computer; if they work normally, then the problem is that the speakers are broken. If none of your speakers play music tracks, you should check the type of sound video card that is connected to your computer's motherboard. To do this, you need to open the case of the system unit of your personal computer. Then you should find the sound video card on the board and look at its model and version. To check the audio card model, you can also use third-party software, for example, the CPU-Z program, which allows you to view all the technical characteristics of the processor without opening the personal computer case.
After determining the type of sound card, check on the manufacturer's website what types of speakers it supports. There are several types of sound speakers:
- Type 2.1 sound cradle models
- Models of 5.1 type sound cards
- Type 7.1
If the type of connected speaker matches the requirements of the sound card, but there is still no sound, you need to check whether the driver software is installed and configured correctly. A few tips for correctly installing drivers:
- Download all software exclusively from the websites of video card or audio system manufacturers.
- Try to download driver software archives. They always contain all the necessary software that is necessary for the normal functioning of the system.
All of the above options help eliminate the main reasons for the lack of sound from the speakers.
Hear is a must have for MacBook owners
MacBook owners won't let you lie: the sound quality through inexpensive speakers or headsets leaves much to be desired, which is also typical for other computers without a professional sound card. When the functionality of the operating system and the built-in equalizer in a program become powerless, you need to act radically. It is for such purposes that various software DSP processors are provided, and Hear is one of the best today.
For a Mac owner who feels nostalgic every time the iTunes Volume Logic plugin is mentioned, this program will be a real find. Make no mistake, Hear will be the best replacement for the iTunes Volume Logic project, which ceased to exist and was only available as an iTunes plugin. Why is this program so good? The absolute coolness of Hear is that the utility processes sound for all running applications at once (Opera, Safari, VLC or iTunes), improves the quality of the audio stream in any game, any movie, and only after that sends it to the audio output.
In general, an ideal solution for those who use an inexpensive headset. Hear is unlikely to surprise professional musicians or sound engineers, but for all other users the program will definitely be a real find. Hear is naturally compatible with Windows and there are no serious difficulties when using it. The main advantage of the utility is a huge set of built-in tools that allow you to set general settings for the sound: add volume, remove various distortions, even out the sound.
This is interesting: Sony Vegas: how to transfer a project from one computer to another?
Already in the second tab, an equalizer integrated into Hear is available, which can finely adjust the parameters of the audio stream. You can display the tool in the form of curves, which makes the settings more flexible, or in the form of familiar sliders.
Let us note other equally important features of the software:
- bringing the sound as close as possible to natural sound using two dozen different filters and effects;
- the presence of all kinds of ready-made templates that only simplify the use of the program: you need to choose a suitable template for watching movies, video games, music;
- Hear can simulate spatial sound effect, which creates a special acoustic atmosphere;
- adjusting sound individually for applications and separately for games, music, movies.
Now let's move on to the disadvantages of the application. One of the main disadvantages is that the program is free for one week, after which you will need to purchase a key. The list of disadvantages includes Hear's incompatibility with 64-bit applications. That is, in order for the sound to be processed through Hear, they will need to be launched in 32-bit mode. In all other respects, there is nothing to reproach about the audio stream processor and amplifier.
Testing and adjusting sound in speakers
If the speakers are working, but the sound leaves much to be desired, you need to configure it using standard tools of the MS Windows operating system. To start testing and adjusting sound parameters, go to the system control panel using the Start menu.
Go to the sound menu (to speed up the process of finding the desired icon in the control panel, use the instant search in the upper right corner). Select the desired speakers from the list of installed sound devices and check in the options whether the drivers are installed correctly (if not, reinstall them) and whether they are connected correctly.
Test the sound at different volumes to check for excessive hiss or other interruptions in the sound.
If your speakers have a built-in microphone, be sure to check the sound recording quality. This can be done using a very ordinary voice recorder. If such a program is not in the list of standard pre-installed software on your OS, you can download third-party software. Good analogues to a standard voice recorder are the programs EasyRecorder, RecordMe, StartRecord. Before launching the program and recording anything, check whether the microphone is enabled in the sound settings (system control panel - sound).
Box calculation
Go to the body - press the Box
In the Box Design , select the case type
Closed Box - closed box. Everything is simple here - we indicate the volume. You can click on the Optimum and see what the BassBox 6 Pro itself offers.
Vented Box - bass reflex. There are already two auxiliary buttons : Optimum (optimal) and X-Bass (extra bass) - we do not recommend using them. Enter the desired tuning frequency Fb and select the volume Vb, focusing on the small graph in the upper left corner of the program.
Bandpass Single-Tuned Box - 4th order bandpass. A housing where the speaker is installed between two cameras, one of which has a port. The port settings and volumes of both chambers are indicated.
Bandpass Parallel Double-Tuned Box - a 6th order bandpass, unlike the previous case, it has a port in each chamber; the frequency of both ports and the volumes of the chambers are indicated accordingly.
The Dampig tab is used for a closed box to take into account the influence of the filler (sintepon, wool, etc.) BassBox 6 Pro takes this into account as well. For other boxes you don't need to use it. Accordingly: none - no, minimal - minimal filling, typical - average, heavy - dense filling.
Vents tab (ports) - configure the port if you do not have a closed box.
1- Number of ports; 2- shape (round, rectangular, other); 3- location method; 4 - resulting port dimensions. Lock Vent Dimensions checkbox and change the length ( Lv ), observing the change in the setting.
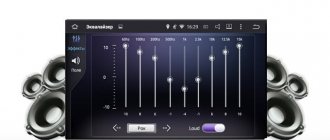
Equalizer settings
High-quality acoustics are of great importance for every user of a personal computer or laptop. A special equalizer can give your favorite music and movie soundtracks a really good sound.
Before you start setting up the equalizer, you should check that the audio system is correctly connected to the sound card. Also check whether all drivers and other pre-installed software required for audio are functioning correctly.
You can use a standard equalizer; it is built into every Windows operating system; however, third-party equalizers, as a rule, have wider functionality and quality of sound correction. Let's look at how to use the built-in equalizer and which third-party programs are worthy of your attention.
The process of setting up the built-in equalizer:
- Go to the Sound menu in the Computer Control Panel (this step is described in more detail in the first paragraph of the article).
- On the menu tab called Playback
- From the list of audio devices that appears, select the speaker. Open the speaker menu.
- In the window that opens, select the properties item - it will open another window.
- In the new window, select the tab called levels. A menu for adjusting various sound parameters of the audio system will open. Setting up sound on a computer involves changing the parameters that appear. In this menu you can configure the sound separately for each of the two connected speakers. Try to set the most pleasant sound level.
- Go to the Improvement tab. In the list of checkboxes that appears, check the equalizer box. After completing this action, you will have access to the sound card equalizer control function. All changes will be automatically saved by the system. You can also return to the original equalizer settings.
The standard settings window for the built-in equalizer in the system looks like this:
The equalizer settings are quite extensive and allow you to customize the sound according to the type of room and personal sound preferences.
Volume²
Volume² is a free alternative volume control that completely replaces the one in the OS. The program provides quick setup of hot keys for volume control. It also has a task scheduler that allows you to adjust the volume of selected software on your computer for a given time.
Volume² reconfigures the Windows audio driver, causing the volume of your computer or laptop to increase slightly (by about 15-20%).
Cover: Boom 3D
Setting up a subwoofer on a computer
A subwoofer is an integral and most powerful element of professional acoustics. The main feature of a subwoofer is that this device can transmit low frequency sound waves. The total frequency range of the subwoofer is from 15 to 200 Hz.
The subwoofer is used in professional audio audio systems, however, an increasing number of users of personal computers and laptops are buying subwoofers for home use. The subwoofer can be connected to speakers. Please note that for the best sound effect, the speakers should have as much power as possible.
First of all, pay attention to the placement of the subwoofer within the room. Incorrect placement of the device may degrade the final sound. The best option for placing a subwoofer is an angle. It is in the corner that the sound will have the most profound effect. Install the subwoofer at least one meter away from the speakers.
After connecting all the subwoofer wiring to the computer, you should perform a number of standard actions: install the driver software and, if desired, use a third-party program to configure the sound on the subwoofer.
Software that will help you customize the sound of the subwoofer:
- JBL-SpeakerShop – calculates the most pleasant sound level. It has a built-in filter calculation module.
- Speaker Workshop - allows you to configure all acoustic parameters. It has a pleasant user interface and fast execution speed.
- Perfect Box. A special feature of the program is the DOS-type interface. This may cause some inconvenience to inexperienced users.
- WinSpeakerz - the program has standard functionality and a well-thought-out user interface.
Adjusting the sound of headphones connected to the audio system
Headphones are also an element of the audio system. Their sound is very easy to tune even for an inexperienced user. To start setting up headphones connected to your computer, follow the instructions below:
- Go to your operating system desktop.
- On the toolbar, right-click on the speaker icon.
- From the proposed menu, select the tab under the name of the playback device.
- In the window that opens, select the sound playback tab and configure the parameter as you wish, or apply standard settings by checking the “Default” checkbox.
If you are using wireless headphones, make sure that the system recognizes and installs them automatically, otherwise install all the drivers yourself. This can be done by using the installation disk or downloading the necessary software from the website of the manufacturer of your headphones.
Hear is designed to improve the sound quality of music and movies in almost all applications. Thanks to a large number of settings, it allows you to achieve high-quality clear sound.
Subwoofer Information
Let's move on to entering dynamics data. Press the Driver (speaker) button.
We see a window with several tabs. In the Description , general data about the subwoofer (model, brand, etc.) is entered that does not affect the calculation. In the Dimensions , the geometric dimensions of the speaker are indicated in order to calculate the volume displaced by the speaker, although many prize drivers indicate this value in the documents. External - data on external resistance (not needed yet). Response - we also do not fill it out.
The first main tab is Configuration . Here you need to indicate the number of speakers used, installation method and connection method. The diagrams show everything clearly.
Go to the Parameters , check the Expert Mode .
After this, additional fields will appear for entering information, but we only need 3 main Thiel-Small parameters: Fs resonant frequency of the speaker, Qts - total quality factor and Vas - equivalent volume. This data is indicated in the documents for the subwoofer, or they can be found online on the manufacturer’s website. Click on the small Calc , the program will calculate the appropriate parameters based on those already entered. Then click Accept .
Possibilities
- surround 3D sound;
- monitoring the range and quality of speaker reproduction;
- increasing the bass of speakers using a virtual subwoofer;
- control over the level of the central audio channel;
- emulation of sound from different places;
- amplification of sound frequencies;
- adjusting sound compression;
- restoration of sound intensity and frequency lost during recording.
Advantages and disadvantages
- sound volume smoothing;
- built-in equalizer for studio-quality sound;
- reverb for emulation;
- a large number of additional settings;
- clear grouping of tools into tabs.
- the program is free trial (full functionality is available only for 30 days);
- English interface.
Alternatives
DFX Audio Enhancer. A free plugin that improves sound quality in media players and Windows OS. Improves frequency characteristics, adds super-bass and deep sound modes, and produces excellent output sound.
Sound Booster. Free program that enhances sound. Can raise sound volume by 500%. It is integrated into the operating system, installed in autorun and, using a slider, makes it possible to dynamically change the volume of sounds. Supports setting hotkeys.
Work principles
All basic sound parameters should be configured in the “General” tab:
You will see several sliders in the window:
- “Super Bass” - will be needed to enhance mid and low frequencies;
- “DeWoofer” - to eliminate growl at mid frequencies;
- “Ambience” - to adjust the spatiality of the sound;
- “Fidelity” - to eliminate defects in files with a high degree of audio compression.
The Volume (dB) control allows you to adjust the overall audio output level.
In the main window you can also select the playback style. To listen from speakers you need to select the style marked “S”, from headphones – “H”.
The “EQ” tab contains an equalizer. Its appearance can be changed using the “Curve” and “Sliders” buttons.
The “Plauback” tab configures playback options and displays errors, if any.
Other functions can be applied in the remaining tabs:
- 3D – volume control;
- Ambience – reverberation effect;
- FX – moving sound to the side;
- Maximizer – access to high/low frequency adjustment.
- BW – listening to melody in different modes;
- Limiter – control over the compression level;
- Space – the effect of expanded space;
- Fidelity – restoration of sound subtlety;
- Speaker – enhances the sound of speakers/speakers, expands the frequency range;
- Sub – setting up a virtual subwoofer.
FxSound Pro
FxSound is free software for improving sound quality. Thanks to the built-in equalizer, effects and basic presets, it can not only increase the volume, but also improve the quality of playback of the audio track. After installation, it is defined as a new output device, but controls the sound on the last connected source. There is no translation into Russian, but if you have ever used an equalizer, you won’t need it.
Program functionality:
- rough equalizer settings;
- fine-tuning the equalizer;
- bass booster;
- selection of preset settings for different content;
- increase volume;
- selecting the audio device for which to apply the settings (each output device is configured separately);
- setting up virtual audio effects.
Installing the “General” preset already raises the volume level slightly above the standard, but if you need to make it even louder, raise all the frequency sliders higher.
A nice addition for music lovers in FxSound, in addition to sound enhancement, will be flexible equalizer settings, bass booster and three-dimensional sound settings. But to fully unlock the potential of the program, you need an appropriate audio system capable of reproducing all this splendor.
SOUND BOOSTER
Sound Booster is a functional and simple utility for adjusting the sound of the operating system. The program is compatible with Windows and supports the Russian language.
Three types of license are available:
- Initial. The license fee is $20. Users receive 1 year of developer support and the ability to work on one PC.
- Standard. The license price is $35. The utility can work on three computers. Technical support - 2 years.
- Professional. The cost of the professional version of the software is $50. Supports work on five computers simultaneously. Users receive support and free updates for 2 years.
After launching the utility, it will move to the operating system tray. When you click on the icon, a small volume control window will open. Maximum sound amplification is 500%.
To open the Sound Booster settings menu, you need to right-click on the program icon in the tray and select the appropriate section.
The following functions are available in the settings:
- Change the interface language. The default is Russian. English and Portuguese are available to choose from.
- Assigning hotkeys to quickly increase and decrease volume.
- Setting the startup gain level. The maximum allowed level is 500.
- Additional settings: launch the utility when Windows starts, enable or disable notifications, automatically check for updates, fix compatibility problems.
In the program options menu you can change the operating mode: interception, interception and APO effect, APO effect, Super Gain. Each of these parameters changes the quality and volume of the sound from your speakers or headphones. You can activate several modes at the same time.
The Super Gain function is not suitable for budget speaker systems. It is necessary to use this mode on professional equipment, as the instrument increases the amount of bass, low and high frequencies.
Hear is an application for configuring system sound. The program creates surround sound on speakers and headphones, increases volume and low frequencies. The functionality of the utility allows you to improve the sound quality of the user's speaker system.
The application is available for Windows and MacOS. To get the full version of the software you need to purchase a license on the official website. A 7-day trial version is available. The interface is English, there is no official support for the Russian language in the program.
The main section of the Hear application contains basic audio settings in the form of sliders. On the right side of the interface you can enable additional effects for sound: 3D Surround, Extended Space, Extended FX, etc. Under the main sound adjustment sliders there is a volume control.
A mute function is available on the top panel of the program. In the “Default Preset” line, you can select ready-made templates for customizing the sound: games, TV and movies, music, effects. Each of the available subsections contains its own templates.
In the “EQ” section there is an equalizer. Users can turn audio boost on or off, make changes, or reset settings.
- You can select devices for playback in the “Playback” section.
- The “3D”, “Ambience” and “FX” sections are used to configure the speakers. Here you can select the room size, surround depth, etc.
- In the “Maximizer” window, you can configure the headphones: low and high contours, gain, enable and disable additional effects.
- You can configure the subwoofer in the “Sub” section of the program.
In the system tray, you can open a small Hear program window for quick sound adjustments. Here you can increase the volume, mute the sound and select a template from the list.
Razer Surround – for video game lovers
If you thought that this is a driver for products of the same name, this is not so. This is a whole universal complex that makes the sound louder, more voluminous, and richer. The main purpose is to improve the sound quality of video games through a headset. Even a short use of the program will make it clear that the clear sound coming out through headphones or speakers has gotten rid of interference, gained volume and an additional volume level. With Razer Surround, it's easy to create a special gaming atmosphere that can deliver maximum gaming pleasure. After initializing and launching the application, the user will see the following screen:
Passing several Razer Surround tests will give the utility information, based on which it will automatically select parameters in order to create amplified, surround sound. Calibration results are saved in the cloud, which frees the user from periodically reconfiguring characteristics. Like other programs that actually bring results, Razer Surround belongs to the group of “shareware” applications. Even a basic set of tools is enough to seriously improve the sound and make it loud. But with access to the full version of the driver, additional functionality opens:
- stereo optimization – expands the dynamic range of the stereo area;
- bass boost – “pumps up” the bass and low frequencies, increasing sound quality;
- sound normalization – reduces fluctuations in sound volume;
- improvement of speech clarity - during a conversation through a microphone, due to special filters, such an important parameter as clarity and clarity of speech is increased;
- volume – this function allows you to significantly increase the volume of your interlocutor.
You can obtain a license by purchasing a key that costs $20 or after purchasing Razer products.
FX SOUND ENHANCER
FX Sound Enhancer is a small utility for tuning and enhancing the sound of headphones or speakers. The program is available for the Windows operating system.
To use the software, you need to buy a premium version; the license price is $50. Users get lifetime access to all features and tools. FX Sound Enhancer has a 7-day trial. The program interface has not been translated into Russian.
After launching FX Sound Enhancer, the Spectrum section of the program will open. The frequency range of the speaker system is displayed here. The “Power” button allows you to enable or disable the utility.
You can configure effects in the “Effects” section. To do this, you need to adjust the Fidelity, Ambience, 3D Surround, Bass, etc. sliders. If necessary, you can reset the changes made by clicking the “Reset” button.
In the “EQ” section there is an equalizer. Here users can adjust the high and low frequencies of the speaker system.
FX Sound Enhancer has built-in templates. They are located in the "Presets" section on the top toolbar. Here you can choose a ready-made template for any style and direction of music.
In the application settings, you can select the playback device, enable or disable the function of automatically launching the program with Windows, activate notifications, etc.
Fifth step: adjusting the frequency junction
The final stage of setup is to adjust the sound of the midbass and subwoofer to a harmonious, comprehensive sound of music. During the preliminary setup, the LPF parameters were already set, which may have a difference with the low frequencies of the front speakers. Because of this, noticeable gaps may occur during playback. For example, if the LPF was set to 50 Hz, and the front speakers are running at 100 Hz, the sound will occur with a frequency dip in the range from 51 to 99 Hz. This does not mean that the filter will cut them off completely. It only smoothly reduces the sound of frequencies lying outside the specified parameter, and does not cut them out completely, but it is still too noticeable to the ear. To eliminate this effect, additional correction should be made using the LPF filter parameter. To do this you need:
- Play music rich in low frequencies through the speaker system.
- Turn the filter phase shifter several positions counterclockwise. This adjustment evens out the sound.
- If the dips are still noticeable. then the filter phase shifter rotates three phases in a clockwise direction.
POWER MIXER
Power Mixer is a feature-rich volume control app for Windows. The software interface is completely translated into Russian. The utility is distributed on a paid basis. To get the full version you need to buy a license. The full version costs 200 rubles, but there is a free demo version of the program for 14 days.
All useful tools for working with audio are located in the main Power Mixer window. At the top of the interface there is a sound diagram - templates for adjusting the volume. Several modes are available: evening, games, mixed, music, mute in all applications, etc.
On the right side of the interface, application users can adjust the overall sound of the operating system: balance, volume, mute or unmute the sound.
In the main program window, you can change the volume of an individual application currently running. To do this, you need to select a program from the list and set the required volume values in the right window.
In addition to individual applications, the program allows you to work with a sound card. To do this, you need to select a device in the list and set the required volume values.
Fidelizer
Fidelizer isolates the audio driver from the influence of unrelated software at the operating system kernel level. The utility does not increase the volume, but removes all kinds of interference, so that the sound reproduced from the computer becomes cleaner and better perceived by the ear. That is, at the same volume it is easier to hear details. This is especially noticeable when listening to music and videos on headphones.
The utility is designed for musicians. Full functionality is available in the paid version. The license cost is $40 (approximately 3,100 rubles). And in the free version, only 4 priority levels are available for the audio driver. All except “Consumer” seriously slow down programs not related to audio output. The “Minimalist” level completely disables all “unnecessary” software, even the network card. The settings are saved until the system is restarted.
SRS AUDIO SANDBOX
SRS Audio SandBox is a volume control program. The utility allows you to improve the sound quality of individual applications and multimedia players. The software is available for the Windows operating system (32 and 64 bit).
To use the software you must purchase a license. A demo version is available to test the utility's capabilities for 14 days. The SRS Audio SandBox interface language is English.
After launching the utility, the main window will open in which users can make their settings.
- In the “Content” line, you need to select the type of content to play: music, movies, etc.
- The “Preset” section contains ready-made settings templates. To save your own settings, you need to click on the floppy disk icon.
- “Speakers”—the speaker settings are performed here. From the available list you need to select the channel of the speakers or headphones.
- In the “Rendering” section you need to select an audio processor. The default is automatic selection.
The following options are available in the list:
- WOW HD - used to improve sound quality in speakers;
- Headphone 360 - this function is used to enable surround sound in headphones;
- TruSurround XT - parameter for enabling surround sound in 2.1 and 4.1 systems;
- Circle Surround 2 is an expansion feature for multi-channel systems.
On the left side of the main window of the SRS Audio SandBox program there is a standard volume control.
Hear
This program is a multifunctional tool for improving the quality of reproduced sound. The functionality is quite rich - general amplification, virtual subwoofer, 3D effect, the ability to use a limiter, flexible equalizer. The main feature is the presence of a brain wave synthesizer, which adds special harmonics to the signal, allowing you to increase concentration or, conversely, relax.
VOLUME2
Volume2 is a simple program that is used as an alternative to the standard Windows volume control. The utility is distributed free of charge, the interface has been translated into Russian.
After launch, the program will move to the system tray. When you click on the utility icon in the tray, a classic regulator with volume, balance settings and a mute function will open.
By right-clicking on the application icon, additional functions will become available:
- Turn sound on and off.
- Select the default playback device: speakers, headphones, microphone.
- Manage connected devices.
- Making changes to the volume mixer.
- Setting up playback devices.
- Turn on the peak audio level indicator.
- Disabling Volume2.
In the General settings section of the program, users can change the device to control, change the volume of an individual application or the entire system, select an alternative device, etc.
- "Screen indicator". Here you can enable or disable the indicator, as well as change its style and placement on the screen.
- “System tray” - in this section the function of changing the program indicator icon in the tray of the Windows operating system is available.
- In the “Mouse Events” section there are settings for changing the format of how the program works with the mouse: changing functions when you click on the left and right button, setting new capabilities for the wheel, etc.
- “Edge Control” - in this section of options you can enable the volume control function at the edge of the screen.
- "Hotkeys". Here users can set hotkeys to quickly control the program.
- "System". Here the system settings of the Volume2 application are made: launching the utility along with Windows OS, enabling notifications, etc.
- "Schedule". In this section, you can enable a schedule for performing various actions: increasing or decreasing the volume, launching a program, etc. To do this, you need to specify the date, time and number of repetitions of the selected action.
- In the “Interface language” section you can change the program language.
Do you have any questions, suggestions or comments? Contact us and ask a question.
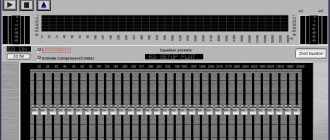
Graphing
Plot button builds all kinds of graphs based on all entered data. Below is the frequency response ( NA ) graph.
CA - sound pressure graph taking into account the supplied power; CD is the diffuser displacement amplitude; I - impedance graph; P —phase graph; GD - group delay graph. As you can see, Bassbox 6 Pro has a lot of features. The graphs are scaled, overlaid on each other for different designs, there is the possibility of printing, etc.