Materials and tools
First, we need to prepare and ensure that we have the materials and tools necessary to solve our problem.
We will need:
wire cutters; sharp knife; slotted screwdriver; Phillips screwdriver; soldering iron 25-40V; neutral alcohol rosin flux; lead-free silver-containing solder; some beeswax; gas lighter; industrial hair dryer or gas stove; thin-walled heat-shrinkable tube with a diameter of 8 mm; cotton keeper tape; spool of cotton thread; 220V mains plug; IEC 320 or Neutrik Powercon connector possible (panel and cable connectors); 3.1 m of cable PK50-2-11 or Klotz MY250 depending on the version of the cable being manufactured.
We will assume that you have all of the above, except the connectors, in stock. Now all that remains is to purchase the most suitable ones depending on the cable design and its modification. Where and how to do this will be discussed as we go along.
Model No. 1 – based on cable RK50-2-11
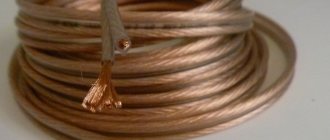
To make a network cable, we need a piece of domestic radio frequency coaxial cable PK50-2-11 (shown in the photo).
The central conductor of this cable is a copper single core with a diameter of 0.67 mm placed in insulation consisting of low-density polyethylene (diameter 2.2 mm). The outer conductor is a dense braid of 80 annealed copper conductors with a diameter of 0.1 mm. Braid density 88-92%. The outer sheath of the cable is made of light-stabilized polyethylene. The outer diameter of the cable is 3.7mm. The total cross-sectional area of the conductors is 0.98 mm2.
These cables are widespread and available for purchase from specialized companies.
For example, here is the Radioelectronics Catalog of JSC Concern ARGO.
For our purposes, the optimal choice in terms of price-quality ratio would be a power plug manufactured by the German company Mennekes, article number 2927 (SHUKO-type cable plug, IP44 with cable seal). These forks can be purchased from Mennekes product suppliers in Belarus, Ukraine, and Russia. For example, at the First Cable Company.
As an alternative to this fork, you can also use products from Marinco, Schurter, Wattgate, Furutech, Oyaide, Leviton, Kopp, but most of them are much more expensive.
In the future, you will need to decide how our cable will be connected from the equipment side. If there is a detachable cable, there are few alternatives - we will need an IEC 320 connector. But connectors of this type of acceptable quality are quite rare and many of them are expensive. In the event that you are not ready to modify your device by changing this type of connector, then we will stop there. Then a fairly good solution would be inexpensive, but quite high-quality (required minimum quality level) IEC 320 connectors made in Taiwan, model AC-102 according to the catalog of the Brown Bear company.
Alternative and higher quality connectors of this type may be more expensive, but still available in our countries, products from Kopp, Supra, Schurter, AVC-Link.
If you are ready to replace the panel power connectors installed on your equipment, then the ideal option in terms of price and quality would be to switch to the panel and cable connectors (models NAC3FCA and NAC3MPA) series
POWERCON manufactured by the Swiss company Neutrik. These connectors are widely available for purchase, for example here.
Well, the last case is that you do not want to use additional detachable connections at all. In principle, this is the most optimal option in terms of results. Then the cable will be led directly into the device and connected there.
Now that we have all the materials, we can start making the network cable itself. To do this, we cut two 153.5 cm long sections from the cable coil. In this case, you need to mark the beginning of each cable section in terms of their relative orientation before cutting it from the cable coil.
After this, stepping back 7mm from the edge of the cable, we tightly wrap it with keeper tape with the turns overlapping by 5-7mm. The tape is wound until 7mm remains to the opposite end of the cable. The ends of the keeper tape are fixed at the beginning and end of its winding with cotton thread. Both sections of the cable are wrapped in this way.
Now both cables are laid parallel and in different directions (look at the marks at the beginning of the segments), and are fixed in a parallel state by wrapping them with cotton thread. In this case, you need to ensure that the parallelism of the conductors is maintained along their entire length, preventing the cables from twisting together.
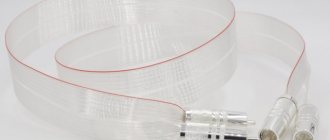
After this procedure, we tighten this bundle inside a heat-shrinkable tube with a diameter of 8 mm. The distances of the thermotube from the edges of the cable are preliminarily assessed based on the design of the network plugs and connectors used. Next, the thermotube shrinks. As a result, we get a two-wire, fairly flexible, flat cable.
Now it's time to install the connectors and plugs. To do this, remove 5 mm of the outer insulation of the cable, then unravel the shielding layer into individual conductors, and very carefully, so as not to damage the central conductor, remove the insulation around it.
The next step is to tin the stripped ends of the conductors. For this, a soldering iron with a power of 25-40 W, alcohol-rosin neutral flux and lead-free silver-containing solder are used. First, the central conductor is tinned, after which the shielding braided conductors are wound evenly around it (to achieve the same thickness along the length). After wetting with alcohol-rosin solder, quickly, in order to avoid overheating and melting of the dielectric, we tin the place where the conductors are twisted. Next, you need to thoroughly clean the soldering area from flux residues.
The next step is to seal the ends of the cable where the conductors exit the heat shrink tubing. To do this, just melt a little wax in a small bath, and using a brush, carefully coat the ends of the cable in the required places until the wax is absorbed into the fabric and a protective wax plug is formed. This measure will protect the cotton layer from saturation with moisture and ensure stable properties of this dielectric during cable operation.
We are almost ready to install the connectors. Before this procedure, it is very advisable to additionally install a piece of heat shrink on top of the cut of the heat shrink on each side of the cable - 8 cm long on the side of the IEC320 connector and 2-3 cm on the side where the power plug is installed. This is true when using a Mennekes plug and an AC-102 connector, and is done to protect the cable from damage where it is fixed in the connectors and to prevent kinks. Next, the AC-102 plug and connector are installed on the cable without any fuss. Fixation of cable conductors and contact parts of connectors, as well as fastening of cables to connector bodies is carried out using screw connections.
That's all, the cable is almost ready, all that remains is to choose the correct direction to connect it. But more on that at the end of the article.
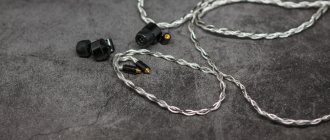
Fisch Performance-7 M-1e/F-1
Oyaide recently introduced M-1e/F-1 turned body connectors. Replacing a plastic cup with an aluminum one is not their only difference. The contacts are machined from beryllium bronze, then polished and coated with two layers of precious metals - platinum and palladium. Why such wisdom? Firstly, you get fantastic intelligibility in dynamic contrasts. The transfer of complex spectra also does not cause problems - even the most disharmonious and difficult to reproduce instruments are reproduced vividly and naturally. Secondly, a unique combination of absolute neutrality and harmony. Microdynamic precision increases so much that when listening to vocals, you begin to literally “see” the performer’s face, facial expressions, his hand movements, and air appears in some supernatural way from the noise of the recording. The guitar string not only rings, but naturally sings. Not only horizontal separation arises, but also vertical one.
But there is a fly in the ointment: the bass is slightly softened and steamed.
- Manufacturer Fisch Audiotechnik (Germany)
- Made in Germany
- price, rub. 60200
- Length, m 1.5
- www.fisch-audiotechnik.de
Model No. 2 – based on Klotz MY250 cable
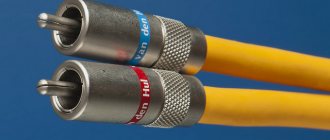
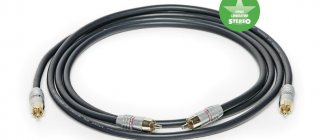
To make the second model of the network cable, we will need a piece of microphone cable produced by the German company Klotz, model MY250 (shown in the photo).
The cable consists of two multi-core conductors (16X0.2 mm) in polyethylene insulation twisted into a twisted pair. The total cross-section of this pair of conductors is 1 mm2. A layer of low-density polyethylene is extruded around a pair of twisted conductors. Next comes the copper braid. External insulation is made of polyvinyl chloride.
The cable is widely available from specialist retailers and suppliers of professional live and studio equipment. For example, it can be purchased here.
All points regarding the selection of plugs and connectors for the manufacture of this cable model are the same as for the first model, so we will not describe them again.
To make a network cable, we need two MY250 sections of 150.5 cm each. In this case, we need to mark the beginning of each cable section in terms of their relative orientation before cutting from the coil.
Now for each section of cable we need to remove the outer insulation and remove the braided shielding. We won't need them in this design. After this operation, we will be left with two sections of cable, each of which consists of two twisted conductors placed in a polyethylene sheath. One of these segments will serve us as a phase wire, and the other as a neutral wire.
Next, for the resulting wire segments, we repeat all the steps for making a network cable described for Model No. 1. The only difference in the tinning procedure is that in the cable sections of the same name, both twisted pair conductors are stripped, carefully twisted and then tinned. There are no further differences in the manufacturing procedure of the cables of these two models.
Fisch Performance-7 P-046e/C-046
The next sample is equipped with Oyaide P-046e plugs and a connector of the same C046 series. As for the “seventy-ninth” series, contacts for them are made of phosphated bronze with a low oxide content and are subjected to very fine mechanical polishing. The surface is simply perfect. The only differences are in the coating. This connector is first coated with a 1.5-micron layer of gold, and then an ultra-thin, three-tenths of a micron, layer of palladium (there are also plugs of this series on which rhodium is deposited instead of palladium).
Is there a difference? The cable with palladium connectors provides slightly higher resolution in the mid and high bands and has a slightly upwardly shifted tonal balance. Higher frequencies are transmitted more abundantly and more airily. The sound stage has a clearer background. There are disadvantages - it creates a feeling of absolute unnatural purity. The attack of the drums does not seem as confident and punchy as that of a cable with simply gold-plated contacts. In general, they are somewhere equivalent. The choice is a matter of personal preference.
- Manufacturer Fisch Audiotechnik (Germany)
- Made in Germany
- price, rub. 45000
- Length, m 1.5
- www.fisch-audiotechnik.de
Choosing the correct cable connection direction
From the point of view of the final result, the correct connection of network cables to your equipment is very important. The best result when changing only one cable is obtained if you start changing the network cable from the amplifier/receiver. Ideally, this is best done for both audio sources (with the exception of PCs and turntables) and possible intermediate devices (phono stage, external DAC). Those. When replacing standard cables, not all of the listed devices will receive the maximum increase in sound quality provided by the sound reproduction path.
Now about connecting the cable directly to the device. Significant from the point of view of the impact on sound is how a pair of conductors is connected to the 220V input of the device. Those. If we conventionally designate the conductors as numbers 1 and 2, and the input contacts of the device as B1 and B2, then two connection options are possible: 1->B1/2->B2 and 1-B2/2-B1. And they are not equal in terms of sound. This is due to the fact that the cables are initially designed with multi-directional conductors in order to ensure the maximum result in increased sound quality when choosing the optimal connection option. Therefore, it is very important to check the sound of your equipment in two options: connecting with a manufactured cable and connecting with reshuffled conductors. The optimal one is selected from these two options. To carry out castling, if an IEC 320 connector is used, the conductors in it are swapped, and if the cable is inserted directly into the device, then the cable conductors are swapped directly in it. After castling the conductors, do not forget to turn the plug in the socket 180 before listening, so that the result is not affected by changing the phasing of the plug. There is very little audio equipment in which the phasing change is imperceptible to the ear, so this factor of influence on the sound must also be taken into account.
I really hope that you did not neglect these tips and made efforts to choose the optimal cable connection. It's worth it.
Good luck making it. But remember that this cable does not replace high-quality equipment, but only uses the potential inherent in it.
July 14, 2006
© AMUR, 2006
Fisch Performance-7
The standard and most affordable version of the P-7 cable comes with a Mennekes MHF06 plug and an unnamed monolithic IEC connector, the quality of which is not in doubt - the connector is just a connector. Typically, such connectors use nickel-plated brass contacts. In this case, they are also distinguished by a very high class of cleanliness - the surfaces do not have visible traces of mechanical processing.
A cable with such a plug gives a fairly neutral, but more voluminous and booming sound than the same one, but with P-079e/C-079 connectors. The resolution is a little worse - it’s as if the sound image was cleaned up, but it was done as if in a hasty, rather rude manner. The top has acquired subtle spiky shades. However, according to some characteristics, a cable with the described connectors outperforms a more expensive model. For example, the backgrounds in the scene stand in their places and are not brought closer; separation does not raise any questions at all. Sharp localization is maintained both in the center and at the edges of the scene.
- Manufacturer Fisch Audiotechnik (Germany)
- Made in Germany
- price, rub. 37400
- Length, m 1.5
- www.fisch-audiotechnik.de