- December 13, 2019
- Android
- Alexandra Pal
If you are not afraid to be left without Apple headphones or you feel sorry for giving them to a repair shop, then this article can help you decide to disassemble the device yourself or make sure that it is still better to take the AirPods to a repair service (which is desirable in this case). At the same time, get acquainted with the structure of the headphones and find out how to disassemble the EarPods.
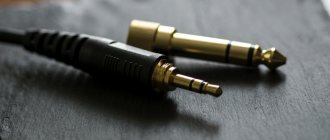
It is worth noting that there are EarPods with both lightning and 3.5 mm Jack - a connection connector. Since the iPhone is being modernized from year to year, recently the package with an Apple smartphone began to include EarPods with a lightning connector, and the 3.5 mm connector on new iPhone models has ceased to exist altogether. So in this article we will analyze headphones with a lightning connector.
We will analyze it from the bottom up: first we will look at the lightning connector device, then the control panels and speakers. So, how to disassemble EarPods?
First step: overview of appearance and characteristics
It's no secret that Apple's headset includes a number of useful features. These are, for example, speech recognition (do you use Siri?), noise reduction. First of all, let’s unpack our Airpods.
It is worth noting that if you use a headset with a lightning connector, you will not be able to charge your phone at the same time. Charging uses the same port as wired EarPods. Let's look at the control panel.
As you can see on the slide, we can adjust the volume with two buttons and answer calls with the key in the middle. On the back of the panel there is a microphone, which is used to record voice.
There are markings on the headphones - R and L (right and left).
So, let's start solving the question of how to disassemble the EarPods.
How to solve the problem with low sound in headphones?
If the headphones begin to make strange sounds and play quietly, or one earphone plays quieter than the other, you can try the standard cleaning scheme; most likely the speaker is clogged.
For this you will need water and a toothbrush. Rub the speakers with wet bristles for a few minutes and check the sound.
If this does not help, then you need to clean the internal components of the equipment. When the headset is disassembled, you will have access to all the main structural elements. If this does not help, and the headphones play quietly, you will have to pinout the headset.
The pinout process involves disassembling the main wire in order to solder the wires in the correct sequence. To perform such a manipulation, you will need a soldering iron with a thin tip to get close to the small parts of the device.
Wiring
Pinout of apple headphones is somewhat more complicated compared to other standard versions of the headset. The main difficulty lies in the pinout diagram and the arrangement of wires inside the plug. However, it is possible to repair the system; to do this, you will need to perform the following manipulations with equipment:
- Disassemble the equipment body according to the diagram presented above. Separate the wire strands so that all parts are located separately.
- Using a soldering iron, you need to sequentially solder all the wires in the right place. This is the main difficulty, since Apple has an additional wire for the microphone.
- You need to solder the green and red wires in series, corresponding to the left and right headphones.
- Then you need to solder red-yellow, red-green and yellow-green wires to the middle part.
- Lastly, you need to solder the wires with golden braid. After completing all the manipulations, you can carefully close the wire and then glue the elements of the outer casing.
Second step: disassemble the lightning connector
If your headphones are in good condition, it is better not to disassemble them. The article is for informational purposes only and is not a practical guide. We'll just take the headphones apart so you can see how they work inside.
First of all, you need to cut off the plug from the lightning. We cut it along the seam using a stationery knife.
Inside we see a steel sleeve, it is needed for better protection against mechanical stress. Let's remove the seal to look at the power board. There was a thick layer of glue under the steel plate, which will also have to be removed.
Now we get to the printed circuit board. Please note that the identification chip may not be present in a cheap Chinese counterfeit.
Here's what was inside: a steel sleeve for protection, special glue, power board, plug, insulation, wires.
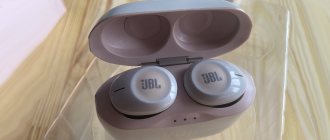
How to clean your AirPods case
I clean the inner surface of the case using ear swabs and cotton pads. Moreover, if the dirt is really strong, I also use a soft toothbrush. In some hard-to-reach places, for example, under the rim of the lid, I also use a toothpick.
Some bloggers have claimed that alcohol and hydrogen peroxide will corrode and ruin the top inside of the case. Perhaps the problem was relevant on the first generation headphones. My 2019 AirPods survived these experiments beautifully. Of course, I didn’t heavily swab the inside of the case with a swab containing alcohol, but lightly wiped off the dirt with a moistened ear stick. Real alcohol evaporates quickly, so you can safely clean the charging ports very carefully, first with a damp ear swab, and then immediately with a dry one.
After carrying out these procedures, I let the headphones lie separately from the case, left open on a napkin for 20-30 minutes. Well, then I continue to use the device for its intended purpose. This is my experience in caring for my favorite gadget, but how do you clean your AirPods? Share your experiments in our Telegram chat.
Third step: disassemble the control panel
To adjust the sound volume in the headphones, call an assistant, make and receive calls, EarPods provides the user with a functional control tool - buttons.
The control panel housing is secured with latches so that it can be easily opened. And here it could not be done without a steel plate. In this case, it is designed to maintain the shape of the case: very thin (which makes it almost weightless) and elastic.
When you press the remote cover, the steel plate deforms, bends and touches a specific area on the board. In this case, a certain route (chain) for signal transmission is built, which allows us to control the system. On the back side of the steel case there is a hole for voice recording. There are 3 buttons under the steel plate.
Before you disassemble your AirPods, think carefully about whether you have enough knowledge to fix this device yourself.
How to properly clean AirPods?
The official Apple website provides basic recommendations for cleaning branded gadgets. So, neither the headphones nor the case should be washed under water; they can only be wiped with a soft, dry, lint-free cloth. It is recommended to clean the speaker and microphone meshes exclusively with soft brushes or dry cotton swabs without using any cleaning or detergent substances. The maximum that the user is allowed to do is wipe the case with a soft cloth lightly moistened with isopropyl alcohol. But my personal experience shows that such cleaning is ineffective. With active use, at least for me, the headphones very quickly become clogged with wax, and this despite the fact that I regularly monitor hygiene and do not push the headphones very deep into the ear canal. Usually, after one and a half to two months, one of the headphones begins to play noticeably quieter than the other, and the time comes for serious intervention.
Apple AirPods are the absolute leader among wearable electronics gadgets
Last step: disassembling the EarPods speakers
So, we come to the main question: how to open Apple headphones?
Since the plates of the earphone body are tightly coupled to each other, they can only be disconnected with a scalpel with a sharp and thin blade. Then you need to remove the glue around the edges.
The diaphragm, coil and magnet are compactly located inside the case. The diaphragm in this case is a paper cone (as it seems at first glance, but in fact it is a thin film with a lot of fibers), bordered by a layer of rubber (polymer), due to which sound waves propagate in space during vibrations.
The inside of the device consists of a metal frame and a middle magnet. Under the diaphragm there is a coil - the most important element. The magnet is static, but the electromagnet (coil) is either attracted or repelled from it, causing the diaphragm to vibrate and propagate sound waves. There are 2 wires running from the speaker to the circuit on the back side.
How to disassemble it yourself?
If, while listening to music, you notice that your headphones are not working as well, you should try cleaning the headset. If this does not help, you need to pinout the device.
But first you need to disassemble the system, for this you will need to perform the following steps:
- Using a sharp utility knife or scalpel, you need to cut the seam along which the components in the headphones are attached to each other. They are tightly connected with glue, so you will have to go through the scalpel several times.
- After this, you should carefully separate both parts, but you should not jerk the elements sharply, as this may lead to a break in the wires inside the case.
- The final step is to remove the membrane from the headset body.
- Now, having gained access to the internal elements, you can repair your apple headphones.
With this disassembly method, noticeable traces of opening will remain on the headphone body. If you doubt that you can repair the device yourself, use the help of specialists. If you repair it yourself, you will not be able to use the warranty card.
IMPORTANT: If the headphone housing opens and closes easily, this most likely indicates a counterfeit version of the headset.
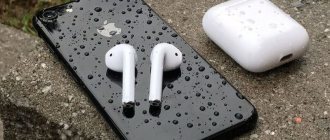
If water gets on the headphones or inside the mobile phone connector
Short-term exposure to water is not dangerous for headphones. It’s worse if the headset, along with the phone or player, fell into a puddle. However, there is no need to panic here either. The main thing is to quickly remove the electronic device. We will now look at what to do if the headphones get into water or liquid leaks into the connector.
First aid for headphones that have fallen into water
To save headphones that have fallen into the water, you should not hesitate for a minute. It will be necessary to carry out a rescue operation consisting of a number of decisive actions:
- If an unpleasant situation arises, the headphones are immediately removed from the water. Pull the plug out of the phone or player connector as soon as possible.
- The headphones are directed downward with the mesh with the ear holes and with sharp movements they try to shake the liquid out of the case. Remaining moisture is removed by wiping with a paper napkin or toilet paper. Any material that absorbs water well will do.
- No matter how hard you try, moisture will remain inside the case. It's ideal to disassemble the headset to thoroughly dry all the parts, but not all headphones are easy to disassemble. Undisassembled headphones will take a long time to dry. The headset is placed on a warm radiator with a paper napkin. You can blow it with a hairdryer, but not with hot air, otherwise the thin plastic will melt. You cannot use headphones until drying is complete.
- Dry the undisassembled headset on the battery for at least 3–5 days. It will be faster with a hairdryer. At the end of the procedure, performance is tested. Even if the speakers are working, there will be distortion in their sound.
If the procedure is unsuccessful, the speakers will have to be replaced by removing parts from the old broken headphones.
Drying disassembled headphones
Let's consider the situation if you were lucky enough to disassemble the headset. This is an ideal option for completely drying each part. They are carefully wiped with a napkin and laid out in a warm place. There is no need to rush with a hairdryer. The air flow will dry out the membrane. Let it dry better naturally.
When all the parts are dry, the speakers are brought out into the light and the membrane is inspected. The purpose of the procedure is to identify water stains. They will greatly distort the sound of the speakers. You can remove stains with a damp cloth, but you must act carefully so as not to damage the membrane.
If the headset fell into tea, soup, or was simply washed, you cannot do without disassembling it. There is nothing left to lose. All parts are washed with clean water, wiped with a napkin and laid out to dry. It is unlikely that after such a procedure high-quality sound will appear, but before purchasing a new headset you will have to use what you have.
What is needed for the procedure?
To clean the headphones themselves and the case (depending on the method) you will need:
- hydrogen peroxide;
- vinegar;
- insulating tape;
- scissors;
- wipes made of microfiber (they are required to remove dirt from the surface of the case);
- cotton swabs (ordinary swabs that do not have dense cotton wool are most suitable for the task at hand);
- cotton pads;
- toothpicks;
- Toothbrush.
These tools can restore your headphones and case to their original appearance.
How to avoid skin irritation?
Some tips on how to avoid skin irritation, especially if you have allergies or sensitivities:
- Use the correct size AirPods Pro.
- After exercising with AirPods, or after exposing your device to liquids that may irritate your skin (such as sweat, soap, shampoo, cosmetics, sunscreen, or lotion), you should clean and dry your device.
- If you have allergies or hypersensitivity to certain substances, you should clean the device with a liquid that does not contain components that are harmful to you.
Do you experience irritation from headphones?
Not really
Can the headphones be washed or washed?
AirPods are water-resistant, but not waterproof. The wireless charging case for the headphones is not waterproof, so be careful not to let liquids get into the opening. If liquid gets in, turn the case upside down and open the lid to dry it out.
AirPods (first or second generation), charging cases, AirPods Max, and Smart Protective Cases are not waterproof, so be careful not to let liquids get into any openings.
Important! If the headphones get wet (including sweat during exercise), wipe them with a dry microfiber cloth.
Care Tips
To ensure that your headphones work flawlessly for as long as possible, you need to follow these simple tips:
- regularly clean the meshes on the speakers;
- store the earbuds in a closed case to prevent them from collecting dust;
- Avoid contact of the gadget with water and other liquids.
Before you begin preventive procedures, you must ensure that the device is disconnected from the gadget. For wired headphones, disconnect the plug from the connector.
We looked at popular methods for cleaning your headset and case, answered frequently asked questions, and gave recommendations for caring for your iPhone headphones. No matter how often you wash your ears, it will not help, and your Apple Airpods wireless headphones will still get dirty.
The main rule is regular, proper and high-quality cleaning of the device. If you follow this, the headphones will serve you for a long time, and the clear sound will allow you to enjoy.
How to get rid of heavy dirt?
In-ear headphones that are very dirty will be difficult to clean using the standard method described earlier. The use of cotton swabs is only suitable in cases where the speaker mesh is only slightly dirty. If there is too much dirt on the surface, you will have to turn to another option.
In this case, we will need hydrogen peroxide, which is sold in any pharmacy. This liquid can quickly break down earwax and other types of dirt. But you should remember that in-ear headphones are not protected from moisture, so you need to perform the process very carefully and carefully.
To clean a heavily soiled device, follow the algorithm:
- Pour a little peroxide (4-5 mm) into the cap of a plastic bottle.
- Place one or two headphones into the cork so that the speaker mesh is immersed in the liquid.
- Wait 10-15 minutes.
- Carefully remove the EarPods and wipe the mesh with a dry cotton swab.
Practice shows that following these recommendations can eliminate 90-100% of contamination.
Is this how AirPods can break on their own?
Exactly! Let us remind you that the battery life in them is only a year, rarely two (by this time they last less than 2.5 hours instead of the declared 5 ). Apple a service program for worn-out batteries in the form of a paid replacement of entire headphones (the cost of each headphone is $49).
Apple AirPods service (chat/call/service).
Wireless AirPods cannot be repaired. Even a third-party repair shop will not contact you with a high risk of breaking your device. And there is no recycling program for them. Although inside the tiny gadget is an environmentally hazardous lithium-ion battery.
“[AirPods] are a prime example of environmental irresponsibility, the pursuit of profit, and a careless attitude towards the e-waste generated.” © DigitalTrends .
Why do iPhone headphones get clogged and what does it affect?
One way or another, wax accumulates in the human ear. No matter how you clean your ears or how often you use your headphones, wax will still end up on the mesh. In addition, dust particles periodically fall on the film.
Important! The habit of putting headphones in a jacket or bag pocket can also lead to unexpected clogging of the speaker. Earwax and foreign contaminants clog the headset, preventing the owner of the device from fully enjoying listening to music.
The sound becomes quieter by several orders of magnitude, the bass disappears, and detail decreases. These factors force many people to go to the store to spend money on new headphones. Luckily, however, there are effective ways to clean your headset and restore its sound to its original level.
In most cases, the biggest challenge in cleaning Airdos is the mesh on the membrane. But if you do not promptly clean your headphones from minor dirt, then after a while they will become completely clogged, the wax will dry completely, and then you will only have to take the device for repair!
Have you ever cleaned your iPhone headphones (AirPods)?
Not really