The rating includes the best gaming headphones 2022 with a microphone for a computer, which will help you hear approaching opponents earlier and enhance the immersion effect in the gameplay. For online games, you must have a built-in microphone, otherwise you will have to buy it separately to communicate with your teammates.
There is a huge variety of models on sale, and to make it easier for you to make your choice, we have prepared the top best gaming headphones with a good microphone, sorted by price-quality ratio.
What types of connectors are there?
Connecting headphones to a computer is not a difficult matter, but sometimes difficulties arise directly when setting up the equipment. Almost all PC models have a sound card. It can be built into the motherboard, or you need to connect to it through a special connector. In any case, the gadget can be connected either to the back panel of the computer or to the front (if there are appropriate sockets).
By looking at the figure below, you can understand how to connect headphones with a microphone to your computer.
The headset output is always green, and the microphone input is pink . Since the plugs of gadgets are also painted in corresponding colors, it is very difficult to make a mistake and insert them into other connectors. You need to insert the green plug into the green socket, and the pink plug into the pink socket. The pink jack can be used to connect both a headphone microphone and a third-party microphone to the computer. After which the connected equipment is configured using special software (in Windows 10, as well as versions 8 and 7, the configuration should take place automatically).
On a laptop, gadgets are connected in the same way. The manufacturer can place the connectors on the front panel of the device or on the left.
Sometimes laptop headset jacks are made tighter to increase their lifespan. Therefore, do not be afraid that the plug does not fit into the socket well.
It should be noted that the plugs of headsets intended for computers are color-coded if there is a microphone on the headphones. The plugs of the rest of the headset do not have any color differences. There is a headset, for example, for a telephone, that has not 2 plugs, but one, which combines contacts for the microphone and audio channels. It clearly shows 3 stripes separating the contacts. Two contacts are used to connect audio channels, and one is for a microphone.
New laptop models have a combo jack to which you can connect headphones with a microphone that have one plug.
A special marking is placed near such a connector. If there is no such jack, but there are 2 standard ones, then such a headset can be connected through a special adapter.
Thus, it becomes clear how to connect headphones from your phone to your computer. Headphones on the front panel are connected according to the same principle: if there is a microphone on the headphones, then it is connected to the pink jack, and audio channels to the green one.
What sound card for headphones
As mentioned, built-in sound cards are great for everyday use. These components interface with speakers, headphones, and more complex sound systems such as 5.1 or 7.1. An alternative to integrated cards are more efficient dedicated systems.
Dedicated sound cards can be internal or external, and each solution has no fundamental advantages over the other. What are the differences between these two sentences? Which headphone sound card will work best? The most important features of both types of dedicated sound cards are listed below.
Internal sound card for headphones
- connects to the PCIe connector on the motherboard
- has a simple design that is hidden in the computer case, and only part of the system with audio connectors “protrudes” out
- does not occupy a USB port during operation, which can be used for any other purposes
- solutions designed for players are characterized by a special style in the form of a programmable lighting system
- internal cards offer good quality sound
- these solutions are more expensive than simple USB cards, but cheaper than professional and complex systems
External sound card for headphones
- usually connected to the computer's USB port,
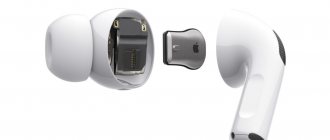
- may be in the form of a small accessory that looks like a pendant
- simple USB sound cards have only one or two headphone jacks and a microphone input
- There are many USB sound cards on the market that not only offer a perfect, clean signal, but also work with many channels and sound systems
- These are solutions that are compatible with almost any device equipped with a USB port, and their installation usually involves connecting the device to a computer or tablet
- When purchasing, you should also consider that USB devices are easy to transport and can be taken almost anywhere
- professional external sound cards are connected to the computer using FireWire or Thunderbolt connectors - these are solutions used in recording studios and cost tens of thousands of rubles
- simple external USB cards are offered for several hundred rubles; higher quality and more efficient designs cost several thousand rubles
Connecting the headset to a PC
Now you know how to connect headphones to your computer. But this action is not enough for the gadget to work properly, although most often it starts working right away and you don’t need to configure anything. But there are times when the connected gadgets do not work, so some actions need to be taken.
- Before you adjust the sound in your headphones, you need to test them for functionality in another device, for example, by connecting them to the headphone jack on your smartphone or tablet.
- If the headset is functioning, this means that the PC does not have the necessary drivers. To detect their presence on your computer, play any audio or video file. If sound appears in the speakers, this means that everything is in order with the drivers, and you just need to make small changes to their settings.
- If there are still no drivers, then you need to go to the PC control panel and click on the “Device Manager” item.
- After that, find the line “Sound video and gaming devices”. If there is an exclamation mark next to it, you will have to update the drivers. Before installing the driver, you must have a disk with the necessary programs prepared. After the software is installed, sound should appear. If there is no disk, select the option to search for software on the Internet, and then install the found one.
- It is also recommended to check the set volume level by clicking on the speaker, which is located in the lower right corner.
- You can also check the volume level through the “Control Panel” tab (in the tenth version of the operating system (Windows 10), all windows look similar). To do this, go into it, find the “Sound” item and click on the “Volume Settings” line.
- You can check if sound playback on your computer is working by looking at the volume controls. If after switching on the file is not played, then there will be no indication (pulsation) on the controller.
Connecting a headset on Windows 7
Before setting up headphones on a Windows 7 computer, you need to connect them on the back or front panel of the device to the appropriate connectors (you already know how to connect correctly). Then you need to start playing the music file. If there is sound in the headset, then the connection can be considered complete. If there is no sound, do the following using headphones on your computer (this instruction is also suitable for setting up the gadget on a laptop).
- Hover your mouse over the speaker image at the bottom of the screen (right) and right-click.
- Next, you should select the line “Playback devices” in the tab that appears.
- In the next window you will see a list of devices installed on your computer. There can be from one to several of them in the list (depending on what type of device will be used for playback). You should make sure that there is a green checkmark next to the “Headphones” item.
- If the checkbox is not checked, you need to select this device: right-click and click “Set as default” in the pop-up window.
- In the next step, select “Speakers” and click on the “Configure” button located at the bottom of the window (left).
- Afterwards, select the “stereo” audio channels and click on “Check”. The test will begin and you should be able to hear audio from the channels displayed on the screen. If everything is fine, click “Next”.
- In the speaker settings, you need to check the box next to the line “Left and right front”, then click on “Next” and “Finish”.
- In the “Sound” window, opposite the “Speakers” item, there is an equalizer scale. When an audio file is playing, the bar should fill in green. If this does not happen, then you need to look for another reason.
- There may be no sound when the scale display is on and the volume level is set to zero.
- But, if the volume level is set correctly, and there is an indication indicating that music is playing, but you couldn’t turn on the headphones, then either the headset is faulty, or you connected it to the wrong jack.
The above settings can also be applied to the Windows 10 operating system (Windows 10), if you do not know how to enable the gadget directly in it.
When do you need loud headphones, and how does loud sound affect your hearing?
Loud headphones are needed for those who do not enjoy listening to music at standard volume. In addition, bass and rock genres are fully revealed at increased volume.
In addition, in a study at the University of Leicester, scientists found that many headphones produce sound pressure of up to 120 dB. This is scary because... noise exceeding 110 dB "impedes the transmission of electrical signals from the ears to the brain."
Now about the other side of the coin. Experts from the BBC website have found a direct correlation between hearing loss and listening to music at high volumes. The standard sound exposure limit is 85 dB (highway noise during rush hour), and prolonged exposure to louder environments increases the risk of hearing loss.
Of course, you can listen to loud music, but you shouldn't do it often. In this case, the sound should be no more than 110 dB.
Microphone settings
Before you can use the microphone in Windows 7 or 8, as well as in Windows 10, you need to configure it.
- After connecting the microphone to the appropriate jack on your PC, right-click on the speaker icon and select “Recording Devices”.
- Set the microphone to your default device.
- In the next menu, check the microphone is working, for example, making any sounds. If it works, the jackal will react by pulsing.
- If there is no pulsation, or it is weak, right-click on “Microphone”, and then select “Properties”.
- In the window that opens, select the “Levels” tab and set the value to “80” on the regulator, then test the device again.
There are also headphones with a microphone that can be connected to a computer via a USB connector. In most cases, after connecting them, the configuration occurs automatically.
Few users of modern devices do not know how to connect headphones to a computer, but not everyone can solve problems that arise during connection. Let's look at some of the nuances of connecting and setting up headphones for their high-quality operation on various operating systems.
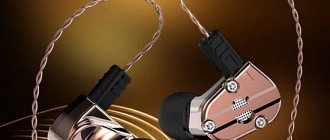
Sennheiser HD 206
- Impedance: 24 ohms
- Frequency range: 21-18000 Hz
- Sensitivity: 108 dB
- Connector: mini jack 3.5 mm
- Cable length: 3m
Sennheiser's affordable entry-level HD 206 closed-back headphones replace the HD-201. Like the previous solution, this model is an excellent option for a variety of studio tasks, including recording vocals and guitars.
Sennheiser HD 206 have comfortable swivel ear pads and provide a comfortable fit for any head size. The fit to the ears is quite tight, but at the same time not so strong as to cause discomfort. In this case, each speaker receives power via a separate cable.
Unlike the HD 201 model, the Sennheiser HD 206 has a modified bass response and a sharper sound. The sound stage in stereo was pleasant and quite wide. There is good detail throughout the entire frequency range, especially when listening to uncompressed audio.
- Purchase
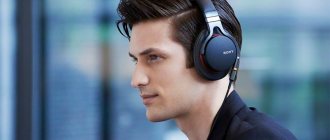
How to choose the best Bluetooth headphones with active noise cancellation: expert advice
What types of connectors are there?
Connecting headphones to a computer is not a difficult matter, but sometimes difficulties arise directly when setting up the equipment. Almost all PC models have a sound card. It can be built into the motherboard, or you need to connect to it through a special connector. In any case, the gadget can be connected either to the back panel of the computer or to the front (if there are appropriate sockets).
By looking at the figure below, you can understand how to connect headphones with a microphone to your computer.
The headset output is always green, and the microphone input is pink . Since the plugs of gadgets are also painted in corresponding colors, it is very difficult to make a mistake and insert them into other connectors. You need to insert the green plug into the green socket, and the pink plug into the pink socket. The pink jack can be used to connect both a headphone microphone and a third-party microphone to the computer. After which the connected equipment is configured using special software (in Windows 10, as well as versions 8 and 7, the configuration should take place automatically).
On a laptop, gadgets are connected in the same way. The manufacturer can place the connectors on the front panel of the device or on the left.
Sometimes laptop headset jacks are made tighter to increase their lifespan. Therefore, do not be afraid that the plug does not fit into the socket well.
It should be noted that the plugs of headsets intended for computers are color-coded if there is a microphone on the headphones. The plugs of the rest of the headset do not have any color differences. There is a headset, for example, for a telephone, that has not 2 plugs, but one, which combines contacts for the microphone and audio channels. It clearly shows 3 stripes separating the contacts. Two contacts are used to connect audio channels, and one is for a microphone.
New laptop models have a combo jack to which you can connect headphones with a microphone that have one plug.
A special marking is placed near such a connector. If there is no such jack, but there are 2 standard ones, then such a headset can be connected through a special adapter.
Thus, it becomes clear how to connect headphones from your phone to your computer. Headphones on the front panel are connected according to the same principle: if there is a microphone on the headphones, then it is connected to the pink jack, and audio channels to the green one.
Buying a sound card for headphones
In order to take full advantage of the sound card's capabilities, you need to use good quality headphones and appropriate materials. When all the conditions are met, you will be able to enjoy truly deep, richly detailed sound, whether you are watching movies, listening to music or playing exciting games in virtual arenas.
Buying a sound card that will provide the best sound for your music is not at all easy and involves analyzing the solutions available on the market in terms of the most important parameters, which include:
- Type of sound card - the choice here is large and concerns external and internal cards, and in the case of the first, also the type of interface used to connect the system to the computer. If your priority is to buy a sound card designed for your laptop and headphones, you'll need to look for a good quality USB chip;
- IMD coefficient – informs about the level of intermodulation distortion and is expressed on a percentage scale. This type of distortion should be as small as possible, so the lower the IMD the better. Its value should be as close to zero as possible;
- The frequency range that the sound card can generate. The minimum frequency is responsible for low frequencies, and the maximum frequency is responsible for high frequencies. Integrated music systems are characterized by a rather narrow frequency band and, therefore, limitations in the generated signal. Specialized sound cards of good quality are distinguished by a frequency response of 20-20000 Hz, that is, the range of sounds audible to humans;
- The SNR parameter is the ratio of useful signal power to noise power in a given frequency band. The SNR value is expressed in decibels, and the higher it is, the better. An effective sound card is supposed to have an SNR of 95 dB or more;
- THD coefficient - informs about the amount of total harmonic distortion, that is, weak and unwanted signals that appear when a signal is generated at a certain frequency. THD is indicated as a percentage, and the lower the THD, the better. Harmonic distortion is an undesirable phenomenon, so its value should be as close to zero as possible;
- Noise level is a parameter that provides information about the noise level when no audio signal is being generated. The lower the noise level, the better the headphone sound card. It is assumed that its value should not exceed −90 dBA;
- Sampling Rate and Depth – Sampling rate determines the number of samples per second that are used when converting an analog signal to digital, and is expressed in Hertz. It's good if the sound card has a sampling frequency of 40-200 kHz. The second of these parameters, i.e., sample depth, also called bit depth, is the number of bits used to describe each individual sample. The higher the sampling depth, the easier it is to reduce quantization noise;
- Additional connectors – in small sound cards the size of a flash drive, you can find one or two headphone outputs and a microphone input. Larger, more complex designs have more useful interfaces on the board and include: RCA, S/PDIF, AUX, or HDMI;
- Sound system – When buying a music card, you should pay attention to one important parameter, namely the supported sound system (2.0, 2.1, 5.1 and 7.1). The sound system tells you how many channels the card supports and how many speakers you can connect to it at the same time.
Connecting the headset to a PC
Now you know how to connect headphones to your computer. But this action is not enough for the gadget to work properly, although most often it starts working right away and you don’t need to configure anything. But there are times when the connected gadgets do not work, so some actions need to be taken.
- Before you adjust the sound in your headphones, you need to test them for functionality in another device, for example, by connecting them to the headphone jack on your smartphone or tablet.
- If the headset is functioning, this means that the PC does not have the necessary drivers. To detect their presence on your computer, play any audio or video file. If sound appears in the speakers, this means that everything is in order with the drivers, and you just need to make small changes to their settings.
- If there are still no drivers, then you need to go to the PC control panel and click on the “Device Manager” item.
- After that, find the line “Sound video and gaming devices”. If there is an exclamation mark next to it, you will have to update the drivers. Before installing the driver, you must have a disk with the necessary programs prepared. After the software is installed, sound should appear. If there is no disk, select the option to search for software on the Internet, and then install the found one.
- It is also recommended to check the set volume level by clicking on the speaker, which is located in the lower right corner.
- You can also check the volume level through the “Control Panel” tab (in the tenth version of the operating system (Windows 10), all windows look similar). To do this, go into it, find the “Sound” item and click on the “Volume Settings” line.
- You can check if sound playback on your computer is working by looking at the volume controls. If after switching on the file is not played, then there will be no indication (pulsation) on the controller.
Connecting a headset on Windows 7
Before setting up headphones on a Windows 7 computer, you need to connect them on the back or front panel of the device to the appropriate connectors (you already know how to connect correctly). Then you need to start playing the music file. If there is sound in the headset, then the connection can be considered complete. If there is no sound, do the following using headphones on your computer (this instruction is also suitable for setting up the gadget on a laptop).
- Hover your mouse over the speaker image at the bottom of the screen (right) and right-click.
- Next, you should select the line “Playback devices” in the tab that appears.
- In the next window you will see a list of devices installed on your computer. There can be from one to several of them in the list (depending on what type of device will be used for playback). You should make sure that there is a green checkmark next to the “Headphones” item.
- If the checkbox is not checked, you need to select this device: right-click and click “Set as default” in the pop-up window.
- In the next step, select “Speakers” and click on the “Configure” button located at the bottom of the window (left).
- Afterwards, select the “stereo” audio channels and click on “Check”. The test will begin and you should be able to hear audio from the channels displayed on the screen. If everything is fine, click “Next”.
- In the speaker settings, you need to check the box next to the line “Left and right front”, then click on “Next” and “Finish”.
- In the “Sound” window, opposite the “Speakers” item, there is an equalizer scale. When an audio file is playing, the bar should fill in green. If this does not happen, then you need to look for another reason.
- There may be no sound when the scale display is on and the volume level is set to zero.
- But, if the volume level is set correctly, and there is an indication indicating that music is playing, but you couldn’t turn on the headphones, then either the headset is faulty, or you connected it to the wrong jack.
The above settings can also be applied to the Windows 10 operating system (Windows 10), if you do not know how to enable the gadget directly in it.
The best 7.1 gaming headphones
Wired gaming headphones - Razer Kraken 7.1
A very recognizable model from popular manufacturers of gaming equipment. In the Razer Kraken model we are faced with virtual 7.1 sound. This effect is achieved entirely using software from Razer. The sound is divided into channels, and a full presence effect is created. You really feel where they hit you from. and if they are sneaking from behind, you really want to turn around.
The ear pads are made of soft leather, Greenpeace, don’t worry, it’s artificial and provides maximum comfort and naturalness. The Kraken 7.1 microphone with a built-in power button is conveniently hidden and taken out only when needed. Convenient and practical.
The headset is illuminated with a proprietary soft green backlight when it is active - it is always easier to understand whether the device is on or not if there is some kind of indicator light.
But with all the advantages in the form of excellent sound and ease of wearing, on the other side of the scale is the high price, virtual rather than real 7.1, and poor assembly. Every eighth person notes that after 4-5 months the Razer Kraken 7.1 headphones fall apart. Not good for a model of this level.
Price: RUB 7,490
Ergonomic gaming headphones - Razer Tiamat
The most powerful weapon for producing high-quality sound. But start considering the Razer Tiamat model only if money is not a critical issue. The cost is considerable. The sound system is real, even more than that. By purchasing a Razer Tiamat, you become the owner of a full-size model with 10 speakers on board. Large cups provide the maximum permissible level of sound positioning. I was able to touch and listen to this model in person, having visited the “Sound in the hand” exhibition.
I’ll tell you, of course, it feels great.
After listening to the ACDC track, you could mentally find yourself at the concert. Well, the main thing for which we are looking for headphones in this review is gaming. Unfortunately, there was only a console with FIFA, not the brightest game in terms of sounds, but I naturally found myself at the stadium.
In addition to precise debugging using software, the Razer Tiamat comes with a remote control. It looks stylish and allows you to control many parameters. If you are ready to shell out some serious money, then you can safely purchase this copy. According to buyers, this is a good investment, but there is an opinion that they cannot last long. The ear circumference of the Tiamat model is too tight and results in a lack of ventilation.
Review from a real buyer What I can highlight: the microphone is loud and clear, the sound is great, they don’t break (yet)! The only thing I didn’t like was their weight, for me they are kind of heavy.
Price: RUB 16,990
Wireless 7.1 Headphones – Corsair Gaming Void PRO RGB Wireless SE Dolby
If the previous models were budget, then these headphones cost quite a lot of money. The first thing you want to pay attention to is the beautiful design. The headset looks like a solid A, and there is also RGB lighting on the sides: it, of course, is not visible to the player himself, but those around him will be jealous.
The headset is wireless. This is both a plus and a minus. The plus is that the wires will not get in the way while playing, but the minus is that the headphones need to be charged regularly. However, the manufacturer claims up to 16 hours of continuous operation. The ear pads are covered with a breathable microfiber mesh, which prevents your ears from sweating while playing. The microphone here is unidirectional with noise reduction. On the cup next to it there is a mute button - very convenient during various force majeure situations.
Well, and of course we can’t help but mention 7.1 technology. It is, of course, virtual: it cannot be compared with real surround sound, but there is still something similar in headphones. The range of the headset is 12 meters. The Corsair Gaming Void PRO is a good deal for the money, but you have to admit that a wireless headset is not for everyone.
Price: ₽ 10,490
Microphone settings
Before you can use the microphone in Windows 7 or 8, as well as in Windows 10, you need to configure it.
- After connecting the microphone to the appropriate jack on your PC, right-click on the speaker icon and select “Recording Devices”.
- Set the microphone to your default device.
- In the next menu, check the microphone is working, for example, making any sounds. If it works, the jackal will react by pulsing.
- If there is no pulsation, or it is weak, right-click on “Microphone”, and then select “Properties”.
- In the window that opens, select the “Levels” tab and set the value to “80” on the regulator, then test the device again.
There are also headphones with a microphone that can be connected to a computer via a USB connector. In most cases, after connecting them, the configuration occurs automatically.
Despite the ease of connecting headphones to a computer and setting them up in Windows, users have questions and problems. For example, the plug does not fit or it seems that the sound could be better than it is. In this article we will figure out how to properly use headphones with a laptop/computer.
Connecting wired headphones
The first problem may arise already at the stage of connecting the headphone plug to the socket. Let's divide the available plugs into:
- Standard 3.5" three-pin - found on most headphones;
- Combined 3.5” four-pin – used on headphones with a microphone;
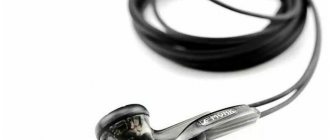
- The rare 6.5” plug looks the same, but is several times larger;
- The small three-pin 2.5” plug used to be on some mobile phone headsets.
On computers and laptops there are no connectors for 6.5" and 2.5" headphones, but they can be connected just like 3.5" headphones through special adapters. But there is always a 3.5" jack in front:
and behind the system unit:
According to the standard, it is green or with a “headphones” icon. You can insert headphones or a headset with a microphone into this jack. Sometimes, the front panel is not connected to the motherboard, and the headphones do not work when connected to the front panel, but work if they are inserted behind the system unit. In this case, you need to open the computer lid and figure out the wires and where they connect to the motherboard, according to the markings.
On laptops there are two separate or one combined connector:
If there are two connectors, then one is for headphones/speakers, and the second is for a microphone. If there is only one connector, then you can insert both regular headphones (three-pin plug) and headphones with a microphone (headset) with a four-pin plug into it.
Simply put, headphones with a microphone with a 4-pin plug can be inserted into any jack, but if it is not designed for a microphone, then it simply will not work, but there will be sound in the headphones. The three-pin plug fits into both a regular and a combination socket; no adapters are required.
Sound cards for headphones - are they worth it?
The vast majority of computer kits currently offered are equipped with built-in sound cards. These are systems built into the motherboard that are an integral part of it. Built-in sound cards do not provide ideal and deep sound, but in most cases these components are enough for everyday use.
The average user does not need an efficient sound card with exceptional capabilities to watch movies, surf the Internet or play games.
The purchase of an additional sound card should depend on the intended use, but it should be remembered that its potential can only be used in conjunction with appropriate quality equipment and materials. The offer of specialized sound cards is addressed to people who appreciate good music, professional computer gamers and music creators.
Sound devices in Windows
In Windows 7,8 and 10, the sound system is designed so that the sound is output to the current “default device”. Let’s open the sound control panel, to do this, right-click on the speaker icon near the clock and select “Sounds” and go to the “Playback” tab:
The screenshot indicates that the sound will be output to "Speakers - High Definition Audio Device" because it is selected as the "Default Device". There is also a “Default communication device”, it is used in instant messengers such as Skype, Viber, WhatsApp:
When you've connected your headphones, a new device may appear here, and if it's not marked as "default", then right-click on it and select "Set as default":
Usually there is only one device in the list, but if you have a TV or monitor connected via HDMI, you will see it in the list of Windows audio devices. You can easily understand which device you connected the headphones to, to do this, right-click on each device in turn and select “Check”. A test tone should sound in the headphones. Microphone recording is configured in the same way.
On some Realtek sound cards, you can separate the rear and front sockets of the computer, i.e., so that the rear and front sockets appear as one common one, or as two separate devices. To do this, go to “Control Panel -> Hardware and Sound” and look for “Realtek HD Manager” there:
In the upper right corner, click on “Advanced device settings”:
You can choose from two modes: classic and multi-threaded. In multi-stream mode, the rear and front outputs operate separately, i.e. You can set different sound output to speakers connected at the rear and headphones connected at the front. In classic mode, these jacks are set to the same sound flow. Also, in the Realtek Manager, reassignment of sockets is available, so you can assign not a green socket for headphones, but, for example, a black socket.
Setting the sound in headphones
If there is still no sound, then read the article about solving sound problems. When sound appears in the headphones, you can adjust the sound parameters; to do this, go to the sound control panel to the “Playback” tab and double-click on the device.
Volume and balance
Let's go to the "Levels" tab:
The slider sets the overall volume level, but it is also available by clicking on the speaker icon next to the clock. But the balance of the left and right channels is available only from this window. Press the "Balance" button and adjust the level of the right and left channels, if necessary. When you change the master volume, the levels of the right and left channels will change in proportion to the values you set.
Enhancements (Sound Effects)
On the “Enhancements” tab, you can configure sound effects; they are also called improving sound quality. The list of effects differs depending on the sound card and drivers, but the logic of application is the same. The “Disable all enhancements” checkbox disables all sound enhancements, so for the effects to work in headphones, you need to uncheck the box:
Next, mark the desired effect and click the “Settings” button. Each effect will have its own settings. Here is a list of some "improvers":
- Bass Boost: Increases the level of low frequencies. In the settings you need to select the frequency (Frequency) and gain level (Boost Level). For headphones, suitable frequency values are 50-100 Hz, gain 3-12 dB, selected individually by ear;
- Virtual Surround: encodes multi-channel audio as stereo (for receivers);
- Room Correction: allows you to adjust the sound using a calibrated microphone to compensate for the reflectivity of the room, not relevant when connecting headphones;
- Loudness Equalization: equalizes loud and quiet sounds, can be useful for listening to quiet recordings through headphones;
- Equalizer: an equalizer for adjusting the sound timbre, less common.
The “Preview” button will help you evaluate the impact of the effect on sound quality. It plays a test sound, or your audio file.
Sampling frequency
You don't need to change anything in the Advanced tab, but if you are listening to high-quality soundtracks with a sampling rate higher than 48 KHz, i.e. It makes sense to choose from the list “24 bit, 96000 Hz” or “24 bit, 192000 Hz (Studio recording)”. In the normal case, there is no difference in sound quality, but the load on the processor increases. The default setting should be "16bit, 48000Hz (DVD Disc)".
We don’t touch the “Exclusive Mode” block, but if there is no sound in your program after some other program is launched, then uncheck both boxes.
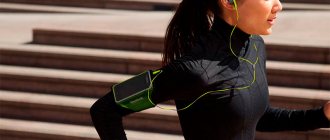
JVC HA-MR60X
- Frequency range: 8-23,000 Hz
- Connector: mini jack 3.5 mm
- Cable length: 1.2m
The JVC HA-MR60X over-ear headphones, part of the XTREME XPLOSIVES series, offer users rich bass coupled with aggressive performance. The design uses mainly plastic: both in the cups and in the headband. At the same time, the downforce is well balanced.
The rim guides have a decent amount of length and are very versatile in terms of fit for any head size. And soft leatherette ear pads add comfort when listening to music tracks for a long time. Each speaker receives power from its own wire.
There is a microphone on the right cable, which allows you to use the JVC HA-MR60X as a headset, and the L-shaped connector allows you to avoid fractures when using headphones in conjunction with smartphones.