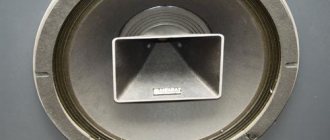
How to properly connect and phase speakers? In this article we will talk about connecting speaker systems to an audio power amplifier (APA).
If you find an old Soviet amplifier and speakers in your closet or on your balcony, then do not rush to throw them away. By connecting all these rarities to the linear output of your computer, you can get good results for practically nothing.
The disadvantage of many Soviet amplifiers was poor tone control circuits. When using a computer as a signal source, you can easily compensate for this shortcoming by using a software equalizer that comes with any sound card.
Existing methods of connecting conductors
Basic methods of connecting conductors in a house or apartment
Connecting wires can be done in several ways:
- welding is the most reliable method, ensuring high reliability of the connection, but requiring skills and the presence of a welding machine;
- terminal blocks - a simple and fairly reliable connection;
- soldering - works well if the currents do not exceed the norm and the connection does not heat up to temperatures above the norm (65°C);
- crimping with sleeves - requires knowledge of technology, special pliers, but the connection is reliable;
- use of spring clamps - wago, PPE - are quickly installed and, subject to operating conditions, ensure good contact;
- bolted connection - easy to perform, usually used in difficult cases - when it is necessary to switch from aluminum to copper and vice versa.
The specific type of connection is selected based on many factors. It is necessary to take into account the material of the conductor, its cross-section, the number of cores, the type of insulation, the number of conductors that will be connected, as well as operating conditions. Based on these factors, we will consider each type of connection.
Required Tools
The flux is chosen depending on the material of the wire
. Installation, modernization, repair and maintenance of wires is a troublesome task, but not difficult. To reduce the time spent, pre-prepare all the necessary tools and consumables for the job. The list looks like this:
- consumables include solder and flux;
- sharp knife;
- soldering station or soldering iron;
- technical or medical tweezers;
- ordinary pliers.
You can use not a well-sharpened knife, but special pliers that allow you to remove the entire insulating layer with a few movements. But their cost is quite high, so many people use a knife or scalpel.
In each case, a certain solder and flux composition for the cables is required, this must be taken into account.
Welding – high reliability in any conditions
When connecting wires by welding, the conductors are twisted and their ends are welded. As a result, a metal ball is formed, which provides a stable and very reliable connection in any conditions. Moreover, it is reliable not only in terms of electrical characteristics, but also mechanically - the metal of the connected wires after melting forms a monolith and it is impossible to isolate a separate conductor.
Welding - it is important to heat the metal, but not melt the insulation
The disadvantage of this type of wire connection is that the connection is 100% permanent. If you need to change something, you need to cut off the fused piece and do it all over again. Therefore, for such connections, a certain supply of wires is left in case of possible alterations.
Other disadvantages include the need for a welding machine, appropriate electrodes, flux and operating skills. In addition, welding takes a lot of time, it is necessary to protect surrounding objects, and it is also inconvenient to work with a welder at height. Therefore, electricians practice this type of connection in exceptional cases. If you are doing it “for yourself” and know how to handle a welding machine well, you can practice on scraps. The main trick is to not melt the insulation, but to weld the metal.
After cooling, the welding site is isolated. You can use electrical tape, you can use heat shrink tubing.
Tinning wires with a soldering iron
Tinning wires with a soldering iron
To do the job well, it is important to be confident in using a soldering iron. If there are no established skills, you will not be able to tin and solder the wire.
There are different models of soldering irons, each with its own technical characteristics - power, dimensions, etc. It is recommended for a novice master to give preference to soldering stations where it is possible to regulate the heating temperature independently.
It is advisable to purchase an expensive device, since the process will take less time and the work will be done with joy.
Connecting wires by crimping
To crimp wires, a special aluminum or copper sleeve is required - it is selected based on the size of the twist (bundle diameter), and the material is the same as for the conductors. The bare wires, stripped to a shine, are twisted, a tube-sleeve is put on them, which is clamped with special pliers.
An example of crimping conductors with a sleeve
Both sleeves and pliers are different, there are several types. Each of them has its own rules of use (the number of wires that can be packed in a sleeve), which you need to be well versed in. It is necessary to pack the wires according to certain rules, measure the size of the resulting bundle, and adjust it to the requirements. In general, a rather dreary task. Therefore, this type of wire connection is mainly used by professional electricians, and more and more often they are switching to spring clamps.
Pro Tips on How to Tin Wires
If you don’t have factory flux on hand, an aspirin tablet, a wooden board or plastic will help clean the surface from oxides. It is enough to place each of these components under a conductor and a soldering iron, and the substances released from them when heated will give the desired effect.
It is most effective to tin with aspirin - this is a universal remedy; plastic is well suited for small multi-core brands of cable and wire products. Wood requires prolonged heating and burning until smoke appears, so it is advisable to use it as an auxiliary element.
New parts that you take out of the package can be soldered immediately, their legs have already been cleaned by the manufacturer, and they do not need to be tinned, since the solder will adhere evenly and firmly to the surface without this.
Rice. 9: soldering a new part without tinning
If you are going to tin a large length or winding wires, it is better to take a crucible; it is not advisable to perform this procedure with a soldering iron.
Rice. 10: Burn the coating of thin wires
In order to solder or tin twist low-current conductors, for example, in a mobile phone headset or headphones, the copper surface is cleared of varnish. But doing this manually is quite difficult, so it is much easier to burn the veins with a lighter and clean off the carbon deposits.
To effectively tin metal, try to work not with the edge of the end of the soldering iron, but with its flat part. This will increase the working surface area and improve heating.
Please note that over time, classic soldering irons heat up even more, so low-melting solder may roll off the tip even before you bring it to the wires. To avoid this effect, do not turn on the device in advance; do it immediately before you start tinning the wire.
Terminal blocks
One of the simplest and most reliable wire connections is through terminal blocks. There are several types, but almost all of them use a screw connection. There are sockets of different sizes - for different sizes of conductors, with different numbers of pairs - from 2 to 20 or more.
The terminal block itself is a plastic case in which a metal socket or plate is sealed. A bare conductor is inserted into this socket or between the plates and clamped with a screw. After the screw is tightened, you need to give the conductor a good tug to make sure it is tightly clamped. Due to the fact that the connection points remain uninsulated, the terminal blocks are used in rooms with normal humidity.
The disadvantage of such a connection: due to the ductility of metals - especially aluminum - the contact weakens over time, which can lead to an increase in the degree of heating and accelerated oxidation, which again leads to a decrease in contact. In general, the connection of wires in screw terminal boxes must be tightened periodically.
Connecting wires in terminal blocks
Advantages - speed, simplicity, low cost, does not require any skills, except the ability to use a screwdriver. Another important advantage is that you can easily connect wires of different diameters, single-core and stranded, copper and aluminum. There is no direct contact, so there are no risks.
Why do you need competent switching of audio equipment?
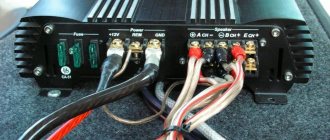
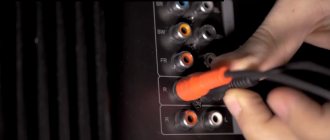
Speaker wire connector
Let us note right away that the number of connectors used (see What types of connectors are there), cables and the total length of acoustic connections in professional installations amaze an inexperienced and unprepared person.
Note. With such an abundance of connections and connectors, a banal “non-contact” can lead to very disastrous results. Expensive equipment can simply go bad due to a poor-quality connector. At best, a separate speaker or other device will fail.
All this was written for a reason. If you carefully monitor the selection of connectors, cables and connectors, you can avoid this. In this way, you can preserve the equipment and provide it with a considerable service life.
Soldering
First, about soldering technology. The connected conductors are stripped of insulation, cleared of the oxide film to bare metal, twisted, and then tinned. To do this, the conductors are heated with a soldering iron and applied to rosin. It should cover the joint completely. Tinned wires are twisted first with your fingers, then pressed using pliers. Instead of tinning, you can use soldering flux. They wet the wires well, but after twisting.
Then, in fact, the soldering process begins: the joint is heated with a soldering iron or narrow torch. When rosin or flux begins to boil, take some of the solder onto the soldering iron tip and bring it into the soldering zone, pressing the tip against the conductors. The solder flows to fill the gaps between the wires, making a good connection. When using a torch, solder is simply added little by little into the torch.
Next, after the soldering area has cooled, according to the technology, it is necessary to wash off the remaining flux (they accelerate oxidation), dry the joint, cover it with a special protective varnish, and then insulate it with electrical tape and/or heat-shrinkable tubes.
Now about the advantages and disadvantages of this method of connecting wires. In low-current systems, soldering is one of the most reliable methods of connecting wires. But, when installing electrical wiring in a house or apartment, it is criticized mercilessly. The thing is that solder has a low melting point. When large currents periodically pass through the connection (this happens if the circuit breakers are incorrectly selected or faulty), the solder gradually melts and evaporates. Over and over again, the contact becomes worse and the connection heats up more and more. If this process is not detected, the matter may well end in a fire.
The second negative point is the low mechanical strength of soldering. It's the tin again - it's soft. If there are a lot of wires in a soldered joint, and if they are also rigid, when you try to pack them, the conductors often fall out of the solder joint - the elastic force is too great, which pulls them out. That is why it is not recommended to use soldering connections when wiring electricity: it is inconvenient, time-consuming and risky.
Procedure
To tin the wire, you need to follow the following algorithm:
- Using a special tool, a knife or scalpel, remove the insulating layer from the wires that need to be connected.
- After removing the insulating material, clean the current-carrying conductors until a characteristic shine is formed. To do this, you can use a knife or sandpaper. If the work is to be done not with a cast core, but with a stranded wire, each wire is fluffed up and stripped separately.
- The soldering iron is plugged into the outlet and cleaned of all the contaminants that it likes to collect, especially old solder and dust. When cleaning the soldering iron wire, it is recommended to use light sandpaper.
- The tip of the wire needs to be heated. This can be done using a soldering iron, a gas torch or a regular lighter.
- When the soldering iron has warmed up to operating temperature, its core is touched to the solder and rosin. The working surface should be generously covered with melted tin.
- The next step is to touch the copper conductor with a hot soldering iron. The solder should be evenly distributed throughout the core. To apply solder, pliers and tweezers are used.
- At the end of the work, the cable or wire is carefully inspected. The working surface must be completely and evenly covered with solder. There should be no empty cavities or accumulations of substance. If shortcomings are found in the work, the procedure is repeated.
If you have to work with very thin wires, it is better not to use rosin, since it is very difficult to calculate the exact amount of the substance. Soldering acid is suitable as an analogue. You can treat the tip of the conductor with an ordinary brush. After this, you can begin applying solder. This method cannot be called more reliable, but with these types of wiring it is impossible to do otherwise.
Spring clamps for connecting wires
One of the most controversial ways to connect wires is using spring clamps. There are several types, but the two most common are wago terminal blocks and PPE caps. Externally and in terms of installation method, they are very different, but both designs are based on a spring, which creates strong contact with the wire.
There is controversy about this spring. Opponents of using wago say that the spring will weaken over time, the contact will become worse, the connection will begin to heat up more and more, which, again, leads to an even more rapid decrease in the degree of elasticity of the spring. After some time, the temperature may rise so much that the body (plastic) will melt, but what can happen next is known.
Spring clamps for electrical wiring - popular connections for wires
In defense of using spring clamps to connect wires, if they are used according to manufacturers' recommendations, problems are very, very rare. Although there are many fakes of both wago and PPE, as well as a sufficient number of photographs of them in melted form. But, at the same time, many people use them, and, under normal operating conditions, they work for years without complaints.
wago wire clamps
They appeared on our market several years ago and made a lot of noise: with their help, the connection is very quick and easy, and at the same time has high reliability. The manufacturer has specific recommendations for using this product:
- wago should only be used for single-core or stranded conductors with a cross-section from 0.5 mm2 to 4 mm2;
- to fix and connect stranded and small-diameter wires, use the CAGE CLAMP - from 0.08 mm2 to 35 mm2;
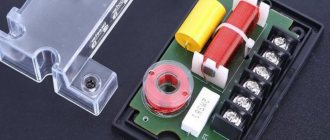
What's inside wago wire clamps
Inside these devices there is a metal plate, which ensures the proper degree of contact. The shape and its parameters of the plates were specially developed and tested. The tests were carried out on a vibration stand for many hours, then heated and cooled. After which the electrical parameters of the connection were checked. All tests were passed “excellent” and branded products always perform “five”.
In general, the range of Wago products is very wide, but for installing electrical wiring or connecting home appliances and lighting fixtures, two types of wire clamps are used: series 222 (detachable) with the ability to reconnect or change the connection, and series 773 and 273 - which are called permanent.
Detachable
Spring clamps for electrical wiring Wago 222 series have a certain number of contact pads - from two to five - and the same number of locking flags. Before starting the connection, the flags are raised up, the conductors stripped of insulation are inserted into them (all the way), after which the flag is lowered. At this point the connection is considered complete.
Wago wire connectors - connection methods
If necessary, you can reconnect the connection - lift the locking flag and remove the conductor. Convenient, fast and reliable.
Wago 222 series range
The 222 Vago series can be used to connect two or three, even five conductors made of copper or aluminum (you can connect different metals in one terminal). Wires can be single-core or multi-core, but with rigid wires. The maximum cross-section is 2.5 mm2. Soft stranded wires can be connected with a cross-section from 0.08 mm2 to 4 mm2.
One-piece
There is another type of clamps that does not provide the ability to redo the connection of wires - series 773 and 273. When using these terminals, the work is generally done in seconds: the stripped wire is inserted into the appropriate socket. The spring present there clamps it, ensuring contact with the plate. All.
wago contact terminals
These spring loaded wire clamps can be used to connect solid aluminum or copper wires with cross-sectional area from 0.75 mm2 to 2.5 mm2, stranded wires with rigid wires from 1.5 mm2 to 2.5 mm2. Soft stranded conductors cannot be connected using such connectors.
Types of mounting terminals for wago wiring
To improve contact, the wires must be cleaned of oxide film before connecting. To prevent oxidation from continuing, wago manufacturers also produce contact paste. The inside of the clamp is filled with it and it itself corrodes the oxide film, and then protects the wires from oxidation in the future. In this case, only heavily oxidized, dark conductors need preliminary stripping, and the clamp body is filled with paste.
By the way, manufacturers say that, if desired, the wire can be pulled out of the clamp. To do this, grab the wire with one hand, hold the terminal box with the other and rotate them back and forth with a small range, in opposite directions, stretching them in different directions.
Clamps for lamps (construction and installation terminals for lamps)
For quick and convenient connection of lamps or sconces, wago has special 224 series terminals. With their help, you can connect aluminum or copper wires of different sections and types (single-core or stranded with rigid wires). The rated voltage of this connection is 400 V, rated current:
- for copper conductors - 24 A
- 16 A for aluminum.
Methods for connecting wires in chandeliers and sconces using wago clamps
Cross-section of connected conductors from the mounting side:
- copper 1.0 ÷ 2.5 mm2 – single-core;
- aluminum 2.5 mm2 – single-core.
Cross-section of connected conductors on the side of the chandelier/sconce: copper 0.5 ÷ 2.5 mm2 – single-core, stranded, tinned, crimped.
When connecting aluminum wires, it is necessary to use contact paste, and copper wires must be stripped by hand to bare metal.
This product has two disadvantages. The first is that the price of original terminals is high. Secondly, there are a lot of fakes at a lower price, but their quality is much lower and they burn and melt. Therefore, despite the high cost, it is better to buy original products.
PPE caps
PPE caps (which stands for “connector insulating clips”) are very easy to use devices. This is a plastic case, inside of which there is a spring that has a conical shape. The conductors, stripped of insulation, are inserted into the cap, and the cap is turned clockwise several times. You will feel that it has stopped scrolling, which means the connection is ready.
How to make a wire connection using PPE
These conductor connectors are produced by many manufacturers; they are available in different sizes, for different diameters and the number of connected conductors. In order for the wire connection to be reliable, the size must be selected correctly, and for this you need to understand the markings.
After the letters PPE there are several numbers. Depending on the manufacturer, the number of numbers varies, but they mean the same things. For example, there is this type of marking: SIZ-1 1.5-3.5 or SIZ-2 4.5-12. In this case, the number immediately following the letters indicates the type of case. “1” is set if the body is a regular cone, on the surface of which grooves can be applied for better grip. If there is a SIZ-2, then there are small protrusions on the body that are convenient to grasp with your fingers and twist.
All other numbers reflect the total cross-section of all conductors that can be connected using this particular PPE cap.
An example of marking of PPE caps and its explanation
For example, PPE-1 2.0-4.0. This means that the body of the connecting cap is ordinary, cone-shaped. With its help, you can connect two conductors with a cross section of at least 0.5 mm2 (in total they give 1 mm, which meets the minimum requirements - see the table). This cap contains a maximum of conductors whose total cross-section should not exceed 4 mm2.
Connecting wires using PPE caps
In the second version of marking, after the abbreviation PPE there is only a number from 1 to 5. In this case, you just need to remember which of them is useful for which cross-section of wires. The data is in another table.
PPE caps and their parameters
By the way, only copper wires can be connected with PPE caps - aluminum wires, as a rule, are thicker than the maximum allowable for these connectors.
Features of the choice of connectors, cables and connectors
As a rule, if you follow the tips below, you can avoid many problems with car audio:
- The manufacturer's brand needs to be given considerable attention. You should not save, because the rule “The cheapest product, the most expensive product” is evident in this situation. When choosing connectors, connectors and other connections, the name of the manufacturer plays a vital role.
Note. As evidence, we cite a case that happened to one user who bought Chinese switches. So, in his initial opinion (of which no stone was left unturned), he saved money. All plastic components could not stand it and immediately melted as soon as the necessary soldering connection was made. On the contrary, products with the name are distinguished by excellent quality and reliability.
- Connectors need to be given special attention. Today, the so-called favorites of such products are known, making connectors of the highest quality. Connectors from the Swiss company Neutrik are considered one of the best. They have been held in high regard by professionals for over 35 years, and that means something. Our country is no exception in this regard, where Neutrik connectors are selling very well.
Note. The American Switchcraft also makes connectors of good quality. They have been on the market since 1946. The Australian company Ampenol is no exception. But it is these three popular manufacturers that are subject to frequent counterfeits. For this reason, you need to be extremely careful.
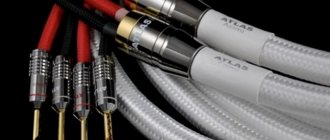
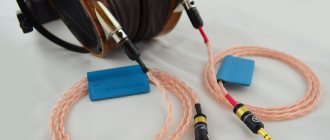
- Cables and wiring, along with connectors, also need to be given attention. This product range is much richer than connectors, and making the right choice in this case will not be so easy. In the articles on our site, the reader can find all the information he is interested in about speaker cables. Here we touched on the topic of them because of the connectors with which they are closely related. And we recommend choosing cables from these manufacturers: Japanese Canary, German Klotz or Kabl cables, American Belden and others.
Car audio speaker wires
Note. Amateurs have their own tastes, which even pros have to reckon with. They, who have long passed that stage of development in car audio when they were called “dummies,” more often choose Italian-made Tasker cables.
Bolted connection
This connection is assembled from a bolt of any diameter, a suitable nut and one, or better yet, three washers. It is assembled quickly and easily, serves quite a long time and reliably.
Bolted wire connection
First, the conductors are stripped of insulation and, if necessary, the top oxidized layer is removed. Next, a loop is formed from the stripped part, the internal diameter of which is equal to the diameter of the bolt. To make it easier, you can wrap the wire around the bolt and tighten it (middle option in the right picture). Afterwards it all comes together in this order:
- A washer is placed on the bolt.
- One of the conductors.
- Second puck.
- Another conductor.
- Third puck.
- Screw.
The connection is tightened first with your hands, then with the help of keys (you can take pliers). That's all, the connection is ready. It is used mainly if it is necessary to make a connection between wires made of copper and aluminum; it can also be used when connecting conductors of different diameters.
Wire processing methods
Tinning with a wooden block
There are several ways of tinning. Some craftsmen prefer a method, the essence of which is to press the wires with a soldering iron to a flat wooden surface.
When heated, wood releases gases that act as flux, helping to remove oxides from the metal.
It is possible to remove the oxide film on the surface of conductive wires more efficiently using aspirin. During operation, the tablet is placed under the wires. When heated, acetylsalicylic acid releases gases that envelop the joint, displacing impurities that negatively affect the quality of the joint. This simple and inexpensive method provides high-quality tinning.
There is another way to prepare multi-core cables and wires in which the copper base is coated with enamel. It is preferable to use a small piece of PVC material as a substrate. When exposed to heat, polyvinyl chloride begins to actively release hydrogen chloride, which effectively destroys the oxide layer.
How to connect aluminum and copper conductors
By the way, let us remind you why you cannot directly connect copper and aluminum wires. There are two reasons:
- This connection gets very hot, which in itself is very bad.
- Over time, the contact weakens. This happens because aluminum has a lower electrical conductivity than copper, and as a result, when the same currents pass through, it heats up more. When heated, it expands more, squeezing out the copper conductor - the connection becomes worse and gets hotter.
To avoid such troubles, copper and aluminum conductors are connected using:
- terminal blocks;
- wago;
- bolted connection;
- branch clamps (make connections of wires on the street).
Other types of connectors cannot be used.
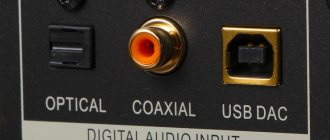
Features of connectors
It is always preferable to connect using XLR connectors. But the popular Jack connector is not so good. Phono or RCA connectors, tulips, etc. are not considered at all as a professional option, but only as an amateur one.
Jack connectors
Let's take a closer look at popular Jack connectors:
- It is more correct to call the Jack connector TRS, since it consists of a Tip, a Ring and a Sleeve. Popularly, this type of connector is often called a stereo jack or mono jack, if a 2-pin connection is meant.
Connectors of different sizes
Tinning by dipping
If you have to work with wires and cables of large diameter, then it is advisable to carry out the preparation differently. In this case, complete and uniform distribution of solder is not easy to achieve.
There is a special device - a crucible, into which small pieces of tin are placed. There they heat up, resulting in molten metal. The end of the wire is first immersed in rosin or other types of flux, and then in the crucible container. This approach ensures complete and uniform distribution of substances at the cut site.
This method can only be used with fully tinned wires. Immersion is already on a completely different scale, and is carried out in industrial conditions. The process is implemented using a special coil with wound wire. First, the entire copper surface is manually processed with hard brushes; their bristles are first treated with liquid zinc chloride. Dissolved flux is obtained from a mixture of technical hydrochloric acid and zinc.
Next, the wire from the coil begins to slowly unwind and is dipped into a container filled with dissolved tin. The uniformity of the coating is ensured by secondary processing of the cable or large-diameter wire with rubber brushes. Finally, the cable is immersed in a container of cold water and brushed again. After this, the wires and cables are wound and packaged for further sale in hardware stores.