A low-frequency sound system can fail for a variety of reasons. All defects can be divided into several groups:
- Speaker malfunction
- Amplifier failure
- Power supply failure
- Broken or damaged connecting cables
Repairing a subwoofer with your own hands is not difficult. For a person who does not understand electronics, it is easier to restore the functionality of the loudspeaker, since repairing it only requires care and following simple rules. Just find a break in the connecting wires. To do this, the ability to work with a tester is enough. Troubleshooting a low-frequency amplifier or power supply will require knowledge of radio engineering.
DIY home subwoofer repair
Repairing and restoring a subwoofer with your own hands must be carried out from simple to complex. One of the common defects in a home sound system is damaged connecting cables. This happens especially often where there are pets. Therefore, if there is no sound in the low-frequency speaker, first of all, you need to check the wires. In household sound systems and home theaters, the passive speaker is located away from the ULF unit. There is no power supplied to the devices, so it is enough to check the integrity of the audio cable. First, the presence of a low-frequency signal is checked at the output connector, then at the end of the cable that is connected to the speaker. If there is no signal, it is better to replace the cable.
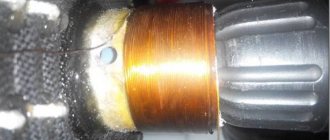
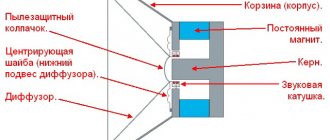
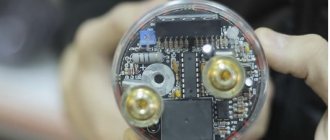
If the cable is working properly, but there is no sound from the speaker, you need to check the speaker. This is done using a tester or a regular battery. When its contacts are connected to the speaker input, clicks are heard in the speaker. When the tester shows a break at the external terminals, you need to open the column and check the speaker resistance directly at its contacts. The absence of resistance indicates a break in the loudspeaker voice coil. It is possible to repair a subwoofer speaker at home, but disassembling the speaker and repairing the voice coil is the topic of a separate article and is not discussed in detail here. In order to get to the voice coil, you need to unsolder the ends of the coil from the speaker terminals and carefully separate the diffuser and centering washer from the metal basket. Then, depending on the degree of damage, the coil is rewound, replaced with a new product, or the peeled turns are restored.
General principle of subwoofer operation
If you don’t want to turn to specialists for help, you can repair the speaker yourself. What does this require? First of all, some knowledge in the field of electronics, you also need a tester and a soldering iron - nothing will work without these tools. How does a subwoofer actually function? It all happens something like this: the on-board network voltage passes through the filter. Next, it is sent to the capacitor, and after that it goes to the transistor switches, which, in turn, control the high-frequency signal.
Afterwards, the amplified signal from the transistors is transmitted to the transformer - this is where the voltage increases to 40 V. Each individual microcircuit is powered by a pair of diodes, while capacitors are necessary in order to smooth out the pulses.
DIY subwoofer amplifier repair
DIY active subwoofer repair begins with checking the wires connecting the output terminals of the amplifier and speaker. If no circuit violations are detected, a sequential check of the circuit elements is performed. If the subwoofer is installed in a car, check the power supply cables and the signal wire from the car radio. Defects in a household active subwoofer can be divided into several groups:
- Power-on indicator does not light up
- The indicator is on, there is a hissing sound in the speakers, but there is no sound
- The indicator is on, there is no hiss in the speakers
To repair a sub, you first need to check the power supply. For all work on diagnosing the sound system, you will need a tester. First, an external examination is carried out. It allows you to identify failed electrolytic capacitors, burnt resistors and damaged circuit board tracks. If burnt resistors are found, then the stabilizer chip will also have to be changed. After restoring all elements, it is better to check the power circuit without an amplifier. Sometimes this requires cutting the PCB track.
Why do subwoofers break?
Quite often it is necessary to repair subwoofers due to broken speakers. The reason for this is the rewinding of the coils. The fact is that the coil can not only burn out - it often simply crumbles, the turns fly off the frame (even one is enough for the system to fail).
The most serious case is when the reel frame is deformed, burnt, dented, torn off or cracked. In this case, speaker repair is carried out as follows: the coil frame (and itself) is replaced. This is a serious, time-consuming procedure. The frame is made of different materials: fiberglass, paper, metal (for branded devices it can be copper or aluminum).
Another common problem: wheezing from subwoofers. In this case, they also first find out the cause of the problem. If you intensively used a cheap device made in China, it’s all a matter of overload. The subwoofer housing is simply not designed for such loads - this is what provokes wheezing. As a rule, the situation here is as follows: free-air speakers are installed in a bass reflex enclosure (usually small in shape). For this mechanism to work, an amplifier is required, which is usually not fully adjusted correctly (as is the volume level). If everything is configured properly, the problem may be solved.
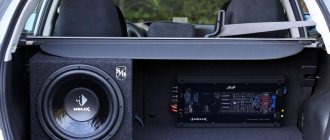
Repairing a car subwoofer yourself
Since all elements of a car sound system are constantly subject to shaking and vibration, the most common defect is a breakdown in contact. This applies to both the power supply system and audio interconnect lines. If a characteristic hiss is heard in the speakers, then the functionality of the amplifier can be checked by touching the input terminal with a screwdriver. No sound from the speakers may be due to a faulty connecting wire. If the power supply produces normal voltage, but the speakers are completely silent, you need to check the ULF elements, starting with the output stage. Only a specialist can perform diagnostics and troubleshooting in the amplifier, so if you lack experience, it is better to contact a workshop.
How to install and connect a subwoofer
Installing and connecting a subwoofer in a car yourself will require some tools and supplies. In addition to the amplifier and subwoofer, we will need:
- wiring (power, “tulips” and positive wire to the amplifier and car radio);
- fuse;
- capacitor;
- pliers and wire cutters;
- insulating tape;
- screed;
- a set of wrenches and an adjustable wrench.
Passive subwoofer connection diagram
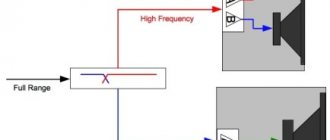
The subwoofer, together with the satellites, is connected to the amplifier, and it, in turn, is connected to the car radio.
The amplifier receives the signal from the radio and distributes it between the low-frequency speaker (subwoofer) and high-frequency speakers (satellites). Often a subwoofer with an amplifier is installed in the trunk, since that is the only place there is for it. Therefore, we need to stretch the wires through the entire cabin from the battery to the trunk. Before you start connecting, make sure that all safety regulations are followed. To avoid a short circuit, the car battery must be disconnected.
The power wires, especially the “plus” ones, must be protected by something, for example, corrugation. At the very least, the part that will be located in the engine compartment must be protected. Also, you need to install a fuse on the positive wire as close to the battery as possible. You can buy a ready-made wire with a fuse installed. Its rating can be determined by finding out the maximum current consumed by the amplifier and adding 5 amperes just in case.
Step-by-step instructions for connecting a subwoofer and amplifier
This algorithm is suitable for both a classic box and a stealth subwoofer. The whole process takes approximately 1-3 hours, and the most difficult part is running the power cable to the amplifier. Let's start with this.
- We find a technological hole. It is often closed with a rubber plug, and in domestic cars it may not be closed at all. If there is no hole, you need to drill it, and after pulling the cable, fill it with sealant. To prevent the cable from fraying, it is better to insert a rubber bushing (for example, a piece of hose).
- We lay the wiring in the engine compartment in the standard wiring harness and bring it out into the cabin. It is better to think in advance where the power cable will be laid. In some places it is necessary to remove (or partially loosen) the sill trims, interior trim and other elements under which the wiring will be routed. Be careful not to pinch the wiring. After pulling the wires, you can put everything back in place.
- In the trunk, where we have the amplifier, the wires are also routed through a technological hole. We connect “plus” and “minus” to the amplifier, respectively.
- The amplifier is connected to power, now it needs to be connected to the car radio. For this, standard RCA cables are used - “tulips” and the amplifier power control wire (a thin single-core wire, often blue). To remove the radio, you can use special keys, but if there are none, a knife or screwdriver will do.
- We connect the tulips in accordance with the colors of the connectors. It happens that the wire has red and black plugs, and the radio is red and white. In this case, we connect red to red, and white to black. We also connect the positive power wire if you want the subwoofer to turn on along with the radio.
- Next, we stretch the wires through the interior along with the power wire. We connect the RCA connectors to the corresponding ports of the amplifier.
- If you connected the power cable to the tape recorder, then you need to connect it to the amplifier so that it turns on along with the tape recorder. We find the terminal and connect the power cable from the radio to it.
- All that remains is to connect the subwoofer to the amplifier. In our example, the amplifier is two-channel, and we connect the subwoofer to both channels so that the amplifier can optimally distribute power between them.
It is not necessary to install a capacitor, but it is advisable. It should be connected when the maximum power of the amplifier exceeds 400 Watts. Where to install the capacitor is up to you, either in the trunk or in the engine compartment.
If you connect a powerful amplifier directly, it will consume a lot of energy and the battery will quickly discharge. The battery charge from movement is not enough to maintain constant operation of the amplifier. The amplifier can also be connected to the button and turned on separately from the radio.
We carefully check that all wires are connected correctly and that they are securely fastened. Some amplifiers are not protected in any way from polarity reversal, which can damage the transistors. Do not mix up the amplifier wires.
We connect the terminal to the battery, listen and enjoy.
https://youtube.com/watch?v=A0dT42R3ZfY
How to calculate hull displacement
What is the volume of the case? This is one of the main quantities on which the sound of the speakers in the subwoofer will directly depend. There are two ways to calculate the volume of the case: using professional programs or manually.
In addition, the programs will calculate the dimensions of all parts and elements necessary for manufacturing, so you just have to take the derived parameters and make a box based on them.
How to calculate the volume of a case manually
Calculations without the use of specialized software are simpler, although it will be impossible to imagine the model of the future subwoofer or the dimensions of its housing.
The volume of the box is calculated using the formula V = h*L*A.
In this case, the following values must be substituted into the formula:
- h is the height of the box;
- L is the length of the box;
- A is its height.
Knowing all these parameters, it is easy to determine the volume of the subwoofer housing.
The program algorithm will take into account all your wishes and calculate the volume and other parameters of the case quickly and correctly
Choosing a speaker for the radio
To select a subwoofer speaker for a closed box, you need to start from the Thiel-Small parameters (Fs, Qts, Vas). Usually this data is indicated in the accompanying documentation, but if you don’t have it, then the parameters can always be found on the Internet.
In order to understand whether the speaker is suitable for the radio, it is enough to carry out simple calculations. You need to divide by and if the value is less than 80, then such a sub is suitable for the subwoofer and will sound optimally in such a housing.
For example, the same speaker RE Audio SX PRO 15D2 has Fs = 27.8 Hz and Qts = 0.38.
Fs / Qts = 27.8 / 0.38 = 73.2 This sub is quite suitable for a closed box.
If the value for your speaker is more than 80, then you should find a different design for it using this very useful sign.
conclusions
Thus, it is clear that making and connecting it to the car is not easy, but not difficult either. This, of course, will require time, patience, and a certain skill in handling tools. But the result is worth it. Self-made sub for your car. This is, at the very least, a great reason to be proud. Moreover, unlike a purchased box, a homemade one is easier and easier to connect, because the holes and dimensions are calculated in advance and correspond to the capabilities of the machine.
Don't be discouraged if everything doesn't work out the first time, you may have to make several attempts. Don't lose faith in yourself and your strength.
Features of manufacturing a closed box
This housing primarily requires tightness and absence of vibrations. As a material for manufacturing, choose plywood or MDF with a thickness of 18 mm or more. If the walls are thin, they will rattle and vibrate, causing unnecessary waves to be transmitted into the cabin, which, when mixed with the sound waves of the playing speaker, will ultimately deteriorate the purity and quality of the bass. This is one of the reasons why ready-made subwoofers with thin cabinet walls made of low-quality material are not even considered for purchase.
It is recommended to make the back wall of the housing beveled for proper reflection and dispersion of internal waves.
See the table for verified box volumes.
Table of cell volumes for different speaker sizes
The net volume for the radio is the internal volume of the housing minus the volume occupied by the speaker.
More accurate results need to be calculated using the parameters of a specific model.
When installing the speaker into the housing, it is not recommended to secure the basket through carpet or similar breathable material. Many subs come with rubber gaskets for this purpose, and if you don’t have one, you can use sealant.
Example of subwoofers with rubber rims
Important points
Be careful with statements like:
- “The plant has kneaded everything and prepared it.” To think so is at least naive. Just imagine a workshop of a large manufacturer, where a new speaker appears every minute, in which hundreds of subs stand and “warm up” for several hours.
- “The material of the suspension and washer does not change their properties, and if they gradually became more elastic, then the sub would become sloppy after prolonged use.” This is what people say who are far from understanding the properties of rubber products and the like. In my line of work, I dealt with membranes that are installed in precision pressure regulators. So, after receiving and unpacking, to increase reliability, they are installed in a stand on which their continuous operation at partial speed is simulated for several hours, after which they acquire the declared properties and retain them for a long time.
Video: how to warm up a subwoofer, and most importantly - why!
Happy exercise!