Just a few simple steps to improve the acoustics of your studio can make your mixing process easier and your audio production more efficient. In this guide to improving your workspace, we'll explain some of the physics of sound and cover the essential tools for studio acoustic treatment.
Many of us are happy to spend our hard-earned money on new synths, sample packs, plug-ins and monitors in search of better sound. But in this quest, we often forget to pay attention to a more mundane, but perhaps more important aspect - the acoustic treatment of the room in which we are mixing.
Have you ever noticed how, during the mixing process, some frequencies (usually in the lower registers) are clearly raised, while others seem quieter? And when you listen to your perfect sounding demo somewhere outside the studio where you mixed it, does it sound completely different?
Such problems are common if you are mixing in an untreated room. So it may turn out that, for example, you used a completely unnecessary equalizer to achieve what you thought was an acceptable sound. But in fact, you only adapted it to your room, and as a result, the track may not sound correctly when played in another place.
An acoustically correct room is not a luxury and should not be an afterthought. On the contrary, it is the first necessary condition for creating a good mix. In addition, proper room acoustics also improve the quality of the recording: about 90% of the recording quality is determined before the sound even reaches the microphone.
Acoustic processing does more to improve recording quality and mixing accuracy than even the most expensive microphones, plug-ins or monitors. And it doesn't have to cost you a fortune, especially if you make the panels yourself.
While the approach we'll describe below won't give you the same control over your mix that you'd expect in a professionally designed studio, you'll be surprised how much better your mixes will sound after applying even the most basic acoustic treatments.
When you listen to music on a speaker system in any room, you are actually hearing a mixture of direct sound from the speakers and reflections from all the hard surfaces in the room, including walls, ceilings, tables, etc.
In the real world, we don't mix music in anechoic chambers. Moreover, we probably wouldn’t like it: people who tried to mix in “dead” studios say that it is very depressing. Additionally, the output will be a mix that will only be properly broadcast to a handful of listeners around the world who have access to their own anechoic chamber.
The typical professional studio also does not completely absorb reflections. But these reflections need to be kept in check so that your monitors and ears can do their job properly. At mid and high frequencies, excessive room reflections degrade the clarity and stereo imaging of speakers, while at low frequencies, reflected sound turns into resonant peaks that can enhance and differentiate certain bass notes from others.
A room with carpeting and soft furnishings will always sound cleaner than a room with hard flooring. But it’s important to note here that carpeting the walls is not the best idea for acoustically treating a room.
In an ideal studio, reflections are processed in such a way that all frequencies decay at the same rate (reverberation decay time is about 0.3–0.5 seconds). The problem with carpet is that it is too thin to effectively absorb anything other than high frequencies. The result is even poorer spectral balance and duller sound.
Where sound is reflected from a hard surface, constructive and destructive interference occurs as it combines with its reflected counterpart. In the case of low frequencies, the waves are “stopped” in fixed positions due to the geometry of the room.
Standing waves are very undesirable in the studio as they can cause large peaks and valleys in the frequency response, especially in the lower register. This can seriously interfere with mixing.
Wavelength
Sound travels at approximately 340 meters per second. If we could see sound as sine waves (pure tones of one frequency), you would see a 1 kHz wave repeating every 0.34 meters. On the other hand, a 50 Hz bass tone repeats every 6.8 meters. This distance between cycles is called the wavelength.
As this example shows, high frequencies have short wavelengths, while low frequencies reach lengths of several meters. Basic knowledge of how sound travels through space is useful for understanding different approaches to soundproofing and explains why some approaches are more likely to work where others fail.
To properly design the acoustic space of a room, we have two main tools: diffusers and absorbers, each to solve different acoustic problems.
Diffusers
scatter sound energy over a wide angle instead of directly reflecting it. Waves hitting them are reflected in a random direction, although otherwise they could confuse the stereo image and cause multiple echoes.
Absorbers
absorb sound energy, reducing reflections and reverberation in the room. They are used to reduce the reverberation time of a room at different frequencies.
Acoustic calculation
To determine which materials and in what quantities are suitable for reducing echo and hum in a room, it is necessary to perform an acoustic calculation, which is performed using a computer program. Necessary:
- Measure the area of the room.
- Provide information regarding architecture, room geometry and location of windows, doors, communication systems.
- Find out what materials were used to finish the floor, ceiling and walls.
- Consider where the sound source and audience will be located.
This information is placed in the program, a study is conducted that shows how much material needs to be purchased, and in what places the installation of acoustic materials is required.
Diffusers
The simplest diffuser is an uneven solid surface, often made of molded plastic or wood blocks of varying sizes, attached to a flat panel. By breaking up direct reflections and dispersing them, diffusers help create a smoother musical sound without significantly reducing the reverberation time in the room. This explains why diffusion is often used to improve sound in large rooms as well as control rooms.
Large commercial diffusers typically contain a series of rectangular wooden bars of varying lengths, where their dimensions and spacing are individually calculated to ensure optimal diffusion. However, a shelf filled with randomly placed objects, such as books and vinyl records, also disperses sound at mid and high frequencies just as well.
For a cheaper and more practical alternative, you can attach wooden beams of different sizes to some kind of backing. For diffusers to work properly, the height of these bars must be at least a quarter of the wavelength of the scattered sound.
Homemade diffuser
In practice, this means that to achieve a real effect at medium and high frequencies, the height of the bars must be 100 mm or more. This length is most effective at frequencies of approximately 1 kHz and above.
Diffusers are often used in large spaces or on the back walls of medium-sized rooms. In the vast majority of studios they are used in conjunction with absorbers. Diffusers tend to be less effective in very small spaces, as they simply don't have enough room to diffuse fully.
Tip: At one time it was believed that placing egg cartons on the studio walls would improve sound insulation and ensure proper diffusion. In fact, egg cartons are too light to do much to help soundproofing, and their profile is too small, only sufficient to dissipate very high frequencies. So throw those boxes out of your studio (and that myth out of your head) - there are much better solutions available now.
Let's start with soundproofing
In the matter of soundproofing, it doesn’t matter whether you want to eliminate (or rather, radically reduce) noise from your neighbors or whether you are pursuing the noble goal of minimizing the disturbance caused to them by your audio setup. The means are the same. But first of all, about mistakes.
For example, the idea of covering the wall adjacent to the noise source with foam plastic and finishing it somehow for beauty (plastering or wallpapering) is often expressed by the public and even representatives of repair teams. Paradoxically, in this way the sound insulation can even worsen. This is HEAT insulation - and sound has nothing to do with it. Two sheets of drywall with different air gaps with the same thickness, cost and labor intensity will work much better.
But let’s agree that it’s not worth increasing the thickness of the walls in the apartment. What then? And then you need to look for places where sound penetrates especially easily into the next room. It is these weak points that we need to strengthen.
Absorbers (absorbers)
Absorbers are panels of porous materials such as mineral wool, fiberglass or open-cell foam that dampen sound reflections. They still allow sound waves to pass through them and return, but the friction process converts some of the sound energy into heat, and therefore less sound is reflected than is received.
Absorbers.
The size of the absorbers matters. For a porous absorber to work effectively, it must have a thickness equal to a quarter of the wavelength of the sound being absorbed. This means that at 1 kHz, where the wavelength is approximately 340 mm, the material must be 85 mm thick. A porous panel of this thickness is very effective at absorbing frequencies of 1 kHz and above, but it can also work well at the lower end of the audio spectrum. The reason for this is that not all sounds arrive at right angles to wall absorbers. The greater the angle of inclination, the greater the thickness of the material through which the sound wave passes. As a result, in real-world conditions at lower frequencies, porous absorbers are more effective than their thickness would suggest.
Tip: Increasing the distance between the wall and the absorber improves its ability to absorb lower frequencies. A 50mm thick absorption panel placed 50mm from the wall is almost as effective as a 100mm thick panel attached directly to the wall. Use scrap material to recreate these gaps and glue them to the back of the main absorbent panel. This way, thicker panels will cost you less.
Nuances of soundproofing work in a recording studio
Before you begin soundproofing, you need to prepare the room. Here's what you need to do:
- replace windows and doors
- wrap ventilation and heating pipes with special material
- repair cracks and defects in the ceiling, floor and walls, if any
- dismantle old sockets and fill the resulting space with foam
- consider the placement of cords and cables of recording equipment (It is very important not to place cords and cables under the cladding. If you need to get one of them, dismantling the acoustic cladding will lead to its disruption and a decrease in insulating properties by up to 85%.)
After the preparatory work has been done, you can proceed directly to the installation of the soundproofing system.
Homemade absorbers
You can make your own mid/high frequency absorbers by placing 30-50mm mineral wool sheets in 100mm deep wooden frames. The absorbent material must be flush with the front of the frame in order to leave the air space mentioned above. Such panels would be about as effective as an equivalent thickness of acoustic foam, and much cheaper. Cover the whole thing with a porous fabric such as cotton or polyester, staple it to the back of the frame, and hang it on the wall like a picture.
Be sure to wear gloves and a respirator when working with mineral wool or fiberglass, as these materials can cause skin and lung irritation. Always cover homemade traps with a cloth to prevent fibers from becoming airborne.
Absorbers
You don't need to cover the entire surface of the room with sound-absorbing panels: this results in a dark and muffled sound (remember that high frequencies are absorbed more easily than low frequencies, so adding too many absorbers to a studio will make its overall reverberation more bass-heavy). Instead, aim for about 20 percent of the room.
But what exactly 20 percent should be closed? When deciding where to place absorbers, you should always remember one simple truth: you need to reduce the influence of reflections in the room in the place where you are directly mixing.
Luckily, there is a proven method to help you decide exactly where to hang your absorbers. Have a friend walk around the room holding a mirror against the wall while you sit in your normal mixing position. Where you see the reflection of one of your monitors in the mirror, you will need to place an absorber to prevent the reflection from returning directly to you.
In most rectangular rooms, these mirror points are located on the side walls between the mix position and the speakers, as well as behind and between them. There will also be several such points on the ceiling. There is no need to worry too much about reflections from the floor - we are so used to hearing them that our ears no longer perceive them.
Where there are reflections from the back wall, absorbers can also help. But most likely, “natural” room diffusers will be enough to solve this problem: a sofa with shelves above it, on which books or vinyl lie.
Homemade absorber-diffusers
Alternatively, you can build your own combined absorber-diffuser for the rear wall. First build the large mineral wool mid/high frequency absorber described earlier and then install a vertical board fence on top with a 20mm gap between the boards. Curved timber beams provide some HF dissipation, especially in the horizontal plane, while mineral wool absorbs some of the mid- and high-frequency energy.
Where is sound insulation needed?
Acoustic correction in a room is needed to create comfort and ensure the purity of speech and music. It is comfortable to be in a soundproofed room, as voice and music sound clear and distinct, there is no hum, noise or echo that makes speech illegible.
Professional soundproofing materials are necessary where people spend a lot of time, for example, at home and at work. To achieve comfortable acoustics, soundproofing structures will need to be installed in the following rooms:
- Amateur and professional recording and listening studios.
- Cinemas.
- Meeting rooms.
- Sport halls.
- Office premises in open space style.
- Conference rooms.
Acoustic foam, panels, and bass traps are useful in an apartment where there is not too much furniture and interior items.
Professional materials to improve indoor acoustics create comfortable conditions for work and relaxation.
Multiple echo
An additional benefit of absorbing mid- and high-frequency frequencies at mirror points is that it helps reduce what's called multiple echoes, which occur when sound bounces between parallel walls or between a hard floor and ceiling. In small rooms the distance between these echoes is so close that an audible musical tone or ringing sound is created. You can hear this effect if you clap your hands while standing between two buildings or in an empty rectangular room.
Professional studio designers use non-parallel walls to reduce echoes. But most of us work in rectangular rooms, where mirror-point absorbers are the best option for avoiding multiple echoes at the listening position. However, it can still appear in other places in the room. Diffusers also help reduce this effect.
Note that multiple echoes are different from standing waves: echoes primarily affect mid and high frequencies, while standing waves are most problematic at low frequencies.
A regular absorber 100 mm thick or the homemade one described above provides sufficient absorption up to 250 Hz. Below this value its effectiveness decreases sharply. Lower frequencies require a different approach.
Taming the bass begins with choosing a speaker model. A common mistake in home studios is choosing monitors that are too powerful for the room. The main rule when choosing speakers is not to put more low (bass) energy into your room than it can handle. If you are using large monitors or a subwoofer system in a small room with minimal acoustic treatment, the low frequency region will likely be very inaccurate. The best strategy is to choose smaller speakers with more subdued bass response.
If your speakers have too much bass for the room, check all the controls on the back to see if you can reduce the bass level. If you get used to the sound of your speaker system by listening to professional recordings, and don't try to EQ any frequencies below what your monitors are capable of reproducing, you can get very good mixes even with fairly small monitors.
Fortunately, despite all the shortcomings, the rooms that home producers usually work in do a pretty good job of controlling bass energy, albeit unintentionally.
While low frequencies are effectively reflected by thick walls, the thinner drywall that most modern homes are built from allows a significant portion of the bass to pass through.
They also vibrate under the influence of low frequencies, while absorbing energy. Doors and windows also vibrate to absorb energy, although excessive vibration can result in weak or dry bass. The more bass energy that is absorbed or released from the room you are mixing in, the more accurate the bass will sound in your studio.
The reason bass problems occur in the first place is that at frequencies where the distance between the walls is a multiple of half the wavelength of the bass note, the reflected sound bounces back and adds to the original sound, causing the level of that frequency to increase, that is, so-called standing waves arise.
It's not just standing waves we have to watch out for. At other frequencies, the reflected sound may, on the contrary, be out of phase with the direct sound, which will lead to a decrease in its level. Resonance peaks that occur depending on the size of the room are also called room modes. The stronger the walls, the stronger these mods are. There are other modes caused by indirect reflections. Such "tangential" and "non-fundamental" modes have less impact on the sound than the fundamental modes.
Cube-shaped rooms are the most difficult to work with, as all their modes have the same frequency and create very strong peaks. To make matters worse, there is always a dead zone in the center of the room where the bass level drops enormously. Often, in small home studios, this is where the engineer is forced to set up his work station. Unfortunately, no amount of bass traps will ever completely solve this problem. The best sounding rooms are those where the room modes are evenly distributed, and these are usually fairly large rooms where the wall sizes are not equal or exact multiples of each other.
Tip: A good way to test for bass problems without resorting to specialized test equipment is to program a music sequence to play a chromatic (halftone) scale in the lower octaves and use a simple sine wave as the sound. Make sure all notes are played with the same dynamics, and then listen for excessively loud or soft notes as the sequence plays. As the pitch decreases, the volume will gradually decrease - this is quite normal. You need to pay attention to individual notes that are too loud or too quiet. If you detect one (or more) of these notes, it's a sure sign that you need to add more bass traps and/or move your monitors slightly.
Movement is life!
Since our only measuring device is our own ears, let's use it. You need a soundtrack with good, powerful and varied bass and a good stereo scene. Turn it on at a volume slightly above average. We begin to move along the listening axis from the rear wall to the speakers.
We draw attention to two circumstances: the uniformity of the stereo scene across the width and the “tastyness” of the bass. The first usually depends on the degree of sound absorption on the sides of the listening area. The second indicates the presence of standing waves in the room associated with so-called resonant modes. In both cases, you need to try to adjust the surfaces.
The way the speaker manufacturer himself sees it
To ensure uniformity of the stage from the side of its amplification, it is worth hanging something rough on the side or adjacent wall. An applique, a picture with a staple, a flower... In the case of bass, the use of bass traps helps, but if without calculations and measurements, then all these Bekesy shields, Schroeder panels and Helmholtz traps can be tried to be replaced with a long-pile carpet.
And if there is no wall space, it also works well on the floor. This way we can achieve acceptable listening conditions in a room that does not meet the golden ratio, Dolby, THX or other strict criteria.
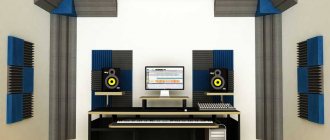
Acoustic panels to improve room acoustics
Another important factor is the location of the listeners and speakers in the room. Subwoofers are a whole different story; it’s not for nothing that installers have a saying “the sub has not yet found its place.” The saddest thing is that these places are often incompatible with the already familiar arrangement of objects. Well, compromises are necessary.
We'll probably stop there. I am sure that any audio lover will be able to add something of his own to what has been written - and in total it is quite possible to aim at creating an entire encyclopedia. On the other hand, sit down and listen. Maybe it makes sense to fix something else?
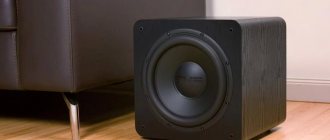
Bass traps
Using solid pieces of porous material to absorb bass is quite problematic because the wavelength of sound at 50 Hz is about seven meters, so a quarter-wavelength trap would require an absorber almost two meters thick. There are hardly any home studios that can accommodate such large absorbers.
However, as mentioned above, not all sounds enter the absorber at right angles, so filling the corners of the room, from floor to ceiling, with large acoustic panels can help.
With a thickness of 30–40mm, these absorbers have little effect on low frequencies hitting them directly, but reflections hitting them at steeper angles pass through a much greater thickness of the absorber. There are many commercial bass traps based on this design. In studios where it is difficult to place traps on vertical corners, corner traps can be attached along the wall and ceiling joints.
Some commercial bass traps combine large, soft membranes (often with a mineral-filled vinyl coating) with porous absorbers. They can be very effective, but tend to be more expensive than simple mineral absorbents. It's important to understand that bass traps are not designed to reduce the amount of low frequencies you hear in a room, but to even out level fluctuations at different frequencies.
Finally, it is worth saying that it is almost impossible to go overboard with the number of bass traps. Therefore, if you have problems with bass, feel free to hang as many traps as possible.
Tip: If you like to DIY, you can build your own corner traps using 600 x 1200mm high-density MVP sheets (30 or 50mm cavity insulation material works well for this), securing them diagonally across the corners of the room, and then stuff the space behind them with insulating mineral wool.
While proper room equipment, some bass traps, and the right choice of monitors will help you control the bass, there are still some important considerations regarding studio layout that also make a big difference when setting up a home studio. At the very least you should:
- Aim the speakers across the room. In small rectangular rooms less than four meters wide, bass frequencies are always easier to control when the speakers face along the long wall of the room rather than across it.
- Avoid placing your workspace in the middle of the room between the front and back walls, especially in very small spaces.
- Do not install monitors too close to walls or corners. Their placement in these areas results in complex reflections that cause an overall increase in perceived bass (up to 6 dB near walls and up to 12 dB in corners). But the gain will be very uneven - some notes are much louder than others.
- Make sure that the distance from the speaker to the side wall and the speaker to the front wall are different. Also, do not place monitors exactly in the middle between the ceiling and the floor.
Moving the speaker closer or further from the wall a few inches can have a big impact on bass consistency, so move your monitors around to find the sweet spot for even bass.
Tip: Modal peaks and troughs have the least impact about a third of the length of the room from the end (specifically 38 percent), so if possible, place your monitoring seat there.
Who's with us?
All the material was with us by a secret guest - the brainchild of the premium line of the iRiver company, the Astell&Kern AK T1 . It was not by chance that he came to us and, first of all, for his versatility.
Astell&Kern AK T1 is a universal audio system that includes a player, an amplifier, and, in fact, the speaker itself. This option is most preferable when acoustically designing a room, because without unnecessary red tape you can independently find the ideal points for placing a subwoofer or front speakers; understand the level of intelligibility of the musical material and understand what “work on mistakes” needs to be done.
The Astell&Kern AK T1 has three-way acoustics consisting of 6 speakers - two for each frequency range: up to 250 Hz, from 250 to 6,000 Hz and over 6,000 Hz. AK T1 is a faithful acoustic tuning fork that can give the average person not only a universal multimedia instrument, but also a worthy alternative to bulky speakers.
And most importantly, you can always experiment with the AK T1.
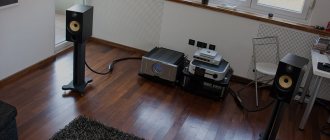
Monitor locations
The golden rule when placing monitors is to form a roughly equilateral triangle between the speakers and your workspace. The tweeters should be aimed directly at your head in both horizontal and vertical planes. You can increase or decrease the distance between monitors slightly if this helps eliminate bass issues.
Installation of studio monitors
- Make sure the speaker layout and acoustic treatment are as symmetrical as possible. This will create the most balanced stereo image.
- It was once fashionable to mount small monitor speakers in a position parallel to the floor, but unless your speakers are specifically designed for such use, they will perform better in a vertical position, creating a wider listening area and a more uniform frequency response.
- Avoid placing speakers on tables, especially hollow ones, as this will result in strong surface reflections that will also color the sound and reduce stereo imaging and clarity of the mix.
- In cases where installation on a desk is unavoidable, use special insulating panels for monitors. They consist of dense acoustic foam, sometimes with a metal or ceramic surface. Most commercial isolation panels can be tilted up or down to point the tweeters directly at the listener's head.
Insulating panels for monitors
- It is important to provide reliable support for the speakers, since any vibrations generated by the monitor drivers lead to movement of the cabinet, which negatively affects the sound and leads to unclear bass. If you plan to use dedicated monitor stands, consider hollow metal legs that can be filled with sand to add mass and dampen resonances.
Tip: Some powered monitors have switches on the rear panel labeled "whole space", "half space" and "quarter space". They are designed to modify the low frequencies of the speaker to compensate for proximity to walls and corners. "Whole space" mode is optimized for monitors placed away from walls or corners, while "half space" is designed for positions where speakers are close to one wall. The latter mode is used when there is no other choice but to install monitors close to corners.
Rear of monitor
Tip: A good way to determine the best location for the subwoofer, if you use one, is to temporarily place it on the floor where you usually sit. Play a test track with lots of bass (or program a chromatic test sequence) and then listen while sitting on the floor close to the wall. As you change your position, you should notice that the levels of the different bass notes become more or less equal. Once you have found the best location, place the subwoofer there. Usually this place is not in the center and somewhere along the wall. Avoid placing the subwoofer under a table with closed walls, as they create a resonant chamber, resulting in peaks and dips in the lower frequencies.
Equipment installation
After installing all the sound-absorbing elements, all you have to do is position the monitors and adjust the volume level. There are three things to consider with monitors:
- The listening position and both monitors should form an equilateral triangle.
- The angle of rotation of the monitors towards the listening point should be 60 degrees.
- Monitors should be placed either on a special stand or on pads that will dampen the device’s own vibrations. Some monitors resonate strongly during operation. This effect can be removed by placing books on top of the body, for example.
In some cases, monitors can be positioned horizontally. This will bring the nature of sound reproduction somewhat closer to coaxial models, in which sound is output from a single source.
Bedroom
If you are unlucky and you don’t have a special room at home that can be converted into a studio, and you use your bedroom for mixing, then don’t be too upset. Most of the tips described above can be applied just as well to the bedroom.
As with a dedicated mixing room, your main goal is to achieve a fairly neutral sound with a short reverberation time that decays evenly across the frequency spectrum.
Regular rooms and garage spaces are usually too small to add any useful musical color, which means you're better off processing them for as dry a signal as possible, to which you can add artificial space yourself at the mixing stage. using reverb or delay.
- To suppress excessive reverberation, use the same mid/high and low frequency traps described above for the dedicated mixing room.
- Install acoustic baffles to further reduce reflections. Hang blankets around the recording area or construct plywood panels lined with acoustic material to reduce mid- and high-frequency reflections.
- When recording vocals, acoustic guitars, or other acoustic instruments, install a Reflexion Filter or similar around the microphone to reduce reflected sound.
- If you plan to record both acoustic instruments and vocals, you might benefit from some space with an uncovered hard floor. Hard floors reflect sound back into the microphone, adding liveliness to the recording. And at a time when you are not writing anything down, you can temporarily cover this area with a rug.
- Avoid, as much as possible, recording bass synths and bass guitars through microphones in small living rooms. The long waves they produce and the subsequent problems they can cause (some notes are much louder than others) are almost impossible to control at home. It's easier to record bass signals using a direct box and then use amp modeling software to shape the desired sound during the mixing stage.
Tip: You can build your own acoustic baffle using acoustic foam glued to one side of plywood or MDF with simple legs to mount it vertically. The foam side can be used for a cleaner recording, and by flipping the screen you can spice up your recording a bit by adding reflections. These screens can also be used as dividers between musicians playing simultaneously. To improve absorption on both sides of the screen, hang a blanket over it.
Lyrical digression
We are often criticized for the fact that the resource, whose main profile is primarily Apple products, pays too much attention to audio equipment: headphones, speakers, sound problems and methods for eliminating them.
Friends, let's be honest. We owe many achievements in the field of mobile technology to old Steve Jobs, a truly brilliant man who was ahead of his time and created a real empire of devices and gadgets that are used by millions of people today. So, being a man who really “thought differently,” Jobs paid a lot of attention to sound:
- Jobs planned to release a new line of iPod players designed to reproduce “perfect sound.” Alas, the project was canceled back in 2012.
- Recognized as a “pioneer of digital audio,” Steve himself preferred vinyl. At home, he listened exclusively to records, and called the MP3 format “dead, although universal.”
- All Apple products are imbued with sound and, if you look closely, you can see a very sensitive attitude to it from both programmers and engineers: from the greeting sound to the release of Garage Band and Logic; from the opportunity to become an amateur musician with only a Mac computer at hand, to creating your own multimedia interfaces and codecs that ensure minimal loss of audio stream.
Believe me, having an iPhone, iPad, iPod or Mac at your disposal, you, one way or another, look at the world of audio a little differently. You are different from users who prefer other devices. And, first of all, because you know how to hear... And you need to live with it.
(
4 votes, overall rating: 4.75 out of 5)