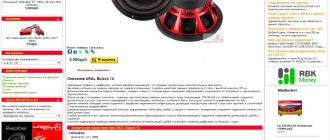
Good day, readers and guests of my blog. In a recent post I described the connection and installation of the Pioneer DEH-1901UBG radio and the MYSTERY MSK 12.3 subwoofer kit based on the MK2.80 amplifier and a 12″ cabinet subwoofer with an MJB120 bass reflex. After installation, the sound was... well, nothing. It was decided to try to create all this happiness on our own. I surfed the net, watched a video on YouTube and decided to set it up. Here I want to share my experience, which does not claim to be correct or to be called an instruction, but rather to hear advice. Maybe someone will correct it, someone will advise something. I'm a complete newbie in car audio, so this is all new to me. Illustrations of the devices will be taken from the Internet, since taking out the amplifier and taking pictures of the radio screen was not fun. So, let's go... First of all, I set up the subwoofer amplifier. The connected subwoofer was a bridge. The photo showed how and where. There is a sea of information on the Internet, as I understand, the amplifier model is old, simple but reliable. There are a lot of reviews and other good stuff on the internet. The main thing is not to confuse “+” and “-“, you won’t burn it, but there will be no sound.
Then we move on to setting up the amplifier controls. We connect the tulips coming from the radio to the INPUT connectors on the amplifier. We also try to maintain the white/red polarity. Next we have three knobs and one switch. Let's start with the X-OVER Selector switch, as I understand it, this is a kind of frequency filter. Since our amplifier is used only with a subwoofer, it must be switched to the Low Pass position, that is, all high frequencies must be cut off. We don't need them. The sub should not sing, but should only produce the bass. — A small digression: A subwoofer is an acoustic system that reproduces low-frequency sounds, including infrasound (from approximately 5 to 200 Hz). (c) Wikipedia It hurts your eyes when you read “subbuffer”, “subbuffer”, etc. on the forums. Be literate, gentlemen.) - Which is what I did. If you are using an amplifier for the front speakers or rear pancakes, then you can, I think, set it to OFF or High Pass - to cut off the low frequencies. In my case, I repeat, the switch is set to Low Pass. Then to the right there is a Low Pass control, which makes sense just when the switch is in the appropriate position. With this we choose to what frequencies to cut the input signal. I set the control to about 80Hz. This seemed sufficient to my ears. Well, in the future I’ll go again, listen, and play. This is a preset. I set the next Bass Boost control to 0. Because it is not needed yet. We will enhance the bass using the GU settings. And finally the LEVEL regulator. It is configured next. way: set it to 0. Turn up the volume on the radio, well, in my case it was 35, and begin to gradually increase the level with the LEVEL control. Until distortion appears. Then unscrew it back a little. For me it was in a position slightly further than the middle. It may be different for you. I think there is no need to talk about the Power and Protection lamps, the first should be on, the second should not be on during normal operation of the amplifier. There is no need to do anything else on the amplifier.
At the beginning of our article, it makes sense to immediately note that the following method for setting up a radio is designed for an entry-level user, and there is nothing overly complicated in it. Note also that the quality of the reproduced sound usually depends only 33% on the composition and quality of the equipment components. Another third depends on the correct installation of the equipment, and the remaining 33% depends on the correct setup of the audio system.
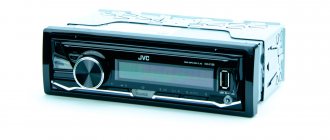
In this article we will look at how to set up a Pioneer radio. Adjustment recommendations are discussed using the example of the Pioneer DEH-1900UB model from the 2022 line. They can also be used to adjust other modern Pioneer car radios, since they all have the same menu. The exception is processor devices, the configuration of which is somewhat more complicated.
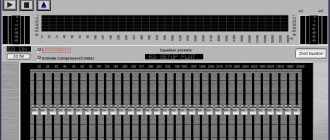
Equalizer
An equalizer allows you to make the sound more even - raise or lower the bass, mid and high frequencies. This is a rather fine adjustment of the audio system. It is not the entire sound range that is regulated at once, as in other menu items, but specific frequency bands. Different models have different numbers of them, depending on the class of equipment. There are five of them in Pioneer radios: 80 Hz, 250 Hz, 800 Hz, 2.5 kHz and 8 kHz.
High pass filter
Next we find the HPF (High-passFilter) item. This is a high-pass filter that cuts the frequency of the sound supplied to the speakers below their specified limit value. This is done because it is very difficult for standard speakers (13–16 cm) to reproduce low frequencies due to their small diaphragm diameter and low power. As a result, the sound is reproduced with distortion even at low volumes. By cutting the low frequencies, you can get clear sound over a larger volume range.
If you do not have a subwoofer, we recommend installing an HPF filter at a frequency of 50 or 63 Hz.
You can then exit the menu using the return button and check the result. It is better to do this at a volume of 30.
If the sound quality is not satisfactory, or if you are outdoors and want to have a loud disco, you can raise the lower limit from 80–120 Hz or more. It is recommended to use the same level of boundary cut if you have a subwoofer. These measures will allow you to increase the purity and volume of the reproduced sound.
There is also an adjustment for the frequency attenuation rate. On Pioneer it comes in two positions - 12 and 24 dB per octave. We advise you to set this indicator to 24 dB.
Tuner saving and recalling settings on a radio station
Page 8
- Image
- Text
Tuner
Saving and recalling settings on a radio station
If you press any of the PRESET TUNING buttons, you can easily store up to six radio stations in memory and recall them later at the touch of a button.
• When you find a radio station that you want to store in memory,
Press and hold any of the PRESET TUNING buttons until the programmed number stops flashing.
The PRESET TUNING indicator will flash and remain lit with the number of the button you pressed. The broadcast frequency of the selected radio station will be stored in memory.
The next time you press the same PRESET TUNING button, the stored radio station will be recalled from memory.
Notes:
• Up to 12 FM radio stations can be stored in memory (6 in each of two bands
FM zones) and 6 MW/LW radio stations.
• You can also use the buttons to recall radio stations from memory.
5
And
∞.
8
Tuning to radio stations with the strongest signal
The local seek tuning feature allows you to tune in only to radio stations with a strong enough signal to ensure good reception.
1. Press the LOCAL/BSM button to enable local search setting.
The local search tuning (LOC) sensitivity will appear on the screen.
2. If you want to return to normal search mode, press
LOCAL/BSM button to disable local search tuning mode.
Storing radio stations with stronger signals
The BSM (Best Station Memory) function stores the six strongest stations in memory and assigns them to the PRESET TUNING 1-6 buttons, so you can tune in to those stations at the touch of a button.
• Press and hold the LOCAL/BSM button for two seconds to turn on
BSM mode values.
BSM will start flashing. The six radio stations with the strongest signal will be stored under the PRESET TUNING 1 - 6 buttons in descending order of signal strength. Once the procedure is completed, the BSM will stop flashing.
• To interrupt the saving process, press the LOCAL/BSM button.
Note:
• Radio stations stored using the BSM function can replace the radio
stations you previously saved using the PRESET TUNING buttons.
Low pass filter (subwoofer)
After we have dealt with the speakers, we will configure the radio for the subwoofer. For this we need a low pass filter. With its help, we match the frequencies of the speakers and subwoofer.
The situation looks like this. When we removed the bass from the speakers (set HPF to 80+), we got loud and high-quality sound. The next step is to “dock” the subwoofer to our speakers. To do this, go to the menu, select the audio item, and in it we find the subwoofer control section.
There are three meanings here:
- The first number is the cutoff frequency of the subwoofer. Everything here is the same as with the equalizer. There are simply no specific settings, and the range in which you can “play around” is from 63 to 100 Hz.
- The next number is the volume of our subwoofer. We think everything is simple here, you can make the subwoofer louder or quieter relative to the acoustics, the scale is from -6 to +6.
- The next figure is the frequency attenuation slope. Just like in HPF, it can be either 12 or 24. There is also a little advice here: if you set a high cut, then set the slope to 24, if lower, then you can set it to 12 or 24.
The sound quality depends not only on the settings of your audio system, but also on what speakers you have installed. If you want to replace them, we recommend that you read the article “what you need to know when choosing car speakers”
Basic principles of setting up the Pioneer DEH, MVH and other models
To get rid of the distortion that will inevitably occur with the sound of an untuned or incorrectly configured audio system, as well as to select the appropriate bass power and clarity of tweets, you need to select and adjust them one by one using the menu. The device is configured using the control panel, in the center of which there is a round joystick. The selection and installation of radio parameters occurs by rotating and recessing the round handle of the joystick into the body of the device. See the photo instructions for setting up the Pioneer radio for a clear understanding of the principle of selecting the necessary parameters.
Setting up the Pioneer DEH radio and other devices, starting with the 3100 models, begins with the joystick, which is used to navigate between menu items. The round handle of the joystick can rotate in any direction and can also be recessed into the body of the radio. Before starting the setup, you need to set the volume to 30 in order to be able to correctly perceive the sound quality. Don't be disturbed by wheezing and other noises at the beginning of the setup - after successful setup of the radio, they will disappear.
Turning off Demo mode
Immediately after purchasing and connecting the radio, you should figure out how to disable the demo mode, intended for displaying the device in the store. It is possible to use the radio in this mode, but it is inconvenient, since when you turn it off, the backlight does not go out, and inscriptions with various information run across the display.
Disabling demo mode is very simple:
- We go to the hidden menu by turning off the radio and holding down the SRC button.
- In the menu, turn the wheel to reach the DEMO item.
- Switch demo mode from ON to OFF.
- Exit the menu using the BAND button.
You can also set the date and time in the hidden menu by going to the System section. The time display is switched here (12/24 hour mode). Then open the “Clock Settings” item and turn the wheel to set the time. In the System section there is also a language setting (English/Russian).
If your settings are reset when you turn off the ignition, the article “how to connect a radio” has the answer to this question