After purchasing a car or a separate radio, every motorist is faced with the need to configure the audio system in the car for high-quality sound from audio files and radio. If your car has the latest Pioneer radio models, for example Mosfet 50wx4, 150UB or 170ub, or some of the AVH line devices, then you can configure it using simple steps, during which you will set the sound quality acceptable to you.
How to use the radio
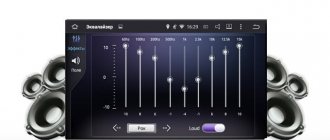
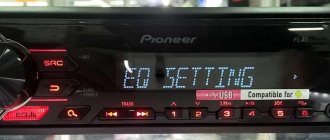
High pass filter
Next we find the HPF (High-passFilter) item. This is a high-pass filter that cuts the frequency of the sound supplied to the speakers below their specified limit value. This is done because it is very difficult for standard speakers (13–16 cm) to reproduce low frequencies due to their small diaphragm diameter and low power. As a result, the sound is reproduced with distortion even at low volumes. By cutting the low frequencies, you can get clear sound over a larger volume range.
You can then exit the menu using the return button and check the result. It is better to do this at a volume of 30.
If the sound quality is not satisfactory, or if you are outdoors and want to have a loud disco, you can raise the lower limit from 80–120 Hz or more. It is recommended to use the same level of boundary cut if you have a subwoofer. These measures will allow you to increase the purity and volume of the reproduced sound.
There is also an adjustment for the frequency attenuation rate. On Pioneer it comes in two positions - 12 and 24 dB per octave. We advise you to set this indicator to 24 dB.
JVC radio device features
How to connect a standard and non-standard radio in a car.
JVC products have been known on the market for a long time. It has established itself as a high-quality and multifunctional equipment. In addition, this manufacturer is known for unusual head units.
So, all JVC car radios have a non-standard appearance. Basically, it is quite simple, but this does not in any way affect the functional capabilities of the device, which can surprise any music lover.
There is one small drawback. It lies in the fact that the buttons on the console are plastic and painted silver. Therefore, some people mistakenly think that they are made of aluminum. In addition, the display shows the file name, but not in Cyrillic. This causes a lot of inconvenience for Russian users. As for the controls, the radio is quite simple. Anyone can cope with this task, even an amateur.
Settings
Geely Emgrand EC7 RV 1.8 Comfort AT Logbook We integrate Bluetooth into the standard radio
The setup work is divided into several different points. It is advisable to go through all the settings, but it all depends on the additional equipment that is in your car. To configure the radio, turn on the volume “30”, this allows you to make the best quality sound adjustment by ear. Often, the speakers begin to wheeze, but don’t be alarmed, this will go away after the setup. When tuning by ear, it is recommended to focus on your feelings, because the perception of sound is different for all people. The work is done using a joystick; it can tilt up, down, to the side, and also retract.
The settings are made in the following order:
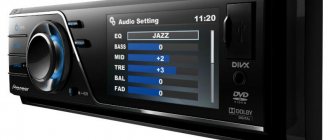
- We switch to the “AUDIO” mode
, by rotating the handle we find the balance and fader. This looks like Balanse/Fader. After which, we press the joystick and see: BAL 0, Fad 0. In some cases, the numbers may differ, which means that someone dug into the settings. We translate the “fader” indicator to +15. The signals are transmitted specifically to the front speakers. We return to the main menu; - Setting up the cut
. We are looking for the front amplifier filter settings. This is done by turning the joystick. Find “HIGH PASS FILTER”. After pressing the joystick, you will see HPF OFF. This means that the full spectrum of sound is concentrated on the front speakers. This is the source of distortion, especially on small speakers. We press the joystick and see HPF 50, this is the designation of the lower frequency threshold. Not every amplifier is designed for this. Therefore, we increase the level to 100-150, the smaller the speaker diameter, the higher the threshold should be. We exit the settings and determine the purity of the sound by ear. If you don’t like it, you can go back to the settings and change the indicators; - Next, go to the “advanced settings” panel. To do this, turn off the radio, and then press the power key. This will take you to the additional menu. Turn the joystick and see what functions are there. Usually there is a language setting, a step of searching for radio stations. Find the SW Control function. We recess the control knob and switch the function to SW mode. So the rear speakers will work in subwoofer mode;
- We go to the regular menu and find the Setting 1 mode. On the left there is the SW symbol, and on the right there are 3 operating modes. Choose the most suitable one from your point of view;
- Find the Setting 2 mode
. Here you will see SW 60 Hz 0. First you need to set the frequency, it is recommended to set it to 50 Hz. Next we adjust the sound power. Here you can select a range from -6 to +6. At the same time, we focus on the characteristics of the speakers and our perception of sound. Experiment with sound; - Setting up loudness compensation
. To do this, look for Loudness in the menu and enter this menu. Here it is best to choose the high (HIGT) level. This way, the tone compensation will be audible even at average sound levels.
In general, the setup is completed here. Of course, there are other settings, but they are usually of interest only to music lovers. To extend the life of the speakers, it is recommended to set the level of low frequencies in the Go Setting 1 menu. It is advisable that this indicator does not exceed 1. This will significantly extend the life of the speakers. Conclusion. Nowadays it’s hard to imagine a car without a high-quality audio system
At the same time, it is extremely important to adjust it correctly, otherwise the sound will be very bad. Therefore, it makes sense to wonder how to set up a Pioneer radio in a car
In fact, this is not particularly difficult. The menu is simple and clear, which makes the task much easier. The right combination of different settings will allow you to make the sound in the car most consistent with your perception.
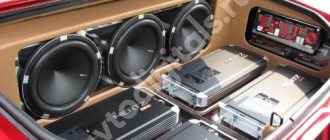
What speakers are best to put in your car for great sound?
Good sound in a car is one of the most important criteria for car operation for many drivers. Driving without great music can be boring, but the high performance of sound equipment brings real pleasure not only to music lovers, but also to simply lovers of beautiful music. The question often arises about which speakers are best to put in the car to achieve the required sound quality. We are talking not only about power, shape and size, but also about the manufacturer, the technologies used in production and other factors.
Modern speakers allow you to use small playback elements, but still get the ideal ambience and sound content of the car interior. It is incredibly difficult to answer unambiguously the question about the type of speakers used in a car. It all depends on the car itself, on the preferences of the owner, as well as the type of music that will be played in the cabin.
Choosing the right speakers for your car based on different criteria
The first rule of high-quality sound is the number of speakers in the car. But this does not mean that you need to place three dozen sound sources in the car - everything should be in moderation. It is important to respect the presence of different frequencies. For example, you can use one or two subwoofers, two tweeters and seven or nine midrange elements.
The number of sound sources in the car should not exceed reasonable limits. For example, an 11.2 sound system (eleven regular speakers and two subwoofers) is considered the most functional for an ordinary car. Often one subwoofer is enough, and high power is not necessary. You should also comply with the following criteria for purchasing speakers for your car:
- absence of incomprehensible discrepancies in frequencies, a large number of high-frequency devices;
- correctness of the kit - it is better to buy ready-made audio systems than to create them yourself;
- the presence of either two powerful speakers with low frequencies or a subwoofer;
- the ability to connect the entire system to a small car amplifier;
- reasonable power consumption so as not to drain the battery from one track;
- the presence of built-in fuses in each sound source or correct connection.
Measures for proper operation of the device
How to properly connect, configure and use the Torque application
After connecting the radio, you need to carry out the setup process, since in its original form at the manufacturer the settings are set to a single position.
When you click on the center of the spin washer, a settings menu with various subsections and sections will appear on the screen. It all depends on the preferences of the owner.
With its help, you can choose the style of music being played, adjust minor sound nuances and create an individual picture of how songs are played in the car.
On the video - how to set up a Pioneer radio in a car:
Bass adjustment
An equally important option allows you to adjust the bass frequency in the car. There is a choice from no bass at all to a maximum value at which only the bass will be heard;
The information in this article will help you figure out what a car radio with navigation and rear view camera looks like and how effective it is.
You can learn more about all Pioneer car radio models from this article.
For those who want to learn more about how to connect an amplifier to speakers in a car, it is worth reading the information from this article.
On the video - how to properly configure the pioneer deh ps900mp car radio:
Front and side volume distribution
Depending on the driver’s preferences, he can adjust the sound volume according to these parameters, increasing the sound power, for example, of the front speakers and shifting the emphasis to the left side;
The menu contains a demo mode setting in which the radio is restored to factory settings;
You can tune the selected radio station frequency or use auto-tuning;
You can also change the color of the radio backlight in the menu (most radios have this function).
A wide arsenal of functions allows you to customize the Pioneer radio (even in a budget version) individually for each driver.
Turning off Demo mode
Immediately after purchasing and connecting the radio, you should figure out how to disable the demo mode, intended for displaying the device in the store. It is possible to use the radio in this mode, but it is inconvenient, since when you turn it off, the backlight does not go out, and inscriptions with various information run across the display.
Disabling demo mode is very simple:
- We go to the hidden menu by turning off the radio and holding down the SRC button.
- In the menu, turn the wheel to reach the DEMO item.
- Switch demo mode from ON to OFF.
- Exit the menu using the BAND button.
You can also set the date and time in the hidden menu by going to the System section. The time display is switched here (12/24 hour mode). Then open the “Clock Settings” item and turn the wheel to set the time. In the System section there is also a language setting (English/Russian).
If your settings are reset when you turn off the ignition, the article “how to connect a radio” has the answer to this question