Replacing a standard car radio is a common procedure performed by car enthusiasts. Main reasons for replacement:
- breakdown of the standard radio;
- desire to expand the functionality of the device;
- increase in power and sound quality in the cabin.
When replacing the radio, it is important to connect new speakers or speakers. Indeed, connecting a new head unit to an old speaker system can reduce all efforts to zero. If the new radio has increased power, then the acoustic parameters of the interior may even worsen.
When replacing speakers or installing additional speakers, it is important to make the connections correctly. Errors can lead to failure of the car radio or poor quality sound from the speaker system.
How to connect speakers to a radio in a car (how to determine plus and minus on the speaker)
Replacing a standard car radio is a common procedure performed by car enthusiasts. Main reasons for replacement:
p, blockquote 1,0,0,0,0 –>
- breakdown of the standard radio;
- desire to expand the functionality of the device;
- increase in power and sound quality in the cabin.
p, blockquote 2,0,0,0,0 –>
When replacing the radio, it is important to connect new speakers or speakers. Indeed, connecting a new head unit to an old speaker system can reduce all efforts to zero. If the new radio has increased power, then the acoustic parameters of the interior may even worsen.
p, blockquote 3,0,0,0,0 –>
p, blockquote 4,0,0,0,0 –>
When replacing speakers or installing additional speakers, it is important to make the connections correctly. Errors can lead to failure of the car radio or poor quality sound from the speaker system.
p, blockquote 5,0,0,0,0 –> adsp-pro-1 –>
Determination of polarity by alternative methods
If it happens that you don’t have a multimeter at hand, but you need to find the polarity, you can use alternative and “folk” means.
For example, speaker wiring charges are checked using a 3-volt battery. To do this, you need to briefly touch the wires connected to the battery to the speaker terminals. If the cone in the speaker begins to move outward, this will mean that the positive terminal of the speaker is connected to the positive terminal of the battery, and the negative terminal to the negative terminal. If the diffuser moves inward, the polarity is reversed: the positive terminal is connected to the minus, and the negative terminal to the plus.
If you need to connect a DC power supply or battery, but there are no polarity markings on them, and you don’t have a multimeter at hand, plus and minus can be determined by “folk” methods using improvised materials.
The easiest way to determine polarity that you can use at home is to use potatoes. To do this, you need to take one raw potato tuber and cut it in half. After this, two wires (preferably of different colors or with any other distinctive sign) with their bare ends are stuck into a cut of potato at a distance of 1-2 centimeters from each other.
The other ends of the wires are connected to the constant current source being tested, and the device is turned on (if it is a battery, then after connecting the wires, nothing else needs to be done) for 15-20 minutes. After this time, a light green spot will form on the potato cut around one of the wires, which will be a sign of a positive charge on the wire.
How to determine plus and minus on a speaker
p, blockquote 35,0,0,0,0 –>
In heavily worn, dubious speakers and loudspeakers, polarity information may be missing. In this case, the polarity of the speakers is determined using simple experiments.
p, blockquote 36,0,0,0,0 –>
Multimeter
The speaker impedance is low (from 2 to 4 ohms). It can be checked with a multimeter, but it rings equally in both directions. However, when connecting the red (positive) probe to the “+” speaker, the negative (black) probe to the “minus” speaker, the diffuser will move slightly forward (towards the listener). This movement is best determined by touch with your finger rather than visually.
p, blockquote 37,0,0,0,0 –>
Using a battery
When connecting the plus of the battery to the + of the speaker, the minus of the battery to the minus contact of the speaker, the cone will also move frontally, along which the speakers can be phased. Even if you phase all the speakers in reverse polarity, the sound quality will be the same as in direct polarity. The main thing is that all speakers work in the same phase. The battery should be connected for a short time (one or two seconds), otherwise you can “burn” the speaker.
p, blockquote 38,0,0,0,0 –>
Video - how to find out the polarity of the speaker:
p, blockquote 39,0,0,0,0 –>
p, blockquote 40,0,0,0,0 –>
Under no circumstances should you check the polarity of speakers and speakers using a car battery or charger. Even a short-term connection of the speaker to the battery can damage it.
p, blockquote 41,0,0,0,0 –>
Using a battery and a sheet of paper
Sometimes (for example, in a speaker) the speaker cone is covered with mesh or fabric. In this case, you can put a light sheet of paper on its surface. When voltage is applied, the sheet of paper will move forward or backward due to the sound pressure of the air. By the direction of movement one can judge the polarity.
p, blockquote 42,0,0,1,0 –>
“+” on the speaker
how to find (phasing)
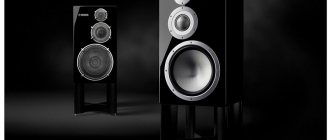
Connecting speakers (dynamic heads) in two-way speaker systems
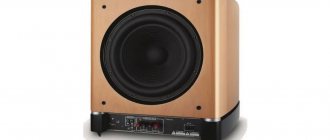
Connecting DC Power to the Speaker
Speaker 2GD-40
On the 2GD-40, “plus” is indicated by a “+” sign on the contact holder.
Speaker 3GD-38E
On 3GD-38E, the “plus” is indicated by a black dot.
Speaker 4GD-8E
On 4GD-8E, “plus” is indicated by a red dot.
Speaker Tesla ARV 168
On the Tesla ARV 168, the “plus” is indicated by a red dot.
Speaker 2GD-36: in half of the cases the beginning of the winding is not indicated
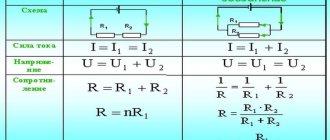
Speaker phasing improves sound reproduction quality.
Unphasing of broadband acoustic systems (speakers) leads to a sharp drop in output at low and medium frequencies, which is clearly noticeable to the ear. At the same time, the output of high frequencies also decreases somewhat, and the frequency response of the system in this area has pronounced peaks and dips, that is, greater unevenness. Voices and instruments acquire a harsh, unpleasant timbre. An imbalance of low and high frequencies in the sound material is noticeable to the ear; speech becomes “barking.”
In two-way acoustic systems, in the absence of phasing of low-frequency and high-frequency loudspeakers with each other, the same picture is observed.
When the low-frequency speaker is out of phase with respect to the high-frequency one, a dip in the frequency response appears in the band of joint operation of both loudspeakers. The width of this gap will be determined by the properties of the separation filter. The presence of a dip can lead to a distinctly audible separate sound from the low-frequency and high-frequency loudspeakers.
To identify the reasons that cause deterioration in the quality of loudspeakers when their phasing is incorrect, it is necessary to understand the operation of the emitter. It has been established that when the moving system of the loudspeaker head oscillates, a periodic change in the pressure of the air located in front of it occurs (let's call the front side the surface of the diffuser facing the listener).
So, when the system moves forward, the pressure increases, and when it moves backward, it decreases. The change in pressure that occurs causes vibration of air particles, that is, the propagation of a sound wave. It is quite obvious that if two moving systems oscillate, then they must oscillate in phase (the forward and backward movement of both systems must occur simultaneously, for example, when the S-90 is working, “the curtains are already moving”). Otherwise, one of them will create an increase in pressure, and the other will create a decrease. Thus, mutual full or partial compensation of excess pressure will occur.
Simultaneity, or in-phase, oscillations of moving systems is ensured if the direction of the current in the voice coil and the polarity of the magnet are the same for both heads.
How to properly connect speakers to a car radio
p, blockquote 17,0,0,0,0 –>
From the point of view of acoustic properties, the car does not have the best characteristics. The interior has a complex architecture; it contains structures made of various materials: metal, upholstery, plastic, rubber, etc. It is rare that a manufacturer specifically optimizes the interior to ensure high-quality sound.
p, blockquote 18,0,0,0,0 –>
However, standard speaker installation locations are selected to ensure the greatest sound propagation efficiency. Usually they are located in the doors, on the front panel, under the rear window. If you decide to install more powerful speakers, you will need to remove the old system, measure their mounting dimensions (diameter in inches and depth) and purchase speakers of the same size but with better characteristics.
Selection of connecting wires
p, blockquote 26,0,0,0,0 –>
Installing audio leads is different from normal electrical connections. The fact is that an alternating sound signal propagates through the conductors going to the speakers and speakers. It has a frequency ranging from 20 Hertz to 20 kilohertz. In principle, the frequency is low, but linear distortions, electromagnetic interference, and interference are possible. They degrade the sound quality. Therefore, along with observing the rules for choosing the cross-sectional area of the wire, the type of conductor is selected.
p, blockquote 27,0,0,0,0 –>
The cross-section is usually chosen from the following consideration: for every 10 watts of amplifier power - approximately 1 sq. mm of wire cross-sectional area. That is, with a radio power of 40 watts per channel, the cross-section of the conductor leading to the speaker must be at least 4 sq. mm.
p, blockquote 28,1,0,0,0 –>
You should think about choosing the type of speaker cable if the radio is capable of providing high-quality sound. On the Hi-end equipment market you can find many different speaker cables with unique parameters and prices.
p, blockquote 29,0,0,0,0 –>
p, blockquote 30,0,0,0,0 –>
The feasibility of installing such expensive conductors for a middle-class car radio is zero. The main thing when connecting is to ensure that the phases of the speakers and speakers are synchronized. Otherwise, the interior will be filled with cacophony instead of high-quality sound.
p, blockquote 31,0,0,0,0 –>
Schemes for connecting speakers to the radio
p, blockquote 6,0,0,0,0 –>
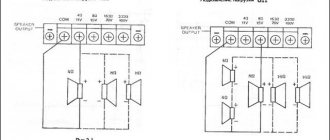
Currently, most car radios use a standard ISO interface for connecting external speakers and speakers. Its functional diagram and pinout of pins on the connector are shown in the figure.
p, blockquote 7,0,0,0,0 –>
p, blockquote 8,0,0,0,0 –>
The diagram shows that connector B is responsible for connecting speakers and speakers, from which wires of different colors extend. The primary color wire is connected to the positive terminal of the speaker, the two-color wire is connected to the negative terminal. In many radios, the signal is transmitted through a single-color wire, the two-color wire is common (ground).
p, blockquote 9,0,0,0,0 –>
Video - connecting speakers to the radio by color:
p, blockquote 10,0,0,0,0 –>
p, blockquote 11,0,0,0,0 –>
Some car enthusiasts, in order to save conductor and time, combine the mass, and the signal is routed only through a single-color wire. Under no circumstances should this be done. The circuits of many radio amplifiers with high output power are of the bridge type. There is no common wire at their output: one output is “swinged” by the first arm, the other by the second in antiphase. Grounding one of the terminals leads to failure of the arm amplifier. An example of a bridge circuit for a radio amplifier.
p, blockquote 12,0,0,0,0 –>
p, blockquote 13,0,0,0,0 –>
In order to correctly connect the conductors, it is better to find a color scheme for connecting the speakers or speakers to your radio. She looks something like this.
p, blockquote 14,0,1,0,0 –>
p, blockquote 15,0,0,0,0 –>
This diagram clearly shows how to connect the speakers and which wires on the radio go to the speakers. But you shouldn’t rush to connect. First you need to install the speakers correctly and select the conductors.
p, blockquote 16,0,0,0,0 –>
What happens if you mix it up during installation?
Modern electronic devices are usually well protected from polarity reversal. If the batteries are installed incorrectly, a protection will be activated that will prevent the flow of electric current.
If there is no protection, then many electrical devices can be damaged in this way. For some devices, polarity is not of fundamental importance, for example, in flashlights with incandescent lamps.
Still have questions or have something to add? Then write to us about it in the comments, this will make the material more complete and accurate.
Connection order (sequence of actions)
p, blockquote 43,0,0,0,0 –>
1. Ensure reliable disconnection of the radio from the on-board network. To do this, you can temporarily remove the fuse that serves the radio or the negative terminal of the battery.
p, blockquote 44,0,0,0,0 –>
2. Determine by the color of the wires going to the radio connector which wires serve a specific speaker.
p, blockquote 45,0,0,0,0 –>
3. Lay out the wiring, avoiding possible crossing and chafing of the wires. The most dangerous zones are around the corrugations of doors and thresholds in the cabin. It is forbidden to lay connecting audio wires and cables under the floor mats in the area where the driver and passengers' feet are located. After installation, the wiring should be secured with plastic clamps with existing harnesses or additionally installed guides.
p, blockquote 46,0,0,0,0 –>
4. Cut off the remaining wiring, leaving about five centimeters of margin for connectors.
p, blockquote 47,0,0,0,0 –>
5. Install the terminals on the stripped ends of the wires connected to the speakers, secure them to the terminals of the speaker or speaker. It is better to connect conductors and terminals using crimping, twisting and soldering methods.
p, blockquote 48,0,0,0,0 –>
6. Strip the ends of the wires connected to the radio connector.
p, blockquote 49,0,0,0,0 –>
7. Check the connection polarity again on the side of the wires connecting to the radio. Using a ground tester, check that the audio wires are not shorted to the body.
p, blockquote 50,0,0,0,0 –>
8. Connect the conductors to the radio connector by twisting plus soldering plus insulation using heat shrink.
p, blockquote 51,0,0,0,0 –>
9. Apply power to the radio (connect the battery terminal). Set the volume to minimum, turn on the radio (or vice versa, if the volume control is electronic).
p, blockquote 52,0,0,0,0 –>
10. Set the radio to play a signal. Gradually increase the volume. Make sure there are no nonlinear distortions (wheezing, metallic sound, rattling). If there is distortion, check the mounting of the speakers and speakers and their serviceability. This can be accomplished by temporarily changing the outputs, for example from the left speaker to the right one. Check the movement of the signal level around the cabin using the controls on the radio, right-left (balance), back-to-front.
p, blockquote 53,0,0,0,0 –>
The installation is considered complete if all tests are passed successfully.
p, blockquote 54,0,0,0,0 –>
We will understand the main causes of misfires (error p0300, p0301, p0302, p0303, ...) in car engine cylinders.
What is and why is a CV joint in a car needed?
Video - how to properly connect speakers to a car radio:
p, blockquote 56,0,0,0,0 –> p, blockquote 57,0,0,0,1 –>