American speakers are high-quality acoustics sold all over the world. Russians actively use JBL products, enjoying the excellent sound characteristics of the devices from this manufacturer. The average price of the original is about $200, Chinese fakes for JBL are 5-10 times cheaper. Since the speaker has a mobile format and is often taken on the road, it often fails for various reasons. To identify the cause of the breakdown (most often mechanical), the column must be disassembled. Below we will look at how to disassemble the popular JBL brand speaker (charge 3, charge 2+, Xtreme), present the corresponding videos and a step-by-step format for analyzing these speakers.
Headphone repair instructions
We will need the following tools and materials:
New wire that was purchased on aliexpress
- The first step is to remove the ear pads. To do this, with a little effort, pull them up a little until the edge of the ear pad snaps off from the base.
- After this, you need to unscrew the four small screws on each earcup.
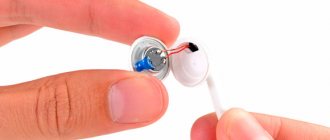
- We take the speakers out of the earcups. I do not recommend soldering directly to the speakers in this model, since they are in a closed box. The box itself is collapsible, but filled with sealant.
- We strip the wire and tin it with a soldering iron. The wires are covered with a thin layer of varnish, which must be removed before tinning. The easiest way to do this is with a lighter. Just hold the tip of the wire over the flame for a couple of seconds.
- Wires from aliexpress, as a rule, come already tinned, so you don’t need to do anything with them.
- Now carefully solder the wires
- To insulate the wires I used regular nail polish. If you want, you can use heat shrink tubing or electrical tape.
What is needed for disassembly
How to open a JBL speaker, it is important to prepare the necessary tools for the job. To solve the problem you will need:
- Screwdriver with bits.
- Medical spatula / mediator.
- Tweezers.
- Soldering iron (may be useful for repairs).
Please note that disassembling a regular round speaker or a model with a handle must be done carefully. In case of incorrect actions, there is a high risk of damaging the battery, breaking the fastening of the wires, breaking the side passive speakers, or leaving the device without moisture and dust protection. To avoid such consequences, you must act carefully.
How to enter DFU mode on iPhone 7
1 comment
No need to splice wires. You need to remove 4 screws from the box with the wire, why warm it up a little with an ordinary hair dryer around the edges and hook it up. The box will be removed, unsolder the wire, then pull it out, the hole will be free of glue.. Insert a new one into the hole and solder it, glue the box, glue the hole and seal it, screw the box into place.
I decided to repair my favorite Sennheiser HD 180 headphones and share the process with you. The problem is simple - one earphone does not work. The repair is also not complicated and boils down to replacing the wire with a new one. Read the article about how to disassemble the headphones and the best way to replace the wire.
Is it possible to disassemble the jbl column yourself?
It is possible, but mainly it is necessary to disassemble them for cleaning, like other types of speakers, there is no need.
If simple repairs are required, for example, the battery in the speaker has failed, you can disassemble it yourself. If you have a spare battery, it is quite possible to replace it. This is especially true when on vacation far from civilization and service workshops. If necessary, you can disassemble the column using simple tools that every car enthusiast has in his car.
Reference! Disassembling the column takes no more than 10-20 minutes, depending on the model.
Headphone repair instructions
We will need the following tools and materials:
New wire that was purchased on aliexpress
- The first step is to remove the ear pads. To do this, with a little effort, pull them up a little until the edge of the ear pad snaps off from the base.
- After this, you need to unscrew the four small screws on each earcup.
- We take the speakers out of the earcups. I do not recommend soldering directly to the speakers in this model, since they are in a closed box. The box itself is collapsible, but filled with sealant.
- We strip the wire and tin it with a soldering iron. The wires are covered with a thin layer of varnish, which must be removed before tinning. The easiest way to do this is with a lighter. Just hold the tip of the wire over the flame for a couple of seconds.
- Wires from aliexpress, as a rule, come already tinned, so you don’t need to do anything with them.
- Now carefully solder the wires
How to repair a column
In order to save money and time, many owners of portable speakers ask how to repair a JBL speaker. The most common problem is a broken USB port due to poor quality cables or careless use. Damage can be recognized by the following symptoms:
- The speaker is not charging.
- The connector falls inside the casing.
- Connection problems due to skew or other problems.
Once you have managed to disassemble the JBL speaker, remove the board and USB connector, and then solder a new one. Proceed with caution and try not to overheat the board.
An equally common breakdown is damage to the battery, which over time can fail or wear out due to natural reasons. Problems with the power supply can be noticed by the following signs:
- Reduced operating time without charge.
- Quick shutdown after switching on.
- Battery swelling.
In the cases discussed above, you need to immediately repair the JBL speaker, because the situation can lead to negative consequences in the future.
How to remove background microphone noise
To achieve the desired effect and eliminate noise defects, various operations with sound will be required. Many sources of low-quality sounds are eliminated through special programs. Most audio editors include noise suppressors of varying complexity.
To clear sound from interference, we recommend the Audacity application - a program with a simple interface and free functions.
- In the program, to enable the noise suppressor, you must select the option with effects and the noise removal function.
- By activating the button for creating a noise model, the parameters of the interval with extraneous sounds are determined - save the settings by pressing the OK button.
- After selecting the entire audio track, you can start running the tool again. High-quality sound is achieved by changing the following values: sensitivity, suppressive strength, smoothing frequencies.
Why is the microphone noisy?
Quite often you may encounter the microphone hissing, making crackling or noise. The reasons why the microphone is noisy are as follows:
- increased microphone sensitivity;
- using a low quality device;
- problems connecting to the computer;
- errors in device settings;
- electromagnetic waves emanating from nearby electronic devices;
- outdated drivers;
- poor internet quality.
The microphone may become noisy due to several simultaneous reasons.
DIY subwoofer amplifier repair
DIY active subwoofer repair begins with checking the wires connecting the output terminals of the amplifier and speaker. If no circuit violations are detected, a sequential check of the circuit elements is performed. If the subwoofer is installed in a car, check the power supply cables and the signal wire from the car radio. Defects in a household active subwoofer can be divided into several groups:
- Power-on indicator does not light up
- The indicator is on, there is a hissing sound in the speakers, but there is no sound
- The indicator is on, there is no hiss in the speakers
To repair a sub, you first need to check the power supply. For all work on diagnosing the sound system, you will need a tester. First, an external examination is carried out. It allows you to identify failed electrolytic capacitors, burnt resistors and damaged circuit board tracks. If burnt resistors are found, then the stabilizer chip will also have to be changed. After restoring all elements, it is better to check the power circuit without an amplifier. Sometimes this requires cutting the PCB track.
Dirty speaker
If dirt has accumulated in the speaker holes, they need to be cleaned. It is advisable to first read the user manual or look on the manufacturer’s website.
You need to clean the speaker with the smartphone turned off and, if possible, it is better to remove the battery. Compressed air is used for cleaning. If you are not confident in your abilities and do not want to lose the warranty, it is better to take the device to a service center.
Application sound settings
If you can't hear sound inside an app, check its audio settings. The sound may have been muted or the volume may be too low.
Some applications allow you to adjust the sound separately from the system sound.
Related posts:
- The best apps and games on Android and iOS as of 07/11/2021
- The best apps and games on Android and iOS as of 07/04/2021
- The best apps and games on Android and iOS as of June 27, 2021
- The best apps and games on Android and iOS as of June 20, 2021
- The best apps and games on Android and iOS as of June 13, 2021
Popular types of microphones
Let's assume that an external microphone is already available and all that remains is to find the optimal way to connect it. To do this, you will need to find out what type it belongs to. The most common microphones on sale are dynamic, electret and condenser microphones. The user does not need to understand their device: it is important to understand that the first two types do not require power, and the third either contains a battery in the case or requires connecting an external source.
By design they are:
Recommendations: How to connect wireless headphones to your phone
How to properly set up a headphone microphone on a Windows computer
How to make a microphone from headphones
Which microphone can be connected to a laptop?
You can connect any external microphone to your laptop, but for some you will have to purchase the appropriate adapters or use an external audio card (for professional equipment). There are three standard sizes of devices with the corresponding diameter of the plug (connector, jack): 2.5 mm, 3.5 mm and 6.35 mm. The latter are used in professional (studio) speakers, but they are connected to a laptop through an appropriate adapter or external sound adapter.
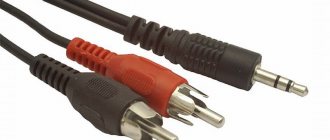
Under the generally accepted name jack is the abbreviation TRS, which in decoding and translation means: tip, ring, sleeve. Jacks vary in the number of contacts:
- TS – 2 contacts – two-pole – obsolete, practically not used;
- TRS – 3 – headphones, sound adapters and other equipment;
- TRRS – 4 connectors – mainly regular and audiophile headphones, karaoke, professional equipment (mixing consoles);
- TRRRS – 5 – noise canceling headset.
Should LED, LCD, OLED and Plasma screens be cleaned differently?
With many types of TV screens, you may wonder if you need to care for each type differently when cleaning. LED, LCD and OLED TVs have the same type of screen, while plasma TVs have a glass screen. They all have a very sensitive anti-reflective coating that must be handled correctly.
No matter what kind of TV you have, the same rules apply: use a very soft microfiber cloth, wipe it very gently, and only use mild cleaners.
Home theater Sony DZ100K, weak sound. Maybe I didn't search well, but I didn't find a similar defect in my search. The device works properly, everything is readable, displays and switches. But at maximum volume (on the display the volume is adjusted from 0 to 33) the sound is weak. Moreover, both when watching movies and when playing MP3 discs. But what’s interesting is that if the device works for about an hour, the sound is sharply restored to normal and the device begins to “scream” as expected. According to the confused words of the owner and his family, after the device began to malfunction, normal sound appeared after 15 minutes, then someone pressed something on the muzzle, and it began to appear an hour later. I reviewed everything in the setup, tried everything - zero! I didn’t look inside, didn’t measure anything. Maybe someone has encountered a similar defect, please give me some advice. Thank you in advance, with uv. Yuri
Try resetting it to zero first. Although it’s unlikely to help. You need to take it to the service center. Press stop.eject.power at the same time
The laptop takes its cue from the phone
At one time, all laptop PCs were equipped with a standard pair of audio connectors - input and output. The input could receive a signal from the microphone and digitize it, the output could output sound to speakers or headphones.
Physically these ports are the same. To distinguish them, color designations are used:
- Pink color – microphone input
- Green color – output for headphones or external audio system
Sound cards for PCs often have other color designations (line-in, optical out, etc.), but laptops have a maximum of two. In headsets for computers, accordingly, until recently, two plugs were always used, with corresponding color codes.
But recently, laptop manufacturers are increasingly using a combined solution - connecting the input and output in one physical connector (as in mobile phones or tablets). This solution really has many advantages:
- Saving space in the device body (especially important for ultrabooks and transformers)
- Compatible with telephone headsets
- Inability to mix up connectors
But for owners of “old-fashioned” headsets with separate input and output, such combination becomes a problem. Of course, you can buy a new one for modest money at any kiosk. But many people use expensive, time-tested devices and do not want to exchange them for a cheap one or spend money on an analogue one with a different type of plug. Therefore, we are not considering purchasing a new headset at all. For the same reason, let's not even look at wireless technologies.
If you encounter such incompatibility, we traditionally have two news:
- Bad. In 99% of cases you will have to purchase an accessory for connection.
- Good. The expenses will be incomparably less than the price of a good headset.
How to remove extraneous noise from a microphone
If the microphone and all its elements are working correctly, and it is impossible to get rid of noise using the methods described above, you must resort to special software products. Their main advantage is the ability to clear sounds from noise in real time. Adobe Audition can handle this task. Before using the program, you must reduce the volume level to 50%.
At the time of the first launch, you need to click on the “file” line, activate the option to open a new file, enable the Multitrack Session function and determine the values: 48 thousand Hz, 16 bits, stereo mode. Next, you need to open the editing mode and select the Audio Hardware function from the list. In the menu that opens for creating various effects, you must activate the corresponding option: Noise Reduction - a professional packet processor, or Noise Gate, suitable for simplified adjustments.
The values of these parameters should be set to default. The application contains a function that can suppress various types of noise, when activated, the quality of the processed broadcast noticeably decreases.
Do Not Disturb mode is enabled
This handy feature may be to blame for your lack of sound. Go to Settings > Sound > Do Not Disturb Mode and see if it is enabled or not. Or you can open the Settings panel with two swipes from the top of the screen and look at the Do Not Disturb tile. The mode must be disabled. If you wish, you can add exceptions to it. If there are no exceptions, all sounds will be muted when the mode is enabled.