Articles
How to make a subwoofer more powerful
How to make a subwoofer more powerful is a question that is of interest to a large number of users. After all, it is with the help of a subwoofer that you can make sure that low frequencies are also well distinguished from other elements of the melody. In addition, with such a subwoofer the bass will sound even louder and better quality. From this article the reader will learn how to make a subwoofer more powerful.
How to make a sub more powerful
How to make a subwoofer more powerful
Naturally, to make the buffer more powerful, it is necessary to use special sound amplifiers (see Class D amplifier for a subwoofer: advantages and differences from others). If an amplifier is also added to the speaker system, the result will be the following:
- Not only will the sound power be higher, but the quality of the played songs will also improve . In this case, the sound amplifier will act as a source of energy. It will be used to control the speakers, as well as the subwoofer itself. In addition, the user does not have to make any effort for this.
Setting up the subwoofer
Note: This is because subwoofers do not have playback limits. In other words, the melody will sound equally good at any volume level (lowest or highest).
- In some cases, the device is purchased after the head unit has been installed. But the fact is that almost all modern radios have a built-in sound amplifier. Therefore, before you go to buy an additional unit, it is recommended to make sure that it is needed;
- If the speaker system is too powerful, it may require a large amount of power to operate. The subwoofer is also high powered, so it requires a lot of power to perform well. Many radios are not able to provide this, so you have to buy an additional amplifier.
Subwoofer listen
Note: any subwoofer requires the installation of an additional amplifier if the user wants to get truly high-quality sound.
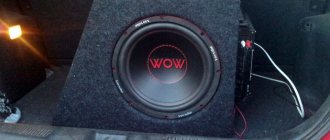
Where to install: in the trunk or under the seat
If an active subwoofer can be placed almost anywhere, then the purity and power of its sound at low frequencies will directly depend on the location of the passive device. Depending on the preferences of the car owner and the availability of free space in different types of cars, several installation locations are offered:
- in the center in front is the optimal position for communication with the front speakers, which will ensure almost perfect sound of tracks in the cabin. However, most cars don't have room in the front to accommodate any large devices, so a center front location is more suitable for minibuses;
- in the trunk, with the speaker directed forward - one of the most popular ways to place a subwoofer among drivers. Suitable for all types of vehicles;
- in the trunk, with the speaker directed backwards - more suitable for a car in a hatchback body, since the sound wave does not encounter obstacles in its path. The location in the trunk back is unacceptable for cars in a sedan or coupe, since the sound will be greatly deformed due to the specific design of the luggage compartment;
- on the floor under the seat is another option, which, however, is not widely popular among drivers. Due to the fact that the subwoofer is located flush with the floor, and the housing is located under the seat, the sound encounters many obstacles in its path;
- on the rear parcel shelf is one of the best options for placing a subwoofer in all types of cars. The main condition is that the shelf must be wide and strong enough to withstand low-frequency bass.
Photo gallery: main places to place the device in a car
When choosing a location to install a subwoofer, you need to accurately calculate how safe the bass energy will be for surrounding objects. The fact is that resonance from the housing can, in some cases, damage both the installation site and the glass in the car.
Types of amplifiers
Currently, there are several main types of sound amplifiers:
- Mono amplifiers designed for low-frequency subwoofers;
- Two-channel, which are used if only front speakers are installed in the car. In this case, such an amplifier allows you to reduce battery power consumption, since it affects only one pair of speakers;
- Three-channel, which are necessary if the car, in addition to front speakers, also has a subwoofer;
- Four-channel. This is a device with which you can strengthen the entire acoustic system, and not just its individual elements.
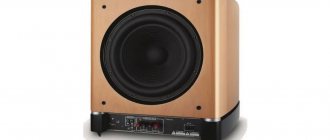
Speakers with subwoofer
How to properly install and connect a subwoofer in a car
Installing a homemade device in a car, as well as connecting it, will require a certain tool. So, in addition to the fact that you need a subwoofer and an amplifier for it, you will have to worry about the following devices in advance:
- fuse;
- wires (three wires in one winding - for power, for “+” to the battery and a wire to the radio);
- capacitor;
- wire cutters;
- insulating tape;
- plastic clamps;
- set of wrenches.
Once a location has been chosen to install the subwoofer, you need to make sure that it will withstand the resonant waves coming from the device. Installing subwoofers on fragile and light vehicle surfaces is prohibited.
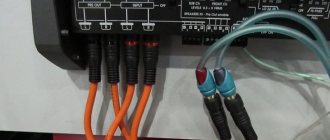
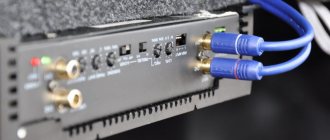
The wires are connected according to the following diagram:
- Initially, the subwoofer wire is routed to the amplifier.
- From the amplifying device, the wire is connected to the car radio.
- The “+” power cable must be protected from damage - for example, wrapped in corrugation.
- The fuse is placed on the same “+” wire at a minimum distance from the battery.
You can connect the subwoofer yourself, based on the parameters of this circuit
Before starting work, make sure that the vehicle battery is disconnected. This is a safety measure that will not only avoid damage to the speaker system, but can also preserve the health and performance of parts of the human body.
Video: connecting and setting up a subwoofer
Independent design, manufacture and connection of subwoofers in a car is available to almost every driver. The key to success will be both a competent calculation of the dimensions and volume of the product, and careful assembly of the case. At the same time, the car enthusiast can independently select the desired size of speakers in order to create in the cabin the low-frequency sound that suits him most.
Many music lovers want to make their subwoofer more powerful so that the bass thunders to its fullest. Of course, the easiest way to solve the problem is to buy a more powerful subwoofer model and not fool yourself with various circuits and magnets. But you don’t always have money for a new device; it’s not cheap at all. If you don’t want to buy a new speaker, but its rated power is not enough for you, then there are several ways to improve sound quality.
Subwoofer Gain
Of the entire speaker system, the most difficult to amplify is the subwoofer. Therefore, currently on sale you can find a huge variety of amplifiers for this component of the speaker system. They have a specialized purpose and are used only to amplify low frequencies.
Buffer Strengthening
If there is a need to improve the sound of a subwoofer, then you need to consider the following points:
- 1-channel amplifiers function normally only with a wide impedance range. In this case, there is already an additional setting for the timbre of the voices. There are also separate filters that help the bass deliver its full power;
- Two- and four-channel devices also provide excellent subwoofer amplification. However, they cannot cope with the effect of low impedance. This is due to the fact that they heat up too quickly when the subwoofer is playing at full blast.
Useful amplification circuit
Note: therefore, the ideal option for subwoofers are amplifiers that will allow the sub to produce a balanced sound. It is recommended to choose devices with parameters of 50-200 W.
What to make a box from
A subwoofer box is more than just a box that houses a speaker. The box must comply with many dynamic laws of acoustics in order for the sound to be truly rich and clear. To make different types of boxes, different materials will be required, and the manufacturing methods will in many ways be different from one another.
How to build a box for a bass reflex subwoofer
The standard version of a homemade subwoofer is a bass reflex. This is the simplest type of subwoofer; moreover, its box is good because a special bass reflex tube allows you to reproduce low frequencies that are practically not perceived by the human ear. And the design of the box is quite simple, which makes its production accessible to almost everyone.
- sound insulation;
- wood screws 50 mm long;
- drill;
- screwdriver;
- electric jigsaw;
- liquid Nails;
- sealant;
- PVA glue;
- carpet
The housing for housing a bass reflex subwoofer must be as durable as possible and not allow sound waves to pass through. Multilayer plywood or high quality chipboard is perfect for these purposes. The best option is to take a plywood sheet 30 mm thick.
To make the case you need to follow this plan:
- Prepare parts of the body: front, back, two sides, bottom and top in accordance with your calculations or parameters derived by programs.
- To fit the speaker size (for example, diameter 160 mm), cut a hole in the front part of the housing blank.
- Above the hole for the speaker you will also need to cut a slot for the bass reflex tube and screw the bass reflex compartment to it.
- After two holes are made on the front panel, you need to glue all the side parts of the box together and then screw them to each other with self-tapping screws.
- In this case, it is especially important to tighten each screw until it stops, since empty spaces between the panels will seriously distort the sound of the speaker.
- Next, you will need to cut a small hole for the wires on the back of the case.
- Before connecting all parts of the case, we insert the speaker.
- Next, it is necessary to carry out the interior finishing of the case: for this, all joints and cracks need to be coated with resin or sealant to improve the sealing, after which soundproofing fabric is glued to all side panels.
- After completing the interior decoration, you need to move on to the exterior: the body is covered with carapet fabric, and the fabric should also cover the slot for the bass reflex. Karapet can be tensioned using regular epoxy or a furniture stapler.
Once the speaker is secured, wires are pulled from it through the hole and connected to the car's sound system.
Photo gallery: how to assemble a compact box with a bass reflex
How to make a Stealth subwoofer box with your own hands
Despite the sound quality of a bass-reflex subwoofer, not every driver wants to carry a large box in the trunk. In some cases, the luggage compartment must be filled with things and cargo, so there is no room left for a subwoofer.
The logical way out of the situation is to make a Stealth subwoofer for the trunk. It will provide the same low-frequency sound quality as a bass reflex, but will take up minimal space.
Usually the Stealth subwoofer is installed directly in the trunk, but there are often cases of installation inside the fender or even in the spare wheel well.
The minimum volume required for normal operation of the Stealth is 18 liters, provided that a 12-inch speaker is used.
Materials and tools
To make your own Stealth subwoofer, you need to prepare in advance:
- speaker grille;
- speaker;
- socket for connection;
- wires of the required length;
- plywood or chipboard 20 mm thick;
- a piece of fiberboard;
- epoxy glue;
- brush;
- fiberglass;
- masking tape;
- polyethylene;
- wood screws (40 mm);
- jigsaw;
- drill.
Initially, you need to choose exactly where the subwoofer will be placed. You will need to empty the luggage compartment of the accessories stored in it, after which you can begin to remove its lining. The casing must be carefully removed only in the place where you plan to install the acoustic device.
The following steps are followed:
- A plastic film is placed on the base of the trunk - it will protect the compartment from drops of glue and the adhesion of debris.
- The place where the Stealth subwoofer will be located needs to be covered with masking tape in at least two to three layers.
- After that, pieces of fiberglass are placed on the surface of the adhesive tape, which need to be treated with an epoxy compound. It is best to glue fiberglass overlapping so that joints and gaps between the pieces are not visible.
- You will have to glue about 5 layers so that the thickness of the fiberglass sheet ends up being 10 mm.
- The subwoofer housing will harden for about 10-12 hours. Only after it has completely dried is it possible to continue working.
- The bottom for the subwoofer is cut out of plywood and glued to the body. You can use caulk or epoxy resin, as it is important to eliminate any leaky seams in the box.
- You will need to cut off all unnecessary parts from the body so that the fiberglass or frozen drops of glue do not stick out.
- Next, you need to cut out the side panels and the upper part of the Stealth body from chipboard. In addition, the rounded shape will also need to be made from plywood - for this it will need to be wetted, formed and well secured.
- All parts made of chipboard or plywood will need to be well glued with epoxy glue or sealant, and then fastened together with self-tapping screws.
- A hole for the speaker is cut out on the front panel.
- You need to cut a hole in the back or side of the subwoofer housing for the wires.
- After which the speaker is inserted into the housing, secured there using the same screws and glue, all parts of the subwoofer box are mounted.
All that remains is to give the box a finished appearance - paint it or cover it with carapet. Painting involves sanding the surfaces, which will take a lot of time, so it’s faster to cover the body with carapet fabric using an adhesive composition.
What to consider
It is important to understand that finding a suitable amplifier is not a difficult task. In this process, the following points must be taken into account:
- The subwoofer impedance must be nominal. Otherwise, one of the devices will fail;
- The amplifier must have sufficient power to withstand the loads that appear due to the influence of the subwoofer;
- The most suitable power is called rated power or RMS. This is the power that the subwoofer can withstand without changing parameters.
Note: for an amplifier this power should be maximum.
Method 2: Technical intervention
What do we need?
1. Subwoofer. 2. Transistor stage. 3. Soldering iron.
Instructions
If you are skilled with circuits, you can increase the power of the subwoofer through technical intervention. Most of these devices use the TDA7294 or TDA7293 circuit .
You can solder an additional amplification stage to it through a bridge of capacitors. This requires certain knowledge of all characteristics and the ability to work with a soldering iron and circuits.
Worth paying attention
You need to find out all the technical characteristics of the device in the instructions for the subwoofer or from the manufacturer in order to correctly select the ratings of the elements.
Adviсe
You can contact a specialist who will require less money for his work than a new subwoofer costs.
Equalizer settings
High-quality acoustics are of great importance for every user of a personal computer or laptop. A special equalizer can give your favorite music and movie soundtracks a really good sound.
Before you start setting up the equalizer, you should check that the audio system is correctly connected to the sound card. Also check whether all drivers and other pre-installed software required for audio are functioning correctly.
You can use a standard equalizer; it is built into every Windows operating system; however, third-party equalizers, as a rule, have wider functionality and quality of sound correction. Let's look at how to use the built-in equalizer and which third-party programs are worthy of your attention.
The process of setting up the built-in equalizer:
- Go to the Sound menu in the Computer Control Panel (this step is described in more detail in the first paragraph of the article).
- On the menu tab called Playback
- From the list of audio devices that appears, select the speaker. Open the speaker menu.
- In the window that opens, select the properties item - it will open another window.
- In the new window, select the tab called levels. A menu for adjusting various sound parameters of the audio system will open. Setting up sound on a computer involves changing the parameters that appear. In this menu you can configure the sound separately for each of the two connected speakers. Try to set the most pleasant sound level.
- Go to the Improvement tab. In the list of checkboxes that appears, check the equalizer box. After completing this action, you will have access to the sound card equalizer control function. All changes will be automatically saved by the system. You can also return to the original equalizer settings.