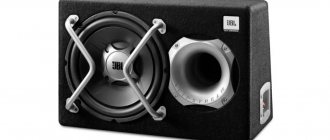
As you know, a subwoofer in a car is an integral element for obtaining high-quality, rich and powerful sound. Moreover, in addition to the speaker for the subwoofer, the most important part is the box for the subwoofer.
The sound quality, volume, as well as the ability of the subwoofer to fully “open up”, etc. will depend on the box. In this article we will look at what to pay attention to when designing, as well as how to make a subwoofer box yourself.
Subwoofer boxes: types and differences
So, having decided on a speaker for the sub (usually 10-12 inch speakers from well-known manufacturers), you can move on to the box. Please note that the design of the subwoofer box determines the volume and sound quality of low frequencies. Simply put, an incorrectly designed box can “strangle” a high-quality and powerful subwoofer woofer.
First of all, it is important to understand that there are several types of subwoofer boxes (subwoofer box, subwoofer box, etc.). To put it simply, we can highlight:
- closed subwoofer housing;
- bandpass;
- bass reflex;
In practice, a closed box means that the woofer is installed in a sealed wooden enclosure. The solution is simple, the output results in good acoustic performance, but the efficiency is reduced.
If we consider the bandpass, in this case there may be a bandpass of the 4th or 6th order. In the first case, this type of subwoofer has a housing that is divided into chambers of different volumes. One chamber contains the speaker itself, and the other receives a bass reflex, also known as an air duct. A subwoofer of this type gains the ability to somewhat limit the frequencies reproduced by the diffuser.
A subwoofer with a 6th order bandpass housing differs from its 4th order analogue in that it has another bass reflex and an additional chamber. Also, the 6th order bandpass is divided into two types: with one bass reflex or two, and one inverter will be common to both cameras. This type of box is difficult to design, however, the sound quality and efficiency are the highest.
A bass reflex is a subwoofer that has a special tube in the housing. This pipe removes air and is also capable of transmitting additional sound coming from the rear of the woofer. The sound of a sub in such a cabinet is “average”, being the middle ground between a closed box and a bandpass.
Closed box
This type of design is the simplest. A closed box for a subwoofer is easy to calculate and assemble. Its design is a box of several walls, most often 6.
Advantages of ZY:
- Simple calculation;
- Easy assembly;
- Small displacement of the finished box, and therefore compact;
- Good impulsive characteristics;
- Fast and clear bass. Plays club tracks well.
A closed box has only one drawback, but sometimes it is decisive. This type of design has a very low level of efficiency compared to other boxes. A closed box is not suitable for those who want high sound pressure.
However, it is suitable for fans of rock, club music, jazz and the like. If a person wants bass, but needs space in the trunk, then a closed box is an ideal option. A closed box will not play well if the wrong volume is selected. What volume of box is needed for this type of design was long ago decided by experienced people in car audio through calculations and experiments. The choice of volume will depend on the size of the subwoofer speaker.
The most common speaker sizes are: 6, 8, 10, 12, 15, 18 inches. But you can also find speakers of other sizes; as a rule, they are used very rarely in installations. Subwoofers with a diameter of 6 inches are produced by several companies and are also rarely found in installations. Mostly people choose speakers with a diameter of 8-18 inches. Some people indicate the diameter of the subwoofer speaker in centimeters, which is not entirely correct. In professional car audio, it is customary to express dimensions in inches.
Subwoofer housing: how to make it yourself
Taking into account the fact that the bandpass is the most difficult to manufacture, this enclosure is difficult to design and calculate the subwoofer box without special skills, knowledge and experience.
On the one hand, you can use the WinlSD program to calculate the subwoofer. This software allows you to select the size, calculate the volume of the subwoofer, and even create a three-dimensional model.
However, on the other hand, such a task is usually beyond the capabilities of an ordinary car owner without special knowledge (you need to know the characteristics of the speaker, take into account a number of additional features, etc.).
In fact, to make a sub with your own hands, it is better to choose a closed box or bass reflex. In this case, it is recommended to pay attention to the second option as a homemade subwoofer.
This solution (subject to proper design) will be more than enough. The bass reflex makes it possible to play back the lowest frequencies with high quality, provides increased efficiency, etc.
So, first we select the material for making the subwoofer. Typically, multilayer plywood is used for these purposes. You can also take chipboard. These materials are affordable, easy to work with, and provide good sound insulation.
- As an example, consider a subwoofer made of multilayer plywood (3 cm thick). In order to make a box for a subwoofer, you need to prepare, on average, about 100 wood screws 50-55 mm.
You also need to purchase sound insulation, have a drill, a screwdriver or screwdriver, a jigsaw, liquid nails, sealant and PVA glue, about 3 meters of carpet and a terminal block. The next step is the drawings of the subwoofer box.
The calculation of the subwoofer box is individual; the parameters depend on the size of the speaker, etc. Using an example, consider a sub with one 12-inch speaker. The volume of a box for a subwoofer with one such speaker, according to the recommendations of experts, is 45-50 liters.
To calculate the box for the subwoofer, below is an introductory diagram with the dimensions of the panels. If you do not have the skills to do this kind of work, it is recommended that you separately study the materials on how to make a drawing for a subwoofer yourself.
During design, you need to separately ensure that the minimum distance from the walls of the case to the speaker, as well as the volume of the box itself, is calculated exclusively on the inner surface, and not on the outer one.
Let's move on. After preparing all the elements, you can proceed to assembling the subwoofer box. First of all, use a jigsaw to cut out a hole for the speaker. For example, a speaker is 30 cm. Please note that the shortest distance from the center of the diffuser to the wall of the subwoofer is, conditionally, 200 mm. You can measure 230 mm, since 3 cm is the width of the plywood itself.
Then a hole is cut for the bass reflex slot. You can also use a tube instead of a slit. Then you can assemble the bass reflex slot, and then attach it to the front panel of the subwoofer. The joints are glued with liquid nails, then screws are tightened. The screws must be tightened as tightly as possible to avoid resonant vibrations.
Now you can assemble the side walls of the case, coating them in the same way with liquid nails and tightening them with self-tapping screws. You also need to cut a hole for the terminal block on the back cover of the case for the subwoofer. Next, all parts of the subwoofer need to be connected, checking the correct dimensions of the structural elements themselves and the quality of fastening.
At this stage, you can insert the speaker without screwing it in, check its fit and then move on to finishing the box. At the initial stage, it is necessary to glue the joints, cracks and gaps with epoxy glue. You can also use sealants. Then, using PVA glue, the entire upper surface is glued with sound insulation.
The outer surface is covered with carpet (including the bass reflex slot). The carpet is attached with epoxy glue and/or a furniture stapler. The speaker can now be reinserted and screwed in place. The final stage is drawing the wires from the speaker to the terminal block. After the entire structure has “settled” and dried, the sub can be connected to the amplifier. To do this, you need to know how to connect a subwoofer in a car correctly.
Bass reflex
This type of design is quite more difficult to calculate and build. Its design is significantly different from a closed box. However, it has advantages, namely:
- High level of efficiency. A bass reflex will produce low frequencies much louder than a closed box;
- Simple calculation of the body;
- Reconfiguration if necessary. This is especially important for beginners;
- Good speaker cooling.
The bass reflex also has disadvantages, the number of which is greater than that of the ZYa. So, the cons:
- FI is louder than ZY, but the bass here is not so clear and fast;
- The dimensions of the FI box are much larger compared to the ZY;
- Large displacement. Because of this, the finished box will take up more space in the trunk.
Based on the advantages and disadvantages, you can understand where FI boxes are used. Most often they are used in installations where loud and pronounced bass is needed. The bass reflex is suitable for listeners of any rap, electronic and club music. It is also suitable for those who do not need free space in the trunk, since the box will occupy almost all the space.
The FI box will help you get more bass than from a small-diameter speaker. However, this will require much more space.
What volume of box is required for a bass reflex?
- for a subwoofer with a diameter of 8 inches (20 cm) you will need 20-33 liters of net volume;
- for a 10-inch speaker (25 cm) – 34-46 liters,
- for 12-inch (30 cm) – 47-78 liters,
- for 15-inch (38 cm) – 79-120 liters
- and for an 18-inch subwoofer (46 cm) you need 120-170 liters.
As with ZY, the numbers given here are imprecise. However, in a FI case you can “play” with the volume and take a value less than recommended, finding out at what volume the subwoofer plays better. But do not increase or decrease the volume too much, this can lead to loss of power and failure of the speaker. It is best to rely on the recommendations of the subwoofer manufacturer.
What does the FI box setting depend on?
The larger the volume of the box, the lower the tuning frequency, the bass speed decreases. If a higher frequency is needed, then the volume must be reduced. If your amplifier's rated power exceeds the speaker's rating, then it is recommended to make the volume smaller. This is necessary in order to distribute the load on the speaker and prevent it from exceeding the stroke. If the amplifier is weaker than the speaker, then we recommend making the volume of the box a little larger. This compensates for the volume due to the lack of power.
The port area should also depend on the volume. The average speaker port area values are as follows:
for an 8-inch subwoofer you will need 60-115 sq.cm,
for 10-inch – 100-160 sq.cm,
for 12-inch – 140-270 sq.cm,
for 15-inch – 240-420 sq.cm,
for 18-inch - 360-580 sq.cm.
The length of the port also affects the tuning frequency of the subwoofer box; the longer the port, the lower the box tuning; the shorter the port, the higher the tuning frequency. When calculating a box for a subwoofer, first of all, you need to familiarize yourself with the characteristics of the speaker and the recommended parameters of the housing. In some cases, the manufacturer recommends completely different box parameters than those given in the article. The speaker may have non-standard characteristics, causing it to require a specific box. Such subwoofers are most often found from manufacturing companies Kicker and DD. However, other manufacturers also have such speakers, but in much smaller quantities.
The volumes are approximate, from start to finish. It will differ depending on the speaker, but as a rule they will be in the same plug... For example, for a 12-inch subwoofer it is 47-78 liters and the port will be from 140 to 270 sq. cm, but how to calculate the volume in more detail, we will learn all this in subsequent articles. We hope that this article answered your question, if you have comments or suggestions, you can leave your comment below.
How to make a stealth subwoofer with your own hands
Having considered how to make a box with your own hands, it should be noted that the owner does not always intend to install a large box in the trunk. For this reason, many car enthusiasts are interested in how to make a stealth subwoofer with their own hands.
It is well known that a stealth subwoofer is practical, does not take up much space and is often a factory solution on cars where a subwoofer is used in the speaker system.
As a rule, such a stealth sub is installed in the inner part of the wing. If you install it yourself, you can use the niche for the spare wheel. The minimum box volume for a 10" to 12" speaker is 18L.
Let us immediately note that making and installing a stealth subwoofer with high quality is more difficult and more expensive than a regular box. If only this option is needed, then for manufacturing and installation you will need:
- woofer;
- grill grate for protection;
- socket for connecting to an amplifier;
- wire for connecting the woofer to the outlet;
- Chipboard or multilayer plywood (thickness 2 cm);
- some fiberboard, epoxy glue, fiberglass;
- wood screws, mounting tape and plastic film;
- tools you need are a screwdriver, a drill, a jigsaw and a brush;
Having decided on the installation location, you need to unload the trunk, remove the trunk trim at the subwoofer installation site in order to be able to install the subwoofer as close as possible to the car fender.
At the initial stage, you need to lay a plastic film on the floor in the trunk to protect the inner lining from epoxy glue and to implement a fastening for screwing the back wall of the sub. Then you will need to cover the inside with tape. The adhesive tape is glued in a couple of layers.
Now you need to cut the fiberglass into small pieces (pieces 20 cm in length and width). Next, these pieces are applied to masking tape, after which they are glued with epoxy glue. It is better to lay fiberglass overlapping, which allows you to get rid of noticeable seams, joints, etc.
Next, the layers of fiberglass are glued to each other, coating each layer with epoxy glue. The main task is to obtain a sheet about 1 cm thick, which will require 4 or 5 layers.
Then you need to let the material harden for about 12 hours. If you don’t want to wait, you can speed up the drying process using a lamp. After the material has dried, you need to cut out the bottom of the subwoofer and glue it to the body. The joint can be glued with epoxy resin or it will need to be treated with a sealant.
The main task, the shape should be made so as not to interfere with the trunk hinges, that is, the homemade subwoofer should not interfere with the trunk closing. Having removed all the unnecessary parts, all that remains is to cut out the side walls from the chipboard, as well as the top part - the lid. The rounded part can be made from plywood, and no special calculations are required.
We also recommend reading the article on how to connect a subwoofer in a car. From this article you will learn about ways to connect a subwoofer in a car, how to connect a subwoofer without an amplifier, features of connecting a subwoofer to a radio, etc.
The only thing to get a rounded shape is to wet the plywood, bend it as needed, then attach it and wait until it dries completely. All chipboard sheets must be glued with epoxy glue or sealants used, and then tightened with self-tapping screws. As for the fiberglass box, it is also glued with epoxy resin, and after the resin dries, self-tapping screws are used for fastening.
To achieve a good seal, the seams are taped again. After applying epoxy glue, it is better to “load” the structure by placing something heavy and thereby pressing all the joints against each other. This way the glue adheres better and the joints are stronger.
Now all that remains is to take measurements of the front panel, after which it can be cut. Then a hole for the speaker is cut out with a jigsaw. After the panel is ready, it is attached to the body with self-tapping screws.
To do this, bars are placed along the entire inside of the panel (the distance is maintained slightly greater than the thickness of the plywood). For example, 2.5 cm from the edge. This solution will allow you to mount the front part at the top, bottom, left and right. The result is a reliable connection, especially with the round part.
The final step is cutting out a hole for the socket, which is done in the end part. Upon completion, the strength of the structure is assessed. If necessary, you can add more layers of epoxy and fiberglass to the curved part.
If the end result is satisfactory, then you can install the socket, connect the speaker to it, but do not screw it in. As a finishing touch, you can cover the sub with carpet or paint it. The painting option is more complex and time-consuming, but the end result is more aesthetically pleasing. To paint, you must first level the surface.
This can be done using universal putty. After drying, all that remains is to level the surface with medium and then fine sandpaper, then prime and paint the body.
Phase reflex tuning frequency
You've probably at least heard something about quarter-wave resonators. This type of enclosure is not so widely used in the construction of subwoofers and low-frequency sections of acoustic systems compared to, say, a bass reflex and a closed box. But why? After all, a quarter-wave oven provides undoubted fat advantages: Perhaps the widespread use of CV is also limited by the somewhat laborious nature of its calculations. Although the calculation itself is not that complicated, usually while you are designing a box, you have to go through several options, recalculating everything again each time.
Where to install: in the trunk or under the seat
If an active subwoofer can be placed almost anywhere, then the purity and power of its sound at low frequencies will directly depend on the location of the passive device. Depending on the preferences of the car owner and the availability of free space in different types of cars, several installation locations are offered:
- in the center in front is the optimal position for communication with the front speakers, which will ensure almost perfect sound of tracks in the cabin. However, most cars don't have room in the front to accommodate any large devices, so a center front location is more suitable for minibuses;
- in the trunk, with the speaker directed forward - one of the most popular ways to place a subwoofer among drivers. Suitable for all types of vehicles;
- in the trunk, with the speaker directed backwards - more suitable for a car in a hatchback body, since the sound wave does not encounter obstacles in its path. The location in the trunk back is unacceptable for cars in a sedan or coupe, since the sound will be greatly deformed due to the specific design of the luggage compartment;
- on the floor under the seat is another option, which, however, is not widely popular among drivers. Due to the fact that the subwoofer is located flush with the floor, and the housing is located under the seat, the sound encounters many obstacles in its path;
- on the rear parcel shelf is one of the best options for placing a subwoofer in all types of cars. The main condition is that the shelf must be wide and strong enough to withstand low-frequency bass.
Photo gallery: main places to place the device in a car
The optimal location for a subwoofer in a car is the trunk of your car. The sound quality of a subwoofer located under the front seat will be slightly lower. One of the simplest and most practical places for a subwoofer is the rear parcel shelf of a car.
When choosing a place to install a subwoofer, you need to accurately calculate how safe the bass energy will be. for surrounding objects. The fact is that resonance from the housing can, in some cases, damage both the installation site and the glass in the car.
Operating principle
Motorists may be familiar with a resonator, another example of which is the CV box, in a completely different area. For example, it is used as a functional element of a muffler. In this case, the hollow structure has its own characteristics and another purpose.
From a technical point of view, a resonator is an oscillatory system that accumulates vibrations due to frequency resonance. Typically, the design involves “working” with a limited set of frequency characteristics. Depending on the design, resonators of cumulative and instantaneous action differ.
Homemade wooden box
The storage resonator accumulates external energy by reducing the frequency of internal oscillations. In a mathematical context, any resonator design whose oscillation frequency is greater than the oscillation frequency of the external influence is cumulative. This happens whether the diameter is 10 or 12 inches, but you need to choose a different volume.
Instantaneous action implies the correspondence of the internal oscillatory force in period to external oscillations. Such resonators increase the sound power due to thermal absorption of the surrounding space, shifting the frequency at the input power - changes due to an increase in the playback interval.
The common CV box has a rectangular shape with partitions resembling a caterpillar in arrangement. The appearance will depend on the speaker and its features, size – 10″ or 12 inches. At the moment, you can find drawing diagrams for any frequency device and make a resonator at no extra cost. It will differ slightly from the brand name.
You can make a resonator in a mini version. This solution is shown in the figure.
Drawing of a CV box for 12″
To obtain drawings of 10, 12 and 15″ HF boxes, you can use a search engine or our resonator database or calculation program. The easiest way is to search by type of speaker and required volume. For example, a 12″ CV box can be implemented in several versions, depending on the technical features described and demonstrated below.