Many people use voice communication features in games and other programs. This requires a recording device, which can be connected separately or included in the headset. If your device is malfunctioning, you need to know how to check the microphone on your headphones in Windows 7.
Windows Audio and Microphone Test Panel.
How to check the microphone on headphones
Headphones with a microphone are one of the essential accessories for a desktop computer or laptop.
They allow you to play online games, chat online, record your voice and much more. But after purchasing this accessory, users often wonder how to check whether the microphone on the headphones works or not. If you are also interested in this issue, we suggest that you read our article.
The most accessible way to check the microphone on headphones is to check through the microphone settings in the Windows operating system. To do this, right-click on the speaker icon on the taskbar and in the menu that opens, go to the “Recording devices” section. The screenshot below shows how this is done in Windows 10.
After going to “Recording Devices”, the “Sound” window will appear in front of you, open on the “Recording” tab. This window will display all recording devices. In particular, the microphone from the headphones should be displayed here if it is connected to the computer. If there is no microphone, then most likely it is not connected, or the drivers for the sound card are not installed. If the microphone is present in the Sound window, then you can check its operation. To do this, just say something into the microphone and watch the bar on the right side of the window. This bar should start blinking green, indicating the current signal level from the microphone.
If the signal does not appear or it is very weak, then you can try to strengthen it. To do this, select the microphone with the mouse and go to “Properties”.
Here, on the “Levels” tab, you need to increase the microphone volume and its gain. After this, you need to save the settings and check the signal level again.
In addition, you can check the microphone on your headphones using any audio recording program. If you use Windows 7, then you can use the standard Sound Recorder program for this. To launch it, open the “Start” menu and go to “All Programs – Accessories – Sound Recorder”. After the program starts, click on the “Start Recording” button and say something into the microphone. After that, stop the recording, save the recording and listen to it.
If you use Windows 10, you can check the microphone on your headphones using the Voice Recorder program. To launch this program, open the Start menu, search for “Voice Recording” and open the found program. If you don’t find anything, try searching for “Voice record”. After launching the program, click on the record button and say something into the microphone of your headphones. After that, stop the recording and listen to it.
If you have checked the microphone and determined that it is not working, then you can try to solve the problem. Below we will look at the main reasons why a microphone may not work.
- Sound card drivers are not installed.
- The microphone is turned off or plugged into the wrong jack.
- The microphone is disabled in Windows settings.
- The microphone is too quiet.
- The front panel of the system unit is not configured correctly.
You can read more about these problems and ways to solve them in a separate article.
Microphone test
Testing area
- Detect your media devices. Please wait.
- I'm waiting for your permission.
- Your microphone turns on. Please wait.
- For more information, [[click here]].
- Changing the microphone will reset the current process. Do you want to continue?
- An unexpected error occurred. Reload the page and try again.
- The media devices could not be found. It is very likely that your browser does not allow access to these devices. Try reloading this page or opening it using a different browser. Just remember that in order to run your microphone, you need to allow our website to use it.
- The microphone could not be found, but there are other media devices (such as speakers or webcams). This most likely means that your microphone is not working properly or your browser is unable to access it.
- Your browser does not support multimedia device access features. Please update your browser or install another one.
- It looks like your browser is blocking access to microphone IDs. This makes it impossible to detect and control all available microphones.
- You do not allow the browser to use the microphone. Reload the page and try again.
- Apparently your microphone is being used or blocked by another application. To launch the microphone, you must temporarily close this application.
- Your permission has timed out. Reload the page and try again.
- Unable to stream audio. This could be due to a faulty/disconnected microphone or because it is currently being used by another application.
- The audio track is paused.
- An active media content stream cannot be detected.
- Your microphone is not outputting audio tracks.
- Your browser does not support functionality for accessing audio tracks.
- The audio track is unavailable due to technical problems.
- Your microphone suddenly stopped transmitting the audio track.
- For unknown reasons, the audio track is disabled.
- Click here to allow access to microphone IDs
- Click here to try to force the microphone
- Testing your microphone and recording your voice.
- Please say "Hello" or make some noise. The tester records the audio recorded by your microphone, so you can play it back after testing is complete.
- The microphone has been detected. Click Test My Microphone to check the functionality and supported features of your microphone.
- Several microphones were detected. To check the functionality and supported properties of your microphone, select it from the list below and click Test My Microphone. Please note that for more accurate results, it is recommended to leave only one microphone on.
- Testing was successful and your microphone appears to be working fine. All details about your microphone are displayed in the Microphone Information table. Please don't forget to leave a review about your microphone.
- The test failed because your microphone couldn't pick up any sounds. Please make sure your microphone is not muted and try again.
- The test failed because your microphone only picked up one tone. Please make sure your microphone is not muted and try again.
- There were errors during testing that made it impossible to determine some parameters of your microphone. Reload the page and try again.
Microphone information
| Quality Rating: | — |
| Microphone name: | Not selected |
| Automatic Gain Control: | — |
| Number of audio channels: | — |
| Echo Cancellation: | — |
| Estimated delay: | — |
| Noise suppression: | — |
| Sampling frequency: | — |
| Sample size: | — |
| Volume: | — |
Rate your microphone
Check how good your microphone is! Leave a review of your microphone and find a place in the ranking of the best microphones.
Thank you, everything is fast and complete information - vyvyv
very useful site, for a long time I couldn’t determine whether the microphone was working, which is why I changed my headphones more than once. thanks to the site developer(s)! — Karina
Thank you, everything is fast and complete information. — Alex
Thanks for the site - I set everything up in 10 minutes - both the microphone and the camera. — Owl
About MicTests.com
This website provides a simple online microphone test that allows you to check if the microphone is working properly. Since this is a browser-based microphone test, you don't need to download or install any third-party software. Moreover, even if it may seem too simple, MicTests.Com will test your microphone regardless of its type, as well as the device and operating system you are using. And to surprise you even more, this microphone test will display a lot of useful information about your microphone (such as its name, number of audio channels, latency, sample size and sampling rate, and whether it supports echo cancellation or noise). suppression). Plus, if the tester finds any problems with your microphone, you'll receive tips on how to fix them.
Why do you need a microphone test?
There are many reasons why people want to test their microphone. Here are just a few of them:
- You bought or connected a new microphone and want to check if it works correctly.
- Check if the microphone is turned on.
- Make sure your computer microphone is not distorting your voice.
- Find if the webcam has a built-in microphone.
- Make sure other apps can detect their microphones.
- Admire the visualizer microphone.
- Just out of curiosity.
How to test your microphone?
Testing your microphone with our online tool is quite simple: just wait until all your media devices are detected and click the "Test My Microphone" button. If this button doesn't appear and you haven't received any notifications, there's probably a problem with your browser. To help you, please contact us at [email protected]
How is a microphone tested?
- First of all, it is determined whether the browser supports functions for accessing multimedia devices. If so, a list of detected microphones and required controls is displayed.
- When you click the "Test My Microphone" button, your browser will ask for permission to run your microphone on that site.
- Once access is granted, the microphone will turn on and you will see a visualizer of the sounds captured by your microphone.
- The tester begins recording your voice and any noise captured by your microphone.
- Now it's time to determine the supported features and take some measurements.
- Finally, test results, tooltips, and additional controls (including playback) are displayed.
Why do we encourage you to leave a review?
After completing the microphone test, you can leave feedback about your microphone. This is not necessary, but we encourage you to do so to help others buy a good microphone and beat out the bad ones. Plus, once your review is published, you'll see how good your microphone is (that is, you'll know how well it performs in the best microphone ratings).
System requirements
To test your microphone, you only need a modern browser (unfortunately, Internet Explorer is not that kind of browser) that supports multimedia device access features. As you will notice, our microphone testing tool does not require any additional software such as Adobe Flash, Microsoft Silverlight or browser plugins. There are no restrictions on device type, so your microphone can be integrated (into headphones, mobile device, laptop), wireless (WiFi, Bluetooth) or connected via cable (USB, TRL, XLR).
The operating systems and minimum versions of supported browsers are listed below:
If your operating system or browser is not listed, this does not mean that it is not supported. It just hasn't been tested yet. So don't hesitate to test yourself.
Confidentiality
- All operations necessary for testing are performed by the browser, and all data is stored in the memory of the user's device.
- We do not store technical information until a user posts a review of their microphone.
- If a user does not post a review, all data on the device is deleted when the page is closed.
- Reviews are publicly available and contain only technical information about the microphones tested.
- We never store audio recordings made using your microphone.
How to check the microphone on headphones?
Good afternoon.
There is no doubt that for many users the Internet nowadays replaces the telephone... Moreover, via the Internet you can call any country and talk to anyone who has a computer. True, one computer is not enough - for a comfortable conversation you need headphones with a microphone.
In this article I would like to look at how you can check the microphone on your headphones, change its sensitivity, and generally customize it for yourself.
Connecting to a computer.
This, I think, is the first thing I would like to start with. Your computer must have a sound card installed. 99.99% of modern computers (those intended for home use) already have it. You only need to connect your headphones and microphone to it correctly.
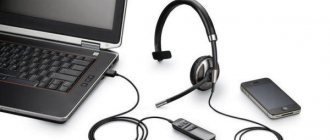
Typically, headphones with a microphone have two outputs: one green (these are the headphones) and one pink (the microphone).
The computer case has special connectors for connection; by the way, they are also multi-colored. On laptops, the panel is usually located on the left so that the wires do not interfere with your work with the mouse. An example is just below in the picture.
The most important thing is that when connecting to a computer, you do not confuse the connectors, but they are very similar, by the way. Pay attention to the colors!
How to check the microphone on headphones in Windows OS?
Before you start setting up and testing, pay attention to this: headphones usually have an additional switch that is made to turn off the microphone.
Well, that is. for example, you are talking on Skype, you were distracted so as not to interrupt the connection - they turned off the microphone, expressed everything that the person next to them needed, and then turned on the microphone again and began to continue talking on Skype. Comfortable!
We go to the computer control panel (by the way, the screenshots will be from Windows 8, everything is the same in Windows 7). We are interested in the “equipment and sounds” tab.
Next, click on the “sound” icon.
In the window that opens there will be several tabs: I recommend looking at the “record”. Our device will be here - a microphone. You can see in real time how the bar moves up and down, depending on changes in the noise level near the microphone. To configure and test it yourself, select the microphone and click properties (there is this tab at the bottom of the window).
In the properties there is a “listen” tab, go to it and enable the “listen from this device” option. This will allow us to hear in headphones or speakers what the microphone will transmit to them.
Don't forget to click on the apply button and turn down the volume in the speakers, sometimes there may be strong noises, grinding noises, etc.
Thanks to this procedure, you can adjust the microphone, adjust its sensitivity, position it correctly so that it is convenient for you to talk through it.
By the way, I also recommend going to the “communication” tab. There is one good, in my opinion, feature of Windows - when you are listening to music on your computer and you unexpectedly receive a call, when you start talking - Windows itself will reduce the volume of all sounds by 80%!
Checking the microphone and adjusting the volume in Skype.
You can check the microphone and make additional adjustments in Skype itself. To do this, go to the program settings in the “sound settings” tab.
Next, you will see several charts showing the real-time performance of the connected speakers and microphone. Uncheck automatic adjustment and adjust the volume manually. I recommend asking someone (comrades, acquaintances) to adjust the volume during a conversation with them - this way you can achieve the best result. At least that's what I did.
That's all. I hope you can adjust the sound to the “cleanest sound” and will have no problems talking on the Internet.
Voice chat test
- Start a voice chat service that allows you to make test calls, such as Skype. Log in with your username and password, if applicable.
- The menu will be slightly different depending on which service you're using, but is usually called something like Sound Settings and can be found under Tools. Make sure your headset is turned on. Save your settings.
- Activate a test call or similar feature. Typically you do this by selecting a dummy contact labeled Test Call or something similar from your contact list. Then initiate the call. When you speak into the microphone, you will be able to hear your voice.
If you are using a USB headset and cannot hear sound, try turning it off and exiting the audio application you are using. Wait a few seconds, then reconnect your headphones and run the utility again. Your problem may be caused by a temporary program glitch.
How to check the microphone on headphones: you can’t hear me at all...
A fairly typical problem, which is most often associated not with a breakdown (or malfunction) of the headphones themselves, but with incorrect software settings (for example, due to a lack of drivers).
I’ll also add another popular problem on my own - often an extraneous sound may appear in the headphones: hissing, crackling, etc. If you have a similar problem, check out my other article:
So, let’s try to check and adjust the microphone for optimal performance...
Connection to PC/laptop
The first thing to start with is properly connecting the headphones to the computer. First, you must have a sound card installed (all home PCs usually have one).
Do you have a sound card on your computer and what model is it:
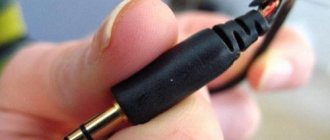
Secondly, the headphones have only 1-2 plugs (and, it would seem, what should you connect here? ☺) - there are a couple more nuances here (many users don’t even pay attention to this!). Nowadays on home computers/laptops, in addition to the classic jacks (for microphone and headphones), there is a headset jack (see Fig. 1)! Near the headset jack, there is usually a small icon of headphones with a microphone.
Rice. 1. Classic (left) and headset (right) jack(s)
The point here is that you cannot connect regular headphones (with two plugs) to the headset jack, just like headset headphones cannot be connected to classic audio jacks. For proper connection it is necessary to use special adapters.
Rice. 2. Adapter for connecting classic headphones with a microphone to the headset jack
Note!
If you don’t know what kind of headphones you have, then pay attention to the number of contacts on the plug: if there are 4 of them, these are headset headphones, if 3 are classic ones (an example is shown in Fig. 3 below).
Rice. 3. Headset (left) plug and classic (right)
More information on this topic is covered in this article:
I will assume that the headphones and microphone were connected correctly, the wires are fine and the connectors are fine too. By the way, it would be a good idea to test your microphone on another PC (to be sure that the microphone is working at all...).
Is the driver installed on the audio card?!
Quite often there is no sound on the computer due to the lack of a driver for the sound card (or a driver conflict). To check if the driver is on the system, open Device Manager.
To do this, you need to open the Windows Control Panel, then the “Hardware and Sound” section, it will contain a link to the manager (see Fig. 4).
Rice. 4. Hardware and Sound -> Device Manager
Next, look at the “Sound, gaming and video devices” section - if the drivers are installed, you should see a line in it with the name of your audio card (note: look for the line that contains the word “audio”).
If there is nothing in this section, check the “Other devices” section - it contains all devices connected to the computer for which drivers are not installed (and which have not been distributed in other thematic sections).
Rice. 5. Is there a driver - device manager
In general, the problem with drivers is a rather broad topic, and I have not written a single article on it on my blog. Therefore, below I will give a couple of links that will help you solve this problem.
Utilities for auto-updating drivers -
How to install drivers on a computer/laptop -
ADDITION
Please note that if you have a non-standard microphone, you will also need to install a driver for it. To check if your computer sees the connected microphone, open Device Manager and check the “Audio Outputs and Audio Inputs” section (see Figure 6).
Rice. 6. Audio outputs and audio inputs // device manager
By the way, after installing the audio driver, 1-2 links to fine-tune the sound should appear in the Windows Control Panel, in the “Hardware and Sound” section (see Fig. 7, installed along with your audio driver).
Rice. 7. Links to fine-tuning the sound...
In my case, this is Smart Audio (for fine-tuning the sound and microphone operation) and Dolby Digital Plus Advanced Audio (for adjusting the sound in movies, games, when listening to music, etc.). Yours will probably have a link like “Realtek Audio HD” (just an example ☺).
Rice. 8. Smart Audio (smart sound): setting up the microphone and “ears”
Checking your microphone in Windows
Before checking, I can’t help but remind you that many computer headphones with a microphone have a special small switch - it allows you to turn the microphone on/off (very convenient during a conversation when you don’t want your interlocutor to hear something unnecessary).
There is also an additional sound control on this switch.
Important! Check that the switch is in the ON position. And then we had to deal with a couple of times when users sinned on the microphone, and the problem was in a small button, see fig. 9.
Rice. 9. Turn the microphone on/off; increase/decrease volume. Additional switch on headphones
Let's start fine tuning
First, open the Windows Control Panel and go to the “Hardware and Sounds” section. Next, open the “Sound” link (see Fig. 10, red arrow).
Rice. 10. Open the sound settings
The window that opens will have 4 tabs:
- Playback: speakers, headphones, etc. devices that reproduce sound will be shown here;
- Recording: in this you can find the connected microphones (which is what we need);
- Sounds: setting up sounds in Windows (for example, you can make the system mute);
- Communication: Set the sound when talking over the network.
By opening the “Recording” tab, you should see your microphone: try saying something into it: the green slider should start jumping up/down (see Fig. 11). If you don’t see a microphone here: solve the issue of properly connecting it to the PC and setting up the drivers (see above).
Rice. 11. Checking the microphone // “Recording” tab
Next, open the microphone properties to configure its operation in detail. To do this, select it and click on the “Properties” button at the bottom of the window. Then open the “Listen” tab and enable (check) the “Listen from this device” item (see Fig. 12). Thanks to this, you will be able to listen to what the microphone will transmit (be careful with the volume: there may be a strong sound of creaking, grinding, whistling, etc.).
Rice. 12. Tab listen to microphone
I also recommend opening the “Levels” tab and setting the microphone sensitivity level, and, if necessary, setting the desired microphone gain (see Fig. 13).
Rice. 13. Levels - microphone gain
In addition, open the “Advanced” tab and set the format (bit depth and frequency of discrediting the device’s operation), enable exclusive mode, as well as additional sound tools (see Fig. 14).
Rice. 14. Additional microphone settings
Thus, with the help of these several tabs, you can very precisely adjust the operation of your microphone, adjust its sensitivity, and remove unnecessary whistles and interference.
Addition!
In the settings in the “Sound” section, I also recommend going to the “Communication” tab: in it you need to set the slider to the “Reduce the volume of other sounds by 80%” mode. This is necessary so that when you talk over the network, the volume of other sounds is muffled and you can clearly hear the interlocutor (and he you).
Rice. 15. Microphone operation during network communication
Checking on computers, laptops with Windows 7, 8, 10
There are several ways to test a headset on Windows. The simplest life hack on how to check the microphone on headphones:
- Connect your device to your computer.
- Take a look at the system tray - at the bottom right of the display you will notice a speaker icon.
- Right-click on the icon and select the connected headset from the drop-down list.
- The working microphone from the headphones is marked as the default device, as indicated by a daw in a light green circle.
- On the right side of the name you will see a sensitivity scale.
- How to check the microphone on Windows headphones? Put on your headphones and say a couple of phrases into the microphone.
- If the scale bars begin to vibrate and fill with green, it means the microphone is working.
- You can further adjust the quality and volume of the recorded audio by going to the Properties submenu, going down to Levels, and adjusting the sliders.
How to check the microphone on Windows 10 headphones? Another method for testing microphones on PCs and Windows computers is through the built-in voice recorder:
- On the “seven” go to “Sound recording”, and on the “ten” - to “Voice recording”.
- A small voice recorder window will appear in front of you.
- Here's how to test your headphone microphone on your computer: Press the center button, say a few phrases into the microphone.
- Complete the recording and save it.
- Listen to the file in the built-in player to make sure that the recording is going as it should.
Setting up a microphone in Skype/Skype
Most often, problems with the microphone in Skype occur because the program does not correctly detect the default microphone (that is, it works with the wrong microphone. This happens even if you have one physical microphone).
In the latest versions of Skype for Windows 10, the settings are hidden ☺ (in my opinion). To find them, you need to click on your profile icon in the upper left part of the window, then select settings and go to the “Sound” section. In it, select your microphone and check the sound.
Rice. 16. Sound settings - Skype on Windows 10
If you have an older version of Skype (I think it is much more convenient for a computer), then there are a little more parameters in the sound settings. I recommend checking the box next to “Allow automatic microphone settings” (this way the program will automatically select the volume level). However, the sensitivity level can be adjusted manually (the best way to do this is to talk to someone and move the slider to the desired position).
Rice. 17. Setting up the microphone (older version of Skype)
If you have a problem when speaking (hard of hearing, grinding, stuttering and trembling of the voice, etc.), pay attention to the following:
- Download and install the latest version of Skype (Official website). Although I don’t like the design of the latest versions, I admit that the stability and quality of communication is increasing;
- Check your internet connection and its speed to see if any packets are being lost. You can find out how to check your Internet speed from this article: (the fact is that if the connection quality is poor and the speed is low, Skype automatically reduces the sound quality in order to keep the connection active!);
- check if your computer is slowing down (if the processor, hard drive, etc. is loaded). I talked about why the computer slows down and how to find the reason in this article:.
Webcammictest.com - device testing with listening
The web page https://webcammictest.com/ru/ contains another excellent service for testing a microphone. This is a special listening test, where you can also get many useful recommendations if the device is not visible in connected devices. For example, if you encounter problems with your microphone while visiting a site, the site offers a solution. Click on the link “Why is the microphone not working” and select one of the possible options in the next window.
If everything is fine with the device, clicking "Test Microphone" will show moving diagrams during a call. By default, many browsers disable access from websites to your devices. There are instructions on this page that demonstrate how to give permission to use the device for a test. This must be completed if you are not prompted for permission automatically.
For this:
- You need to click on the green padlock at the top in the address bar;
- Select the gear sign in the “Permissions” block in the window;
- In the browser settings, opposite the microphone, select the “Options” button;
- And on this page allow access.
After that, return to the page and take the test. The site provides online voice recorder services. After recording, you can download the file to your computer for listening.
Perhaps you want to check your webcam, find out more.
Checking the microphone online: instructions.
Checking your microphone using our service is very simple. Just above you see a Flash application that tests the microphone and determines its performance by analyzing the incoming signal. If the sound device is working poorly or not working at all, you will see a corresponding report. Also, you can check the microphone’s operation yourself by assessing the presence and volume of incoming sound using the visual scale located on the right side of the program. The service requires an installed Flash player. Next, step-by-step instructions will be given, following which you can evaluate how well your microphone functions.
Step 1: Allow access to your microphone. When you launch the online diagnostic tester, the application will ask you for access to your computer's microphone. Don't worry, this is a standard security measure built into Adobe Flash Player. You need to allow access using the appropriate button, because otherwise it will not be possible to check the microphone.
Step 2: Make some sounds . Whistle, tap the microphone, blow into it, or say “One, one, one-two...”, etc.
Step 3: Review the report . Once device access is approved, the app will begin continuous analysis of your microphone, displaying the volume and strength of incoming audio in real time. If the report says that the microphone works well, your goal has been achieved and you don’t need to read any further.
Step 3. If the tester writes “No sound” , then this can happen for three reasons. Firstly , the wrong microphone may be selected in the application settings. Check it at the very bottom, under the sound indicator. If necessary, select another device from the list. Secondly , the microphone may be very quiet, which often happens on older laptops. Therefore, try increasing its volume using the vertical slider located on the left. Also, we recommend turning on the loud sound (sirens), which will be suggested by the application.
If the tips above did not help, then most likely your microphone is not connected to the computer, is not configured, or is simply broken. Try checking the connection, updating the drivers, or connecting another device (for comparison). It also sometimes happens that a USB port does not work, so we recommend trying to plug the device into the adjacent one. You never know?
Possible problems
Attempts to test the microphone may fail. For example, what could go wrong?
- The most common reason for failures is errors in the Windows system settings. You should definitely check which microphone is used by default on the system. Very often, users forget to switch the checkboxes on their laptops, and by default the built-in microphone continues to be used, and not the one in the headphones.
- It also happens that the application in which you want to use your voice is denied access to the microphone. Just check the appropriate settings. So, for example, it will be impossible to use voice search in a browser if access to the appropriate equipment is not provided.
To set it up correctly, click Start > Settings (gear icon) > Privacy > Microphone. Next, next to the item “Allow applications to use the microphone,” move the slider to the “On” position. Below in the list of applications include those in which you plan to use communication or voice commands.
- Also, software problems may be due to the lack of the required driver in the system, or the version of the sound card driver being used is outdated and requires updating.
- Other common causes relate to hardware problems: the microphone or cable itself may be faulty. To be sure of the technical condition of the device, it is better to try connecting it to several computers one by one, if possible, and check each time whether it will work.
Additionally, an article on why the microphone in Windows 10 headphones may not work.
On what devices can I test the microphone?
check your microphone online and do an instant test on any device that supports Flash technology or connects to a PC. This means you can test the microphone on your computer, laptop, headphones, webcam, smartphone and much more. Moreover, the operating system of the device does not matter. You can perform diagnostics with equal success on Windows XP, Windows 7, Windows 8, Mac OS or Linux.
The diagnostic service can be used free of charge and without registration . The microphone test function will be useful to professional computer scientists and system administrators who constantly deal with hardware, as well as computer store salespeople and just ordinary users who need to test a new microphone before communicating on Skype.
Record audio online using a microphone.
Free flash application “ Online microphone ”. Designed to record audio from your computer online. The finished recording can be listened to and downloaded in mp3 . The application does not require registration and is available directly in the browser. Simply put, this is a simple and convenient online voice recorder .
At the very beginning
of online, the microphone will ask for access to your audio device.
Confirm your consent by clicking on the “Allow” button. After this, make sure that the device is receiving a signal. To do this, tap the microphone, blow into it, or make some sound. If green waves appear on the sound indicator in the application (and the lights on the microphone body blink), then everything is in order. To start recording , press the round “Rec” button (in the center of the microphone) or the spacebar. The number of seconds is displayed on the upper display. Microphone sensitivity can be adjusted before or during recording using the vertical slider (right). You can end the recording by clicking on the square (which appears instead of “Rec”) or on the space bar. After this, you can listen to the resulting online microphone recording and download the finished mp3 file.
The application for recording audio through a microphone requires Adobe Flash Player to be installed. If sound is not recorded, we recommend checking that the device is connected to the computer correctly. If everything is in order, but there is still no sound, right-click anywhere in the application, then select “Options”, click on the microphone and make sure that the desired device is selected in the settings.
Method 4: VideoForm
VideoForm is another online service that will help you cope with this task. It also checks the microphone in real time without the need to create an audio track, which in some cases will be the optimal approach. In addition, confidentiality is guaranteed when using the site.
Go to the VideoForm online service
- On the main page of the site, select the “Test Your Microphone” option.
- Click the "Test Your Microphone" button.
- Give the site permission to use the recording device.
- Start talking and watch the dynamic waves appear in the window above. At this point, testing is considered complete.
Record voice through a microphone online.
With " Online Microphone " you can record your voice, song or any other sound through a regular household microphone. And all this can be done on this site online directly through your browser. However, the quality of the recording will largely depend on the features of your microphone. If it is old or very simple, then there will likely be various artifacts when listening, such as crackling, rustling, extraneous noise, and so on. If you require perfect sound without interference or other distortions, we recommend using our service in conjunction with a condenser microphone connected to a preamplifier. In this case, the recording will not only be of the highest quality, but also with pleasant “tube” effects.
Also, with the “ Online Microphone ”, you can record the sounds of any musical instruments. For example, guitar, piano, violin, drums and much more. But in order for such a dictaphone recording to be of lesser quality, it must be made in absolute silence and in a room without reverberation (that is, without echo, because otherwise the sound waves will be reflected and returned to the microphone, causing interference). The ideal room for such recording would be a small room filled with furniture and plastic windows. Close the door, remove all extraneous sounds and write your masterpieces using the free “Online Microphone”!