When creating your own subwoofer and for its high-quality and loud sound, you should take into account a large number of important nuances. For example, what kind of speaker for the subwoofer you purchased, how correct is your box, is the amplifier power enough, is the amplifier enough power, etc.
In this article we will touch on one of the many issues that will help you get closer to louder and better bass. Namely, we will answer the question, from what material is it best to make a box for a subwoofer?
Materials for making a subwoofer
The choice of material for construction is an important step in the construction process. On this page we will look at what is the best material for a subwoofer enclosure and how to choose it correctly. The main requirements for the box are that it must be rigid, airtight and free of resonances. For example, premium home speakers are very heavy for their type, this is precisely to enhance these three qualities.
The ideal material for a subwoofer would be granite or something similar, but of course car audio cannot afford this - this concerns the weight and complexity of processing. Therefore, the materials used are: chipboard, plywood, MDF, fiberglass. The thickness of the material should be selected based on the volume of the case - the more, the thicker to maintain strength, while for sheet material take 18 mm as a minimum. An exception may be, in which, due to the large number of partitions, good rigidity is gained; for it, material from 16 mm can be used.
What is the best way to make a subwoofer box with your own hands?
What is the best way to make a subwoofer box?
What is the best way to make a subwoofer box with your own hands? Readers often ask. Let's try to figure it out. This article was written precisely for this purpose. In addition, the reader will receive valuable instructions on how to make a cabinet for this speaker with their own hands. Having found out what would be the best material to make a subwoofer box from, you can safely proceed to the operation.
Chipboard
Chipboard - wood chipboard. It is used mainly in ready-made cabinet subwoofers of low quality, to reduce the cost of production. We do not recommend using a good subwoofer to make a box. The strength of chipboard is much lower than any solid or laminated wood; the board has low hardness, resonates at low frequencies and can chip during assembly. A box made from chipboard will “inflate”. Moreover, there is no need to assemble a subwoofer from furniture, especially from the doors of an old closet (unless of course it is for fun), because to the previous disadvantages it will add “ringing”, which is very undesirable.
Poor closet
Purchased or made yourself
Making boxes for a subwoofer
Making a subwoofer box is a responsible process, but at the same time very interesting. Of course, you can always go to the store and buy a ready-made sub in a housing. But this is a matter for beginners. A professional always buys a subwoofer head separately and then makes the box with his own hands.
Note. The latter option is suitable not only for professionals, but also for people who are passionate about car audio and want to get the most out of the speaker. A subwoofer head placed in a homemade box will produce incredibly strong low-frequency sound.
Before we move on to the manufacturing process, let’s again dwell a little on the topic of purchased subwoofers complete with a housing. As has already become clear, there is no hope for quality here, but the price can attract a buyer. For some models of ready-made cases, the price is only 1 thousand rubles. Needless to say, the material of such a box cannot be expensive. The plywood is always thin, and the box itself cannot even boast of rigidity.
Note. A purchased subwoofer will not give you the right sound. And the same head, if you move it to another box you made yourself, you can connect it so that it sounds much stronger and of better quality.
Plywood
Plywood (laminated wood board) is a multilayer material that is made by gluing prepared veneer. To increase strength, layers are applied so that the wood fibers are strictly perpendicular to the previous sheet.
The most popular material for making your own subwoofer. It happens: construction, industrial, packaging, furniture and structural. It’s better to use furniture; if you’re lucky enough to find a structural one, it’s generally great.
Plywood has high strength, is easy to process, and with sufficient thickness gives good rigidity to the body, but can delaminate during assembly.
What material can be used to cover a subwoofer?
For high-quality sound, the subwoofer must be sheathed. How to choose a material to cover a subwoofer with? There are many materials, but carpet is mainly used. To do this, it is enough to know a few rules and have several tools. Knowing this information, you will be able to properly process your box and you will not be ashamed to open the trunk.
Preparation of materials and tools
First of all, you need to list a list of tools and materials to get started:
- scissors;
- stationery knife with blades;
- spray paint (matte black);
- ruler;
- roll of self-adhesive carpet;
- soldering iron (for processing carpet around the edges of holes).
Paint is necessary to paint the port so that it does not stand out against the background of the box. You can also paint the joints where the sheets will be connected. It will be enough to paint these places with a small strip. Once you have prepared all the tools and materials, you can begin covering the subwoofer box.
How to cover a subwoofer box with carpet
After preparing the workplace, we begin pasting. First of all, you need to decide on the joint. Where will it be located? It is usually placed on the back wall, since it is least visible.
A very important point: all surfaces must be cleaned before pasting, otherwise the film will not stick tightly and will eventually come off the surface. We identify half of the back wall of the box by eye and begin work. Carefully seal all the walls around the perimeter until it reaches the back wall again.
After this you will need to make a nice, even joint. To do this, paint the line with black paint at the overlap site and glue the carpet with an overlap onto the old layer.
Next, we apply a ruler to the box and, using a utility knife, cut the carpet in a straight line and tear off the excess material. Thus, you should get a beautiful, even joining of sheets.
For durability, you need to take a hard cylindrical object and walk it along the joint. Roll and press the carpet at the point of contact.
In this case, it will not shrink in the future and an unsightly and unesthetic gap will not appear.
This joint is not the most difficult part. The most difficult work is the top and bottom walls. First you need to wrap up the remnants of the carpet that remain along the edges of the back wall and this perimeter.
To do this, select the middle of the corner and cut a straight line. Afterwards, we carefully bend the remains and glue them to the finished surface. After gluing, you need to cut another line diagonally and remove excess material.
This procedure must be repeated 7 more times, for each remaining angle.
Features of a bass reflex for a subwoofer
The next step is to tape the top and bottom of the box for the subwoofer. If you chose not a self-adhesive carpet as a material, but a simple one, then you only need to coat the plywood with glue. The glued carpet cannot be coated with glue.
If you are using adhesive-based material, you can simply lay a piece the size of the bottom or top side of the box and cut out the missing part in the center. Then we cut lines diagonally from the corners of this piece to the edges.
Don’t worry that you won’t be able to cover the subwoofer with carpet the first time. Carpet material is inexpensive, so you can perform this procedure again without any special financial costs.
We try on the resulting blank and partially glue it to the bottom or top side of the box. Then, using a ruler, cut off the unnecessary carpet along the edges.
The utility knife must be pressed firmly to cut through the decorative material evenly. After this, we remove the excess adhered material and glue our workpiece. The same procedure must be repeated with the remaining wall.
On the lower and upper walls you will get smooth and almost invisible joints.
There are two final steps left - the speaker port and the hole in the box to install the speaker itself. We need to make sure that the carpet in the port area does not shuffle over time. To do this, you need to cut a hole for the port and cut off excess material. Take a heated soldering iron and carefully run it along the edges of the material around the holes. In this case, it will never lint on you.
At this point the work can be considered completed. As a result, you will get a smooth, beautiful box for the subwoofer, which you won’t be ashamed of. In the article, we examined in detail the process of covering a subwoofer with carpet and highlighted all the nuances that are worth paying attention to. All you have to do is install your speaker and enjoy your favorite music.
MDF
Medium Density Fiberboard (MDF) is made by dry pressing small wood chips at high pressure and temperature. It is very well suited as a material for subwoofer housings and acoustic speakers in general, as it has a homogeneous structure, absorbs sound well and is easy to process. It has a high density and holds screws well. An MDF box of sufficient thickness is dull, durable, and has no resonances.
Why doesn't a subwoofer play without a box?
If we remove the speakers from the box of a working subwoofer, we will find that the bass that it reproduced efficiently will disappear. That is, a subwoofer without a box (acoustic design) does not play! Why is this happening? The subwoofer creates sound vibrations in both directions, i.e. forward and backward. If there is no screen between these sides, the sound vibrations cancel each other out. But if we place the subwoofer speakers in a closed box, we can separate the front and back of the subwoofer and get good quality sound. By the way, in a bass reflex box the box works on a slightly different principle; it reproduces sound in one direction, which increases the volume by about 2 times compared to Z/Y.
The principle of operation of subwoofer boxes
You say, why do we need this mess with frequencies, waves and boxes? The answer is simple, we want to clearly and simply demonstrate to you how the material from which the box is made affects the quality of the final result.
What happens if the box is made of poor quality material?
Now let's imagine that you made a box from your grandmother's closet, that is, you used chipboard material, which is only 15 mm thick. After that, a medium-power subwoofer was made from it. What will be the result?
Due to insufficient wall thickness, the rigidity of the box is reduced. When sound is reproduced, the walls of the box begin to vibrate, i.e. the entire box turns into an emitter; the sound waves that the box resonates, in turn, dampen the waves that the speaker emits from the front side.
Remember we said that a subwoofer speaker without a box simply cannot produce bass. Likewise, a low-rigid box will create only partial shielding, which will not be able to completely prevent the interpenetration of sound waves emitted by the subwoofer speakers. As a result, the output power level decreases and sound distortion occurs.
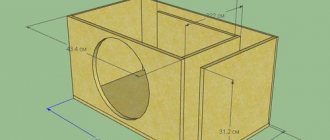
Subwoofer enclosure assembly
To properly make a box for a subwoofer, before screwing in a self-tapping screw, drill a hole for it with a thin drill, this will increase the strength of the fastening and protect the plywood from delamination. Distribute the number of screws evenly along the length of the side and make sure that they do not meet at the corners.
Almost always a template for cutting out the mounting hole comes with the sub; it can be part of the box or be a separate attachment. Cut out the template, transfer it to the front side of the box and cut it out with a jigsaw or router.
Template for mounting hole (cut from box)
If you don’t have such a template, you’ll have to arm yourself with a compass. When marking and cutting out the hole for the speaker, be very careful! The basket shelf is almost always narrow. If you cut less than required, the subwoofer basket will not fit into the hole; if you cut a little more or not exactly, the sub will not fit tightly or the mounting screws will hang in the air.
For heavy subwoofers, it is recommended to make the front wall of the housing double to eliminate vibrations during speaker operation.
Double front wall
With large dimensions of the case, double walls may not be enough and in some cases it will be useful to use spacers.
Options for struts and stiffeners
Please note that all wire entry channels, terminal blocks, etc. must be sealed, internal partitions (port walls) must not have any gaps.
Types of acoustic design structures
Infinity screen (freeair) - the speaker head is installed in the reinforced rear parcel shelf of the car. Despite the ease of installation, it is rarely used due to the low sound pressure, as well as the change in sound depending on how full the trunk is. Can only be sold in sedan vehicles.
The closed box is the most common subwoofer enclosure. A closed box of sufficient rigidity completely isolates sound vibrations emitted by the back of the head. To better attenuate sound waves inside the case, the inside of the box is covered with sound-absorbing material: felt, cotton wool or foam rubber with a thickness of at least 2 cm. One of the advantages is the simplicity of calculations and manufacturing. Also, speakers in such a housing can easily withstand peak loads. The closed box is suitable for listening to music with a rich tonal color. There is one minus, but a significant one. This is a low subwoofer efficiency because half of the sound waves "remain" in the box.
Bass reflex. It is a closed box with a port exit through which the sound wave from the back of the head comes out of the box to the outside. The tunnel has a round or rectangular shape. It is this port that is called the bass reflex. It has a certain size and installation location, due to which it changes the phase of the sound wave passing through it. The sound from the back of the speaker is superimposed on the sound from the front, increasing the efficiency. This allows you to obtain a sound pressure twice as high as with a closed housing. However, such a housing is more complex in calculations and requires a larger box size compared to installing the same speaker in a closed box. Also, at high sound levels, noise may occur due to air turbulence at the edge of the bass reflex port.