Headphones have many vulnerable spots, since all elements of the headset are subject to mechanical stress during use. It’s not a shame to throw away an inexpensive product after it breaks down. Branded headphones will have to be repaired after a breakdown. However, it is better not to let the headset fall into disrepair. There are many ways to protect your headphones and wire from bending, and you need to use them.
Wire exit from the plug
The most vulnerable spot is the wire coming out of the plug casing. This element is also called a jack. The plug and the wire coming out of it are constantly exposed to mechanical stress, even when the headset is not working, but is simply inserted into the phone jack.
Recommendations: How to fix headphones yourself if one stops working
, How to connect broken headphone wires
, DIY headphone repair
Let's look at a few of the most common reasons:
- When listening to music, the mobile phone is usually placed in the pocket. The option is not bad, but you need to place it with the plug facing up. If the jack is on the bottom, the entire weight of the phone presses on it. L-shaped plugs suffer less from this position, since the wire exits the casing from the side. For an even jack, pressing it to the bottom of a clothing pocket is detrimental. The wire at the entrance to the casing is sharply bent at an acute angle, resulting in a fracture of the copper core.
- While listening to music from your phone while traveling, the headset cable is secured to your clothing with a plastic clip. In the event of a sharp turn of the head, the clamp will weaken the force of the wire jerking at the point of attachment to the plug.
- Music lovers have a habit of putting the phone in their pocket after listening to music without removing the headset plug from the jack. This option is detrimental to both devices. The phone's plug and socket gradually become loose. Poor contact will cause crackling noise in the speakers and loss of sound. Finding the location of the fault will become more difficult, since the wire breaks along with the connector and plug.
- Headphones deteriorate even during storage. There is a killer combination - leave the plug in the socket and wrap the wire around the phone. Such storage will kill even the most expensive and high-quality headphones within six months. The plug and the entire wire before connecting to the speakers will fail due to sharp corners at the bend. The hard case provides safe storage of the headset. The wire is wound around three fingers. The coil is obtained without sharp bends and will be safely stored in the case.
- The long service life of headphones is taken care of even at the purchase stage. A headset with a straight plug is the worst design. The wire near the jack will quickly break due to sharp bends. It is better to give preference to a plug with the letter “G” or at an angle of 45°. If your favorite headphones are sold only with a straight jack, additionally buy an L-shaped adapter - an adapter.
- In addition to the adapter, there are female-male adapters. A piece of cable has a plug attached to it at one end, which is inserted into the phone jack. At the other end of the wire there is a socket - an analogue of a telephone connector, where the headset jack is connected.
If the wire near the plug is broken, it is cut off, after which the jack casing is cut off and the wires are soldered to the contacts.
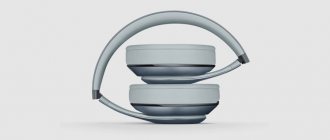
⇡#JVC HA-MR77X: while they're stretching the tires
In our review of this thunderous headphone model, we briefly mentioned that the rubber on the headband moves too easily.
Time has shown that the JVC HA-MR77X headphones contain a kind of time bomb. After ten months of daily use of the JVC HA-MR77X, we see that the protective rubber coating has worn out and began to “play” and bubble even more.
There is no doubt that sooner or later the rubber will either wear out or burst, which will be the main reason for the loss of attractiveness of the headphones. It’s hard to say when this will happen: most likely, if handled not very carefully, it will take four years.
In addition, the ear pads began to dry out surprisingly quickly. From frequent wear, the leather rings have lost their shine and become dull on the side where they touch the ears. But there are no visible cracks anywhere on a pair of ear pads. The rotating mechanism of the cups, which allows you to “throw” the speaker over your ear, has become slightly freer. In practice, it turned out that this is a very convenient thing, especially when you need to exchange a few phrases with someone, interrupting listening to music. This slight play is not a hindrance at all. Otherwise, the JVC HA-MR77X is not satisfactory.
By the way, in the winter of 2015 we saw the JVC HA-MR77X on Western sites at a big discount, for about 50-60 dollars. This is a realistic price for this model, which will be justified even if the service life of the JVC HA-MR77X is not very long.
Speaker wire output
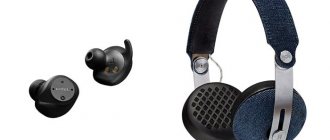
The second weak point after the plug is the cable exit from the headphones. Most often, the wire here does not break, but comes off from the speakers. The user is to blame for pulling the earphone out of his ear by the cable. Even if the vacuum headset is deeply buried inside the ear, remove it by holding the body with your fingers.
A wire break from the speaker contact occurs in cheap Chinese models. The wire inside the case is not secured by anything and dangles freely. The branded headset is designed differently. The cable connected to the speakers is tied in a knot before exiting the headphone body.
This creates a kind of stop that prevents the wire from breaking off the contact. However, you still cannot pull such an earphone by the wire. The core will not come off the speaker, but the cable itself will begin to stretch. Over time, a gap forms in the thinned area.
Near the entrance to the headphones, the wire is constantly suspended. Even if you don’t pull on it, over time the cable will tear the wires away from the speaker under its weight. You can ease the load by placing the wire behind the ear. In this position, no force is applied to the cable section near the entrance to the headphones.
How to disassemble headphones: instructions with step-by-step photos of repairing all elements of the headset
Bifurcation section
The headset cable leading to the speakers splits into two. The separation point is secured with a plastic or rubber stopper. In this area, similarly, there is a threat of fracture of the veins, but this happens extremely rarely.
You can protect the split with a voltage reducer, but they are only installed on expensive branded headphones. For a cheap headset, the only salvation is the clip. The area where the bifurcation begins is secured to the clothing with a clothespin.
Pulling the cord rather than the plug
Here's another big reason why your headphones keep breaking: The tension on the cord causes tension when the cord connects to the plug. Over time, the tension can cause the inner wire to break and become disconnected from the plug.
This is also true for headphones. When you're done, do you pull the cord to cut the buds out of your ears? Uneven voltages will cause one of the internal wires to break before the other, leaving you with headphones that only produce sound from one side.
Never pull on the cord! Voltage is the main reason why your headphones break. You can break yourself out of this habit by switching to a cord with an L-shaped connector, which cannot be disconnected by pulling the cord.
Basic rules for using headphones
The user can protect the headset from damage if they follow a number of important rules:
- Do not wash dirty tips without removing them from the headphones. Water that gets inside the case will damage the speakers. Do not clean the plug, connector or earphone mesh with a needle or other sharp metal object.
- Avoid blow-drying your hair while wearing headphones. Sudden immersion in cold has a similar negative effect. Due to the temperature difference, condensation forms inside the case, destroying the speakers.
- Do not remove the plug from the phone socket without stopping the playback of the music file.
- To store the headset, use a hard case, and the plug is removed from the connector of the player or phone.
- The earphone is removed from the ear by the housing, and the wire is secured to the clothing with a clip.
The rules for using the headset are simple and should be followed.
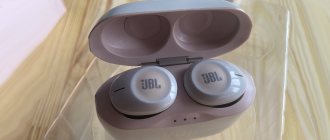
How to charge wireless headphones
Winding the cord into knots
Have you seen those “hacks” that show “genius” ways to wrap cords so they don’t get tangled? Well, ignore them! Especially those designed for headphone users. If you're wondering why your headphones break so easily, this could be the reason: narrow loops and knots make the internal wires wear out faster.
Never tie knots. Avoid tight loops. Loser is always better.
If you need a lifeline for your headphones, wrap the cord around a roll of toilet paper with notches for the plug and buds. For regular headphones, use the "Roadie Wrap" method shown in the video below. You can then push the two ends of the circle together to form a figure eight and secure it with a rubber band or tie.
Two ways to improve your headset
When you buy new headphones, don’t rush to use them right away. There are two simple ways to improve your headset by increasing the cable's resistance to mechanical stress.
1. The first method is aimed at protecting the input to the plug. To prevent the wire from sharply bending into a break, you will need a bandage. A stiff spring is taken from a fountain pen or children's toy and wound in coils onto the cable. Next, the bandage is lowered along the wire to the connector, where a couple of turns are screwed onto the jack casing. The defense is ready. An elastic spring will never allow the wires to bend at an angle of 90°. A similar bandage can be screwed onto the area where the wire begins to bifurcate.
2. The second method is aimed at protecting the headphone output. The wire constantly dangles in the hole in the housing, causing insulation failure. The problem can be easily solved. A drop of glue is injected into the hole. It will securely fix the wire to the headphone body.
Compliance with the rules of use, together with improvement, will extend the life of your favorite headphones.
Thematic materials: Independent production of simple headphones and a headset with a microphone
, 10 most expensive headphones
5 Best Wireless Hi-Fi Headphones
, If water gets on the headphones or inside the mobile phone jack
, How to properly warm up headphones and whether it is necessary to do so , How to solder a headphone plug
, How to fix headphones yourself if one stops working , How to improve the sound quality in headphones
, Hi-res music: how it differs and how to use it
Letting the cord dangle
Here's another way to damage headphones with a long cord: letting the cable hang over the edge of a table while you're resting or using it. This is a risk even for the best wired headphones
The dangling cord is basically stuck bent at a 90 degree angle and this puts undue stress on the inner wire at that point. Think of it like a paperclip: bend it back and forth and it will break. If you accidentally press or press the cord to the edge accidentally, it may cause the inner wire to break.
Wiring diagrams for wires with more than two cores
Users often wonder whether it is possible to repair headphones of a more complex design when there are more wires inside? A different number of wires may be suitable for one plug - this depends on the class of headphones:
Now we will tell you in more detail about each class, except the first.
Three cores
Each earphone must have two wires in the same braid or in different ones - this is a plus and a minus. Sometimes at the end, when connecting to a plug, designers combine the negative ones into one harness and get 3 pieces at the output. To make it clear to all users, we provide a detailed wiring diagram for the plug, where you can see exactly where the wires need to be soldered according to their color design.
There is no strict standard for coating with colored varnish. For example, the left channel wires can be blue, white or green.
Four wires
There are two different options here.
- Ordinary headphones without a microphone and control buttons. 4 wires are connected to the plug: a minus from each copper-colored speaker and a plus (blue with red or green with red). For convenience, the negatives are twisted into one bundle and the result is three wires that need to be soldered to their specific places.
- Headset with microphone. Here the plug has 4 types of contacts: one from each speaker, one for the microphone, and there is room left for soldering a common wire or ground. Schematically, such soldering looks like this:
Important! At first glance, the microphone wire looks like one wire, but in fact there are two of them: a very thin wire in a PVC sheath is wrapped on top with a copper wire with colorless enamel for protection.
5 cores or more
Different types of headsets of the latest class may have from 5 to 10 separate veins, so it will be much more difficult to navigate. The signal wire from the microphone is always braided in one color, and the rest come in all sorts of shades. No specialist can tell you exactly which wire should be soldered where. How to replace the wire from the plug on the headphones in this case? The only method that works here is this: we check each vein with a multimeter to determine whether it goes to the left or right speaker, then we find the common ones and combine them into one flagellum.
Read also: How to cut a profile pipe at 45 degrees
You need to solder it to the plug according to the diagrams that we showed, or find a separate diagram on the Internet that is suitable for your case.
Repair your headset or headphones for your mobile phone using this method and save money from your home budget.
How to solder a wire to different types of batteries
Despite the fact that the batteries all seem to be similar to each other, each specific case has its own soldering subtleties.
Solder it to a regular battery
How to solder a wire to a one and a half volt battery? Everything is very simple if the necessary tool is at the ready. To succeed, you need to adhere to the following sequence of actions:
- Before turning on the soldering iron, check its tip. If there is scale on it, it should be cleaned off. This can be easily done with sandpaper or a file. You need to clean until the metal sparkles.
- We connect the soldering iron to the network and place it on the stand. You need to wait a bit until it warms up. You can check the temperature by looking at the solder. If the solder responds to the touch of the tip by melting, then you can solder.
- In order to get high-quality solder, we will not wait until the soldering iron heats up, but we will go ahead and process the place on the battery where the wire will be soldered. We take a brush and process it. This is necessary so that the solder holds better, since the battery material is poorly suited for such operations. Don't forget about processing the ends of the wires. If there is no brush, any match can replace it. We just need to drop a drop of acid to carry out the treatment.
- Once you apply the acid, take a hot soldering iron and drop some solder onto the pole. We do the same with wires.
- If you use rosin, then first of all you need to tin the surface and clean the wire from varnish. But we can guarantee almost one hundred percent that the strength of soldering with rosin is much worse.
- If it was not possible to find acid, and the household only has rosin, the battery needs to be cleaned; the rosin will act as a flux. It should be applied to the surface of the element, after which we take solder with a soldering iron and tin the places where the wires will be attached. Don't forget to tin the wire too.
- If you tin it correctly, a fairly strong film will be formed on the battery, and you should solder on it.
- The wire needs to be pressed against the battery that has already been processed, then take the solder with a soldering iron and solder. We try not to move the wire so that it lies motionless in its place, then we can solder it tightly.
- After the solder has solidified, we act similarly on the other pole of the element.
The wires are now securely soldered.
How to solder a wire to the crown
What to do if you need to solder a crown element? In fact, there are no differences in the soldering process between a regular battery and a “crown”. The only difference is that the crown contacts are located on the top cover and are located next to each other. There are the following subtleties:
- Opposite contacts need to be treated with acid. The wires will be soldered at these places.
- If you use rosin, you need to tin the opposite sides of the contacts. Why is this so? This way we will avoid the possibility of a short circuit.
- The crown contacts are made very inconvenient for soldering. In their upper part they expand, and in order to tin and solder well, you need a soldering iron with a very thin tip.
The soldering process itself is very simple. You need to treat the contacts themselves, as well as the wires, with acid, after which we apply the wire to the contact. Having collected solder on the tip of the soldering iron, drop it onto the wire and smooth it out. Actually, that's all.
4.5 volt square batteries
It is very easy to solder wires to these elements. Their contacts are quite long and flexible, which makes the task of tinning them easier. And soldering is much faster and easier. The main thing is to ensure that the wires do not move during the process.
⇡#Superlux HD669 (Axelvox HD 272): through fire, water and copper pipes
The Superlux HD range is one of the best in terms of price and quality, which was confirmed by the large number of positive reviews we received after our review.
How curious the fate of headphones can be sometimes! This pair was put at his disposal by a tireless summer resident who never stops building all kinds of “superstructures” and “extensions.” He immediately appreciated the practicality of this model and... began to use it when working with an angle grinder, protecting his hearing. The headphones have passed the toughest crash test imaginable. They were dropped several times from a height of two meters, they fell on concrete, they were left in the scorching sun, the headphones worked in the rain, and so on. By the way, the owner also listened to music through the Superlux HD669 - for this purpose, he hung a tiny MP3 player directly on a short cable near the cup and removed it only to recharge.
Surprisingly, except for the battlefield dust, we did not see any major losses. On the underside of the cup, where the cable connector is located, the insulation has taken on a worn look. In a year or two, you can expect a cable break in this place. The ear pads also began to show signs of wear. But wear and tear are different: if in the case of the Sennheiser PC 350 headset we see the complete unsuitability of the ear pads, then in the Superlux HD669 the picture is much better. Only cracks are visible on them (given such treatment, this is not surprising), nothing has crumbled (yet), the shape of the ear pads holds well, although they have become rougher, now reminiscent of the calloused hands of the owner of the headphones.
The design of the headband is still rigid, the pressure is just as tight, the structural elements do not creak, and the pressure pads on the headband have not worn out. An excellent result, especially considering the “extreme” these headphones have gone through.
Regular cleaning
Headphones need to be periodically cleaned of earwax to prevent bacteria from multiplying.
If the mesh is removable, you can take it out, wash it with soap or soak it in an alcohol solution for 5 minutes, then dry it and fasten it back, but the permanent one should be cleaned as follows:
- Use a toothpick or needle to clean the mesh from wax.
- Wipe the mesh and wires with a cotton pad soaked in alcohol or chlorhexidine.
- Dry on a paper towel with the mesh side down.
Silicone or rubber linings of vacuum headphones need to be cleaned especially carefully as follows:
- Remove the pads, clean them with a cotton pad soaked in alcohol, rinse and leave to dry.
- Use a toothpick to remove wax from the mesh.
- Moisten a cotton pad with hydrogen peroxide, place it on the table, and place the headphones on top for 20 minutes with the mesh down and press down slightly so that it gets into the holes and dissolves the remaining sulfur.
- Take out the headphones, wipe them dry and leave them to dry with the mesh facing up.
- Reattach the covers.
Wireless headphones are usually non-separable, and they have holes in the middle that become clogged with dirt. You need to clean them like this:
- Gently clean the holes in the headphones with a toothpick or needle, being careful not to push the wax inside.
- Soak a cotton swab in hydrogen peroxide, squeeze it a little and carefully wipe the holes.
- Clean the body with cotton wool also soaked in peroxide or alcohol.
- Leave to dry for 2 hours.
You need to clean the accessory at least once a month.
We check for quality
Upon completion of the operation, we need to check the functionality of the repaired headphones. We connect them to any player, smartphone or stereo system and turn on the music. Now, accidental touches to the cable should not cause any audible consequences, so we can only rejoice at the result.
How does a contact plug work?
Before you start soldering, it is useful to study the design of the stereo headphone plug. Below we offer a schematic representation of it. A headphone cable contains three wires: the right channel (usually red), the left channel (green, white or yellow) and ground (in our case copper-colored).
There is no separation between right and left channels on the mono headphone plugs. Depending on the plug, the contacts for soldering will be of different sizes. During soldering, try not to create electrical connections between the contacts, especially to ground, otherwise when you connect the headphones to the device, a short circuit will occur and they may fail. Therefore, in no case should you expose the ends of the cables (see point 2) more than is necessary for soldering.
Other useful articles on the website iCHIP.ru