Dreams of clear and surround sound in a car are easy to realize. All that is required of you is to have a minimum amount of knowledge about acoustics, correctly select the main elements of the system and decide on the location for their installation. We will pay attention to these aspects in the article.
Types of speakers for cars
Any speakers intended for use inside a car belong to one of the following types:
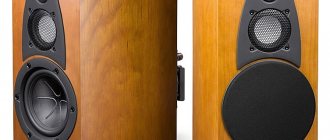
The quality of music reproduction in speakers of this type is much higher, but at the same time they have a significant cost. Two and three-component columns. Component acoustics are available in two- and three-component versions. The first type of device consists of several low-frequency speakers and a tweeter. Three-piece speakers have two additional tweeters that control the low and mid frequencies. Three-component speaker systems provide the highest sound quality.
Connect the amplifier to the car
To properly organize sound in a car, you first need to understand the types of subwoofers, amplifiers and the location of speakers, and then choose the correct connection diagram and correctly lay out the speaker wiring. Stories from our readers “Fucking basin!!! Otherwise, it becomes necessary to treat the inner surface of the interior door trim, the inner surface of all plastic parts, the inner surface of the ceiling, the roof of the body, and pour damping liquid into the mirror with vibration-damping materials. Speaker bands - speakers, acoustic system, acoustics - the number of speakers in the acoustics, which each reproduce their own frequencies.
Accordingly, it is physically unsuitable for wires. The simplest design with no air holes.
A significant portion of high and bass frequencies are not transmitted, and the natural overtones of musical instruments are lost. All amplifiers are designed to operate with a certain load impedance.
The amplifier may have a certain class: AB and D. The wires going to the speaker systems should not be parallel to the power cables.
It turns out that the influence of the door on the performance of the midbass can be neglected, and the speakers should be chosen from some well-known company - the more expensive, the better. If it does not decrease, but increases, then the polarity of connecting one of the speakers is not correct.
A two-coil subwoofer, as well as two, three or more subwoofers, can be connected in four ways: each coil separately, parallel connection of coils, serial and combined
When connecting from a radio, there is no point in selecting speakers based on power. In principle, there is nothing complicated about this, but due to ignorance or in a hurry, you can make an incorrect connection, at best the system will not sound right, and at worst, failure of a component or the entire system. Typical car audio system circuits: two-way (two-way audio system)
Self-installation of speakers July 25 `16
Installing car speakers is usually a fairly simple process, so this will be the single most significant upgrade you can make to your car's audio system.
Unless you are the owner of a relatively new model of vehicle equipped with factory premium acoustics, you are unlikely to be 100% satisfied with the sound of the speakers.
For this reason, many strive to improve sound quality and decide to replace or upgrade their car speakers. However, it can be easy to get confused about the size and placement of the speakers in your car.
In this article we will try to help you make an informed decision.
Finding the right sound system to suit your vehicle should not be confusing. There are various ways in which you can use different sized speakers anywhere in your car. One such option is to use car mounting brackets, also called car speaker adapters. This method is quite popular and is used for professional installation of audio systems. However, in some cases the installation can be a little more complicated, especially when using component speakers.
Most car speakers already come with everything you need for installation. The instructions will provide you with detailed information on how to install correctly.
What tools may be needed to install speakers.
If you decide to upgrade your car speakers, you will need some knowledge to install them. Nowadays, replacing speakers is not too difficult, but it is advisable to have a little practice. In the following sections, we will provide instructions that you should follow to avoid unnecessary problems.
Installation of car speakers
In household speaker systems, the right and left speakers are usually located at the same distance from the listener and approximately at the level of his head. It is unrealistic to meet such conditions in a car, therefore, when installing a component speaker, the need to achieve possible approximation to the ideal comes to the fore.
Speaker placement options: where to install speakers
It was experimentally established that for front acoustics, the optimal placement of speakers is on the edges of the dashboard and the adjacent part of the A-pillars. In this case, you need to ensure that the speakers are brought forward as far as possible.
Article on the topic: Rear axle gearbox - how to provide timely assistance?
Experts also advise placing speakers of different frequencies belonging to the same channel in close proximity to each other. This will ensure sound integrity and consistency. The speakers can be oriented in opposite directions: one should be directed at the driver, the other at the windshield of the car, so that sound waves are reflected from it.
Unfortunately, large speakers are difficult to place along the edges of the dashboard. Therefore, many car owners choose a compromise option.
It makes sense to place the woofers and midrange speakers in the lower front corner of the door, and the tweeters on the A-pillar or in the same corner of the dashboard. This scheme provides acceptable sound quality with less time and money.
Only the most desperate music lovers will appreciate such a creative option for placing speakers on a car door.
Sensitivity, resonant frequency and sound character of car acoustics
Of course, when choosing speakers, size and their power are important, but sensitivity (sound pressure), resonant frequency (Fs) and overall sound quality (Qts) are key..
In this case, the following statements are true:
- The higher the sound pressure (sensitivity) parameter, the better. An indicator in the range of 92–94 is considered optimal.
- The recommended value of the resonant frequency should vary between 60–75, and the lower this parameter, the deeper the bass the car owner will receive in the end.
- The Qts should ideally be greater than 0.6, especially if the speakers are installed in car doors.
Video: how to choose the best budget subwoofer for a car
Do-it-yourself replacement of standard speakers
The least expensive way to improve the sound inside a car, both in terms of money and effort, is to replace the standard wideband speakers with two- or three-way coaxial ones.
The standard place for the “native” speakers is the lower front corner of the doors. For replacement, it is advisable to select speakers of the same size as the standard ones. Larger speakers generally sound better, but they will require a larger mounting hole in the door.
Installation Tools
To replace the speakers you may need the following tool:
- jigsaw,
- electric drill,
- Phillips and flathead screwdrivers,
- knife,
- soldering iron,
- pliers,
- set of car keys,
- panel puller,
- file,
- insulating tape,
- plastic clamps for fastening wires.
Video: learning how to independently connect speakers to a car radio
This is interesting: How to choose a GPS navigator for a car and install it
Preparatory work: how to remove the trim
Before carrying out work, turn off the ignition and disconnect the negative cable from the battery. Then do this:
- Often there is no speaker panel, and the speakers are hidden behind a non-removable mesh (grid) of the door trim. In this case, remove the door handles that interfere with dismantling. If there are fastenings with self-tapping screws, remove the protective plugs and unscrew the screws. Then remove the trim.
Slowly rocking, remove the panel, releasing one fastener after another.
- If the standard speakers are covered with a separate decorative panel, carefully pick it up in the least visible place and pull it, roughly identifying the attachment points. Slowly rocking, remove the panel, releasing one fastener after another.
Remove door handles and other body parts that interfere with dismantling
- If fastening with plastic clips, hook the trim in a less visible place, being careful not to leave scratches on the surface. Remove it, releasing the latches sequentially around the perimeter of the door.
How to remove a standard speaker and attach a new one
Further work will require patience and attentiveness from you. Only compliance with the sequence of actions below guarantees correct installation of the speakers.
- Once you have access to the speaker, unscrew the fasteners and pull the speaker out towards you. Disconnect the connector with wires.
Unscrew the fasteners and pull the speaker towards you. Disconnect the connector with wires
- If the standard speakers are attached with plastic rivets, do not drill them out, but pick them up with a screwdriver, grab them with pliers and pull them out of the mounting sockets. In this case, the rivets will most likely be broken.
- After removing the stock speaker, try on the new speaker. Ideally, it can be installed on the old seat. Assess whether the column will interfere with the operation of mechanisms hidden behind the casing.
It is advisable to cover the door (the area of the door near the speaker) with sound insulation, vibroplast or something similar
- Before attaching the speaker, it is advisable to cover the door (the area of the door near the speaker) with sound insulation, vibroplast or similar material. This will significantly improve the sound of the speakers.
What should be the power of good speakers?
When analyzing the concept of speaker power, it is worth remembering that the value of this indicator should be slightly greater than the outgoing power of the car radio. Otherwise, all attempts to obtain more or less high-quality sound will be reduced to zero.
Video: how to find out the power of the speakers
Typically, speakers are labeled with a rated and peak power rating, with the former indicating the power at which the speaker can be operated for long periods of time without the risk of damaging the cone or overheating the coil, and the latter indicating the maximum power the speaker can withstand for a short period of time. .
Choosing the right speakers and radio
First of all, specialized audio equipment is intended for installation in the car interior. Manufacturers of car speakers take into account not only sound quality, but also difficult operating conditions: vibration, dust, temperature changes, etc.
Is it possible to install household or variety speakers in a car?
Computer and concert speakers are designed for more gentle conditions. They most likely won't last long in a car.
In addition, computer speakers usually require not only a sound source, but also a separate power supply, without which they will not work, while car speakers are connected only to the output of an amplifier or radio.
As a rule, it is advisable to buy speakers where it is possible to evaluate the sound quality. Appearance does not play a special role, since in the car's interior the speakers are usually covered with a decorative mesh or grille.
Choosing suitable speakers for a car consists of determining the basic requirements for them and comparing the technical characteristics of several models of the same price category
Is it possible to install speakers in a shelf without speaker holes?
- Not worth it if... in a car the rear parcel shelf is load-bearing. In this case, it adds rigidity to the body, and drilling holes in it is highly not recommended. Many people still go to the length of making a hole and screwing in an oval - as a result, the glasses begin to burst and the integrity of the car is compromised. If there are no seats in such a car initially, we do not recommend making them.
- It’s possible if... it’s a hatchback with a folding shelf. In such a car you can cut holes and insert speakers without any problems. This will not replace a good subwoofer, but will be a budget solution that will provide an increase in sound quality in the shortest possible time for minimal money. Problems will also not arise in a car where the hole already exists and you can simply install a speaker there.
Component Audio Source Locations
The sound quality of coaxial speakers satisfies most motorists, but not all. The design disadvantage of coaxial sound is that high-frequency tweeters are placed in inaccessible places along with the front speakers. To overcome this disadvantage, component systems with speakers spaced apart in space are used.
The peculiarities of high-frequency sound propagation require that, firstly, the tweeters be oriented towards the listener, and, secondly, that there are no obstacles between them and the ear.
Due to the layout of car interiors, it is difficult to choose the ideal location for tweeters. The most acceptable compromise between price and quality is to place the low- and mid-frequency speakers in their standard place and move the high-frequency drivers to the dashboard or the A-pillar.
Connecting tweeters
The installation procedure for component speakers is given below:
- With the battery turned off, install the crossovers in a place protected from dust, moisture and vibration. Connect the crossover filters directly to the output of the radio. Place the wires under the casing.
When installing crossovers, make sure that they are reliably protected from dust, moisture and vibration
- Connect the tweeters to the crossovers using a temporary circuit without fastening.
- If there are no crossovers, connect the high-frequency speakers in parallel with the main ones through a capacitor connected to the open circuit (do not use an electrolytic one) with a capacity of about 1–1.5 μF.
- Apply power and select the most suitable location for mounting the tweeters, based on sound quality. Disconnect the battery.
- If necessary, drill holes in the panel for tweeters. If using cabinet speakers, mount them in the chosen location, route the wires and connect them to the crossovers.
If you decide to use cabinet speakers, securely attach them to the corners of the dashboard
Selecting speakers without an amplifier
If a car owner is faced with the task of choosing speakers without an amplifier, then you need to understand that achieving high sound quality will be almost impossible. Remember: without an amplifier, car audio is simply unable to reveal its full potential.
But don’t be upset, because not everyone needs a first-class speaker, and it is quite possible to achieve sound quality that is sufficient for the average user. For this, it is recommended to use speakers with a high level of sensitivity and light suspension (ideally made of paper or Kevlar).
How to connect speakers in two-piece systems
Approximately 80% of car enthusiasts who install component sound systems are limited to installing additional tweeters. For some, this is not enough, since achieving the highest sound quality is impossible without “drawing” the lower frequencies of the sound spectrum to the point of the limits of human hearing.
Obstacles to the propagation of vibrations of the lowest frequencies degrade the quality slightly. Therefore, huge subwoofers operating in the lower sound band are placed in the trunk or on the rear parcel shelf.
A component car audio system can contain from 2 (including tweeter) speakers per channel to 4, 6 or more
Thus, a component car audio system can contain from 2 (including tweeter) speakers per channel to 4, 6 or more. Practical implementation depends on the aesthetic requirements of the car owner, his desire to spend money and time to achieve them.
Scheme of channel-by-channel connection of speaker components
All components of the audio system are connected to each other by wires. Weak tweeters can be connected with almost any wire. Subwoofers are a completely different matter. With a power of 100 W, the speaker will require a current of about 8 A. To avoid mistakes, it is best to use a specialized speaker cable with a wire cross-section of at least 2.5 square meters. mm.
To connect the wires to each other and to the speakers, depending on the design features, use standard connectors, terminals or twisting with mandatory soldering
Wires for connecting speakers are laid in inaccessible places, covered under removable casings as far as possible from other wiring harnesses. The sound lines are inserted into the doors through standard rubber accordion covers.
By following the recommendations outlined above, any owner will be able to equip their car with good sound. How many speakers will be used and where exactly they will be installed depends on the design features of the car and the desires of its owner. And the secret of success lies in the availability of the necessary components and accuracy when performing work.
External tuning
So, you have chosen a good acoustic system, installed it and stuck a sticker on the car. But you don’t have enough and you want the car to shimmer with all the colors of the rainbow to the rhythm of the music flowing from the cabin. To do this, you need to tune the car doors by installing additional LED lighting in them, and don’t forget about noise and vibration insulation.
LED interior and door lighting
One of the options for light tuning is the use of an LED strip, which will not only decorate the car at night, but also blink to the beat of the music playing. Please note that the type of strips and the number of LEDs plays an important role. To obtain more saturated light, it is better to use tapes with SMD diodes. Tapes with fewer diodes will shine worse.
The main advantage of such tapes is that, if necessary, they can be cut using ordinary scissors to any desired length. Attaching the tapes to the car door is very simple - just remove the protective coating from its back side and attach the tape to the door with an adhesive backing. LED strips come in both single-color and multi-color. They are powered from a 12 Volt network. They can be attached not only to the door, but also to the trunk, and to almost any surface: bumper, around the license plate, etc.
To sum up all of the above, it can be noted that creating high-quality acoustics in the interior of your car is not a difficult matter. The main thing is to purchase only high-quality equipment and have an accurate plan and idea of the future result. The remaining factors depend only on your desire and the amount of money that you agree to spend on the business.
First, let's look at the head unit
I suggest you choose - KENWOOD KMM-304Y
It has a processor with delays and filters and 6 RCA outputs, which makes it possible to create different system options. The Kenwood KMM-304Y can allow you to build a decent-sounding system on a very modest budget.
You can even organize a channel without separate amplifiers - in 3-WAY you can connect a speaker to the GU. Then a separate amplifier will be needed only for the subwoofer. It couldn't be simpler or cheaper.
But we'll talk about a better system using amplifiers!
Next, let's look at acoustics!
In the front doors - Component speaker Ural AK-74.S
This acoustics has all the makings of a good acoustics, but for little money!
The basket is covered with anti-resonance coating. Convenient spring type terminals. The compressed cellulose cone features a phase-equalizing bullet to improve sound at certain frequencies! The build quality is good; no traces of glue or crooked elements were found in the structure.
The sound is clear, accurate, balanced, there is not much low end, but very detailed drums, high frequencies are moderately clear and airy!
In the rear doors or shelf - Coaxial speaker Ural AK-74
Almost all the advantages and advantages of their older brothers Component Speaker Ural AK-74.S , only all in one design!
Competent choice of acoustics is the most important task
Front acoustics
As a rule, such acoustics are installed in standard places intended by the manufacturer. If the quality of the front acoustics is not very good, then you can endlessly improve the head units, even spending crazy money on it, but nothing meaningful will be achieved. Therefore, choosing front speakers is the most important task that a car owner must solve. So:
- When choosing this acoustic system, the first thing to pay attention to is sensitivity. When purchasing speakers and an amplifier, you should try to obtain complete information about the technical characteristics.
3-way front speakers
- Each acoustic, we must always remember, has its own sound character and before buying it, you need to decide what sound quality can satisfy individual tastes.
- There is such a term as an acoustic tweeter. This is a separate speaker used in acoustic systems and designed to reproduce high and ultrasonic frequencies. So, it is believed that a silk tweeter produces a soft sound, and a metal tweeter produces a hard sound. Soft sound, as a rule, appeals to lovers of classical music, and hard sound is a delight for rock lovers.
Note. On the other hand, acoustics with silk tweeters are omnivorous and can sound equally good both when playing classical music and when scoring rock. And in professional sound studios, silk tweeters are often preferred.
- In most cases, a metal tweeter is liked by those music lovers who value detail and assertiveness in sound, even at the expense of tonal bass. In addition, a metal tweeter is much cheaper than a silk tweeter.
- The tweeter, regardless of its type, is usually installed on top of the entire front speaker system. And in this case, its size plays a big role. So, if the tweeter is small, then this is not very good. The larger it is, the better, and it’s not worth considering a tweeter smaller than 20 mm.
Acoustic tweeter
- When choosing acoustics, we also pay attention to the midbass, which also determines the sound character of the acoustics. You can only catch its subtle sound in an audio system that has a separate amplifier.
Note. When choosing front speakers, it is advisable not to give preference to powerful speakers. We remember that a standard head unit has only 15 W of power and it makes absolutely no sense to install 250 W acoustic speakers with it. In addition, powerful speakers always have low sensitivity. Of course, we don’t mean special samples, but they cost a lot of money. For front speakers, 30 W speakers are quite suitable.
- For midbass, in turn, correct installation is important. Even regardless of the fact that the midbass is mounted in standard places, they must be modernized without fail. In particular, it is necessary to provide a flat surface so that the speaker basket is firmly attached. Installing a speaker in a leaky and flimsy door, which also rattles, is also considered a bad idea. Before installing a speaker here, the door needs to be restored and soundproofed.
- The size of these mid-bass speakers is also important. You need to pay attention not only to the diameter, but also to the size of the seat, that is, depth.
Note. Conventional front-facing acoustics with a tweeter have speakers with a diameter of 16 cm or 13 cm, and the depth of the seat is 5-6 cm. Some cars, for example, Japanese ones, do not have deep seats for speakers, and the existing ones are designed for speakers less than 5 cm.
- If you plan to install the tweeter on a stand, then you need to check the front speaker kit in advance, which may contain the necessary tools for mounting the speaker at an angle.
- When making the correct acoustic calculation, we must remember that using perfect acoustics, it will have sufficient reserve for scoring the bass drum and solos, which is very important when playing high-level compositions.
- If preference is given to low-class front speakers (due to insufficient funds or other reasons), then there will be no opportunity to become familiar with the intricacies of sound recording.
The difference between front and rear speakers
So:
- As a rule, the task of frontal acoustics is to provide high-quality sound to the driver and front passenger, first and foremost. In this case, attention is also paid to the rear passengers, but normal sound is out of the question.
Diagram - connecting front speakers
- Rear acoustics, on the contrary, are designed to provide some comfort specifically to the rear passengers.
- As a rule, a coaxial system is always selected as rear acoustics.
Next, let's look at the subwoofer and amplifier for it
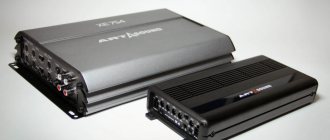
I suggest taking JBL Stage 1200B and SWAT M-1.500
JBL Stage 1200B subwoofer , although not powerful, is of moderate quality, suitable for increasing low frequencies, efficiently and accurately, highlighting the lower frequencies! Of course, it won’t shake the windows and drive the wind, that’s not what it’s for! The bass is very fast and accurate. No chirping or buzzing, the sound is pleasant. The depth and power of the bass is certainly not enough. But for the price it's an excellent sub!
A compact and lightweight subwoofer that fits easily into any trunk. Carefully covered with carpet, there are protective grills.
SWAT M-1.500 amplifier is a very compact monoblock. It has good filters and tuning, has a subsonic (although it is not needed for the JBL Stage 1200B) and has a phase control (smooth) that will make it possible to coordinate the front speakers and the subwoofer! I installed such an amplifier in a BMW X5 in a niche where there was an CD changer for the Kicker subwoofer, it plays clearly, controls the speaker well!
“Nominal output power at 4 Ohms” is 300 W, and for the subwoofer “Nominal output power at 4 Ohms” is 250 W, which is completely acceptable and will not let you burn out your speaker, no matter how much you want!
This monoblock is also suitable for a more powerful subwoofer, because... it is capable of pumping 500W into 2 Ohm
Types of car acoustics
Today there are two types of speaker systems on the market:
- Coaxial acoustics are made in the form of speakers. It consists of 2-3 speakers of different frequencies. The main advantage of the technology is ease of installation. There is no need to drill anything or make additional holes in the panels. But due to the desire to simplify the design, the main drawback of such systems “comes to light” - low quality of workmanship. But there is no certainty here. If you choose acoustics from a well-known brand and at an affordable price, then the design and quality will be excellent. The main thing when choosing is to pay attention to the technical characteristics, material and workmanship of the speaker base.
This is what coaxial car speakers look like
- Component acoustics belong to the category of composite ones. This means that the speakers will have to be mounted separately, and each of them will have its own sound frequency. This system has several disadvantages:
- high price;
- the need to install speakers, which requires special fastenings and cutting suitable holes.
This is what component acoustics looks like
But there are also advantages - with proper installation, you can achieve purity and maximum sound power. The main thing is to pay attention to the sensitivity and power of the device. An important issue is the dimensions of the speakers, which should look good in the interior of the cabin.
When do rear shelf speakers need an amplifier?
There are two main types of people who use car audio. The first ones like it to be loud and energetic. The latter listen to music in the background while driving, so that it does not distract from the traffic situation. If you are one of the first ones - you want to surprise your friends, and open doors in nature and get a cool sound - you desperately need an amplifier.
The purpose of an amplifier is simply to amplify the input signal. The head unit usually produces 18-20 W, which is enough for listening at volume level when we communicate. If you want more, we install an amplifier that increases the amplitude of the signal from the head unit. Thus we get a louder sound.
The manufacturer puts its potential into the speaker. There are speakers that were originally designed for low power. They have high sensitivity without claims to super detail, quality, and so on.
And there are rear-shelf bass speakers of higher series that can convey good bass and fierce attack of instruments. But for this, the power supplied to them must be greater. To unlock the potential inherent in them by the manufacturer, you will need a car amplifier.
Car radio + speakers - classic scheme
This is the most budget-friendly and common way of voicing a car.
Music of this configuration can play quite loudly and is much higher quality than the factory device. As a rule, coaxial acoustics are purchased for such a circuit. For the front doors - 5-6.5” (13-17 cm), for the rear shelf - “ovals” (“pancakes”) 6x9 inches. You shouldn’t get carried away with the number of coaxial strips, two are enough - 99% of people will not hear a piezoelectric supertweeter at 22 kilohertz. In general, the softer the suspension and the larger the diameter of the diffuser, the lower the sound the speaker can reproduce at low power. If ready-made podiums are sold for your car, use this solution. This is especially true if the standard seats have a diameter of 10 cm (4”) - in this case, switching to 16 cm speakers will give a noticeable effect in terms of midbass.
- To raise the sound stage higher (if it is appropriate to talk about it in the context of this configuration), it is advisable to install component acoustics (“spaced”) in front. We place a separate HF unit (tweeters, tweeters) on the front windshield pillars, in the corners of the dashboard, or in the area where the side mirrors are mounted.
- For denser bass, it is necessary to replace the rear shelf in the hatchback with a plywood one. In a sedan, you need to cut out the metal of the body panel and strengthen the structure (make wooden spacers between the base and the cladding). Owners of station wagons will have to make more efforts by placing “speakers” in the rear doors or side niches of the trunk.
- If possible, replace the wires included with the speakers with thicker and better ones (with a cross-section of 0.75 mm²), and connect the radio power via a fuse directly to the battery through 2.5 sq. mm. in a corrugation (we take the control wire from the standard connection socket or ignition switch).
In this configuration, you can also use a 4-channel amplifier.
If the car does not have audio preparation, let’s not forget about the antenna.
How to choose the right size car speakers
If we talk about speaker sizes, experts do not recommend purchasing devices with a height of 4–5 inches (1 inch - 2.54 cm). It is better to opt for 6–6.5-inch models, as they do a good job of reproducing low frequencies (bass).
As a result, if you want to get high-quality HF reproduction, then you should opt for speakers with the smallest cone diameter. If getting deep and high-quality bass is paramount, then choose speakers with the largest cone diameter.
Car audio 2.— 2 “speakers” and a subwoofer
This is already a fairly serious configuration with an external amplifier, allowing you to get decent quality.
Based on budget and installation complexity, we divide this type into three connection options:
- Simple.
We connect the front “speakers” to the head unit, and take the signal to the active subwoofer (it already has an amplifier built in) from the linear subwoofer output of the radio or from the rear channels. - Fast.
Component “front” - from the “head”, “sub” - through a single-channel D-class monoblock or a two-channel auto amplifier connected by a “bridge”. - Correct. A system with a four-channel amplifier, where the head unit is used only as a source of low-current signal. We connect the front channels each to its own connector, and connect the rear channels using a bridge circuit. You can use a “three-channel” - such models are also available.
For such an audio system you will need to buy a set of wires. The larger the section, the better (8 gauge is enough). If you plan to leave the rear speakers for volume, connect them to the corresponding outputs of the receiver.
Whatever method you choose, to ensure the result does not disappoint, you should start with minimal noise and vibration insulation of the door cards. Instead of expensive “Dynamate” or “vibroplast”, you can use self-adhesive vibroinsulation from the construction market and polyurethane foam mats.
There is no limit to perfection - if you become seriously interested in car audio, you will subsequently end up with an expensive audio system with channel amplification for SQ or a full trunk of subwoofers for SPL. But even the options proposed in the article can seriously improve the sound inside your car today.
Ilya Ilmarin, 2020
Installing front speakers
We learned how to make the right choice and acoustic calculation. Now let's move on to the most important thing - how to properly install these speakers in a car?
Podiums
First, let's decide on such mandatory elements as podiums. Not a single serious installation is complete without podiums for midbass, which are located in front. And this applies to almost any car model. If you plan to install, for example, a 3-component front speaker circuit, then everything should look like this:
- On podiums in the doors there should be a midbass with a diameter of 16 cm.
- In standard places, for example, on a high panel, a midrange with a diameter of 13 cm is placed.
- The tweeters are given a place on the A-pillars.
The correct angle of midbass is the main subtlety and complexity of the installation. This must be selected long and hard, often experimentally.
Note. Of course, an ordinary person, far from high music, does not need to make an ideal midbass setting. It’s quite possible to assemble some kind of acoustic stage in a car, and “steer out” the unnoticeable disadvantages with the help of tweeters and midrange. Therefore, the angle of midbass and their shape can be selected by eye.
DIY podiums
DIY podiums for front speakers
Installing front speakers always involves choosing a technology for covering a plywood frame. There are currently several ways to do this:
- Cover the frame with a knitted T-shirt.
- Spray the sheathing with macroflex.
- Cover with fiberglass.
It is better to give preference to an intermediate scheme and spray macroflex onto the load-bearing frame and cover it with fiberglass. Tools and materials:
- First of all, you need eight-millimeter plywood. About 0.8 square meters of this material will be quite enough. In addition, we find scraps of hardboard and thick cardboard.
- We also prepare fiberglass, which should have a thickness of 0.25 mm. You can buy such material at a model aircraft store. About 2 square meters will be enough.
- Don't forget to also buy 0.06 fabric, as well as carbon tape.
- An important material is epoxy. It is advisable to buy this glue immediately in packages of 150 grams (7 pieces will be enough).
- We always buy polyester putty with fiberglass. You need one jar.
- We definitely arm ourselves with sandpaper, for which we find a rubber holder that can be bought at any hardware store.
- We also prepare a cutter, plasticine, PVA glue, Macroflex, screws and nails.
Preparing the frame
DIY podiums
First, we try on and understand that there can only be one acceptable shape for the bottom of the podium:
- From 8 mm plywood we cut out the bottom, a kind of ring for the speaker and side struts.
Advice. Note that it is advisable to immediately cut out all the parts in duplicate, so that it is much easier to adjust them to each other. In addition, it will be easier to maintain right angles when sanding.
- We assemble the entire structure using nails and PVA glue.
- The door pocket can also be used as a standard one. Therefore, you need to unscrew it and file it so that it matches the base of the podium.
- Fill the finished structure with Macroflex, always in a thin layer.
- After drying, we trim off the excess and shape it using sandpaper.
- We putty the surface.
Pasting with fiberglass
As mentioned above, you need to use thick fiberglass fabric. ST will have to be calcined over fire, because it is initially impregnated with paraffin.
- Rub the epoxy glue into the foam.
- We put ST impregnated with resin. After this, two more layers.
- You can also paste over the top with carbon tape, but this is not necessary.
Final stage of work:
- An additional backdrop is cut out of hardboard and glued to the plywood with epoxy glue.
- Then putty is applied, which must be quickly leveled, otherwise it will harden.
- After drying, smooth with sandpaper.
- We cover the frame, preferably with vinyl. We use a hair dryer and special glue in the process.
Final installation
Acoustic podiums are ready. Now all that remains is to install them correctly. If the podiums were purchased ready-made, then all the same, you need to read these instructions so as not to make mistakes:
- Use a knife to cut a hole in the door trim.
- We screw the podiums to the plywood base with self-tapping screws.
- It is better to install a lining that must be cut out of plywood in advance. It will then need to be coated with sealant and tightly screwed to the door with self-tapping screws.
Note. The podium is firmly set through the gasket.
- It is also advisable to secure the door trim with self-tapping screws, since the pistons do not hold very well.
- Installing speakers.
Installing speakers yourself will probably not be particularly difficult. The instructions given here will help you do everything correctly, if you don’t forget to watch the video and photo materials during the process. The price for making podiums for frontal acoustics will not be high, because you only have to pay for consumables.
Grigory adored cars since childhood, and in his teens, when he independently connected the car radio in his father’s nine, he realized that cars would be his job, hobby, calling.
Grigory Romanchuk
Published: 10/03/2014
Add to favorites Printable version
What does car acoustics consist of?
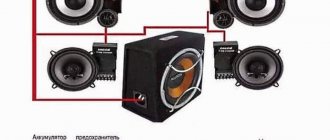
A car audio system is more than just a radio and a few speakers. It consists of a group of devices, the choice, location and installation rules of which determine the sound quality. Let's consider the main elements of the system:
Crossover (pass filter)
This is a special device for dividing sound into several bands. In appearance, a crossover is a compact box that is mounted in the circuit between the speakers and the amplifier. Depending on the design, crossovers are made passive or active.
Crossover for acoustics
Amplifier
When purchasing this device, consider what functions the device will have. If a radio is needed to create a general background and listen to the news, then spending money on an amplifier for a car is pointless. When the task is to obtain high-quality and powerful sound, you cannot do without a special device.
Acoustic amplifier
When choosing an amplifier, consider the following parameters: power (must be at least 100 watts), interior volume and available acoustics. If you install a 100 W amplifier with 10-15 W speakers, then the latter will not “live” for long. The very first attempt to increase the volume will damage the diffuser, which cannot be restored. The amplifier power should be 10-15% less than the same parameter for the subwoofer and speakers.
Power is not the only parameter that should be paid attention to when choosing. Please note the following points:
- operating frequency range - no less than 30-20000 Hz;
- The signal to noise ratio (background level) should be between 96 and 98 dB. Otherwise, the constant noise between songs will force you to buy a new amplifier;
- number of channels. Modern devices for sound amplification are produced with 1, 2, 4, 5, 6 channels. Please note that there is a separate output for the subwoofer.
Subwoofer
The main task of the device is to produce low frequency sound. The main parameter when choosing a device is power. The subwoofer itself is available in two types:
- passive. This device does not have a built-in amplifier;
- active - with an amplifier in the device housing.
Car subwoofer
For the subwoofer to work properly, it is necessary to ensure the correct sound design, namely the ideal interaction of the front and rear waves. There are three ways to solve the problem:
- make an endless screen. The main advantage of this method is ease of installation and high quality bass. Minus - low sound pressure level and the appearance of differences in sound effects with different filling of the luggage compartment;
- The bass reflex is a closed box with a special hole (tunnel) that acts as a connector between external and internal sound. The disadvantage of this method is the complexity of calculation, installation of the box and the large volume of the finished product (finding a place for it in the trunk is a difficult task). The advantage of this design is minimal sound distortion and the greatest impact of low frequencies;
- The closed box is distinguished by its simplicity of design, excellent bass quality and reliable protection of the speaker from accidental mechanical influences. On the other hand, the efficiency decreases, so it is better to select an amplifier and speakers with more power.
Music in the car: where to start?
Don't like the sound of the standard audio system? This is fine. But then the classic Russian question immediately arises: “What to do?” Let's see!
Owners of cars in the middle price segment are most often dissatisfied with the sound of standard audio systems: costing from 500,000 to 1 million rubles.
As a rule, all kinds of factory configurations of such machines do not differ in the variety of audio preparation options: at best, there is a choice of two or three systems. Moreover, they will differ from each other mainly in the number of speakers or the presence of a more functional radio.
In the minimum version, the audio preparation of a “mid-range foreign car” is four speakers and a radio, while the “maximum” option is up to 13 speakers. I don’t want to particularly criticize manufacturers, but in cars in the mid-price segment, an audio system is added just “for the sake of it.” And often, even after ordering the most sophisticated audio preparation, the owner is dissatisfied with the sound. There's nothing you can do: we need to improve.
And it is best to do this in stages, starting, as they say, small. For it often happens that after you do one thing, the other is no longer needed.
Changing speakers
The first thing to start with when “reworking” a standard audio system into something more pleasing to the ear is replacing the standard speakers with higher quality ones and a higher class.
Then minimal audio preparation is done. Here, in particular, they make separate preparations for the doors for installing speakers, during which the cavities are damped and vibrations are eliminated. In this case, they leave the “original” radio and connect everything using the factory wiring.
Replacing the standard acoustics and soundproofing in the workshop will not cost the owner that much money - they will ask for everything along with the work
15,000-25,000 rub. However, the sound of the system will change noticeably, and its quality will become noticeably different.
Many people stop there. If the owner does not have any special complaints, and he listens to music in the car “on the go,” then replacing the standard acoustics along with sound insulation is often enough.
Connecting the amplifier
If not, then the next step: installing an external, additional amplifier. This is done not so much for the sake of volume, but to improve sound clarity. The point is that the built-in amplifier in the standard radio, when the volume increases, introduces distortion into the audio path of the system across the entire frequency spectrum: the so-called. clipping.
An external amplifier allows you to provide a wide range of the signal going to the speakers, good parameters for its increase, etc. In a word, with an external amplifier the sound is cleaner and better.
However, the problem is that not a single standard radio has linear outputs to an external amplifier. Such “outputs” have to be obtained artificially.
The easiest way is the so-called. “passive”: when a circuit is assembled on transformers that lowers the level of the output signal from the radio to the level required for connection to an external amplifier.
This scheme costs little: 1,000-2,000 rubles. However, in this case, all frequency distortions carried by the standard audio path do not disappear anywhere and are transferred to an external amplifier. The advantage of this connection scheme is ease of installation and minimal intrusion into the standard head unit.
A more advanced option is the so-called. “active” circuits that “intelligently” process the signal. As a rule, these are ready-made devices, which, depending on the manufacturer, cost from 5,000 to 15,000 rubles.
However, the most advanced way is to modify the standard radio itself and organize linear outputs in it. To do this, the head unit is disassembled, the connection point to the built-in amplifier is found, and a line level signal is output. Such work costs from 7,000 rubles.
A logical alternative, it would seem, is to simply replace the standard radio with a new one, which already has linear outputs (no need to invent anything - just plug it in) and higher functionality. For the same 7,000-15,000 rubles. You can pick up a device of a very decent level!
However, the main problem that non-standard radios bring with them is the interest of criminal elements in them: simply put, theft. Any device, even the simplest one, attracts thieves like a magnet. Finding broken glass and a torn panel when approaching a car is a typical case.
In addition, non-standard devices often require rather complex and expensive installation into the panel, so many people decide to modify the standard device.
Of course, if you want to have “advanced” functionality in the form of MP3 playback, USB connectors, memory card slots, Bluetooth, a color LCD display and other things that audio equipment manufacturers now pamper consumers with, the radio will have to be changed.
By the way, replacing the radio may also be necessary in order to change the standard car acoustics.
In a number of cars in the high price segment (for example, Audi and Mercedes), it is impossible to replace just the speakers - you need to change the entire audio system. And if the equipment is also “advanced”, and the audio is tied to an intelligent control system, then any upgrade is associated with very serious technical difficulties. In some high-end cars, it is completely impossible to dispense with the standard audio system.
We install a subwoofer.
The third stage is installing the subwoofer. Not everyone gets there: better-quality speakers are already starting to produce good bass. Coupled with an external amplifier, the sound is already very high quality and clear, which is quite enough for the average user.
However, you often want more, and if the owner listens to modern electronic music, then a subwoofer is indispensable.
By the way, we warn readers against teenage nonsense and wasted money. Namely: from purchasing a ready-made subwoofer with a built-in amplifier and connecting it to a standard audio system.
There are now a lot of different “boxes” and “barrels” on sale at affordable prices, which you can connect either yourself or for little money in a “garage” service. But nothing good will come from such an “installation”! Almost certainly there will be an indistinct banging and buzzing sound that does not agree with anything.
In order for a subwoofer to sound correctly and truly beautifully complement the sound picture, it must be built to fit the existing speaker system, taking into account the space of the car. And only so!
In terms of price, together with the installed subwoofer, the modified audio system will cost approximately 50,000-90,000 rubles.
...and a new radio.
How much did you run in total?
Well, the last stage is replacing the radio. As we have already said, this is done both for the sake of new functionality and the sound of the device itself. By the way, many high-end devices provide only spartan capabilities: their “direct purpose” is to spin disks, and an equally ascetic design.
If you do not take Hi-End class components, but simply install high-quality elements from well-known manufacturers, then you will have to pay 50,000-170,000 rubles to replace standard acoustics, install a subwoofer and a playing device. For a car bought for 1 million rubles, probably not so much. Although, is it even possible to compare the pleasure received from good music with anything?