Now we will show you how to create really good stage speakers with high power and efficiency for relatively little money at home. There are often situations where someone buys speakers with excellent parameters, and, despite everything, the effect ends up being mediocre. But the fact is that a design based on normal technical developments and careful measurements, plus decent workmanship are essential for the formation of professional sound.
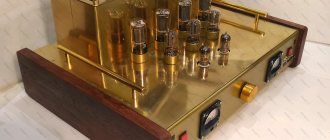
This is a 1 kW amplifier, under which the speaker system will be created.
Speaker technical data
- System: 2-1 with 2-way low-frequency reflector
- Rated power continuous – 600 W RMS
- Peak power – 1200 W
- Efficiency (1 W at 1 m) – 102 dB
- Maximum SPL – 129 dB
- Frequency response (-3 dB) 62 Hz – 20 kHz
- Nominal resistance – 4 Ohms
- BR setting - 55 Hz (measurement)
- Material – 12mm hardwood plywood
- Finish – structural varnish
- Speaker weight: 27 kg
- External dimensions (HxWxD) – 102 x 40 x 43 cm
- BR tunnels – two PVC pipes with a diameter of 110 mm and a length of 70 mm.
- The usable volume of the speaker is 97 liters.
- Woofers – 2 Celestion TF 1225 tweeters
- Tweeter – STX D800ti MRH-83
- Bandwidth – 18/12 dB passive crossover with switching stabilizer.
The body was designed using 3D technology, which allows you to predict all the complex physical relationships of elements with each other, in other words, you can almost feel the finished project while it does not yet exist, plan every little detail and there will be no mistakes that something will not fit . Even at the design stage, you can achieve the highest accuracy.
DIY speaker system
This project is about creating speakers from composite parts and wooden planks. You will need advanced woodworking skills and a good understanding of the inside of a sound system.
Materials:
- Wooden bars and planks
- Loudspeakers
- Paint (optional)
- Batting
- Wood glue
- Varnish
- Table saw
- Milling machine
Speaker assembly
To correctly trim elements, you must follow several rules: we use only one ruler all the time and draw lines with a black pen, not a pencil (its line is thinner, better visible and completely the same width - the pencil is erased).
Cutting elements that have angled and trapezoidal column slots, some of them must be done on a saw with an inclined blade. If you do not have such a saw, we recommend that you contact a carpenter - it will be beautifully and accurately cut.
Cutting a grate groove: Select a cutter with the appropriate diameter and set the desired routing depth on the router. Then screw the "guides" into the appropriate line for the router, this is important and quite difficult because the guide must be screwed parallel at the ideal distance. The best way to define it is:
- Screw the guides with two screws (a straight strip, such as plywood) to a piece of plywood and draw lines along the guide on the surface with a pen (draw a line where it sticks to the board).
- We mill the groove and slide along the guide, pressing the milling machine tightly against it.
- Unscrew the guides and measure the distance from the edge of the groove to the previously drawn line.
- We have a line drawn on the feature where the groove should be, and we know the distance of the guide from the edge of the groove, so we measure and draw the lines.
- Screw the guides along the drawn line.
- Now mill the groove in the element by moving the milling machine along the guide
- Check, everything must be perfect, because the grate must be exactly level.
Useful: Voltage converter for powering a car amplifier
We cut out the supports for the grille, all 3 are very important, so we must copy them.
- Drawing a very precise arc pattern
- Precisely cut out the design and polish it with sandpaper.
- Draw copies of the picture, 3 per AC, and label them side up.
- Use a jigsaw to cut copies with a small margin
- To copy, screw the design evenly and cut off the excess with a router with a suitable knife, and you will get a finished copy, each copy will be identical.
The holes that need to be cut on the front panel are drawn, so in the center of the circle (which will contain the speaker), insert a needle, mark the hole with a nail (for a drill) and drill a hole into which we insert the axis of the router bit.
It is best to use a thin cutter with a diameter of up to 5 mm (the easiest method). Rectangular holes are easiest to cut using a jigsaw.
Round holes that are too small for a milling machine (for example for a BR - bass reflector) are also made using a jigsaw and preferably using a hole saw for a drill of the required diameter.
We put everything together, we do it precisely with the help of glue and screws (plywood screws 12 mm “3.5 x 35” each 10-15 cm.
Remember that the element that is screwed to another must have holes for screws (3-4 mm drill), the screw head must be hidden under the surface by about 4 mm, especially along the edges of the column, which will be rounded, so you should additionally drill a chamfer with using a 6 mm drill with the drill depth stop set to 4 mm.
Apply a lot of glue along the entire length. The squeezed-out excess is quickly wiped off with a damp cloth. We install the mounting supports.
When we assemble everything, mount the speakers and look for the center of gravity, there will be handles at such a height that it will be convenient when moving the speaker.
Then we unscrew the loudspeakers and do finishing work for varnish. The edges (panel joints) are milled with the same cutter that was used for copying. We need to align the joints of the plates, now we begin to round the edges using the appropriate rounding tool, which was used with a radius of R = 10 mm.
The best effect is achieved by sanding with an orbital sander (equal to a table and a smooth surface) using varnish.
The quality of surface preparation is of great importance.
Home acoustics. Selecting the number of bands
Before you begin choosing the necessary acoustic components, you need to decide on the number of bands. Ideally, bookshelf home acoustics should be single-way, but not everyone will be able to make a separate acoustic element for each of the strips.
As a result, we have to make compromises and produce two or even three-way speakers. We recommend that you opt for the classic two-way version, which can use speakers responsible for low (bass) and high frequencies.
Choosing acoustic speakers
The main requirement for speakers is the optimal combination of sound quality and cost. You must understand that you will not get high-quality sound from speakers that are offered to buyers for 300 - 500 rubles. At the same time, we would not recommend chasing high-end acoustics, which can cost several thousand dollars. That is why you need to maintain a kind of golden mean, which will allow you to create high-quality bookshelf acoustics at minimal cost.
We used inexpensive four-ohm Vifa XT19SD-00/04 ring-rad tweeters as high-frequency speakers. For their price, they have high sound quality and are popular among audiophiles.
For low frequencies, we used Soundstream Exact 5.3 speakers. These speakers allow you to get clear bass and high-quality mids at the same time. The do-it-yourself speakers mounted in an aluminum cast basket operate from a four-ohm voltage and at the same time have a minimal size. If possible, we recommend purchasing these woofers, which will allow you to create high-quality bookshelf speakers.
After the loudspeakers have been purchased, you can proceed directly to creating acoustics.
Passive acoustics or active acoustics
Each type of acoustics has its own advantages and disadvantages. When choosing passive or active acoustics, you need to decide on the future size of the box and the dimensions of the speakers. The possibility of using separate modules that connect to the speakers and control their operation is also taken into account. Subsequently, you can easily combine and replace such modules, which will allow you to change the sound of the acoustics.
A significant disadvantage of active acoustics is its relatively high cost. In this case, it is necessary to install a special amplifier, the cost of manufacturing which may in some cases be greater than the cost of manufacturing the acoustics themselves. Low frequency amplifiers must be installed in each of the speakers. Whereas when using passive acoustics, you can get by with one amplifier.
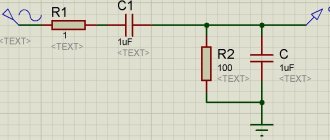
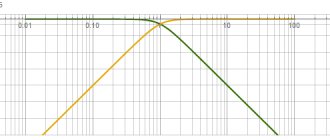
Speaker crossover diagram
Crossovers are made based on measurements, here is a diagram.
We put everything together - we insert sound insulation, crossovers, cables, etc. We put on gaskets for the speakers, handles and cable entry. We install the speakers (here on hex screws with nuts).
BR (bass reflector) tunnels are made of PVC pipe, they have rounded exits so that they do not hum, ventilate them, then paint them black with a spray can, then press a black grille into the groove (preferably powder coated), glue strips of black felt on the grille supports so that they did not buzz and the assembly was completed.
As a result, the speakers sound very good. We had a combat test at a wedding, and everyone praised them very much for their sound and capabilities, no one even believed that these speakers were not store-bought!
iSpeakers, do it yourself
October 22, 2012 jozhik
I’ll make my contribution to the psychedelic trash “crazy hands”. So, it’s Friday, urgent matters have been redone, non-urgent ones have been postponed until next week. The soul wants a holiday. What's a holiday without music? That's right, no way! But for some reason the office didn’t buy us any speakers, sad thing. But our hands are not for boredom!
To make iSpeakers you will need:
- Sound warning speakers found in a warehouse. I think everyone has it, you just have to look for it)))
- Box of paper.
- Screwdriver.
- Cutter, sir
- Scotch!!
We open the box and we are faced with the first global problem - the box is jam-packed! The speaker doesn't work!!
- Option 1 - cut a recess for the speaker with a screwdriver and a cutter. But... a lot of dirt.
- Option 2 - gut the box.
We mercilessly shake out the insides of the box! We don't regret anything!
Further attention! A very complex process - you need to get one piece of iron with a cross into a bunch of small ones. Just a reminder, it's Friday...
Unscrewed? Well done. We continue the exercise... ugh, design. Turn the mesh over and make cutouts under the legs in the bottom of the box!
Then we apply the speaker and trace it with a pencil. Keeping everything smooth is important!
Then we try very hard to cut out the circle, moving away from the edge. Wow, it turned out to be an almost round hole biggrin.gif
We push the legs of the grille into the cutouts, look from the inside, and are touched
Next is a very difficult moment. We need to get together! From the inside we are trying to get screws into the seats on the grille. It turns out to be rubbish, but it doesn’t matter - the goal is close!! We hit two - the other two will go on their own
All! We screw the wires, put the cover on, and secure it with tape. The sound system is ready.
But we need STEREO! Let's repeat it all again... I really got up to speed and did three! The question “why?” It’s not worth asking)) We screw the wires to the 3.5 jack and into the computer! Works without amplification from the built-in sound.
Budget
10 rubles for a plug and 52 rubles for a wire because I couldn’t find any long ones.
Source: https://baseacoustica.ru/izgotovlenie/31-izgotovlenie-kolonok/191-ajkolonki-svoimi-rukami.html
Housing materials
Rice.
2. Acoustic system made of concrete Beta Andromeda. In addition to the types of acoustic design, materials also have a significant impact on the quality of sound reproduction. Depending on the material used to make the speaker cabinet, the front and back walls of the box emitted sounds of different lengths. This led to increased attention being paid to the material from which the speaker enclosures were made.
Ideally, the sound emanating from a speaker placed in the speaker system body should be subject to minimal distortion when reaching the human ear. Considering that the most common material used by man for many millennia is wood , its use in creating speaker cabinets is quite natural. Moreover, nature has endowed the Earth with a wide variety of natural renewable raw materials.
But the structure of wood fibers varies between different types of wood, which makes it necessary to take this natural effect into account. The conditions in which the speakers are operated may have different air humidity. This leads to expansion of the fibers and, consequently, to a change in the quality properties of the entire acoustic system.
laminated wood , as well as cases made using modern technologies, have found proper application
It is technology, coupled with natural wood, that has given rise to the most diverse and high-quality derivatives of wood processing:
- multilayer glued plywood ( OSB );
- chipboards ( chipboards ) lined with veneer or plastic with a decorative pattern on one or both sides of the panels;
- fine fraction or fibreboard ( MDF ).
In addition to wood and wood processing derivatives, other materials used to create speaker cabinets have also found their application. This is, first of all, stone in general and the most popular material is slate . But the material, which is easy to process and absorbs vibration well, has impressive weight.
Plexiglas allowed all loudspeaker lovers to literally look inside the once opaque closed speaker housing.
Metal also did not stand aside in the manufacture of speaker cabinets. The most popular are aluminum alloys , characterized by their lightness and rigidity. As a rule, the upper and lower panels of acoustic structures are made from this material.
And in a completely separate category are various exotic materials, from which attempts are also being made to create an optimal acoustic enclosure. This is both cardboard and simply pressed paper .
The search for minimizing sound wave distortion in modern speaker cabinets continues. You can get acquainted in more detail with the list of materials used in the manufacture of a variety of designs in our article “Materials of acoustic system housings”.