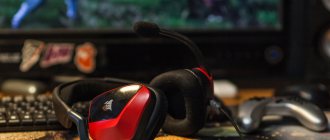
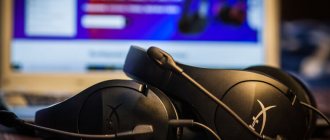
No, I'm not going to talk about creatures from horror films. There are such headphones Monster beats by Dr. Dre Studio.
In July 2011, a friend called me:
“Can you fix the button on the headphones?”
It fell off, the infection. - Bring it, we'll see. — Do you have AAA batteries or should you bring them too? - Are they “radio”? - No, wired. - ??? Bring it, we’ll figure it out... In March 2012, the dialogue was almost repeated, only it was about newly arrived headphones - the other button did not work. These two incidents made me write this article.
↑ Let's sort it out
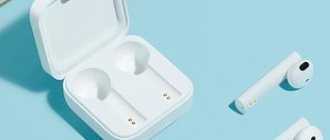
Why are there batteries and microphones near the speakers? Here's why:
MAX4410
- as the datasheet says - 80 mW class AB ear amplifier with a built-in power inverter and the absence of an output coupling capacitor.
The parameters are not surprising, but decent. MC33202
is a dual op-amp with low-voltage power supply. Nothing unusual.
This is how I turned them on in disassembled form. And then turned it off. They started up at a frequency of about 1 kHz. Well, I think we’ll also have to “shovel” the electronics. Wait, why are there microphones there at all? Looking at all this disgrace, the desire to draw the diagram completely disappeared. I assembled them without screwing in the screws. Turned it on. They won't start. Unfolded and started. It's clear. Stereo expander on microphones (and, apparently, on phase shifters) - the left channel microphone is in the right ear, the right channel is in the left ear. Hmmm... The fact that someone had already climbed into them before me was confirmed by the absence of a broken piece of the cover on the “On/Off” slide switch and the glued “Mute” button.
With the help of dichloroethane, pieces of plastic and a couple of strong words, the engine cover was restored.
How to disassemble headphones of different designs - instructions
In this article we will take a closer look at how to disassemble headphones of different designs (including wireless) using the example of popular brands (JBL, Sony, Samsung, etc.)
- Full-size on-ear headphones, using the example of wireless Beats and wired Sony;
- Vacuum headphones using Phillips as an example;
- Earbuds (Apple EarPods);
How to disassemble over-ear headphones
Plantronics GameCom 388 - ear pad disassembled
Generalized instructions for disassembling any full-size/on-ear headphone model look like this:
- We remove the ear pads.
- Unscrew the screws on the headphone housing.
- Carefully remove the speaker.
- If you need to replace the speaker, then carefully unsolder the wires coming from the speaker .
- We unscrew the remaining screws on the headband and headphone body if there is a need for complete disassembly, for example, when replacing individual parts of the headphone or headband.
(In general, the ear pads are removed quite easily and are held on by small latches, but in some headphone models, for example, Beats, they can be additionally glued. In this case, you will first need to carefully peel them off with a thin scalpel or knife if they do not come off on their own when you try remove them. You may also find headphone models in which the ear pads are additionally screwed with one or two screws to the headphone body, for example in some Sony models.)
On-ear (full-size) headphones are the easiest to disassemble. For this we need:
- Phillips screwdriver (according to the size of the screws on the headphones);
- A thin knife or scalpel (needed to carefully peel off the ear pads attached to the glue, as well as for other small things);
- Soldering iron;
1.1 Disassembly of wireless Beats Studio and wired Beats Solo headphones
Step 1.
Remove the cover from the battery compartment. It is located on the left side of the earpiece. To do this, carefully turn it counterclockwise. You also need to remove the pads. This is easy to do - press them on the side and separate them from the speaker.
Step 2.
Now we see two speakers. To disassemble the earphone further, we need to carefully remove them. To do this, take a Phillips screwdriver, unscrew the screws and remove the speakers.
Step 3.
Next we see two wires coming from the speaker (soldered to it). In order to remove the speaker itself, we need to carefully unsolder them.
Step 4.
After removing the speakers, you should be left with an arc and a side housing (spoon). In one of the headphone cases you will see a board. You need to carefully remove it. This must be done from the speaker itself. Behind the speaker you will see a plastic mount held in place by two bolts. To remove the board we need to unscrew these bolts, then both the board and the mount itself can be easily removed.
Step 5.
Now you need to unsolder all the wires soldered to the board.
Step 6.
Separate the side housing of the earphone from the arc.
Step 7
To do this, first unscrew the bolts on the arc itself, then on the body. Then carefully bend the inner part of the case from the outer one (they are held on by latches).
After this, calmly remove the necessary wires from the bifurcated housing. You will have one arc left.
Step 8
Now the headphones can be considered almost disassembled. If you wish, you can unscrew 4 more screws and detach the rubber bands from the latch to completely disassemble the arc. But, if you only need the wire from the arc, then it can be removed without problems immediately after performing step 7.
The headphones are put back together in the same way.
1.2 Wired Beats Solo HD
Step 1.
We remove the ear pads. To do this, turn them counterclockwise. The pads may be glued, so to remove them you will need to take a scalpel and carefully separate the pads from the body.
Step 2.
Now you need to remove the two speakers. To do this, take a Phillips screwdriver and unscrew the screws. Carefully pull out the speakers themselves.
Step 3.
Now carefully unsolder the wires from the speakers.
After that, we were left with only the arc and the side housing with wires sticking out of it. Now take a scalpel or flathead screwdriver and bend the inner part of the case away from the outer one (they are attached with a latch).
Step 4.
After bifurcating the side housing, carefully pull out the wire. Only the arc remains intact.
If you want to disassemble it, then unscrew the 4 screws on it and unfasten the rubber bands from the latch.
The headphones are put back together in the same way.
1.3 Disassembling Sony MDR XD100 and Sony MDR XB700 on-ear headphones
There is nothing special about this model. Basically the instructions and instructions are similar to the general one.
- We remove the earphone. To do this, unscrew one bolt on the headband that holds the earphone mount:
- Remove the part that holds the earphone mount:
- Unscrew the body of the earphone itself . To do this, you can first remove the ear pads, but without removing the ear pads, you can carefully find two bolts on opposite sides, as shown in the figure, unscrew them and remove the earphone, as we did:
- This concludes the analysis of our earphone .
- If you need to disassemble it further , or you want to change the speaker, re-solder the wires, then you need to carefully unsolder the two wires coming from the speaker with a soldering iron:
- If desired or necessary, you can disassemble the remaining parts of the headphone by unscrewing the remaining bolts on the body.
Let's look at the analysis of these headphones using the example of replacing ear pads. Taking into account the fact that this is not so easy to do in this model, I think this instruction will be useful to all owners of this and similar models.
- carefully move the ear pad and look for three bolts under the pad on the body (two next to each other and one separately on the opposite side).
If you do not want to disassemble the entire earphone , but only want to replace the ear pads, then you only need to unscrew one bolt - the second of the two that are located nearby on one side (as shown in the figure below).
To change the ear pads, we need to carefully remove the clip ring and remove the ear pad.
How to disassemble vacuum headphones
Let's look at the analysis of droplets using Philips vacuum headphones as an example.
- Carefully pry up the silicone ear pads with a screwdriver (you can use a file or your nails) and remove them.
- We take a utility knife and carefully cut the seam, after which we use a screwdriver to push the body halves apart.
- If there is a need to remove/replace the speaker, then carefully unsolder the wires and disconnect the speaker:
- The headphone mesh can be easily pulled out by prying it with a thin needle:
That's all. The earphone is disassembled. It is also assembled in reverse order. Only the previously glued parts will have to be glued again.
How to disassemble vacuum headphones:
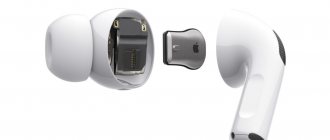
How to disassemble EarPods from an iPhone
Let's look at the analysis of droplets using the example of iPhone headphones - Apple EarPods. Any in-ear headphones can be disassembled in the same way. .
Disassembling the control panel:
The headset remote consists of the following components:
- two plastic covers - one on top, the other on bottom;
- elastic band with buttons;
- flexible board;
- oblong metal plate.
To disassemble the remote control, it is better to use a mediator.