Before you suspect that the sound card on your computer is broken, carefully inspect the existing PC connectors for external damage. You should also check the functionality of the subwoofer with speakers or headphones through which the sound is played - try connecting them to any other device. Perhaps the cause of the problem lies precisely in the equipment you are using.
It is likely that reinstalling the Windows operating system, be it 7, 8, 10 or the Xp version, will help in your situation, since the necessary settings could simply be lost.
How to choose a sound card?
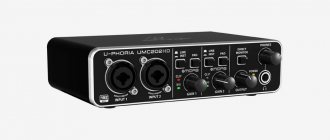
TOP 17: The best sound cards - for music and games (Rating 2021)
- RME HDSPe AIO (internal)…
- BEHRINGER U-PHORIA UMC22. ...
- Steinberg UR12. ...
- Focusrite Scarlett Solo 3rd Gen. ...
- Creative Sound BlasterX G6. ...
- BEHRINGER U-PHORIA UMC404HD. ...
- ASUS Xonar U7 MKII. ...
- Creative Sound Blaster Z (internal)
1 Mar
2022 Interesting materials:
How to calculate pension exit 2022? How to calculate the interest rate on a Microloan? How to calculate how many foam blocks are needed for a garage? How to calculate how much fabric is needed for a product? How to calculate the cost taking into account the discount? How to calculate line 070 in 6 personal income tax? How to calculate tulle? How is military pay calculated? How is the old age pension calculated in 2022? How is pension calculated in 2022?
When the sound disappeared after updating Windows 10
Many problems with sound surfaced among users after Windows 10 update 1809 in October 2022. Most often, users received the error: “The audio output device is not installed.”
According to information from Microsoft, this happened due to the fact that during the update an Intel driver was installed on audio devices by mistake. You can read about this, for example, here - https://blogs.msdn.microsoft.com/matthew_van_eerde/2018/10/12/if-windows-update-sent-you-intel-audio-controller-version-9-21 -0-3755-by-mistake-uninstall-it/
To manually fix the problem, manufacturer support recommends following these steps:
- Log in with administrative rights to Device Manager (see above);
- Under “Sound, Game and Video Devices”, look for the Intel audio driver (may display as Intel SST Audio Controller, or Intel Smart Sound Technology driver), or the audio driver with a yellow exclamation mark.
- Right-click on it and select “Remove Device.” In the pop-up confirmation window, you must check the box to completely delete the driver files:
- Reboot your computer.
After a reboot, the sound will most likely be restored, since the drivers for your audio device (for example, RealTek) will be automatically installed on the system. If the problem persists, then you need to look at the status of sound devices in Device Manager. You may have to install the driver manually, as described in the previous section. It is also possible to update the driver via the Internet.
By the way, to fix sound problems in release 1809, patch KB4468550 was released.
Therefore, you can use it to automatically fix the problem. In fact, update 1809 had so many bugs that it was eventually withdrawn. The main bug was, of course, that when installing this version, user files were automatically deleted.
Later in 1809 this error with sound was corrected and theoretically now these problems should not exist.
Don't sleep!
| The Creative Console's main panel is a bit like a receiver with a ton of options. |
For music, ASUS Xonar DX has two operating modes. One connects various interesting technologies, and the second, Hi-Fi, turns them off and transfers energy to output a clean signal without distortion. Xonar DX works very carefully with sound. It’s difficult to put into words, but when you turn on the same Paradise City recording from Guns’n’Roses, you feel that it sounds exactly the way the musicians themselves conceived it twenty years ago. Everything works smoothly and neatly: if the guitar is supposed to complement the voice, then this is exactly what it will do (the board from Creative in such places tried to highlight the guitar parts and mix them with the vocals). But most importantly, the card works very beautifully with acoustic instruments, but for a sound card this is a problem area - very often in dynamic parts they are simply choked by the sound of the acoustics, creating the feeling that the performer is sitting in some kind of barrel. So, ASUS solved this problem. Thanks to decent operational amplifiers at the output for this.
Now about the sad stuff. The card can't handle modern music in Hi-Fi mode. During the tests we had Britney Spears's Circus disc, replete with looped electronic bars. Here the Xonar DX was let down by its own quality: songs that were dynamic by design were easily separated into channels and ended up sounding too clear. And hearing the same clatter of an electronic plate once a second is still a pleasure. I had to connect Dolby 7.1 Virtual Speaker technology to the case, which smeared all these overtones in an even layer. X-Fi was just such songs with a bang.
Our last test was films. Here we wanted to paint a colorful picture of the X-Fi processor and how wonderfully it decodes DTS and Dolby formats, but Creative never wrote the corresponding drivers for Windows Vista and Windows 7. Hardware decoding only works on Windows XP. So on new systems, the sound is encoded by the central processor; neither card has any advantages.
Ear Test RUS - Mixapo
Ear Test RUS
Purpose
The program is designed to test your hearing capabilities for each ear separately, over the entire frequency range. You can measure with great accuracy up to what frequency you can hear and compare your result with friends and family members.
The upper frequency limit of the human ear depends greatly on the age of the person.
A child can hear frequencies usually up to
20,000 Hz
(oscillations per second), but for an old person it can be at the level of
5,000 Hz
or even lower.
For the average age of a person (40 years old), frequency 14000 Hz
, average value. Some people may have “holes” in the spectrum due to internal ear injury - this can also be tested.
Warning
Please be careful when using this program with headphones (which is recommended)! Always start with low volume. This program can potentially cause hearing damage at high volumes, although this program's maximum setting is not very high compared to the maximum audio capabilities of your PC overall. The program is not intended to replace a professional hearing test in a doctor's office.
How to use
Start with a mid frequency that can be easily heard at low volume levels (default 2000
Hz).
Click the “ Start ” button. The intermediate sine sound of the audio signal will now be heard in the left speaker (headphones are recommended for accurate testing results)
Now turn down the volume on your computer speakers until the sound is barely audible.
For each frequency, you can click on the “ I hear sound
!”
“But you have to lower the volume so that the sound is barely audible.” You can select the step “Step” selector: 10 Hz (very fine), 100 Hz (medium) and 1000 Hz (or 1 kHz, rough).
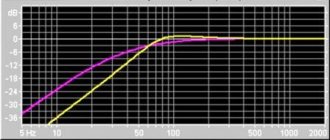
Each time you press the “I hear sound!” button, a graph is drawn up at the bottom of the program window. For high frequencies, you can choose a fine grid and for mid frequencies a coarse one (1000 Hz). When you have finished testing one ear, you can switch to the other and repeat the test. The graph will give you a good impression of the hearing curve, provided that the sound card in the computer and headphones can reproduce the entire sound spectrum. Download the Ear Test RUS for free, without registration from Yandex disk
Share link:
Views All Time
1441
Views Today
5
Spectrum window
Controls:
Approximation
Removal
Toolbar elements:
- Anti-aliasing graphics. Eliminates the effect of aliasing when displayed on the screen.
- Swap graphs - draws the right channel in the background, and the left one in the foreground
- Configure display options.
- Saving the graph in a graphic file on disk.
- Scale: Log/Linear/Mel - scale: logarimic, linear, melodic
Mouse control:
Left button—selects a horizontal fragment of the graph and zooms it in.
Spectrum analysis
Spectrum analysis is an advanced spectrum analyzer for arbitrary WAV files.
Clicking opens a standard WAV file selection dialog. This could be, for example, a non-standard signal generated and recorded that is not in the list of tests. Spectral Analysis Options:
Spectral analysis of the file is performed in blocks of “FFT size” size, with the spectrum averaging over the entire file.
If you want to analyze the spectrum of only part of the file, then it must be cut out in an external sound editor and saved into a separate WAV file. Supports 16 and 32-bit WAV files and a wide range of sampling rates. FFT size
- size of the FFT block in samples.
The number of spectrum frequency bands (bins) depends on this, i.e. detailed frequency representation of the signal (important for analyzing signals in the low-frequency region). The higher the FFT size, the longer the signal should be in time. The minimum time in seconds can be calculated using the formula FFTsize/Fs. Resolution
- the width of one “frequency band” of the spectrum.
For convenience, the frequency resolution is automatically calculated for the current sampling frequency. Zero padding
- padding the signal with zeros before taking the spectrum.
Allows you to draw the spectrum a little more accurately (this leads, as it were, to interpolation of the spectrum by frequency). FFT overlap
- overlap of FFT windows in time (as a percentage of the window width). More overlap results in slightly better averaging of the spectrum over time.
FFT window
-shape of the weight window. A compromise between sidelobe suppression and peak broadening.
Kaiser window beta
-Kaiser window parameter adjusts the degree of suppression of side lobes. If there are high peaks in the spectrum, you can increase it to 13 -15, if there are no high peaks, you can leave it alone or lower it to 5 - 7.
User Interface
In the current version the program has a multi-window interface. When launched, the main program window appears. At the top there is a selection of playback devices (top list) and recording devices (bottom list). Sampling modes are also located there - sampling frequency and bit depth. These settings also affect the data saved to a WAV file for testing external devices.
“Wave mapper” is the currently selected Windows audio device in Control Panel/Multimedia.
The Modes button starts a test to check whether drivers support all possible sampling modes. Ping—checks support for the current mode. Mode support does not always mean correct operation in this mode.
The Properties button opens the diagnostics and settings window for ASIO devices. Available only in RMAA PRO version.
The tree list below contains program settings (regular font) and a list of tests (bold font).
Changing test options is only possible in the RMAA PRO version.
The Reset to defaults button returns the values of all parameters to their default positions.
Read also
Optimizing the operating system
2. Optimizing the operation of the operating system In addition to protecting the computer, it is important to maintain the system in such a condition that working on the PC is comfortable and enjoyable. To maintain the operating system in proper form, there are special programs. With this
System research and testing
Researching and Testing the System As you gain experience in debugging the kernel, you will learn more and more little tricks that help you research and test the kernel to answer your questions. Since debugging
Scripts executed when the operating system shuts down
Scripts executed when the operating system shuts down To enable shutdown scripts, select the Shutdown property in the Scripts (Startup/Shutdown) section, after which the Properties: Shutdown dialog box will be displayed
2.4. Shortcuts for quickly logging out and shutting down
2.4. Shortcuts for quickly logging out and shutting down Windows Vista has a utility program - shutdown.exe, which allows you to log out, shut down or restart your computer. With this program you can create shortcuts for quick execution
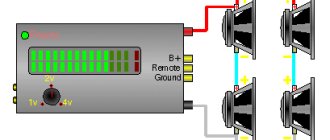
Speaker tests
Frequency response (swept sine) and Total harmonic distortion (set of tones) tests
designed for testing acoustic systems. Acoustics testing algorithms have specifics, so it is recommended to use the tests for their intended purpose.
Thorough frequency response test
— in the logarithmically increasing sine frequency response testing mode, a longer test signal is used.
Subwoofer test -
Only the low frequency range is tested. The calibration signal also has a lower frequency.
Plot THD in swept sine test
— builds a graph of distortions in the frequency response test.
In the settings of the second test, by searching through sinusoids increasing in amplitude and constant in frequency, the number of test frequencies and the range of amplitude changes are indicated.
Check the microphone in headphones online
- Webcam & MicTest
- Mic Test
- Online Voice Recorder
- Skype
- Online Microphone
- Voice recorder online
Microphone check online
Microphone test site
If, when checking the microphone on the computer, the system does not see it, you first need to check that the device is turned on in the sound settings. The selected device is marked with a green tick. The integrated device very rarely fails. When connecting an external audio device, there may be a poor contact in the connector, a connection error, or a break in the connecting wire.
Troubleshooting Windows Audio Service
Once you are sure there are no viruses on your PC, go to the Start menu using search and find the “Services” application. You will see a list of services installed on the system. You need to select the Windows Audio service and restart it.
After reinstalling the operating system, the user may encounter a problem - no sound. Such a defect may be caused by the lack of the necessary drivers, the correct display of the sound card in the Device Manager, or error code 10, which indicates that this device cannot be started. To solve a sound problem, it’s worth finding out two things: how to find out what sound card is on a computer with Windows 10 and what drivers are suitable for it? All methods presented will be relevant for the Windows 7 operating system.
Music sheet
| The tiger painted on the ASUS Xonar Essence casing is a replica of an ancient Chinese musical instrument, the erhu. |
Oddly enough, only Creative has made its own means of recording sound with an audio card. When switching to recording mode, the card connects ASIO 2.0
. Why is this necessary? Imagine that you are directly recording a guitar: the sound card simply does not have time to capture the sound and immediately output it to the speakers, and you hear the music with delays - it is simply impossible to play some complex melody, the musician loses his rhythm. To eliminate delays, special drivers are used, whose task is to turn off all unnecessary technologies and turn all the power to output the captured sound.
In addition, Creative has developed a fairly simple and powerful software shell for beginners, with which you can split music into channels, apply basic effects, and generally record directly and edit it in real time. So if you like to play music in the evenings and don’t want to deal with complex software, then you should like X-Fi - a powerful processor and simple software do an excellent job with their responsibilities.
Unfortunately, ASUS cannot boast of such capabilities: Xonar DX, of course, supports ASIO 2.0, and it records sound at an honest 192 kHz, and not at 92 kHz, as the X-Fi Titanium Champion Series does, but it loads the central processor so that delays appear anyway. Yes, and for recording you will have to use third-party editors.
View results
The “Test results” window contains information about all tests performed
The window is divided into 4 slots (4 vertical columns), each of which can store the results of one set of tests. Thus, it is possible to simultaneously download test results for four devices or four device modes, including the test files themselves generated by the program.
For each test, a short numerical result is displayed in the window. A more detailed report of the test results can be obtained by right-clicking on the numerical result.
The vertical row of buttons to the right of the numerical results allows you to view the spectrum plot for the corresponding test.
The “Select” buttons below the slots allow you to select multiple slots to compare results.
The Open and Save File buttons allow you to download or save a set of results to a SAV file for later viewing. The SAV file saves all the report details and spectrum plots.
The HTML report generation button allows you to generate an HTML file with test results or comparing results from several slots. All detailed reports and graphs are included in the HTML report.
Programs to improve sound on a computer
Not all computers and laptops are capable of reproducing high-quality sound. On a laptop, most often the sound is too quiet. Some budget computers may be equipped with cheap sound cards, which is why the user may hear various types of noise when the signal is output to the device. To fix this, there are special programs that will help you configure and even increase the level of music playback on your PC.
No. 1. Sound Booster
In some cases, this utility helps increase the volume of devices by 300%. Can work with all programs, such as a browser, audio and video players, instant messengers (Skype). Sound Booster is a worthy addition to your computer volume slider. The program cleverly and compactly folds into the Windows tray and displays its settings with a mouse click. The utility itself is small in size, so it does not conflict with other applications and practically does not load any system at all.
Video review
It is installed in a standard way, the interface is very simple. It can be integrated into autorun on its own and run along with the operating system, so that you don’t have to configure it every session. Despite the fact that it is small in size, it has enough functionality to improve and enhance the sound. In the settings, you can set hotkeys for certain effects, as well as for adjusting the volume. Its advantage is the Russian-language interface and support for all versions of Windows.
No. 2. DFX Audio Enhancer
The most popular digital audio format is MP3. Despite the fact that software manufacturers have been trying for a long time to make other, better formats popular, everything is useless. It is quite difficult to change established traditions that have been formed over decades. Therefore, the developers created a special utility, DFX Audio Enhancer, which could improve the advantages and hide the disadvantages of the popular format, as well as a number of other formats. The program allows you not only to increase the sound level, but also to increase the depth, as well as the range of higher frequencies and much more.
Video review
DFX Audio Enhancer works with most popular players - VLC Player, Windows Media Player, Winamp. A minor inconvenience is that each player requires its own version. The program has ready-made settings templates that you can apply or create your own “by ear”. You can specify for which device the settings are adjusted. A set of skins will allow you to create a unique style for the graphical shell.
No. 3. Hear
To use this application, you can use headphones as a receiving device, and you must also allow the use of a microphone. The fact is that this utility not only works to amplify sound, but is also capable of capturing ambient sound from a microphone and applying special effects to it. For example, the “Auto Volume” effect makes it possible to turn off ambient sounds and tries to “catch” human voices. "Office" replaces the noise around you with unusual sounds.
General test settings
General
Save resulting WAV files - saving a file with the results. Used for debugging and detailed analysis of results in third-party programs. Disabled by default.
Analyze noise and distortion only in 20 Hz — 20 kHz range
— enable an audio range filter similar to standard AES17. Used to obtain results comparable to the passport data of the tested products. Enabled by default.
Normalize amplitude of test signals before analysis
— automatic normalization of results by amplitude. Used to compare measurement results of devices with different signal levels. Most important when testing AC'97/HDA codecs and MP3 players. Enabled by default.
Sound card
Use WDM drivers - The WDM driver model is used in modern operating systems. Enabled by default. Disable if using Windows 9x and VxD drivers.
Mono mode
— mono mode. Removes the second graph from the spectrum, which can be useful when testing acoustics. Disabled by default.
Signals
Calibration tone and sync tone frequency—select a test tone for adjusting the signal level. A useful option when testing speaker systems. Default is 1000 Hz.
THD test signal, IMD test signal
— settings of test signals in the corresponding tests. The default settings are shown in the screenshot. It is not recommended to change.
Display
Smaller spectrum windows—the setting reduces the size of spectrum windows. Useful for screens with a small diagonal.
Display full frequency range (up to Fs/2)
— display the full frequency range, up to half the sampling frequency. Affects the generation of HTML reports.
Draw only tops of spectrum on comparison graphs
— plotting only the maximum values for the displayed spectrum points. This option allows you to better see the relative position of the spectra when comparing.
Invert spectrum graph colors (for printing)
— changes the background color from black to white, for printing on a printer or for printing.
Graph line width
— thickness of lines on graphs.
Сolor slot #
-selecting a graphic color from the palette.
Soundcheck
| Under the cover of the ASUS Xonar Essence STX the main parts are hidden: the ADC and DAC, and under it there are also replaceable operational amplifiers. |
We started with games. Installed Battlefield 2
,
BioShock
and
The Sims 3
(here it must be said right away that only the first two games fully support EAX). During tests, all cards were switched to game mode.
Thanks to Battlefield 2, we were able to evaluate the performance of audio cards with “large-scale sound” - processing multiple sources, correct positioning, volume adjustment. X-Fi Titanium handled this task better: it clearly handles almost all the nuances and has an excellent understanding of the location of sources on the ground. If the enemy opens fire behind you, rest assured, the shots will come from the rear speakers. Moreover, after some time you will be able to determine by ear at what distance the attack is taking place. Perhaps the only thing we didn't like was the way Creative emphasized sounds from the rear. The card often cuts off the high frequencies of shots and pushes out the bass: it sounds impressive, but doesn’t sound very reliable.
However, with the Xonar DX the situation was much worse: the sound began to sags from the very beginning, simply switching the card to game mode did not give us anything. More or less honest calculation of sources began only after the inclusion of Dolby Laboratories technologies, but at the same time the speed of the game as a whole sharply decreased, since Xonar DX transferred all calculations to the central processor.
The BioShock test gave Xonar DX back the trust it had lost. The card performed no worse than X-Fi - and this is a big plus for ASUS. Whatever one may say, the action in BioShock takes place mainly indoors: when moving from room to room, the environment, the size of locations and many other parameters constantly change. And the fact that Xonar DX in this case was able to show itself on par with X-Fi is worth a lot. It is worth noting that ASUS has thoroughly updated the drivers: previously, Xonar DX missed some effects, but now it catches absolutely everything.
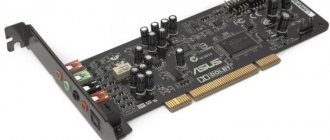
| ASUS Xonar DX is the only low-profile sound card, and it will easily fit into a compact HTPC, the shortened panel is included in the kit. |
In games without EAX support, it is almost impossible to determine which card will sound better. Nevertheless, for the purity of the tests, we ran The Sims 3, and we liked Xonar DX more - simply because Dolby Laboratories technologies distribute sound across channels in a very interesting way. And if you bring the camera as close as possible, it may seem that you have really looked into the apartment of noisy neighbors. But X-Fi sometimes gives up in this game and confuses the location of the sources.
It's easy to name the winner of the gaming tests - this is X-Fi Titanium. If you want to get the most out of sound in games (especially if the project officially works with EAX 5.0), then there is nothing better than Creative. Although you shouldn’t write off the Xonar DX: in principle, if you don’t have the opportunity to directly compare the two cards, you won’t notice the difference. The only disadvantage of Xonar DX is that it shifts all calculations onto the shoulders of the central processor, which on weak machines can lead to a drop in performance and a decrease in fps.