Everyone needs a radio in their car. The older generation can listen to the news or chanson, middle-aged people can enjoy jazz, rock and classics, and young people can have fun and loudly “sway” to electronic music or rap.
In this article, we will not touch upon complex Hi-Fi and Hi-End systems that require serious investment - the purchase of an expensive head unit, cables, amplifiers, capacitors and sound processors. As well as calculating subwoofer enclosures, complex podiums, and adjusting the frequency response.
Therefore, we will consider 3 types of simple car audio systems with minimal financial investment.
Improving the sound of the standard car radio and acoustics
Factory audio in a car, if it is not premium, leaves much to be desired both in functionality and sound quality. How to improve multimedia in this case?
Replacing the head unit (receiver) will give more or less decent sound, plus the ability to play audio tracks from a USB flash drive, SD card and external AUX input. Fans of mobile gadgets should pay attention to modifications that support smartphones via USB and Bluetooth.
Such models may have both a hands free system and mobile phone charging. Moreover, the phone book is displayed on the car radio display, which is very convenient. If we increase the budget, we will get a full-fledged multimedia center on Android with navigation, cameras, and the Internet.
But decide in advance whether a disk drive is needed. If you do not use CDs and DVDs, then there is no need to overpay for these functions. Plus the extra weight is an additional load on the frame. And the volume - in cramped conditions behind the dashboard, it is sometimes difficult to place a large case along with a bundle of wires and linear output connectors.
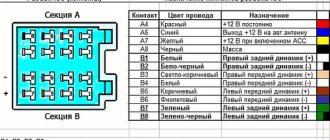
The connection is the simplest - with a standard ISO connector (in extreme cases, you will have to swap the red and yellow wires). Single-din and double-din adapter frames are sold for almost any car.
At full volume the speakers often wheeze. Including due to the fact that the amplifier chip is overloaded. Therefore, when replacing a radio, we give preference to products with an output path using field-effect transistors (MOSFET).
To build car audio without an external amplifier, it is important to choose
a speaker system with high sensitivity (from 93 dB).
By replacing OEM “speakers” with aftermarket ones, we will get better and louder sound. If the standard radio does not play mp3, and you don’t want to invest money, a simple FM transmitter (modulator) will do. With its help, even cassette radio will play modern formats over the radio channel. But distortion at high volumes will not go away, and the range of reproduced frequencies will be limited - you will have to forget about deep bass and “ringing highs”.
Subwoofer
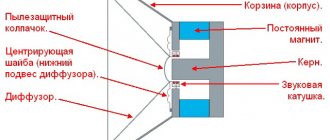
literally translated - low-frequency dynamic head. On the Internet you can find the spelling “sub, superwoofer, superbuffer, buffer, sambufer.” There are four types of acoustic design (enclosure type) - free air (frameless infinity screen, applicable on cars with a sedan body), closed box, bass reflex, bandpass - in the latter case, the diffuser is not visible from the outside and cannot be damaged.
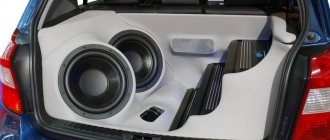
Even the most inexpensive subwoofer will improve bass performance many times over. If desired, the case can be made on your own from plywood, MDF or chipboard. But for this you need to have minimal carpentry skills and you will have to learn what the quality factor, resonant frequency, Thiel-Small parameters are.
Preface
For some car enthusiasts, having a car radio in the car is just a pleasant addition to the options. Such car owners are not particularly happy about the presence of audio preparation from the factory or a good radio. They pay more attention to the presence of heated seats and steering wheel, climate control operation, seat upholstery and the presence of floor mats.
Yes, you can drive without a car radio, but not all car enthusiasts think so.
Another, larger group of car owners love to listen to music in their car. And they are not at all indifferent to high-quality reproduction.
They read a lot about car acoustics, about amplifiers, crossovers and the car radio itself (in the world it is called a “head unit”). They strive to recreate a more pleasant sound in their car, since they can spend more time in the car than at home.
For such connoisseurs of high-quality music reproduction, the problem often arises is how to make the sound more acceptable and enjoyable.
A simple car audio system is affordable for most, since solving such a problem will require the smallest budget.
A car music system can be very expensive. Often, car owners and music lovers strive to get high-quality sound at minimal cost, and this already borders on fantasy. But let's try to figure it out - is it possible to get acceptable sound for minimal investment?
We will not consider the system - what it should look like ideally, what should be included and how much it might cost. Let’s just try to understand whether it is possible to obtain acceptable sound characteristics in the factory (simple) car audio configuration and what needs to be done.
Car radio + 4 speakers - classic design
This is the most budget-friendly and common way of voicing a car. Music of this configuration can play quite loudly and is much higher quality than the factory device. As a rule, coaxial acoustics are purchased for such a circuit. For the front doors - 5-6.5” (13-17 cm), for the rear shelf - “ovals” (“pancakes”) 6x9 inches. You shouldn’t get carried away with the number of coaxial strips, two are enough - 99% of people will not hear a piezoelectric supertweeter at 22 kilohertz. In general, the softer the suspension and the larger the diameter of the diffuser, the lower the sound the speaker can reproduce at low power. If ready-made podiums are sold for your car, use this solution. This is especially true if the standard seats have a diameter of 10 cm (4”) - in this case, switching to 16 cm speakers will give a noticeable effect in terms of midbass.
- To raise the sound stage higher (if it is appropriate to talk about it in the context of this configuration), it is advisable to install component acoustics (“spaced”) in front. We place a separate HF unit (tweeters, tweeters) on the front windshield pillars, in the corners of the dashboard, or in the area where the side mirrors are mounted.
- For denser bass, it is necessary to replace the rear shelf in the hatchback with a plywood one. In a sedan, you need to cut out the metal of the body panel and strengthen the structure (make wooden spacers between the base and the cladding). Owners of station wagons will have to make more efforts by placing “speakers” in the rear doors or side niches of the trunk.
- If possible, replace the wires included with the speakers with thicker and better ones (with a cross-section of 0.75 mm²), and connect the radio power via a fuse directly to the battery through 2.5 sq. mm. in a corrugation (we take the control wire from the standard connection socket or ignition switch).
In this configuration, you can also use a 4-channel amplifier.
If the car does not have audio preparation, let’s not forget about the antenna.
Equalizer
An equalizer allows you to make the sound more even - raise or lower the bass, mid and high frequencies. This is a rather fine adjustment of the audio system. It is not the entire sound range that is regulated at once, as in other menu items, but specific frequency bands. Different models have different numbers of them, depending on the class of equipment. There are five of them in Pioneer radios: 80 Hz, 250 Hz, 800 Hz, 2.5 kHz and 8 kHz.
The equalizer is located in the “Audio” section of the settings menu, EQ item. In it you can select one of the preset standard settings. For those who are not satisfied with these options, there are two sets of user settings (Custom). You can switch between them both from the menu and the EQ button next to the joystick.
- if heavy music is played, it is worth increasing the bass - 80 Hz (but not too much, +2–+3 is enough). Percussion instruments sound around 250 Hz;
- for music with vocals, frequencies of approximately 250-800+ Hz are needed (male voices are lower, female voices are higher);
- for electronic music you will need high frequencies - 2.5-5 kHz.
Setting the equalizer is a very important step. Using this tool, you can improve the sound quality many times over. Even if the acoustics are not very expensive and of high quality.
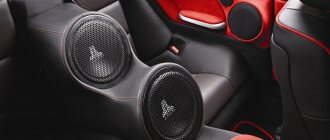
Car audio 2.1 - 2 speakers and a subwoofer
This is already a fairly serious configuration with an external amplifier, allowing you to get decent quality. Based on budget and installation complexity, we divide this type into three connection options:
- Simple.
We connect the front “speakers” to the head unit, and take the signal to the active subwoofer (it already has an amplifier built in) from the linear subwoofer output of the radio or from the rear channels. - Fast.
Component “front” - from the “head”, “sub” - through a single-channel D-class monoblock or a two-channel auto amplifier connected by a “bridge”. - Correct. A system with a four-channel amplifier, where the head unit is used only as a source of low-current signal. We connect the front channels each to its own connector, and connect the rear channels using a bridge circuit. You can use a “three-channel” - such models are also available.
For such an audio system you will need to buy a set of wires. The larger the section, the better (8 gauge is enough). If you plan to leave the rear speakers for volume, connect them to the corresponding outputs of the receiver.
Whatever method you choose, to ensure the result does not disappoint, you should start with minimal noise and vibration insulation of the door cards. Instead of expensive “Dynamate” or “vibroplast”, you can use self-adhesive vibroinsulation from the construction market and polyurethane foam mats.
There is no limit to perfection - if you become seriously interested in car audio, you will subsequently end up with an expensive audio system with channel amplification for SQ or a full trunk of subwoofers for SPL. But even the options proposed in the article can seriously improve the sound inside your car today.
Ilya Ilmarin, 2020
History of car audio
The beginning of the entire history of car sound (we will call it car sound), one might say, was laid in the 30s of the 20th century. With the development of radio technology, the first radio receiver for a car appeared. And already in the late 60s, the first car tape recorder was invented in America. From that moment it all began! The era of car audio has begun.
Now we will not delve into the intricacies of radio technology of those times and analyze historical moments in detail. Although there were a lot of interesting things there (maybe we’ll return to this issue later).
Setting up sound in a car without a subwoofer
Setting up music in a car without a subwoofer means adjusting the standard speaker system playing from the car radio. That is, without separate amplifiers and other units that turn the car interior into a concert hall.
We will explain it as simply as possible, because if you delve into the jungle, you will have to explain each term, and even a book will not be enough for this. The article is intended for beginners; we want to teach them how to perform basic music settings in a car.
So, let's start looking at how to properly set up music in the car. To do this, you will need to adjust the equalizer, high and low pass filters and loudness compensation.
To understand how to properly configure the sound on the radio, prepare test tracks. Those songs that you intend to listen to, preferably something from rock (music with rich acoustic content):
- Turn on the car radio and start playing from a flash drive, for example, and make the music as loud as possible;
- You must determine the acoustic limit of the system, which will occur when the sound begins to "wheeze." Stop twisting the volume control; on the contrary, turn it back a little. Done, you have found the right point;
- Next - a series of tops and bottoms. It’s easier with the first ones - it’s difficult to overdo it with them. Try to set the second ones to the maximum, but until the moment when the speakers begin to “tear”. Now rewind a little, just a little. Ready.
- Now find in the audio system menu the adjustment of front and rear acoustics. They are called Fader and Balance, respectively. The center point of the sound stage in a car should be determined by the driver's position. If the fader and balance values are set to zero, the sound will be “floating”, like a bird darting around the cabin in search of an exit. Let us remind you that the ideal setting is when the sound is uniform, smooth, and without fluctuations throughout. The most correct setting of the equalizer for clear sound on a radio in a car implies the dominant position of the front speakers, while the rear ones act as a subwoofer. Set Fader to +15%, at least. Adjust so that the “rear” does not clog the “front”.
- Don't forget to adjust the sound on the left and right sides as well. Keep in mind that the side to which the driver sits closer always sounds louder to him. Therefore, the sound from the opposite side needs to be slightly increased to achieve balance. This setting is performed using the Balance parameters, the approximate value for the far audio channel is +15%.
Ready. From the driver's seat, listen to the music, try to determine where it is coming from. It should feel like all the sound is concentrated in the area of the windshield, and it does not come out of the speakers. And those sitting behind, in general, should not feel any advantage.
As it was:
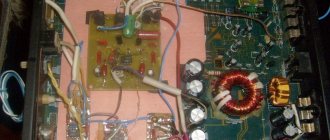
Due to the heavy work load, there is always not enough time for car audio, I didn’t even really set up the system, replacing components one with another, from a like-or-like point of view. And changing equalizer presets. In one word, the system was tuned by ear. As a result of all these recombinations, it turned out that the following connection diagram: From the radio through two low-frequency outputs (front and sub), the signal through 4 wires from ART Sound goes to the trunk where two amplifiers are screwed to the top shelf. The signal from the front output of the radio is divided into two through two y-splitters and enters the 4 inputs of the Digital Designs C4 amplifier. The signal from the sub output of the radio goes to ART Sound 1000.1. The Hertz 165l low-frequency speakers located in the front doors are connected to two output channels of the DD C4 amplifier with a cutoff at the top at a frequency of 3000 Hz (judging by the inscription near the regulator on the amplifier) with a built-in filter on top. Midrange frequencies and tweeters are connected in PARALLEL, with a cutoff at the bottom of 3000 Hz (judging by the inscription near the regulator on the amplifier). The sub is connected by coils in parallel to the ART Sound output in 1 Ohm. The speaker is directed to the rear room, the wall of the housing is pressed against the rear seat, so that between the subwoofer and the trunk lid there is a little space for junk. The crossovers were successfully lying around in the garage. As a result, I got the feeling that I could easily tune my car by ear, and I really liked the result. But still, I, a shoemaker without boots, having a whole measuring laboratory with a decent arsenal of measuring instruments at my disposal, could not find the time to set up my own audio system using specialized equipment. Here is a video of measuring the frequency response using the SPL-LAB USB RTA METER (Pro Edition) device. sweeptone 20-20000Hz, equalizer set to FLAT. Isn’t it terrible :)
Why is it necessary to set up a Pioneer radio?
Before moving on to the process of setting up your Pioneer audio recorder, it’s worth understanding why you need to do this:
- This is done in order to maximize the audio capabilities of the head unit and the acoustics installed in the car.
- Knowing the settings will allow you to easily connect various external devices, eliminate wheezing and distortion of the audio composition, as well as change the interface language and other everyday characteristics, the correct configuration of which will make using the device more comfortable and understandable.
Incorrect adjustment of the radio can nullify the sound of even the most expensive and high-quality professional-level acoustics.
What can and should be configured in the equipment of this company
Depending on the model of the audio recorder, the user has the ability to independently adjust parameters such as:
- equalizer;
- radio stations;
- menu language;
- time;
- enable or disable the Bluetooth wireless protocol (if available) and AUX;
- activation/deactivation of demo mode, etc.
Among all that has been said, special attention should be paid to setting the equalizer, as well as the radio, where the first is useful for those who like to listen to their own music, and the second for car owners who prefer radio stations to music from a disk/flash drive. Special adjustments are also required for the subwoofer