A low-frequency sound system can fail for a variety of reasons. All defects can be divided into several groups:
- Speaker malfunction
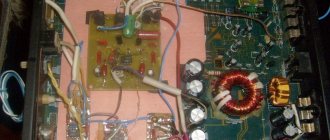
- Amplifier failure
- Power supply failure
- Broken or damaged connecting cables
Repairing a subwoofer with your own hands is not difficult. For a person who does not understand electronics, it is easier to restore the functionality of the loudspeaker, since repairing it only requires care and following simple rules. Just find a break in the connecting wires. To do this, the ability to work with a tester is enough. Troubleshooting a low-frequency amplifier or power supply will require knowledge of radio engineering.
Discount cards
Subwoofer not working? Doesn't work at all or wheezes? This could very well happen. What happened? Where to look for the reason? In electronics boards or in electromechanical devices? There is no clear answer to these questions. The reason could be either electronics or speakers. Despite its apparent simplicity, a subwoofer is a combination of a perfectly tuned amplifier, crossover and speakers. Testing a subwoofer is not difficult. Just listen to how it sounds at low frequencies at extremely high power. Of course, this is far from a complete test, which requires hearing or at least an approximate idea of what exactly should be heard during normal operation. However, if a sufficiently strong and clear sound is heard, in most cases this indicates a high-quality setup and good performance of the subwoofer. This, in fact, is the main task when repairing and subsequently adjusting a subwoofer.
DIY subwoofer coil replacement
Repairing a dynamic head (speaker) is a labor-intensive process, especially if it involves the need to rewind the coil of the electromagnetic system, since this operation requires almost complete disassembly of the speaker and removal of its cone.
It is advisable to carry out such complex repairs if the price for a new dynamic head is sufficiently high, the necessary tools and materials are available, as well as initial knowledge in the field of electronics. The article discusses a relatively simple case of restoring a speaker coil: without the need to make a new base for the coil (the aluminum base is well preserved); Due to the considerable power of the speaker, an enamel wire of an impressive cross-section is used, which is easy to install.
To rewind the speaker coil we will need the following basic tools and tools:
100 ml bottle with BF-2 glue. No more than 10 ml is consumed per coil rewind. Coil IEK KU 09-18 (24V) as a source of winding wire. Before winding, the wire must be thoroughly straightened and rewound onto another storage reel, which has a round shape.
Disassembling the speaker.
Most dynamic heads are not intended for disassembly and are, as it were, disposable (non-separable, difficult to repair) components of speaker systems. In practice, it is often possible to successfully disassemble a speaker of a standard design and reassemble it again. The main task is to soften the glue that holds together the many components of the speaker, and separate them from each other without injury or deformation.
Speaker device. Subwoofer speaker (before repair). The speaker is marked "10P32", probably indicating a diameter of 10 inches and an impedance of 3.2 ohms.
The sequence of operations is as follows.
First, we unsolder the flexible braided conductors (current leads) from the socket on the speaker basket.
PRICE OF SUBWOOFER REPAIR IN THE “AS-REMONT” WORKSHOP
The cost of repairing a subwoofer consists of two parts. This includes the cost of the labor and the cost of the parts that need to be replaced. The principle of setting prices for subwoofer repairs in the AS-REMONT workshop is to make the repair of audio equipment as cost-effective as possible. In simple words, we guarantee that repairing from us is always more profitable than repairing it yourself or buying a new subwoofer. With us, you not only save time searching for new parts or equipment, but you are also confident in the result.
| Malfunction | Cause of malfunction | Repair price |
| Doesn't turn on | Power supply failure | from 600 rub. |
| There is no sound from the device | Amplifier board failure | from 1100 rub. |
| No sound in one of the channels | Oxidation of contacts | from 700 rub. |
| Quiet signal, noise, crackling | Speaker malfunction | from 400 rub. |
| Display does not work | Amplifier protection mechanism malfunction | from 700 rub. |
Let's move on to repairs
If you have firmly decided that rewinding the subwoofer speaker is not a problem for you, then prepare the following materials and tools:
- Shellac (or epoxy) for coating the subwoofer windings
- Solvent
- Rubber glue
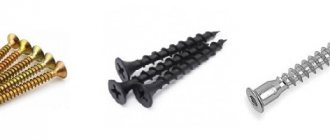
- Screwdriver
- Soldering iron
- Micrometer
- Screwdriver
Disassembly
Not everything is as simple as it seems; repairing a car subwoofer yourself is a painstaking job:
- First we need to carefully disassemble and remove the subwoofer head, we should act slowly, sudden movements with hands are unacceptable, otherwise you can damage the coil sleeve
- In addition, you need to maintain cleanliness during the work process so that dust does not get into the magnetic system, and even more so metal shavings
- Otherwise, after spending a lot of time and effort, instead of a working subwoofer we will end up with a pile of ringing rubbish
- When you get to the sleeve itself, you should carefully unwind the old wire, while counting the number of turns in the layer and the total number in the coil
- Here, the more accurately you calculate, the better the quality of the repair in the end.
- Then you need to measure the diameter of the wire
- A micrometer is needed for this purpose.
- You can, of course, measure with a caliper, but the measurement accuracy is lower, if you don’t have such tools, you can cheat
- Wind the wire around a screwdriver or nail, very tightly, so that turn to turn, and so on for 10 - 30 turns, measure the length of the winding using a ruler
- Then you need to divide this length by the number of wound turns, and you will get the approximate diameter of the required wire (the ruler has a large error)
Getting ready to rewind
Now you need to prepare the subwoofer diffuser for rewinding:
- Using a mandrel suitable in diameter, secure its sleeve in the screwdriver
- It is necessary to very accurately adjust the mandrel and sleeve so as not to deform it during the rewinding process
- Apply epoxy or varnish to the surface of the sleeve
- Then you will need to clean the wire of the diameter we need
- Pass the wire through a cloth soaked in solvent
- After that, lubricate with epoxy or shellac
- Of course, after this, the instructions prescribe that the coating must dry
Rewind
We have the wire and sleeve ready, let's move on to rewinding:
- We immediately solder the beginning of the new winding to the second terminal, if we follow the direction of winding the wire (this way we eliminate unnecessary crossing of wires, this has a positive effect on the service life of the repaired speaker) and begin winding, photo below
- It is important to fix the tension and not forget to count the turns, because the more accurately we wind, the closer the speaker characteristics will be to the factory ones
- After each layer it is better to wrap it with varnish, after laying the winding, solder the second contact, cut off the wire
- Coat the entire coil with varnish again.
The first layer of our winding, put on a screwdriver
- After winding the coil, you will need to leave it for a day to dry completely.
- And if you used shellac, then the coil must be heated to 80-120 degrees (for example, in the oven)
- Shellac will not harden otherwise.
- This is the main inconvenience when using shellac
- But when it dries, a certain amount of elasticity remains, which completely eliminates damage to the winding from drying out of the impregnation or due to its thermal expansion
- After drying, all that remains is to attach the diffuser to the speaker, and
- repair of car subwoofers is considered successful if everything works
Putting it all together
To prevent the coil from rubbing against the magnetic system, we need to set a uniform circular gap:
- Paper cut into strips is suitable for this purpose.
- We insert it in a circle (where possible) between the body and the coil, thereby obtaining a uniform gap
- We check for any jams or snags by moving the diffuser gently down and up with your hand.
Insert pieces of paper between the reel and the body
- Then we glue the suspension of our speaker and carefully insert it into place
- Give the parts time to dry
- Then you can pull out the centering papers
- Once again you need to check for jamming
- When everything is in order, add a layer of glue
- Let's dry it and put the finished subwoofer in the car for testing.
- Don't forget to turn the volume down by half.
- Subwoofer coil rewind completed
WE OFFER REPAIR OF THE FOLLOWING SUBWOOFER PARTS
|
|
|
|
|
|
|
|
Rewinding the subwoofer coil yourself
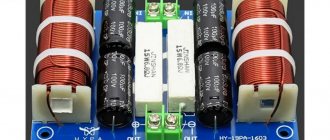
The voice coil is the main part of the electrodynamic head. Moving in the field of a permanent magnet under the influence of an applied audio frequency signal, the coil causes the diffuser to vibrate. From it, sound waves propagate into space and are heard by the human ear. Rewinding the subwoofer coil will be required in two cases: the winding burns out or it is damaged. The voice coil winding may burn out due to breakdown of transistors or an integrated circuit at the amplifier output. In this case, a large current will flow through the coil winding, and it will be broken. Mechanical particles trapped inside the moving speaker system can damage the coil winding so much that it will have to be replaced. In order to rewind the coil on the subwoofer, you will need to completely disassemble the electrodynamic head.
How speaker coils are wound
Replacing or rewinding a speaker coil with your own hands begins with peeling off all the elements of the moving system. First you need to dismantle the dust cap or membrane, which is dome-shaped and located in the central part of the diffuser. In order to separate it without damage, apply a solvent to the gluing area around the perimeter of the cap. You can use a plastic syringe with a needle with a sharpened tip. The solvent is poured into the syringe and applied in a thin strip to the gluing area. The solvent must be applied very carefully so that it does not spread over the surface of the diffuser. It is not recommended to use a brush for this purpose, as hair may come off and get caught in the gap of the magnetic system.
Adhesive compositions may differ on different models, so it is best to start with alcohol and then move on to more active substances, such as solvent 646 or acetone. To prevent rapid evaporation of the solvent, after application, the dynamic head must be placed in a plastic bag. After 10 minutes, the membrane is easily separated using a thin plate.
We repair subwoofers of such brands as:
BBK, BEHRINGER, B&W, CANTON, CASTLE, DAEWOO, DALI, DYNACORD, ESOTERIC, FENDER, FOHHN, JBL, JVC, HYUNDAI, KEF, LG, LUXMAN, MARANTZ, MARSHALL, PANASONIC, PHILIPS, PIONEER, ROLAND, SAMSUNG, SANYO, SHARP, SONY, SOUNDMAX, VELODYNE, SVEN, YAMAHA.
Before choosing a service that you will entrust to repair modern equipment, be sure to make sure that the technicians have modern equipment at their disposal, with the help of which they will quickly and efficiently carry out comprehensive diagnostics, allowing them to identify even minimal damage and eliminate them. It is very important to make sure that the company employs qualified specialists who are familiar with the features of a particular brand of equipment. This approach allows us to guarantee that the work will be done with high quality, and the cost will be fully recouped by the long-term service of the subwoofer.
If you are not ready to waste time traveling to the company’s office, the best solution is to contact a company that provides home delivery services for monitors, amplifiers, and subwoofers. Find out in advance what the price of the work will be and enter into a cooperation agreement to avoid unpleasant surprises later.
A modern system, repaired in a reliable service center in Moscow, will last for many years and will not cause problems during operation.