High-quality sound makes car trips much more enjoyable, but before you can enjoy your favorite music, you need to connect the radio correctly. This procedure is not very complicated, but due to the fact that each car and radio manufacturer uses its own connectors, some installation difficulties may arise. Connecting the radio according to the color of the wires will come to the rescue.
ISO connector
Precautionary measures
You need to understand that incorrectly connecting the car radio can lead to unpleasant consequences:
- Breakdown of the radio;
- Deterioration in sound quality;
- Wiring short circuit;
- In rare cases, if you connect the radio to the battery incorrectly, you can quickly discharge it. Sometimes this can cause a fire.
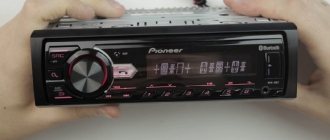
In order not to waste your time, you can use the services of a car repair shop, but you need to be prepared to spend a certain amount that the service will charge for connection. In addition, it is worth considering that the cost of connecting a car radio to a foreign car (for example, Toyota) will be higher. The brand of the car radio is also taken into account. Thus, a Pioneer radio (which is the most common and beloved among motorists) will cost less than a Sony or Kenwood radio.
But if a car enthusiast has a desire to understand the device, the ability to spend a couple of hours and, no less important, the desire to save a decent amount of money, then the rest of the article will describe in detail how to connect a car radio according to the colors of the wires.
Learning to distinguish between plugs
Pin designation of the ISO standard connector
How to install an audio system in a car, how are the wires connected and is an amplifier needed? Let's figure out which plugs can be used for installation. Plugs may have different markings depending on the standard. ISO marking is typical for multimedia systems and wiring in cars; if such a device is used for other purposes, it may break. Most manufacturers make their own adapters for the ISO standard, so there are many different plugs available commercially.
Before you install speakers in your car, you need to understand which plugs to use. Each individual car is characterized by original adapters with which the speakers must be connected to the radio in the car. If standard wiring is installed, it is possible that the audio system can be connected to it. To connect the speakers in the car to the new radio yourself, use a Euro standard adapter.
Car radio device options
All radios are manufactured according to the standards of the company that owns them. The aforementioned Pioneer, Kenwood and Sony are manufactured in accordance with the standards of their companies. However, each of them has a standard ISO adapter. Likewise, every machine has a standard plug for this adapter.
Based on this, one of three situations may arise:
- The first option is ideal. All wires in the car have been removed. Everything is connected according to standards and output to an ISO connector. There will be no difficulties in this case. You just need to connect this connector to the radio.
- The second case is when all the wires are routed correctly, but the connector does not fit. In this case, you can purchase a conductor, of which there are a great many sold in specialized stores, connect the radio through the conductor and enjoy high-quality sound.
- The last option: the wires are not brought out into one connector or there are none at all.
The third option is the most problematic, and therefore it is necessary to consider it further.
Radio sizes – 1DIN and 2DIN
You can listen while parked without turning on the ignition. In addition to different types of acoustic systems, speakers are divided by standard sizes, the choice of which depends on the installation location and the goals pursued. When connecting the speakers to the radio, be sure to maintain the correct polarity, otherwise the sound will be of poor quality, since the acoustics in this case will work in antiphase.
If the car already has seats provided by the manufacturer, this is considered a big advantage.
As a result, I didn’t notice any significant changes, but still the interior became more saturated with music and the sound is now much better quality! In this case, it is necessary to fulfill a number of the following conditions: measures are taken aimed at vibration isolation of the doors, which will avoid rattling when playing low frequencies; a closed volume is made inside the door, which will provide detailed sound; the speaker is securely fixed to the surface of the door; soundproof the door to reduce noise levels from outside; they carry out treatment against vibrations and squeaks of the door trim, which will avoid rattling and overtones when listening to music loudly. Their original shape and non-standard sizes save them from theft.
For this purpose, an additional acoustic podium is built into the door. How to connect 2 ohm speakers and how to connect a car audio speaker cable with your own hands
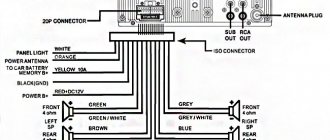
Wire color identification
For the correct connection to work, it is imperative to know the colors of the wires and their designation. The diagram of the radio wires by color is shown in the photo. On all cars and radios (Pioneer, Sony and Kenwood and others) it is customary to use a certain color to indicate the identity of the wire. It is worth noting that the radio wires differ in color and in the presence or absence of a strip. So, all wires with a stripe are a minus, and those without a stripe are a plus.
- Battery negative – black;
- Battery plus – yellow;
- Ignition plus – red;
- Left front speaker – white and white with stripe;
- Right front speaker – gray and gray with stripe;
- Left rear speaker – green and green with stripe;
- Right rear speaker – purple with a purple stripe;
- Antenna – blue;
- Amplifier – blue with a stripe.
Safety
Regardless of which car radio connection scheme you choose, you will have to pull at least one cable from the battery through the partition into the passenger compartment. A standard hole is sometimes provided for this purpose. In theory, the edges of this hole should be covered with a plastic or rubber bushing. Because even a non-sharp metal edge will wear out the insulation due to friction. We check the condition of the rubber or plastic and change it if necessary.
Standard hole edge protection
At the same time, inspect the other wires that are already lying here. Contact between exposed (damaged) wiring and the car body should not be allowed.
We stretch the wiring throughout the cabin so that the risk of damage is minimal. All areas where damage is possible (even theoretically) require additional protection. Use plastic or rubber pads, bushings, etc. Even 5–10 A is already serious.
Do not connect the negative speaker terminal to the car body. Modern amplifiers in a tape recorder have a different design. By attaching a speaker in this way to save on wires, you can damage the amplifier.
Connecting a car radio
When connecting the radio, you must strictly follow the diagram. To power the car radio, you need to connect the yellow wire to the battery positive. The black wire goes to ground, this is grounding. The red wire is powered from the ignition switch. Ideally, it should be connected so that it is powered only when the key is in the ACC position.
Since installation difficulties arise precisely in the absence of an ISO adapter, all wires must be stripped and then insulated. Stranded copper wires with silicone insulation are ideal. Once the wiring is complete, they can be combined into a standard adapter, but you can also insulate them with the radio wires. The main thing is that the color of the wires of the radio and the car match each other.
There are several other undesirable options for connecting a car radio to a car. Most motorists, not wanting to bother with connecting the yellow wire to the battery, connect it together with the red wire to the ignition switch. This deprives the radio of more power and does not allow you to get high-quality and powerful sound. The same thing happens when the radio is powered from the cigarette lighter.
It happens that the yellow and red wires are connected to the battery. The advantages of this connection are that the radio is always in standby mode and ready for use. However, this method quickly lands him. Therefore, it is worth thinking about what is more important: the operation of the radio independent of the ignition switch or the long-term operation of the battery?
Connecting speakers
The colors of the radio speaker wires have already been described above. Therefore, in accordance with them, you can safely connect any speakers.
Today, almost all car radios are oriented towards 4 speakers: two in front and two in back. It is worth noting that a powerful audio system has a plus and minus output to each speaker. A weak audio system has only a positive output. Therefore, the minus from the column is displayed on the total mass. To get better sound, it is best to observe the plus and minus contacts.
If poor sound quality occurs after installation, there is a simple and effective way to make the connection correctly. You need to transfer the sound to the front speakers, then transfer the sound to one speaker, for example, the left one. Turn on the music at full volume until wheezing or distortion appears. After that, transfer the sound to the 2 front speakers.
If the sound becomes louder and remains of high quality, then the connection is made correctly. If there is no change in volume, or distortion appears, then you need to check whether the plus and minus are connected correctly.
As you can see, connecting a car radio based on the color of the wires is not difficult and, with a careful approach, will take no more than 2-3 hours.
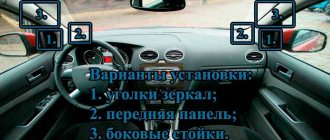
Speaker placement
When installing high power rear channels, they must be installed correctly. Oval speakers are mounted on the rear parcel shelf so that the speaker axis is directed diagonally across the vehicle. The rear right column should be aimed at the driver, and the left column at the front passenger. Only after proper installation has been carried out can the speakers be connected to the audio system.
To ensure high-quality sound, the speakers cannot be covered - they need more space to work properly. As for the tweeters, they need to be installed on the windshield pillars. If you mount them away from low-frequency speakers, you can achieve a bright quad effect. The direction of the tweeters is done in a similar way - the front left one is directed towards the passenger, and the right one - towards the driver. The wiring must be secured securely.
Loading …
Installing an active antenna
The vast majority of car radios have a radio function. The standard antenna that comes with the kit does not always allow you to pick up a weak signal from a radio station. To do this, purchase an active antenna.
There are many different modifications in terms of power and shape on the car accessories market. If you purchased a model for interior mounting, it can be placed at the top of the windshield or rear window.
The neutral (black) cable is fixed on the car body as close as possible to the antenna. The power cable (most often red) is connected to the ISO chip.
The signal wire is connected to the antenna connector in the radio itself. Modern antennas do not have a plug for the signal wire, but it is freely sold in any radio store.
more about the types of antennas and how to connect them here .
Decoding problems
Some manufacturers equip their head units with special protective mechanisms. They operate approximately 10 minutes after the voltage in the on-board network is lost. This is a protective measure designed to protect the radio from being used after theft.
The next time you turn it on, the device will ask the user for a code. If the kit includes a card with a code, then it can be easily entered; if there is no documentation, then decoding is possible using software for a computer or mobile devices. The serial number will be useful for this.
Manufacturers allow you to make a mistake when entering your PIN code only three times. If you enter it incorrectly three times, all functions will be blocked, and this blocking can only be removed in specialized centers. You should also contact these centers if you do not have a serial number.
To prevent such situations from happening, it is not recommended to disconnect the battery for a long period of time. You can make an additional source of energy if the main battery runs out. For this purpose, a battery from a screwdriver is suitable, which is connected directly to the radio.