Let's look at how to set up a subwoofer . This article provides a simple method for setting up a subwoofer at home by ear, without measuring instruments.
AuI ConverteR 48×44 - HD audio converter for high-resolution music files FLAC, WAV, WAV/BWF, WAV/RF64, AIF, AIFF, AIFF/sowt, ALAC, mp3, OGG, AAC, WMA, DTS, AC3 CD ripper ( for Mac OS X and Windows)
What is a subwoofer Connecting a subwoofer Installing a subwoofer
How to properly listen to acoustics (simple method) How to properly listen to 5.1, 7.1 speakers How to choose acoustics How to choose an amplifier for speakers, how to connect speakers
First, all speakers except the subwoofer must be correctly positioned and configured with the subwoofer turned off.
Introductory part
As a preamble to this section, we decided to present a set of basic recommendations from THX regarding the installation and configuration of subwoofers in rectangular rooms. Basically, it boils down to this: there are several options for installing subwoofers, depending on how many of them you have. Small rooms always have problems with standing waves ruining the bass. The following five measures will help bring their negative impact under control:
- Choose a room of such size that its modal frequencies do not overlap;
- Position viewing areas away from modal peaks and valleys;
- Position subwoofers to help better control the amplitude of standing waves;
- Use low-frequency absorbers to remove excess bass energy;
- Apply equalizer or electronic correction (as a last resort, when everything else has already been optimized as much as possible).
In general, if you have four subwoofers, THX recommends starting with placing them in all four corners. If there are two of them, place them in the middle near the front and rear walls. If there is only one subwoofer, place it in one of the front corners. Next, listen to the difference from place to place and move the subwoofers along the walls until you get the smoothest sound coverage of the viewing area. The ability to move the subwoofer around the room often outweighs all the advantages of the option that is tightly built into the wall. Follow the placement guidelines provided, take the necessary acoustic measurements, and always trust your ears.
Based on this, it becomes clear how much time and attention should be paid to the location of subwoofers, the acoustic design of the room, and how much to final fine tuning or, as it is often called, calibration. And yet, we will get the maximum result if we go all the way. So what is this last stage? Let's go in order. First, let's look at setting up a single subwoofer.
Arrangement options
According to the rules for arranging technical equipment, it is necessary to initially decide on the placement of speakers.
Indoors they are installed in several options:
- floor;
- built into a wall or furniture;
- hang themselves;
- integration of acoustics into equipment or the “Sound Around” system is used.
It is also important to connect all the equipment correctly, configure the speakers and place the screen accordingly. If possible, use wireless options to minimize cable use, since not every property owner will be happy with a large amount of wiring on the floor
After the hardware is fully installed and deployed, it is necessary to test the result of the work by turning on the content.
Setting up a single subwoofer
We take into account the following initial data (we recommend considering them as starting data at the stage of searching for a place for a subwoofer):
- if the subwoofer has a low-frequency filter (LPF) control, it is set to the maximum value (usually 120 Hz);
- The Phase switch on the subwoofer is set to the “0” or “Normal” position, the phase control (if equipped) is set to the extreme position indicating “0”;
- The subwoofer volume control is set to 1/3 of the maximum value;
Velodyne Subwoofer Integrated Amplifier Controls
- On the AV receiver, all speakers are set to “Small”, the subwoofer is turned on, and the crossover frequency for all speakers is set to 80 Hz;
- The sound mode “Stereo” or similar is selected on the receiver so that your subwoofer is guaranteed to receive and reproduce the low-frequency component of the audio track (to be sure, you can touch the speaker with your hand - its vibrations should be felt).
Example of GUI settings screens in a Pioneer AV receiver
Phase setting
The first step is to correctly set the subwoofer phase, because... this greatly influences all subsequent manipulations. The system is considered phase coordinated if the woofers of the main speakers and the subwoofer move back and forth synchronously. If their speakers move asynchronously, the low-frequency waves overlap and they cancel each other out. As a result, you will hear less bass and the system will be perceived as being out of phase.
Unfortunately, another problem may arise in the connection between the subwoofer and the main speakers. If the speakers play the same bass notes as the subwoofer, humps will occur at certain frequencies at some points. At other frequencies, dips may appear. The solution would be to entrust the reproduction of low frequencies to the subwoofer alone, setting the main speakers to the “Small” position in the receiver menu. This will help produce smoother bass throughout the room.
To get the best bass, you need to find the correct phase switch position that will maximize the SPL at your listening position. This can be achieved by applying a test signal to the receiver at the crossover frequency (in our case, 80 Hz) and a sound level meter (SLP meter). You need to turn on the test signal, measure the SPL at the listening point, click the phase switch, measure the SPL again, then compare the resulting numbers and draw an unambiguous conclusion. The phase switch, accordingly, must be left in the position where the sound pressure level is maximum. If you don't have a sound level meter, you'll have to trust your ears. In this case, play music (not a movie) with a repeating bass line (drum or bass guitar). Flick the phase switch and settle on where the bass is fuller and faster. If you don't hear a difference, leave the switch in the "0" or "Normal" position.
Example of a signal phase switch on a subwoofer amplifier
Fortunately, most subwoofers have a phase switch, and advanced models even have a rotary control that allows you to smoothly change its value from 0 to 180 degrees. And if you are too lazy to get up from the couch, then there is one little trick for this case: changing the value of the distance to the subwoofer (aka signal delay) in the AV receiver menu has a similar effect as smoothly rotating the phase control on the subwoofer itself. Choose what is closest to your soul and act!
An example of a smooth signal phase control on a subwoofer amplifier
Adjusting the Volume Level and Crossover Frequency
Once the phase is adjusted, you can proceed to adjusting the subwoofer volume level. To do this, it is enough to use the test signal built into any AV receiver or processor, which, as a rule, is reproduced at a level of 75 dB (pink noise). Ideally, you should use a specialized test signal generator or, at a minimum, a disk with their recordings. Don't even try to adjust the level by ear - as a rule, nothing good will come of it. To adjust the level correctly, we need a sound level meter or SPL-meter. We turn on the test signal, look at the sound level meter and adjust the subwoofer level so that the device shows the coveted 75 dB. You can go further and adjust the level even more precisely. To do this, as test signals it is necessary to use 4 sinusoids from the range of 1/3 octave below 50 Hz and 4 sinusoids from the range of 1/3 octave above 50 Hz (for example, 42, 45, 46, 48 and 54, 58, 62, 64 Hz). It is necessary to measure the SPL at each frequency, calculate their arithmetic average and adjust the subwoofer level. And so on until the average value becomes 75 dB.
Examples of portable sound level meters (SPL Meter)
Don't forget to check all other channels of our system, which should also produce the same 75 dB. This completes the subwoofer volume adjustment. Let's move on to setting up the crossover.
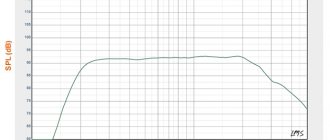
A crossover is an analog or digital block that is responsible for which frequency range of a particular channel is ultimately sent to a particular loudspeaker or speaker. A full-range signal (20-20000 Hz) is received at the crossover input, and at the outputs it is already divided into two or more channels, each of which already has a range of the original signal limited above or below a certain frequency. In theory, on the frequency response graph it looks like this:
Crossover operation on the frequency response graph
It is the crossover that allows you to “redirect” the bass from all 5 or 7 satellites of your home theater to the subwoofer for more correct reproduction in viewing areas.
All crossover settings must be made on the AV receiver/processor, and not on the subwoofer itself. If your front speakers are large and capable of decent bass notes, feel free to set their crossover frequency to 80 Hz. If they are small (shelf-mounted, wall-mounted or built-in), set the crossover frequency to 100-120 Hz. According to the recommendations of the US Recording Academy, the best results are obtained by setting the crossover frequency in the range from 80 to 100 Hz.
Example of the crossover setting screen in the AV receiver menu
More precise adjustment of the crossover will only be possible if you have measuring equipment that allows you to see the frequency response curve. Such equipment is usually called a spectrum analyzer or Real Time Analyzer (abbreviated RTA). The goal of all our manipulations remains the same - to obtain the most linear frequency response graph. In terms of choosing the correct crossover frequency, this goal is achieved by repeated and sequential measurements of the frequency response, each time changing the crossover frequency by the minimum possible number of units (usually 5-10 Hz). Having thus “tested” the range from the lower boundary frequency of the speaker to 100-120 Hz, we select and settle on the option where the frequency response graph is the most linear.
Phonic PAA6 Portable Dual Spectrum Analyzer (RTA)
In most cases, when you have large floorstanding speakers that can play quite low, they will be easier to match with a subwoofer than the small bookshelf speakers that most people have. However, it is not necessarily the best result that can be obtained by setting the crossover frequency to a minimum value in order to neutralize the special signature of the subwoofer at frequencies that the speakers are already capable of reproducing. If the crossover frequency is set to the minimum value, the subwoofer will not be able to stimulate the main speakers near their resonant frequency, allowing them to be the dominant oscillator. If the cutoff frequency is set slightly higher, the sound waves of the subwoofer and the main speakers will be able to strengthen each other, resulting in a smoother and more pleasing bass to the ear. Keep this in mind.
Applying equalizer and electronic correction
As you've probably noticed, equalization and electronic equalization are the last of the things you can do to get your subwoofer to perform at 100%. This state of affairs is not accidental, despite all the attractiveness of immediately turning on the automatic setting and forgetting about everything else, like a bad dream. All the activities described in this article for setting up a subwoofer are strictly in descending order of the degree of their influence on the final result as a whole. Changing this order is highly not recommended, because it can easily lead to unsatisfactory results, which can only be corrected by repeating all the activities again and in order. So save your time and do it right from the beginning.
So, returning to equalizers and electronic correction, it should be noted that most installations occur without their use by installers. On the one hand, you can often achieve a good result by acting correctly at the previous stages, but on the other hand, the necessary equipment or functionality in the receiver/processor is not always available. Much here depends on the advancedness and cost of a particular model. Inexpensive receivers will not be able to please you with the presence of an advanced version of the auto-calibration system, which also works in the range below 1 kHz, and the equalizer for the LFE channel will most likely be limited to 4 fixed bands (for example, 25, 50, 85 and 120 Hz). This set of tools cannot be called satisfactory for solving our problem. Top models of AV receivers and processors always have on board a full-range electronic correction system for room acoustics or auto-calibration (Audyssey, ARC, YPAO, etc.) and a parametric equalizer with acceptable resolution. If you don’t trust the processor’s tools, you have the right to use a dedicated equalizer on the subwoofer channel. The most important characteristic of an equalizer when used in conjunction with a subwoofer is its resolution. The higher the resolution, the more accurate the frequency response correction it will allow you to make. Ideally, it should be at least 1/12 octave per band. It's a completely different story when it comes to a parametric digital equalizer. In this case, you are free to make adjustments at almost any frequency.
LA Audio Two Channel Graphic Equalizer
Basic rule of equalization
in relation to the subwoofer frequency range -
cut off the humps, but do not touch the dips
. Any dip in the frequency response graph in the low-frequency range tells us that either the listener or the subwoofer is located near the zero node point of the standing wave. An attempt to correct this frequency with an equalizer will only add distortion, but will not in any way affect the audibility of the desired note. Remember this.
A modern alternative to a graphic or parametric equalizer are various systems for electronic correction of room acoustics (or automatic sound calibration)
. These solutions are present in most modern AV receivers and processors. They allow you to make basic sound settings for your home theater surround sound system almost automatically. All you need to do is place the supplied measuring microphone in a certain place and follow the instructions. The system itself will reproduce test signals and measure them at several points in the room, after which it will provide recommendations for setting the following parameters:
- Small or Big for each pair of columns (Front, Center, Surr, etc.);
- Crossover frequency for each pair of speakers;
- Distance to each speaker, including subwoofer.
Setup microphone from a receiver with Audyssey auto-calibration system
At the same time, the auto-calibration system will calculate and be ready to apply a special frequency filter, the imposition of which on the current frequency response of each channel will allow (in theory) to make it as linear as possible. Unlike a parametric equalizer, auto-calibration systems like Audyssey MultiEQ operate with hundreds of so-called equalizers. points on the frequency response curve, inverting dips and humps with pinpoint accuracy exactly where it is needed. It will not be possible to repeat this using the most advanced parametric equalizer (we are talking about the full frequency range). The low frequency range is debatable, but using an automatic system will definitely save time and will most likely result in a flatter frequency response.
How Audyssey works compared to conventional equalization
If you decide to use such a system, do not forget to then return the speaker settings to their original places (Small instead of Big, crossover frequency values and distance to the speakers) - here auto-calibration can easily fail. You cannot trust her 100%, especially when we have already made all the necessary measurements and settings ourselves.
Terminology:
- Maximum sound pressure. Maximum subwoofer volume.
- Frequency range (Hz). The frequency range of the subwoofer can be divided into the area of deep bass 20-40 Hz, medium bass 40-80 Hz, high bass 80-160 Hz. Top models from leading manufacturers can reach listeners with frequencies of 20-80 Hz. Higher frequencies usually rely on the stereo pair.
- Crossover (cutoff) frequency. The frequency at which the spectrum is divided by the crossover. If the subwoofer has a crossover frequency of 80 Hz, then all components with frequencies above 80 Hz will be attenuated and transmitted to the speaker system, but the quality of the acoustics plays a role here.
- Sensitivity (dB). The more sensitive the dynamics, the less the amplifier is loaded, the greater the sound pressure it produces at the same power.
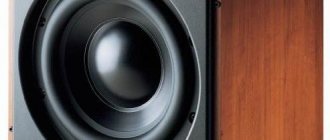
The subwoofer formula is that the larger the area, and therefore the size of the diffuser, the more powerful and organic the bass.
The dimensions of the subwoofer are quite large. Basically, the subwoofer body is cubic in shape and made of standard materials for acoustics, for example MDF board made from wood fiber chips, made at high pressure and temperature. You can also find cylindrical and spherical systems, but they are not widely used. The low-frequency diffuser is located inside the subwoofer housing, and it is worth noting that the stroke of the speaker emitter can reach up to 7 centimeters! Subwoofers are divided into active and passive. The active ones already have an amplifier with them, and the passive one needs to be connected to a separate sound amplifier, the function of which is to amplify and transmit the signal to your Hi-Fi equipment (acoustic speakers, home theater speakers).
The main thing is your perception of the music and your feelings. Rely on them, and the chosen acoustics will delight you every time you listen. With the right choice, even inexpensive components can achieve maximum quality; all that is needed is a balance between them.
Features of setting up a system of several subwoofers.
Now let's turn our attention to setting up the bass section of a movie theater consisting of several subwoofers. There are some peculiarities here. Let's move on to them.
1. Use identical subwoofers
If you want to avoid wasting a lot of time spent on manipulations when setting up a link of 2 or more subwoofers, use the same devices. Only twin subwoofers can have the most similar characteristics of all components and the resulting sound, which is essential to obtain a predictable effect of uniform bass coverage of the entire listening area.
2. Place subwoofers as recommended
We are talking about the practices of the most optimal placement of multiple subwoofers in a room, discussed in detail in the corresponding section of our article.
3. Make sure all subwoofers are playing the same "melody"
Believe me, it will be extremely problematic to set up an array of subwoofers that reproduce different signals. Once again, make sure that the LPF on each of the subwoofers is turned off or turned to the maximum value so as not to interfere with the bass management system of the AV receiver/processor. The phase settings should also be identical. As a rule, the switch or phase control should be left in the “Normal” or “0” position. If the receiver/processor has only one output from the preamp to the subwoofer, it's time to use Y-signal splitters. If the receiver has and uses several subwoofer outputs, make sure that the bass management for each of them is configured correctly and outputs the same signal (“Both” or “LFE+Main”) to all outputs. In short, you need to make sure that each subwoofer receives a mono signal from all speakers designated "Small" plus the LFE channel signal. Some receivers/processors (in particular, some models from Denon) support a stereo subwoofer configuration, the use of which for our purposes will only introduce a destructive component. Make sure it is not enabled (Mono mode is selected).
4. Equalize the volume of all subwoofers
It is very important to set the same sound volume on all existing subwoofers. If this is neglected, you risk ending up with poor integration, and even overload during loud moments if some subwoofers are set louder than others. This will cause distortion at lower volume levels relative to what your system is actually capable of. The correct way to match the level of all subwoofers is to use the pink noise generator built into the receiver/processor and measure it with a sound level meter in the “C-weighted” mode. Measure the level of each subwoofer individually, physically turning off all others during measurements. Measurements must be taken at the same distance relative to each of the subwoofers. And if you are really pressed for time, you can measure the level in the near field of the subwoofer by placing a sound level meter or measuring microphone on the floor at a distance of 10 cm from the wall of the device where the emitter is located.
Example of measuring microphone placement in the near field
If the subwoofer is a bass reflex subwoofer, the microphone should be placed halfway between the center of the speaker and the bass reflex port (already on a tripod). This technique becomes very problematic to implement if the subwoofer has several speakers, which is why we recommend taking measurements at a point equidistant from all devices, and this point will not necessarily be in the listening area. Once you have aligned the volume of all subwoofers relative to each other, it’s time to move on to equalizing the volume of the subwoofer section relative to the front speakers or center channel.
Measure the level for the front LR and C channels and the subwoofer array at at least two points (primary and secondary listening positions, for example, the first and second rows of a movie theater). Record your results in a table so that you can more accurately make the necessary adjustments. It's a really good idea to measure at least two points and calibrate the levels so that the difference is no more than 1-2 dB, this way you will get the most correct SPL coverage throughout the entire listening area. Even THX recommends taking your time when taking measurements. Make time for your experiments with RTA and SPL meters, and with plenty of reserve. THX recommends taking each measurement for at least 20 seconds. Some professional calibrators take up to a full minute for each measurement. This will provide you with a guaranteed correct result. Why? Because pink noise is not always uniform at low frequencies. Noise is by definition random. The longer the instrument measures the noise and calculates the average, the less likely it is to experience SPL measurement errors due to the natural heterogeneity of pink noise. Spend as much time as you need to take good measured measurements - it will be worth it in the end.
5. Take measurements of the initial frequency response
Before moving on to automatic calibration or active equalization, it is necessary to understand what we will start from initially. Getting maximum integration between your theater's front speakers and your subwoofers is critical. An alternative point of view is that the most important thing is the correct integration of the center channel and subwoofers. If you mostly watch movies and listen to multi-channel music, this is probably what you should do. However, as practice shows, a person is much more susceptible to incorrect reproduction of music by the front stereo pair than to accurately determining whether there is perfect coordination between the center channel and subwoofers during the instant action scenes of a movie. If you prefer listening to 2-channel music programs, prioritize calibrating the subwoofers relative to the front LR channels. If you watch movies more often than listen to music, feel free to calibrate the subwoofers relative to the center channel speakers.
Connect the output of your RTA to a free pair of stereo line inputs on the receiver/processor, place the device or its measurement microphone at the main listening point at the level of a seated person's head, and let the fun begin! Set up the meter to measure from 10 to 200 Hz and at 60 dB volume levels so we can see exactly what's happening at low frequencies in your system. Don't forget to make sure that you have a measurement resolution of at least 1/12 dB/oct available. A lower resolution will not allow you to clearly see the real state of affairs.
Frequency response measurement process in full swing
Once you have your initial frequency response graph, capture it and then try playing with the following parameters and see if you get any measurable improvements (smoother graph, fewer humps and dips):
- Main speaker size: Large / Small (Large should only be considered if it has given a real improvement in the frequency response graph, and your speakers are able to play all the necessary low frequencies at the reference volume level (105 dB at the listening point), without overload or distortion) ;
- Crossover frequency of the main speakers;
- Distance to subwoofer (delay);
- Subwoofer phase.
It is not recommended to move the crossover frequency value further than 20 Hz from the often optimal and recommended THX of 80 Hz. It was also noticed that some receivers/processors tend to cut the LFE channel if you set the cutoff frequencies below 80 Hz. If you set the crossover frequency much higher than 80 Hz, a problem with localizing the subwoofers may arise, especially if some of them are located close to the listening area. If you have small satellites, 100 Hz will likely be the optimal crossover frequency. The stereo effect at frequencies below 150 Hz is extremely weak, and depending on the sensitivity, distortion and natural roll-off frequency of the main speakers, setting the crossover at a frequency of 100 Hz can create the most complete sound. The key to success in this business is experimentation. If your satellites are so small that they require the crossover frequency to be set too high, you should consider replacing those speakers or placing the subwoofers as far away from the listening area as possible to mitigate localization issues.
Again, in most cases it is recommended to leave all satellites in Small mode. This will allow for better integration between them and your subwoofers, as well as greater dynamic range from the main speakers, which no longer have to carry the heavy load of low-frequency reproduction. In addition, this will entail a reduction in the amount of distortion in the speakers themselves and the amplifiers that serve them.
Subwoofer distance is an extremely important setting in achieving maximum integration of subwoofers with each other and with the main speakers. If each subwoofer is connected to a dedicated preamp output, measure and set the correct distance for each. If all subwoofers are ideally installed in a rectangular cinema room, a single delay (distance) value will be suitable for them. Moreover, it is recommended to maximize the effect of leveling standing waves.
However, if your current setup is less than ideal, you may need to play around with the delay settings for each subwoofer individually. In such cases, try to calculate the average distance from the listening area to a group of subwoofers sitting on the same line output. For example, if you have one subwoofer at 3 meters and the second at a distance of 2.5 meters, the average result will be 2.75. This is the value of the delay in the receiver/processor to start with. Most likely, it will be adjusted upward due to the presence of a natural delay in the subwoofer digital amplifier path. We can get the ideal delay value by measuring SPL (LCR + subwoofer) at the crossover frequency: change the delay, measure - and so on until the SPL is maximum.
MiniDSP UMIK-1 and Dayton Audio OmniMic measurement microphones for use in PC-based RTAs
Once you've finally achieved the best measurable result for your primary listening position, repeat the entire process for the next most important seat in the room. Try to find a combination of settings that produces the best sound from both points. You can continue further, but as a rule of thumb, if you have done your best in the first two cases (for example, in the center of the first and second rows), other places will also benefit from this. Again, the more correctly you were able to position the subwoofers during installation, the less body movements and additional adjustments you will have to make to achieve a stable and even frequency response graph for all seats.
6. Engage the equalizer or automatic calibration system
Now that we already have an acceptable result of integrating all our subwoofers with the main speakers, it’s time to put the finishing touches on the picture and push the frequency response graph into an even narrower framework. The recommendations below are based on using the Audyssey MultEQ Pro autocalibration system with an external measurement microphone and software, but for the most part they will be valid for most other similar systems, because they all work on similar principles.
So:
- Install the measuring microphone at the height of the listener's head at the listening position, using a microphone stand and pointing the microphone straight up;
- Avoid microphone installation locations where there will be obstacles blocking the direct sound from the speakers. In particular, tilt the backs of theater seats so that they do not interfere with direct sound from the rear speakers;
- Measurements should be taken at points located around and close to the main listening area;
- Avoid the most extreme side places. It is important to measure in a specific area between the most frequently used listening positions;
- Double the number of measurements at the two most important listening locations. This will allow Audyssey to give more weight to these measurements in the final picture;
- Adjust the bass management, delay, and crossover frequency settings after calibration is complete.
The last point is quite important, because... Auto-calibration quite often makes mistakes in setting the speaker type (Large instead of the recommended Small) and in choosing the optimal crossover frequency (underestimates it). In this case, delays are determined, as a rule, quite accurately.
Audyssey based system calibration video tutorial
Any automatic calibration system must be checked by subsequent measurement of the resulting frequency response and comparing it with the original graph. It got better - great! It got worse - we return to the starting point, check the correctness of our body movements when activating the auto-calibration system, and do it again. And so on until it gets better.
7. Listen and make adjustments
Even the best and most accurate measurements in the world cannot guarantee excellent sound in the end. Now is the time to sit down and listen with your own ears to the fruits of your labor. Play music you know with intense bass lines. Listen to it in two-channel mode + subwoofers in all the main places in the listening area and try to understand how it sounds. Then listen to music in multi-channel mode (initially multi-channel recordings and 2-channel through the ProLogic decoder). In most cases, the bass will seem more pronounced when moving from 2-channel mode to 5.1/7.1 matrix. Ensure you get satisfying bass in all modes throughout your listening area. Feel free to turn up or down the subwoofer level a couple dB if you prefer. Experiment and tweak the bass management settings (and speaker size and crossover frequencies) to ensure that your optimal settings, based on measurements, sound similar—optimally.
You can relax a little and listen to your favorite records
When you have achieved linearity in the low-frequency range, you often feel the urge to turn up the subwoofer's volume by a couple of dB. It is much more comfortable to listen to sound with elevated low frequencies when you have a flat frequency response than when it contains pronounced modal humps that make the bass booming and unnatural. So don't be afraid to tune your subs a couple dB higher than your main speakers once you've achieved overall linearity in the sound. In some cases, you may even need to raise/lower the level of one specific subwoofer. Most often this concerns the subwoofer located closest to the listening area.
If you are not happy with the sound with Auto Calibration enabled, turn it off or try calibration again and see/listen if you got better results this time. Simply put, you don’t need to focus on the calibration results if they don’t suit you by ear. Fine tuning is usually still necessary to get the best sound, but there's no denying the strong correlation between great sound and great measurement results.
How to make a projector with your own hands?
Here are step-by-step instructions on how to make a home theater with your own hands from a box and a magnifying glass. In fact, a projector is a fairly simple device that is very easy to make yourself. To do this you will need:
- shoe box;
- magnifying glass with tenfold magnification;
- stationery knife;
- pencil;
- insulating tape;
- clip;
- the device from which the image will come (smartphone).
Once all the necessary materials have been prepared, you can proceed directly to the assembly itself. It includes the following steps:
- Cut a hole for a magnifying glass in a shoe box. It must be located exactly in the center. To determine where the center point is, you need to connect the corners of the plane diagonally. The point of intersection of two straight lines is the center of symmetry of the rectangle.
- We install the magnifying glass in the hole we made and secure it with electrical tape.
- Making a stand for a mobile phone. To do this, you can use a regular paper clip or leftover pieces of cardboard.
- We are looking for a place to install the projector. Remember that when working with a projector, the room must be completely dark. It is also worth considering that the image will be supplied from a smartphone, so choose a place for the projector that has an outlet next to it.
- Download a special application to your smartphone that allows you to manually flip the image. If this is not done, the projected image will appear upside down on the surface.
- We make a hole for the cable from the charger.
As you can see, making a home theater with your own hands from a phone and an ordinary cardboard box is quite simple. There is no need to spend money on expensive equipment, components, etc. to recreate the atmosphere of a movie theater at home. If you want to improve the quality of the projected image, then it is better to use a tablet or laptop as an image source. The only problem that can arise is finding a lens of the right size, since the display of these devices is much larger than the screen of a smartphone.
Results and conclusions
One of the main attributes of a serious home theater system is its ability to blanket the main viewing area with smooth, ear-pleasing bass. The best way to achieve this effect is to: minimize the effect of standing waves on the sound by choosing the size of the room and its acoustic design; use several subwoofers; correctly arrange and configure speaker systems, subwoofers and spectator seats; apply active equalization. Don't underestimate any of these basic components of success in your rush to use automatic sound calibration. Otherwise, you run the risk of simply spinning around like a dog chasing its tail, and spending a lot of time on speculation and unnecessary experiments in attempts to achieve an acceptable result.
Once you listen to a properly calibrated home theater with smooth, pleasant bass throughout the entire viewing area, there is no turning back - after all, it is the low-frequency component of the soundtrack that makes you believe in the reality of what is happening on the screen!
Correctly integrating subwoofers into a home theater system, media room or personal cinema is worth the time and effort spent on it. With the right tools, knowledge and patience, you can make your theater look so amazing that it will easily rival the best public cinema in town. And don’t forget about the absence of neighbors munching on popcorn and chatting loudly on the phone!
Tired of the public cinema? Contact Cinemalounge!
It is important to remain methodical and consistent throughout the process of setting up and calibrating your home theater. Investing in a good tool like TrueRTA from True Audio, LMS from LinearX Systems, or even an FFT analyzer will save you time and allow you to get much more accurate results than you would by relying on your ears, test signals, and SPL meter alone. Forget about folk remedies and let science unleash the full potential of your home theater!
<– Back to choosing a place for subwoofers To the beginning of the article –>
Connectors
First, you need to note what types of connectors are available that the owner of the equipment needs to connect a home theater to a Samsung TV or a model of another brand. Main types of connectors:
- HDMI;
- RGB;
- SCART;
- S-video.
Manufacturers also sometimes provide analog connectors, which are also called “bells” or “tulips”. A budget option for connecting a TV receiver.
When choosing a home theater, preference should be given to HDMI connectors, which will allow you to get high-quality picture and sound.
As for the coaxial cable, it is suitable if it is not possible to purchase equipment with the first two connector options. It is noteworthy that some cables are responsible for transmitting exclusively the video signal; the sound will be transmitted by the home theater speaker system.
One of these cables is component cables. Its design includes three plugs, each with its own shade.
During the cable celebration, it is possible to obtain a clear image that is no different from the analogue one. If one of the devices has the ability to connect a SCARD cable, then you should use this connection option. But it is worth considering that sound will not be output to the TV.
Last cable type: S-Video. Quite an old cable format that is becoming less popular on the market. Such wires are capable of transmitting a low-quality analog signal and nothing more. However, cables are still popular among some users.
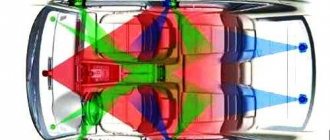
How do I set up a basic 5.1 system?
This is perhaps the most common audio system in modern home theaters. It allows you to create “surround” sound. To the main ones - the right and left speakers, the subwoofer in a 2.1 system - a central speaker and small surrounding left and right speakers are added. First, arrange the main speakers in a 2.1 system as described above.
The central speaker is responsible for reproducing speech from films. It should be placed directly in the center of the sofa or chair, which is opposite the TV screen. The central speaker should be at the level of the seated person's head, directly aimed at him, so that the sound reaches the ears as quickly as possible.
The left and right surround speakers are responsible for reproducing ambient sounds. For example, whistling or the rustling of leaves in the background, these sounds are not fully transmitted by ordinary speakers or are completely drowned out. Additional right and left speakers should be located behind the seated person, creating a feeling of “surround” sound.
Approximate layout of the 5.1 system in the room:
In a 7.1 system, two more speakers are added, which it is advisable to place outside the 5.1 system, at the level with the subwoofer.
To learn how to properly position the speakers and TV in a 5.1 system, watch the video:
YAMAHA YST-SW215
pros
- Good sound quality
- Sound control mechanisms are located at the front of the device
- Acceptable cost
- Compactness of the device
- The presence of switches for operating phases and sleep modes on the back of the subwoofer
Minuses
- Glossy finish attracts dust
- The radiator does not have a cooling system
- There is no composite cable included with the device.
From 11980 ₽
This subwoofer reproduces bass in high quality, which makes listening to music and watching movies a real pleasure. The system combines QD-Bass and Advanced YST. These technologies make the bass more powerful and deeper. The BASS switch allows you to select sound modes and set the crossover frequency. This device will improve the sound of any audio system.
Pioneer S-21W
pros
- Compactness of the device
- Acceptable cost
- Good bass
- Automatic switching of the device to standby mode
- Additional power regulation
- Convenient volume control mechanism
- Three-meter cable for connection
Minuses
- May not work well with certain audio systems
- Heavy weight of the device
- Blue LED too bright
- No crossover frequency control
From 6990 ₽
This is the best subwoofer for home theater sound enhancement. The device has a built-in amplifier for maximum sinusoidal power. In addition, it features a closed speaker system that supports speaker configurations from 2.1 to 5.1. The phase control mechanism controls the timing and phase characteristics of the loudspeaker, preventing audio delay often caused by filtering of multi-channel recordings.
Heco Victa Prime Sub 252 A
pros
- Plays absolutely all types of music well
- Exterior design
- Lack of bass reflex sound
- High power
- Availability of a cooling system
- Compactness of the device
Minuses
- High price
- Heavy weight of the device
From 25425 ₽
This subwoofer is designed to operate in tandem with a full range of Victa Prime series audio systems from the popular German company HECO. This brand is famous primarily for its realistic reproduction of the mid-frequency range, as well as the low-frequency spectrum. The device is ideal for both working in a home theater and for playing a wide variety of music.
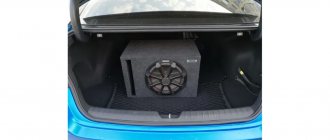
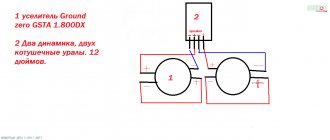
Manual for connecting a car subwoofer at home — Daewoo Lanos, 1.5 l., 2005 on DRIVE2
Greetings to all! I want to share my story, or rather a manual on how to connect a home subwoofer at home.
In general, I had a subwoofer in my Alfa Romeo, put the car up for sale, and took the subwoofer and amplifier home. I planned to soon introduce a Subic into Lanos, but now it’s a cold winter, I thought that I now spend a lot more time at home than in the car and decided to be content with a subwoofer at home!
So what we need is:
1. The subwoofer itself is passive
2. Car amplifier
3. Power supply from the computer (I have 240 watts, it’s not enough, it’s better to take 400 watts)
Now that we have all this at hand, we need to take 4 yellow wires from the power supply and twist them into one. This will be our plus for the amplifier.
Next, we will need 4 or 5 black wires, this is our ground (-). There is also a very important nuance, one green wire needs to be screwed to these ground wires.
This green wire can be taken from the large power supply chip. There is no green wire anywhere else. If it is not connected to the black wires, the power supply simply will not provide voltage.
Here is the green wire. In the photo it is already cropped.
Next, I connected the plus and minus to separate wires, otherwise I don’t like such a big twist.
I dressed these wires in corrugation (but this is optional)
Next we connect the plus and minus to the amplifier. Another important nuance is that you need to install a jumper wire between the Remote and + ports. Since without it the amplifier will not turn on. You can see it in the photo.
Well, of course, we connect plus and minus in bridge mode to the subwoofer.
Now that we have everything ready, we need computer speakers. I had SVEN, I don’t know the model. We connect our car audio system with a standard cable for home computer speakers with a wire at the ends of which there is a 3.5mm jack and two tulips. We connect our wire to the speakers at the Output output. We plug it into a socket and check the operation! If everything was done correctly, we are happy with the result!
How to choose the right one
Before choosing a subwoofer for your home, you need to pay attention to the following points:
- Frequency range (Hertz). The frequency range that the subwoofer is capable of reproducing is divided into three octaves: deep bass range (from 20 to 40 Hz), mid-bass range (from 40 to 80 Hz), high bass range (from 80 to 160 Hz). Basically, these devices operate in the range from 40 to 200 Hz. The best equipment can reproduce deep bass (if it is present in the audio recording).
- Highest sound pressure. The highest volume level of the device.
- Sensitivity (Decibels). The high decibel level makes it possible not to use the amplifier that is built into the device in extreme mode. Greater sensitivity makes it easier for the subwoofer to carry the load.
- Diameter of the woofer.
- Frequency of spectrum division by crossover. If this frequency is 80 Hz, then in the signal that is supplied to the device, all frequencies that exceed 80 Hz are attenuated.
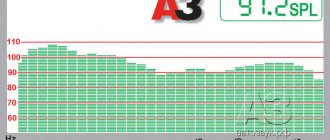
Before choosing a device, you should conduct a subwoofer test, which will help in determining the best model
To do this, you need to pay attention to the direction of the device, which can be directed downwards or to the side.
If the device is directed downward, sound waves travel evenly, but their quality will depend on the floor covering. Direction to the side makes the sound cleaner and better quality.
In addition to the test, it is worth considering the top subwoofers located below to compare the characteristics and choose the best option.
High-quality bass for the car
A car enthusiast and overnight music connoisseur will never refuse to install a subwoofer in his car. Especially if the interior is well insulated. But before you disassemble the car with your own hands to install a subwoofer in it, you need to carefully consider the bottlenecks of such a design. Firstly, you need an amplifier; the car radio will not drive the subwoofer. Secondly, such acoustics are designed for “greenhouse” conditions. In a car, temperature and humidity vary widely throughout the year, and the acoustic system can simply dry out.
Before installation, the sub must be disassembled with your own hands and strengthened a little. You can eliminate several powerful transistors, thereby reducing consumption. It is also necessary to disassemble the rear panel of the car to install speakers, and solve the problem of choosing between an active and passive device.
The essence
Whether you use one or more subwoofers, to get the best bass coverage for your room, regardless of the brand, model, size and connection options, you need to find the best location in the room for each that provides the best performance for each one and all of them combined. To do this, be prepared to listen and move around a lot, and make adjustments to settings to get the best result for your room and listening preferences.
The considerations and options discussed above are intended for use with standard powered subwoofers. If you are using passive subwoofers, in addition to the subwoofers, you will need additional separate external amplifier(s) to power each passive subwoofer.
Buying multiple subwoofers and tuning them for best results can be an expensive and time-consuming project. If you don't think you're up to the task of doing it yourself - consult with your home theater dealer/installer to evaluate your room and current setup to see if you really need multiple subwoofers to get the best bass sound.
Main purpose
A subwoofer is equipment that provides a high-quality presence effect, for example, when listening to music or watching a movie at home.
Such devices quickly gained popularity and became an important component of a powerful speaker system. When choosing a subwoofer for your home, you need to proceed from indicators such as power and purpose
Note that there are two main types of these systems:
- Active. They are ideal for home theater use due to their flexibility and ease of installation. Such devices are cheaper.
- Passive. Subwoofers of this type are initially designed in such a way that they can only be used in combination with an amplifier. In this case, the amplifier must have sufficient power.
An active subwoofer for home is a more convenient and correct solution due to the built-in filter and low-frequency amplifier. Thanks to this, the sound acquires higher quality at any frequency. At the same time, using an active subwoofer, you can improve distorted sound throughout the entire range.
How to choose the right one
Before choosing a subwoofer for your home, you need to pay attention to the following points:
- Frequency range (Hertz). The frequency range that the subwoofer is capable of reproducing is divided into three octaves: deep bass range (from 20 to 40 Hz), mid-bass range (from 40 to 80 Hz), high bass range (from 80 to 160 Hz). Basically, these devices operate in the range from 40 to 200 Hz. The best equipment can reproduce deep bass (if it is present in the audio recording).
- Highest sound pressure. The highest volume level of the device.
- Sensitivity (Decibels). The high decibel level makes it possible not to use the amplifier that is built into the device in extreme mode. Greater sensitivity makes it easier for the subwoofer to carry the load.
- Diameter of the woofer.
- Frequency of spectrum division by crossover. If this frequency is 80 Hz, then in the signal that is supplied to the device, all frequencies that exceed 80 Hz are attenuated.
Before choosing a device, you should conduct a subwoofer test, which will help in determining the best model
To do this, you need to pay attention to the direction of the device, which can be directed downwards or to the side.
If the device is directed downward, sound waves travel evenly, but their quality will depend on the floor covering. Direction to the side makes the sound cleaner and better quality.
In addition to the test, it is worth considering the top subwoofers located below to compare the characteristics and choose the best option.