A subwoofer is a good addition to a car's sound system. But it’s worth considering that buying an expensive subwoofer does not guarantee high-quality sound, since this device needs to be properly configured. To connect and configure a subwoofer properly, you must not only have good hearing, but also a deep knowledge of car audio theory.
Of course, before setting up a subwoofer in a car, it is best to seek help from specialists, and for those car enthusiasts who want to do it themselves, this article will be useful.
Where to start setting up a subwoofer?
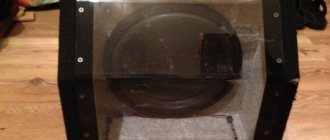
Setting up a subwoofer begins from the moment the box is manufactured. By changing the characteristics of the box (volume, port length) you can achieve different sounds. In this case, you need to know in advance which audio files will be primarily played in the car, as well as which amplifier will be connected to the audio system. When the subwoofer is already supplied in a manufacturer's housing, the flexibility of configuration is, of course, limited, although if you have the necessary knowledge, it is quite possible to achieve the desired sound quality.
One of the important factors affecting sound quality is the amplifier; we recommend that you read the article “How to choose an amplifier.”
Setting up the LPF (lowpass filter) filter
First, you need to set up a low-pass filter (LPF). Every subwoofer today has a built-in LPF filter. The filter allows you to select the threshold at which it begins to block high frequencies, which allows you to naturally mix the subwoofer signal with the signal from other speakers.
Installing a filter, like setting up an active subwoofer, consists of many experiments - there is simply no specific correct “formula”.
The subwoofer is designed to reproduce low frequencies; it cannot sing; this is the task of the speakers. Thanks to the LPF low frequency filter, we can make the subwoofer play bass. You need to make sure that the filter value is not set too high and that the subwoofer does not overlap the woofers of your full range speakers. This can result in over-emphasis on one frequency range (say around 120 Hz) and the speaker sounding unclear. On the other hand, if you set the filter too low, there may be too much difference between the subwoofer signal and the speaker signal.
The playback range of a subwoofer is usually from 60 to 120. Try setting the LPF filter at 80 Hz first, and then test the sound. If you don't like it, adjust the switch until the speakers sound the way you want. On the radio itself, the filter must be turned off.
Setting up a subsonic
Next, you need to activate the infrasonic filter, which is called “sabsonic”. Subsonic blocks the ultra-low frequencies that occur naturally in some songs. You cannot hear these frequencies because they exist below the threshold of human hearing. But if they are not cut, the subwoofer will waste additional energy to reproduce them. By blocking infra-low frequencies, the device will be able to more effectively reproduce exactly those frequencies that are within the audible range. Moreover, in this case, failure of the subwoofer coil due to the accelerated movement of the diffuser is eliminated.
What is Bassboost for?
Many amplifiers also include a Bassboost switch, which can increase the power of the subwoofer by setting a specific frequency. Some motorists use the switch to make the sound more "saturated", although, as a rule, it is used to distribute bass evenly. If you set the switch to the maximum value, the subwoofer may burn out; however, you should not turn off Bassboost completely, because in this case the bass may be completely inaudible.
Setting the input sensitivity (GAIN)
Some motorists do not understand how to properly adjust the input sensitivity. Input sensitivity indicates how much signal can be applied to the input to produce the rated output power. It must be adjusted to normalize the input signal voltage.
It is very important to set the input sensitivity correctly to avoid signal distortion, poor sound quality, or damage to the speakers.
To set "GAIN" you need
- digital voltmeter, which can measure AC voltage values;
- a test CD or file on which a sine wave is recorded with an initial level of 0 decibels (it is very important not to use a weakened test signal);
- instructions for the subwoofer, which indicate the permissible output voltage.
First you need to disconnect the speaker wires from the subwoofer. Next, you need to make sure that the bass, equalizers and other settings on the head unit are turned off to get clear sound. The level of input sensitivity should be minimal.
Make sure the digital voltmeter can read AC voltage and connect it to the speaker terminals on your speakers (you can secure it with a screwdriver). After this, you will have to turn the sensitivity “twist” until the voltmeter shows the required voltage value, which was indicated in the specifications.
Next, you need to feed the recorded audio file with a sine wave to the subwoofer, changing the volume of the audio system from time to time until interference appears. If interference occurs, the volume must be restored to its previous value. The sensitivity is adjusted in exactly the same way. To obtain the most accurate data, you can use an oscilloscope.
Connection
Mystery active subwoofer how to connect
Connection can be made in several basic ways. Moreover, each of them is original.
Connection according to low level of knowledge
Mystery active subwoofer connection diagram
In this case, the connection itself is made by connecting the linear input of a special amplifier (see How to connect an amplifier and a subwoofer to a car radio: you are your own master) to the subwoofer input. This input is called “stereo”. Once connected, inside the amplifier these signals are either mixed or transferred to 2 different amplifiers.
High level connection
The speaker inputs of the device are connected to the amplifier input. In this case, you cannot touch the built-in amplifier. Both outputs coming from the amplifier's speakers are connected respectively to the outputs available on the device itself. Speaker inputs have special terminals, which make switching easy and simple.
Mystery active subwoofer connection diagram
You can also connect a subwoofer yourself. The step-by-step instructions, which are sold in the kit, offer many photos with the help of which even an ignorant person can complete this process. In addition, you can familiarize yourself with a variety of videos on this topic, of which there are a lot on the Internet. The price of home installation will be much lower than that offered in car services.
I want to say right away that I didn’t count on the sound quality, so there isn’t much of it) But the desired effect of the sub is present) I bought the sub for 3,500 rubles)
I was looking for a pinout manual for a long time, since I didn’t get any information from the old owner. As a result, I found it on the drive - www.drive2.ru/l/388601/. I post it here: "1. Attach the silver (black) hose to the car body near the subwoofer location (preferably under a good bolt).2. Blue (red) with a fuse - route to the battery and connect to its positive terminal. (By the way, remove the fuse in advance and insert it back into the holder only after all connections have been completed).3. Purple wire – route to the radio and connect to the active antenna (additional amplifier) control wire coming out of the REMOTE CONTROL radio (usually blue).4. Determine whether there are linear outputs on the radio. 4.1. If there is, then using a double shielded cable with RCA connectors (tulips) connect the linear output of the radio with the linear input of Saba.4.2. If there are no line outputs, then connect in parallel to any pair of speakers (front or rear) using the “high level” input. The gray and gray/white wires are parallel to the right speaker, and the green and green-white wires are parallel to the left. The main thing is not to confuse: “single-color” wires to the minus of the speakers, and “two-color” wires to the “+” of the speakers. Set the bass control WHERE YOU WANT)) and use a black cable with “telephone connectors” to connect to the sub.
Well, now let's get down to business. To begin with, I bought a set of speaker wires for about 1,500 rubles and a “high-level” input for about 300 rubles, as well as a bunch of attachments and tips and wires for 200 rubles.
Why is it important to pair subwoofers and midbass correctly?
If the subwoofer is poorly connected to the midbass, the sound will be of poor quality and incomplete. This is especially noticeable at low frequencies, when instead of pure bass you get some kind of nonsense. Sometimes such disastrous scenarios are possible, when the sound from the subwoofer will play independently. In fact, this applies to all types of music, and not just, say, classical or rock music, where “live” musical instruments are played.
For example, in tracks that belong to the EDM genre, which is so popular among young people, the brightest bass is located precisely at the junction with midbass. If they are connected incorrectly, then the low-frequency loud bass will, at best, be less impressive, and at worst, it will be barely audible. Since the amplifier must be tuned to the same frequency, it is recommended to use an audio spectrum analyzer to obtain the most accurate data.
How do you know if you have configured your subwoofer correctly?
If the subwoofer is connected correctly, then people in the car simply cannot hear it, since it should not interfere with the main signal. If you listen to music at low volumes, it may seem that there are not enough bass frequencies. The absence of bass at low volumes is a sure sign that the subwoofer was connected correctly. Of course, there should be no noise, distortion or delay in the audio signal, and it makes no difference what type of design is used. The percentage of bass in each track must be different, that is, the playback must completely match the original track recorded by the producer.
The next article we recommend reading is called “How does a subwoofer box affect the sound?”
Advantages and disadvantages
How to connect an active Mystery subwoofer
The most important advantages of this active subwoofer are the following functions:
- It is equipped with a built-in amplifier, due to which an even higher sound level is achieved.
- This device is very compact in size.
Note. Due to this, it can be easily placed, as mentioned above, directly under the car seat.
- Thanks to the quality characteristics of this speaker, it is possible to reproduce sound with clear low frequencies. At the same time, due to this, the frequency of the sound will be slightly increased, which is why it will be clearer.
- The speaker costs very little - only 2500 rubles. But despite the price, it is very reliable.
- Its sale began in the Russian Federation in 2012. That is why purchasing such a device will not be difficult, since it is now quite common.
- And although the device has a very compact size, the sound quality can be called very good. That is, the subwoofer (see How to make a subwoofer: practical tips) has excellent sound output.
Video on how to set up a subwoofer
We hope that this article helped you understand how to configure an amplifier for a subwoofer. Rate the article on a 5-point scale; if you have any comments, suggestions or you know something that is not indicated in this article, please let us know! Leave your comment below. This will help make the information on the site even more useful.
Many people believe that car subwoofers are the lot of young people who want to emphasize the uniqueness of their car and set it apart from a long line of others like it. But that's not true. Adults also install subwoofers. Not in order to prove something to anyone and stand out, but in order to experience the full range of sounds produced by a car stereo system. But for this to happen, the subwoofer must be configured. In this article we will talk about how to do this.
Radio control, Band switching, Mono/stereo mode (mo/st)
Local/distant mode, Station selection/automatic and manual tuning
1 0 7 . 1 5 M HZ | Q
1. Radio reception mode indicator
2. Current broadcast mode indicator
5. Radio station number indicator in pa
required frequency range:
Mono/Stereo Mode (MO/ST)
panel or MO/ST (6) on the remote control to select broadcasting in Mono or Stereo mode. The corresponding message will appear on the display.
Press and hold the ST/LOC button (2)
on the front panel or press LO/DX (34) on the remote control to select Auto Setup mode.
Local mode - The receiver will be tuned
Only use radio stations with a strong signal.
Distant mode - The receiver will tune in to all radio stations, including -
with a weak signal.
In AM range signal reception mode
this function is not activated.
Station selection/Automatic and manual tuning
— Single press on buttons 1 - 6
(3-8) on the front panel or (33) on the remote control allows you to recall a station previously stored in the unit’s memory.
— For manual adjustment, press and hold
press the O/P buttons (17/18) for
several seconds until MANUAL appears on the display. Then, by successively pressing the Z/P buttons (17/18), search for radio stations. If manual tuning is not performed within a few seconds using the L/P buttons (17/18), the device will revert to automatic tuning.
Almost every music lover today wants to know how to connect a subwoofer to a Mystery radio. The fact is that this radio is very popular and many people have equipped their car with it. And as you know, not a single musical composition will sound normal without a good subwoofer. Connecting a subwoofer to the Mystery radio is a complex process, but thanks to the instructions given in the article, it can be easily done with your own hands.
Why do you need to set up a subwoofer?
In short - so that with its help low musical frequencies are reproduced as accurately as possible. If the device is configured correctly, the dynamic range of music playback expands significantly, which allows the car enthusiast to capture sound vibrations not only with the ears, but literally with the whole body.
An ordinary pair of car speakers will not cope with this task. The speakers perfectly transmit high and medium sound frequencies, but they have a serious problem with bass transmission, which arises due to their design features. So if a car enthusiast wants to listen to music in all its splendor, he will have to install and configure an additional device, which is a subwoofer.
Music for setting up the subwoofer
There are special programs (so-called tone generators) that allow you to configure the subwoofer in your car. This is convenient and fast, but one simple detail should not be forgotten: the person in the car will listen to music, not the tone generator. And he will rely not on the oscilloscope display, but on his own ears. Therefore, the subwoofer should be checked only with the help of music, so as not to fall out of the audio context. And when choosing music to check, you should remember that in any piece of music there are two types of low frequencies:
So, you can (and should) get rid of parasitic lows with the help of proper subwoofer settings. A simple example: rap, hip-hop, dubstep and other modern styles often use very low frequencies, not exceeding 25 Hz. The human ear practically does not perceive such a frequency. People can feel it only on a physiological level (it causes a certain discomfort). These are “parasitic lows”, the removal of which a person will not notice. It is mainly electronic music that suffers from an abundance of such lows.
The process of setting up a car subwoofer
First, it should be said that setting up this device usually begins at the stage of creating a wooden box for the subwoofer. Even then, the dimensions of the car’s interior, the power of the connected amplifier and the direction of music that the driver prefers to listen to are taken into account. Then comes the fine-tuning of the filters, which is what we'll focus on.
LPF filter
LPF is turned on either on the subwoofer amplifier or in the radio. The abbreviation LPF stands for low pass filter. The purpose of the filter is to pass low frequencies to the subwoofer speaker, cutting off high frequencies.
LPF filter is adjustable with a screwdriver
- access to the LPF regulator is available (usually it is located on the rear wall of the amplifier);
- Using a regular flat-head screwdriver, this regulator is turned clockwise to a frequency of 55–60 Hz. This is the optimal cutoff frequency for most mid-price car subwoofers (it may need to be slightly adjusted in the future);
Subsonic
The purpose of the Subsonic filter is to cut off infrasound. It is he who cuts out the parasitic frequencies below 25–30 Hz, which were mentioned above. However, not every subwoofer is equipped with this filter, which should be remembered.
Subsonic filter control is not available on all amplifiers
- The Subsonic filter control is also located on the back cover of the subwoofer amplifier;
- using a flat screwdriver, turn this knob to an amount that will be approximately 5 Hz below the frequency of the bass reflex port;
Example: If the bass reflex operates at 40 Hz, then the Subsonic should be set to 35 Hz. And the standard frequency of the bass reflex can be found in the instructions for the subwoofer.
Adjusting the Gain level
Gain is the subwoofer's input sensitivity level. And it also needs to be adjusted (on some amplifiers this level is indicated by the word Level).
The Gain level control is rotated with a flat screwdriver
- The Gain control can be located either on the rear or front panel of the amplifier. It all depends on the specific model;
- the regulator handle has an arrow-shaped slot into which a flat-head screwdriver is inserted (the range of adjustable voltages usually varies from 0.2 to 5 volts);
- First, the Gain control is set to minimum, after which a music signal begins to be sent from the radio to the subwoofer with a gradual increase in volume. It is fed until the first sound distortions appear;
- as soon as this happens, the volume knob of the radio is turned back until clear sound appears;
- now the Gain control is turned clockwise using a screwdriver until the first distortion appears;
- after they appear, the regulator is unscrewed back a couple of notches until high-quality sound appears;
Setting the acoustic phase
If the phasing is set correctly, the subwoofer will sound together with the front speakers. If the subwoofer, according to the driver, rumbles somewhere in the trunk area, then the acoustic phase should be adjusted.
- The phase shifter control is located on the front wall of the subwoofer amplifier and is designated as Acoustic phase;
- it is turned manually clockwise until the phase “unfolds” at the desired angle and the subwoofer sounds as one with the front speakers;
Setting the subwoofer and midrange interface
The following task is being pursued here: to match the frequencies of the subwoofer and front speakers as accurately as possible. For example, if the low frequencies of the subwoofer are cut to 60 Hz, and the “low” in the speakers is set to 100 Hz, then clearly audible dips may appear in the sound of these devices. To eliminate them, you will need to adjust the LPF filter, which has already been mentioned.
- music rich in low frequencies is fed to the speakers and subwoofer amplifier;
- The LPF filter regulator is first turned with a screwdriver a couple of notches counterclockwise, and if the dips do not disappear - three notches clockwise. Usually this is enough to accurately match the frequencies of the speakers and subwoofer;
Video: setting up a subwoofer in a car
So, to fine-tune the subwoofer, the car owner will have to rely more on subjective sensations rather than on instrument readings. The explanation for this is simple: everyone’s car is different, their preferred music is also different, and the designs of subwoofers can differ significantly. But even in such conditions, it is necessary to pay close attention to filter settings. Because without this, the subwoofer will not sound at full strength.
Factory subwoofer settings do not always reflect the desired sound. In order for the subwoofer to reproduce low sound frequencies as accurately as possible, it must be pre-configured. In addition, setting up a subwoofer in a car allows you to expand the sound range and give it a characteristic color.
Basic Operations, Stop Memory Function
memorization
— During playback mode
To drive the disc, press and hold the PWR button (1) for a few seconds
to turn off the device, then press this button again to turn on the device. The device will start playing
from the moment of stopping.
— During playback mode
To switch to the next operating mode of the player, press the MODE button (1) on the front panel or (26) on the remote control. If you return it later
to DVD playback mode, the unit will start playback from
First step: turning on the LPF filter
LPF (Low Pass Filter) is a low-pass filter that allows the speakers to play the bass specified during setup, while attenuating the presence of high sound frequencies. It can be located on the car's head unit or amplifier and is designated LPF or LP.
It must be turned on in the low frequency range 50-63 Hz. This parameter will be further adjusted after the settings of the remaining filters have been set. If the LPF filter is located both on the car radio panel and on the subwoofer amplifier, you only need to turn it on on one device. It would be rational to choose a radio, since adjustments on the amplifier are a little more difficult.
What do you need
Before you start connecting the Mystery subwoofer, you need to find or buy several additional components in specialized stores. They will be used during work and will allow you to achieve the desired result as quickly as possible.
To connect the Mystery sub you will need the following components:
- control wire;
- fuse for power wire;
- amplifier plug;
- 2 power wires;
- reversible RCA cables.
In addition to various components, you will need some materials and tools for the job. Without them, it will be impossible to do quality work.
List of required items:
- screwdriver;
- pliers or pliers;
- knife;
- electrical insulating tape.
Second step: adjusting the subwoofer speaker frequency
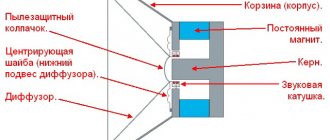
The frequency filter controls the subwoofer's playback frequency. It looks like a gear (phase shifter) with a hole for adjustment with a screwdriver in the center and is designated Subsonic. Adjusting this filter will remove low frequencies that are beyond the audibility range of the human ear and increase the service life of the subwoofer cone by preventing oscillations beyond the limits of capabilities. It is optimal to adjust the frequency five parameters lower than the standard bass reflex frequency of the subwoofer, which is indicated in its technical documents.
Installation and connection
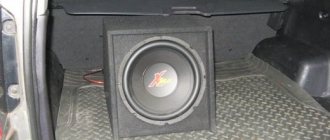
Connecting a Mystery subwoofer is a rather complicated process. It occurs in several main stages. You need to remove one of the battery terminals
This is very important, because due to a short circuit, not only the car wiring can be damaged, but also the driver himself. Using gentle movements, it is recommended to pull the power wire into the trunk (if the buffer is installed there)
This is not so easy to do, since the cable is under the hood. There must be a special hole that is designed for this. The cable must be laid in a straight line and not get caught anywhere. If it gets twisted onto some metal part, it may become deformed and tear while driving. It is also important to ensure that it is securely fastened. Usually, special harnesses are used for this, which have high elasticity, due to which the cable will be securely fastened.
If a standard radio is installed, then it is not necessary to remove it. Otherwise, it may need to be dismantled. After all, modern devices are equipped with built-in amplifiers. Therefore, to check if it is there, you can remove the device. After dismantling it, you should find the subwoofer connector, which is located on the reverse side. This plug is required to connect the cable. Don't forget about the SRC wire. It is noticeably different from all the others because it is long but thin. Its main purpose is to control the operation of the amplifier without user intervention. If this is not done, the amplifier may not function at all.
To connect the device to the battery, you can use any black cable. The negative wire should be located next to the subwoofer, after which you can connect it to the speaker, install all the wires in place and mount the radio.
Third step: adjust output sensitivity
The output sensitivity adjustment filter also looks like a wheel for scrolling with a screwdriver and is designated “GAIN” or “LEVEL”.
There is a misconception that this parameter is responsible for the volume of the subwoofer, in fact this is not the case, even though when set to the upper positions the volume does increase. This filter is responsible for the coordinated operation of the head unit and subwoofer, and is configured using a specific method that has four simple steps:
- set the controls on the radio and amplifier to minimum and the sound signal will sound to check;
- the volume gradually increases until the first distortions in the sound appear, after which it returns to the last position at which there was a clear sound;
- then the regulator on the amplifier rotates upward until the first sound distortions appear;
- as soon as distortions appear, the regulator returns to the extreme position at which they did not exist.
Connection instructions
Before connecting the Mystery active subwoofer, make sure that all the above parts are present. You can buy them at auto stores.
Installing an audio device can be done in several ways. Choose the one that you think is simpler and more convenient. It should be taken into account that active and passive subwoofers have their own installation features.
For car enthusiasts with a low level of knowledge in electronics, the following connection option is suitable:
- Select the location where the Mystery sub will be located. It must be placed in such a way that nothing muffles the sound while listening. Also make sure that the device is not too close to the rear passengers, as this may cause some inconvenience.
- Supply power to the subwoofer. It would be optimal to power it directly from the battery. If it is not possible to connect the device in this way, you can do it through the cigarette lighter.
- When connecting the subwoofer, ensure that the polarity of the wires is observed. You should also take care to install a fuse on the “positive” wire, which will regulate the voltage during sudden load changes. Without a fuse, the audio system may be damaged.
- Connection to the radio occurs using a standard “tulip” or screw power contacts.
Another connection method involves using an amplifier (for passive subwoofers):
- Installation of the device begins with power. The negative wire must be connected to the GND terminal of the amplifier. Its other end is connected to some part of the car body. Be sure to insulate the connection with electrical tape. If wires connected from several pieces are used to connect the power, make sure that the “negative” wire is thicker than the “positive” wire. The latter must be connected to terminal +12 of the amplifying device. Don't forget to install a fuse.
- After power supply, connect the audio device to the Remote terminal. Most often it is located in the head unit system. In a similar way, you can synchronize turning on and off the radio and amplifier.
- Then connect the radio and amplifier using RCA cables.
Fourth step: adjusting the acoustic phase
In order for the bass to sound in harmony with the other frequencies protruding from the front speakers and at the same time there is no perceived separation on the sides of the car, you need to correctly adjust the acoustic phase. This parameter is adjusted according to the driver’s personal feelings and is regulated by the Acoustic phase phase shifter, which is located on the front panel of the amplifier. You should gradually rotate the filter adjustment phase shifter clockwise until the front speakers and subwoofer begin to play in the same plane/acoustic phase (there will be no sensation of separate bass output from the rear). To check compositions, you need to listen to them in the driver's seat, where the sound separation is always more noticeable.
Watch the setup video:
Fifth step: adjusting the frequency junction
The final stage of setup is to adjust the sound of the midbass and subwoofer to a harmonious, comprehensive sound of music. During the preliminary setup, the LPF parameters were already set, which may have a difference with the low frequencies of the front speakers. Because of this, noticeable gaps may occur during playback. For example, if the LPF was set to 50 Hz, and the front speakers are running at 100 Hz, the sound will occur with a frequency dip in the range from 51 to 99 Hz. This does not mean that the filter will cut them off completely. It only smoothly reduces the sound of frequencies lying outside the specified parameter, and does not cut them out completely, but it is still too noticeable to the ear. To eliminate this effect, additional correction should be made using the LPF filter parameter. To do this you need:
- Play music rich in low frequencies through the speaker system.
- Turn the filter phase shifter several positions counterclockwise. This adjustment evens out the sound.
- If the dips are still noticeable. then the filter phase shifter rotates three phases in a clockwise direction.
Expert recommendations
Before proceeding with the settings, it is recommended to listen to several familiar songs and launch a test disc. Only after making sure that the music does not sound right can you arm yourself with a screwdriver and begin active adjustments.
When adjusting the sound, don't rush. Experiment with the settings to achieve the music sound you enjoy. A properly configured subwoofer amplifier will allow you to enjoy powerful sound.
Tips for setting up a subwoofer
- Haste and proper setup of the speaker system are incompatible things. You should set aside several hours of free time for high-quality setup.
- It is best to check the sound on known or favorite tracks, where you can definitely distinguish the correct sound from the distorted one.
- To check the tracks, you should listen to them with the doors and windows closed in the driver's seat, this way you can catch the slightest defects.
- Do not limit yourself to checking on one track; it would be best to carefully listen to several compositions of different genres and with a different set of sound frequencies.
- There are no specific parameters to which filter metrics need to be set. This article provides only the optimal and most popular parameter settings. It is necessary to configure based on personal taste preferences, monitoring the harmonious sound of the front midbass and subwoofer head.
By adjusting all the filters in this manner, you can achieve a loud subwoofer sound, while it will work harmoniously, without blocking the overall musical tone. This setting is suitable for all musical genres and will help expand the range of their sound.