4.6/5 — (110 votes)
The failure of wireless headphones is no less distressing than the failure of a telephone. How to fix headphones, if these are expensive Airpods, and the owner does not have even minimal skills in repairing equipment, then it is better to immediately contact professionals at a service center for repairs. But if the headphones (Head Set) are not truly wireless and the problem is not serious, it is possible to repair the headphones yourself.
Causes of headphone malfunction
TWS – True Wireless Stereo truly wireless stereo.
Head Set headphone models, unlike TWS, have wires in their design.
The wire broke
For example, wireless vacuum headphones (IEMs, plugs) JBL E25BT are connected to the phone via Bluetooth, but the headphones are connected to each other by a cable, since the chain contains a battery and a control unit.
Each time, throwing this bundle behind the back of the head and attaching it to clothing with a clip, the user exposes the cable to mechanical stress and, despite the fabric braid, the wires at the connections may break.
Conductors in ordinary polyvinyl chloride insulation, when stretched, can break in the middle of the connecting cable, and the break may not be noticeable.
Broken speaker in headphones
A problem often arises when the sound signal in one of the headphones disappears, but there is no external damage to the cable.
This can happen due to the separation of one or even two wires from the speaker inside the body of the plug itself.
And also due to poor-quality soldering of thin conductors to the dynamic emitter at the manufacturing plant.
Less often, the speakers of wireless headphones fail due to power overload (again, a manufacturing defect).
In this case, the coil inside the emitter itself burns out, and repairs require replacing the speaker with an identical one.
Membrane damage
The malfunction is determined by a crackling or rattling sound in one of the headphones while listening to a track.
Most dynamic emitters built into earbuds and vacuum headphones have a structural membrane protection - a metal cap with holes that covers the speaker housing.
Therefore, it is almost impossible to mechanically harm the thinnest diffuser through the audio channel of the headset.
However, with inexpensive headphones that are not protected from moisture and dust, dirt may get on the surface of the membrane, which leads to sound distortion, and the intermediate mesh, clogged with earwax, reduces the sound volume.
Damage to the membrane can be considered when the coil peels off from it.
This malfunction cannot be repaired: as in the previous case, the dynamic emitter must be replaced.
You don't have to buy a new one to replace the speaker. You can use a working emitter from other headphones that have failed for another reason.
Volume control malfunction
On wireless headphones, instead of a dismountable (unscrew 2 screws) volume control with a wheel, there is a full-fledged control panel.
It allows you not only to turn on and off music playback, adjust the volume, but also answer incoming phone calls.
The user will not be able to repair such an electronic device. But it’s still worth inspecting the control unit.
The case is most often held on by latches and can be easily disassembled with a knife.
One or more loose wires may be found inside.
Repairing the microphone on portable headphones
If the user normally hears the interlocutor using wireless headphones as a headset, but the other cannot hear him, we can confidently say that the microphone is broken.
This part cannot be repaired, so it is easier to replace it in a workshop.
However, if the subscriber still hears weak-sounding speech, the problem may be that the input hole for the microphone is dirty.
For example, in the same JBL E25BT headphones, the microphone itself is weak in the control panel housing.
If you repeatedly press the buttons with unclean hands, the microphone hole may become clogged.
Therefore, before contacting a service center, it is worth disassembling the control unit and carefully cleaning it with a cotton swab soaked in alcohol.
Repair of in-ear headphones
Wired in-ear headphones are very popular these days. Low price, small size and acceptable sound quality make them indispensable for use in headphones for mobile devices.
Because headphones are used on the go, the wires are constantly bent and then frayed after a while, usually at the phone input, rarely at the jack.
The location of the wire break is usually obvious; the sound in one of the phones begins to disappear from time to time when the wire is moved. In this case, even without instruments, it becomes clear where the wire wear is occurring. Here is an example of self-repairing HTC headphones in a channel.
In this headset, the wire at the input of one of the phones wears out. To fix it, you need to open the case. To do this, insert the blade of a knife into the space between the body halves and twist it slightly to separate the halves.
Typically, the phone halves fit together tightly, thanks to a groove at one end and a raised shoulder at the other, so they pull apart smoothly.
After disassembling the phone, it was clear that one of the pairs of wires was broken, and some of the wires in the second wire were also broken. Considering that the wire at the entrance to the earphone is also worn out, it is necessary to remove all the unusable part.
So the wires were released from the phone, the cable was cut a couple of inches and the wires were stripped of their insulation. The mounting bracket was then removed and crimped onto the cable in its new position. The position was chosen based on the fact that when pulling the cable, the soldered conductors would have poor pull.
What remains is tin and solder, observing polarity, wires to the headphone transmitter. The pliers were used as a third hand. The handles of the pliers were equipped with rubber bands, which provided easy clamping of the phone.
All that remains is to put the halves together and test the headset in action. During the repair, I also resoldered the wires of the second headset, since they will fail in the near future.
Color wiring of wires
The cable coming from the plug contains several wires of different colors. High-quality cables use tinsel, in which thin wires are braided with nylon or linen wire, which increases the mechanical strength when stretching and bending the wire.
There is no international standard for color-coded wires. Therefore, manufacturers solder wires to the connector pins in accordance with their internal documentation.
But from practice we can conclude that ordinary GND wire is not painted by all manufacturers and has the color of copper coated with insulating paint.
How to fix headphones without a soldering iron?
When a connecting wire breaks, good craftsmen make do with only a knife, a lighter, or electrical tape.
But sometimes, in order for the headphones to start working, you don’t need to take out a soldering iron or any other tool at all.
To pair your device and wireless headphones, Bluetooth must be activated on your smartphone or other transmitting device, and the wireless headphones must be turned on, charged, and within range of the transmitting signal.
Driver Update
Wireless headphones stop working due to the fact that the phone does not recognize the headset after a firmware update. In this case, there are 2 options:
- return to the old firmware version;
- installation of a new one at the service center.
There may also be a problem when connecting headphones to a computer.
It may not detect them because Bluetooth drivers are not installed or require updating.
After reinstallation, the headphones will begin to work without the use of tools or a soldering iron.
What to do if JBLs do not turn on on a laptop
On a PC, a common cause of errors in the operation of a Bluetooth headset or wired headphones is the lack of a driver. Or his work is wrong. Therefore, one or both JBL devices simply do not turn on.
You need to open the device manager and check the corresponding software:
- Press WIN+PAUSE together and select the item on the left in the “Device Manager” menu; Press WIN+PAUSE keys together
- Find JBL headphones in the list of devices connected to your computer; List of computer devices
- Select it with RMB and click “Update Driver”; Click on "Update Drivers"
- If the device is not in the list, try opening the “Network adapters” section (if these are JBL Bluetooth headphones) or “Sound devices” (if the headphones are wired) and find it here. Or click the button at the top of the “Update Configuration” panel. "Update configuration" button
If the headset appears in the list of devices after pressing the button, right-click on the model name and select “Update...”. Try reconnecting your headphones to your computer or laptop. Your device may be refusing to work with different devices. This means that a breakdown may affect important parts, such as the battery. Or the speaker itself has failed.
This is often confirmed by the fact that sound comes out of the left or right ear, but it is much quieter. In this case, one of your JBL headphones is broken and therefore does not work. Contact the service to try to fix it. Or return to the store where you purchased the device. You have the option to return it if the warranty period has not yet expired.
Looking for damage
The main reason why wireless headphones malfunction is still damage to the connecting cable.
Therefore, if there are no visible traces of impacts (chips, scratches) on the housing of the headset, control unit or battery, then the first thing that needs to be done is to carry out a careful, detailed inspection of the cord.
It is possible that there are fractures, bends or breaks in the places where it connects to the headphones, control unit or battery case.
To do this, turn on the charged headphones to play a music track, carefully probe and bend the cable along its entire length.
If the cord is deformed at the site of the supposed break, the sound in one or two headphones will be interrupted or, conversely, appear.
Is it possible to return AirPods to Trade In?
In fact, Apple offers the only official option for what to do if your AirPods don’t work - use the Trade In . If you trade in an old iPhone, iPad, Mac, Apple Watch , or even Android device, you get a discount. But that's all.
According to Trade In, they won’t give you anything for AirPods - Apple simply offers to send them the headphones for recycling and that’s it.
To be fair, Apple is not the only or even the worst offender. They are simply the most popular headphones with a fairly large lead over their competitors. Meanwhile, other headphone manufacturers do not even offer such support and processing. To make matters worse, thousands of e-waste recycling companies around the world are not prepared to handle the recycling of wireless miniature devices.
Why can’t you return AirPods for money anywhere?
Amanda LaGrange, manager of Tech Dump, an electronics recycling facility in Minnesota, answers this question:
- • non-disassembled electronics are always sent for shredding for distribution into valuable materials for recycling;
- • AirPods cannot be shredded due to the presence of lithium-ion batteries with a risk of fire if damaged;
- • the procedure for recycling such devices is divided into the stage of manually removing the battery and sending the remaining elements to be shredded;
- • recycling of micro-batteries requires separate documentation, certification and other difficulties that make the process expensive.
In the real world, a dangerous situation is being created. You throw your broken AirPods into the trash, they go to a recycling facility, where they explode during the shredding process and cause a fire. Nobody is responsible for this. For example, Tech Dump calls the situation "irresponsible design" at Apple .
How to repair vacuum headphones or earbuds?
To repair any wireless headphones you will need:
- multimeter;
- low-power soldering iron (25-40 W);
- flux and solder (rosin and tin);
- side cutters;
- sharp knife;
- lighter;
- insulating tape;
- heat shrink tubes of different diameters;
- a piece of multi-core cable;
- Super glue.
How to find a gap?
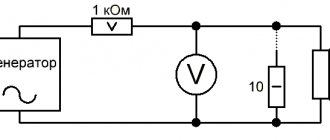
If you cannot visually determine which section of the cable in your wireless headphones is broken, you need to use a multimeter.
A multimeter (tester, avometer) is a combined device that combines the functions of an ammeter, voltmeter, and ohmmeter.
Testing with a multimeter: the basics of the repair procedure
Let's take the same JBL E25BT wireless headphones.
There is no sound in the right earphone. This can happen due to frequent mechanical stress on the nearby control panel.
Carefully, using a knife, disassemble the housings of the vacuum plug and control unit.
In the earphone itself, 2 wires of different colors should be soldered to the speaker, and wires of the same color coming out from the other side of the cable should be soldered to the control board.
With such disassembly, you can immediately detect fallen wires due to poor-quality factory soldering, and also check whether the speaker is working properly.
On the multimeter, the switch knob is set to the “continuity” position.
When the probes are connected to each other, a sound signal should be heard, and a zero will appear on the display instead of one.
To ring the headphones, one of the probes touches the soldering point of a wire of a certain color on the headphone, and the other probe touches its soldering point on the control board.
If the conductor is intact, its resistance is zero and an audible signal will sound. And the second wire in the cable is also checked.
If both wires are intact, you should ring the speaker itself or look for the cause in the control unit.
When one or two wires are broken, this section of cable is replaced with a new one.
If the location of the cable damage can be determined visually or by palpation, it can be repaired without disassembling the Bluetooth headphones, control unit, or battery.
The repair is done in the following order.
Repair of wired headphones with microphone CHP 510
Wired behind-the-ear stereo headphones usually have frayed wires in the cord where they plug into the phone.
My friend brought me the headphones you see in the photo with this problem. He repaired the headphones himself, soldering the broken wires, but they broke again. This repair method only results in short-term operation of the headphones.
A good repair requires cutting the frayed cable, disassembling the headset, and soldering the wires directly to the audio transmitter.
You should begin disassembling the headset by removing the ear pads. To do this, you need to pull it with your fingers and use the blade of a flat-head screwdriver to pull it out of the phone socket.
After removing the auricle, four clips became visible. Sometimes the phone cover is secured with screws.
To remove the cover, use a flathead screwdriver to push the latches toward the center one at a time and push them away.
After cutting out the worn part of the string, I discovered that it had been permanently fused into an elastic tube that protected it from being sharply bent. It was necessary to remove the wire from the pipe using a drill bit. After cleaning, the tube was placed on the cord.
Then, very carefully so as not to damage the wires, cut the insulation with a knife. The soldering iron doesn't help here, as the conductors practically melt into the insulation and could not be moved from the wires.
After removing the PVC insulation, the ends of the wire must be burned with a soldering iron and flux. The photo shows the wire prepared for soldering in the headset.
To avoid confusion with the markings, bad wires were not allowed in at first, but when soldering new wires, the old wire was empty, and wires of the same color were soldered in its place.
The wires going to the open headphone speaker were soldered directly to its pins. The wires going to the second earphone and microphone were connected to each other by soldering. For insulation, paper adhesive tape was used, covered with an existing layer of glue.
The photo shows the CHP 510 headphones that I repaired and hopefully they will last for many more years.
Removing the cable braid
The cable at the point of damage is cut with side cutters.
To make it easier to work with wires inside the cable, the braid at both ends is exposed by 1.5 cm using a sharp knife.
In the case of the JBL E25BT wireless headphones, it is double: on top of the polyvinyl chloride is a layer of fabric insulation that protects it from cracking in the winter.
To prevent fringe from appearing on the top braid during subsequent actions, it is advisable to edge it with narrow tape.
After completion of the work, the place where the cable is repaired can be secured and protected from tearing with insulating tape, but it is better to do this using a piece (4-5 cm) of heat-shrink tube of a suitable diameter, having first put it on one of the ends of the cut cable.
Preparing the cable ends
Regardless of the number of cores inside the cable, they all have different colors, which allows assembly without testing each conductor.
Moreover, in some headphones, each wire has its own polyvinyl chloride insulation, but in most, the stranded copper conductors are coated with varnish of a certain color.
The common wire is coated with a colorless varnish, so it has a “copper” color.
Cleaning off the varnish with a lighter
For future tinning, clean the ends of the wires coming out of the two ends of the cable by 5-7 mm from the insulating varnish coating.
Many people use a lighter to strip wires.
This can be done carefully using a soldering iron and an aspirin tablet.
The ends of the wires are placed on the tablet and pressed with a heated soldering iron.
Under the influence of temperature and acid, the varnish burns out, and oxides are removed from the surface of the copper conductor.
Solder and fasten
Tin the cleaned tip of each wire.
To do this, a layer of flux is applied to it (heated with a soldering iron, dipped in rosin), and then a layer of solder (tinned with tin from the soldering iron tip).
Before soldering wires of the same color together, on one of them a centimeter-long piece of thin heat-shrinkable tube is put on each wire (the common wire can be skipped).
We isolate the wiring
Stranded conductors are so thin that it makes no sense to twist them together before or after tinning.
Veins of the same color are alternately soldered together with an overlap.
After each soldering, the heat-shrinkable tube is moved to this place so that it insulates the exposed section of the conductor, and it is heated with a lighter until it shrinks completely.
We check the quality of repairs
Connect charged headphones via Bluetooth to the device and turn on the track to listen.
If the repair is done correctly, you will hear clear, interference-free sound in the headphones and proceed to the final stage.
It is acceptable to secure the junction of two pieces of cables with insulating tape, but if the user followed the advice and put it on the cord
piece of heat-shrinkable tubing, then proceed in the following order:
- quickly apply superglue to the edges of the braid (after removing the tape) and the soldered wires;
- carefully move the piece of tube so that it sits on the braid on both sides of the connection;
- heat until completely shrinked using a lighter.
Instructions for Elari wireless headphones
If you have problems pairing Elari headphones with each other, you must do the following:
- Remove pairings with Elari EarDrops headphones in the list of Bluetooth connections on your phone (if there have been early attempts to connect);
- Place the headphones in the case for 30 seconds
; - Remove the headphones from the case;
- Turn off the headphones by holding their button for a few seconds;
- After turning them off, hold down their buttons for 15 seconds
. The headphones will turn on and a connection sound will be heard; - Place the earbuds in the charging case for 30 seconds (the red indicator should light up);
- Remove the headphones from the case and wait while they pair.
- All that remains is to connect the already paired devices to the phone.
Connecting Elari EarDrops
Break near the earphone
The most difficult step is disassembling the housing of a broken earphone.
Since the halves of the plug (droplet) or liner are attached to each other using glue, they can be separated with a sharp knife.
To do this, use a blade to make a small depression along the length of the entire seam, and alternately press the knife on one or the other half of the body.
Some craftsmen suggest splitting the headphone housing by clamping it in a vice.
If you squeeze the earphone with the jaws of a vice in the plane of the glued joint, then a crack will appear due to deformation, and the case itself will break into two halves.
This method can only work if high-quality primary recycled plastic is used to make the earphone, otherwise the case will crack in any other places, and case repair will be added to the soldering of wires.
The wire inside the earphone is secured by tying a knot or a metal bracket, which does not allow it to go beyond the cable channel.
After unsoldering the remaining wire from the speaker and removing it from the housing itself, repairs are carried out in the following order:
- from the end of the cable going to the earphone, the braid is exposed by 1-1.5 cm;
- the ends of the wires (5-7 mm) are cleared of varnish and tinned;
- the cable is pulled through the cable channel of the rear half of the earphone;
- tie a knot at the end of the cable or clamp a safety plate;
- the ends of the wires are soldered to the speaker;
- glue the body halves together.
Replacing the cord in large headphones
Larger gadgets, such as Philips headphones or Sven computer headsets, differ from in-ear gadgets only in the size of the speaker (diaphragms in smaller gadgets). Difficulties may arise when trying to reach the column to solder the wire contacts.
The method of opening the headphones varies from manufacturer to manufacturer. These could be latches that are hard to find or screws hidden under the soft ear pads. For example, we often wonder how to disassemble Sennheiser HD203 headphones?
It's simple.
- Use a credit card or other flat object to squeeze the tabs that hold the ear pads in place.
- After removing the soft pads you will see 4 screws that need to be removed.
- On the disassembled device, you will see pins with soldered wires that need to be disassembled and replaced with new ones.
When repairing the Steelseries Siberia headset, the pads are held in place with glue. They can be removed by gently pressing them with a screwdriver, after which you can open the clasp. Some models use latches instead of screws, which can be broken if pressed hard. If they break, you will have to glue the gadget cups, after which they will become indestructible.
With the Razer Kraken headset, the pads do not stick together and are easy to remove.
After detaching them, the fasteners are located under the glued paper.
In Audio-Technica M30 or ES7 headphones, they are also worn on the rim of the gadget's cup. Phillips headphones are no exception.
By the way, Audio-Technica ES7 headphones have hinges for turning the earcups. Therefore, if you are disassembling the gadget during repair, you need to be careful.
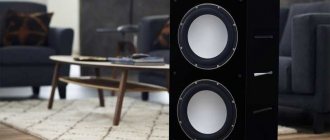
The Philips SHD 8600 headset saves you all the inconvenience of plug and cable replacement as it is a wireless headset.
Channel blockage
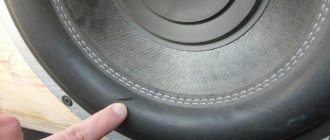
Since the earplugs are inserted directly into the ear canal, the ear pad and mesh located at the output of the earphone sound channel become contaminated with earwax and other secretions, causing the volume and sound quality to deteriorate.
The ear pads are easy to remove and wash, but when you try to clean the mesh from the outside, you can push dirt inside the earphone.
Together with the cleaning liquid, sulfur particles will clog the speaker holes or get onto the membrane, which will degrade the sound quality.
Therefore, disassemble the earphone and wash the half of the case with the mesh in alcohol.
What to do if large headphones break
How to fix large headphones if they do not work. Sound loss or distortion is usually associated with a break in the conductor and mechanical particles entering the membrane of the sound capsule. If a wire is broken inside the structure, this can be easily determined by external inspection. It is enough to solder the broken wire back into place and the functionality of the product will be restored. Distortion occurs when small mechanical particles get between the membrane and the cover with holes. You need to carefully remove the capsule, remove small debris and remove dust from the holes with a soft brush. Sound distortion or wheezing occurs due to deformation of the membrane or misalignment of the coil. Such malfunctions are associated with a factory defect, which appears some time after the start of operation. Repairing a dynamic emitter at home is difficult or impossible, so it’s easier to purchase a new model. At home, you can repair and adjust headphones or a headset with a microphone.
Which headphones make no sense to repair?
You can try to repair any headphones yourself.
Even if it turns out that the cause of the malfunction is more serious than a cable break or speaker failure, the user will know about it and will not pay the same amount in the workshop for a simple repair as for replacing the same control panel.
But it’s not worth returning outdated wireless headphones for repair; it will cost half the price of what was paid when purchasing them. It's better to buy new ones.
Connection problems
There are specific problems with each manufacturer's products. The principles of connection, use and troubleshooting are the same for all Bluetooth devices.
There are some of the most common defects. Among them:
- The headset does not turn on or off;
- unexpected connection or disconnection from a source;
- The Bluetooth module conflicts between devices;
- new renovation required;
- Ability to work only next to the main device (phone, PC, tablet).