Articles
Gluing the subwoofer is possible, do not throw it away right away
How to seal a subwoofer speaker, if you find a hole in its diffuser (there are many reasons, carelessness, children playing pranks, and more), do not rush, throw out the old one, or look for a new speaker to replace it. Such damage can be easily and successfully repaired without consequences or noticeable changes in the operation of the subwoofer speaker. How to seal a subwoofer if a problem arises, we will help you now.
Let's get started
Having assembled a simple repair kit, let's get down to business:
- Disconnect the subwoofer from the amplifier, remove the grille from the speaker using a screwdriver and unscrew the mounting screws from the speaker, carefully remove the speaker from the housing, disconnect the speaker wires
- We inspect the condition of the speaker cone and immediately make sure that the leads from the voice coil have not been damaged.
- Using scissors, cut out a patch from thin cardboard, such a size that it covers this hole by a centimeter in any direction.
- You don’t have to look for electric cardboard, almost any one will do, you can even use a cardboard candy box
- It often happens that the shape of the diffuser is formed by the so-called double curvature surface
- Then you need to make two or three patches, which need to be glued overlapping one to the other
- Align the edges of the damaged part on the diffuser, impregnate the back side with “Moment” glue, diffuser material, wait a little for the glue to dry
- Prepare cardboard patches in advance, then generously moisten the damaged area on the diffuser with glue from the back side, then immediately apply the patches, our goal is to saturate the parts to be joined with glue
- Then we immediately remove the patches from the diffuser without removing them, you need to wait 20-30 seconds, then attach both patches back
- From the reverse side, press them to the diffuser, placing a roll of cotton wool or padding polyester inside the speaker basket
- It is necessary to ensure that the diffuser does not immediately bulge in the place of gluing, which means that you need to select the optimal force for pressing the patches in order to maintain the initial shape of its diffuser
- After a day, we remove the supported support roller from the speaker basket and inspect how well the connection has stuck together.
- If you notice areas that are not glued, then bring the tube of glue to the crack, and gently press the tube and press a drop of glue there
- The main goal is to eliminate chatter when the speaker is operating.
- Use a hairdryer to carefully heat the glue joint until the glue boils, remove the hairdryer and squeeze the gluing area with your fingers.
- Hold for at least a minute, after which the glue will set tightly and hold the patch.
- Carefully move the diffuser both in and out to make sure that the coil does not touch the magnet as it moves.
- If necessary, replace the sealing rubber, connect the speaker cables back to the speaker and install the speaker in place
- As you can see, gluing a subwoofer is not so difficult
- Then you need to do a test run at low volume to make sure there is no chatter during operation.
- Then we gradually increase the volume to maximum, listen carefully for the appearance or absence of any extraneous sounds
- If no extraneous sounds are found, you can return the grille to its place
That's all, in my opinion everything is clear even without video.
How to seal a subwoofer so as not to buy a new one
Gluing the subwoofer is possible, do not throw it away right away
How to seal a subwoofer speaker, if you find a hole in its diffuser (there are many reasons, carelessness, children playing pranks, and more), do not rush, throw out the old one, or look for a new speaker to replace it. Such damage can be easily and successfully repaired without consequences or noticeable changes in the operation of the subwoofer speaker. How to seal a subwoofer if a problem arises, we will help you now.
Seal the speaker
As a rule, there are more speakers in an audio system, so you will need instructions for gluing them:
- If your speaker begins to produce extraneous noise, this means that it may have become worn out over time.
- To glue the speaker, just buy “Moment” glue (“subwoofer glue” and glue “for speakers” do not exist) and take a piece of fabric or bandage
- And if the damage is significant, then you won’t be able to do without a soldering iron.
Car speaker
To repair the speaker yourself, you will need:
- The same glue "Moment"
- A couple of pieces of thin cloth (possibly a bandage) or toilet paper as a last resort
- Sharp knife or scalpel
- Tweezers
- Acetone
What tool will you need?
If a subwoofer in a car is damaged or an ordinary home speaker is damaged, then it is quite possible to restore them on your own. The following devices and tools will be useful for this:
- brush for applying adhesive solution;
- cutting tool (preferably a knife);
- solvent or any degreaser;
- a spare element that is being repaired (for example, a suspension);
- glue;
- screwdriver;
- hair dryer (construction).
How to seal a subwoofer lip with your own hands
Post by makar-glumakov » Dec 30, 2009, 01:35 pm
Messages: 362 Registered: Sep 14, 2008, 00:00 From: Tumen Auto: TYT CROWN JZS155_RSG :
Awards: 1
| Rating: 362 |
| Reputation: 0 |
Post by ivan_vbs » Dec 30, 2009, 2:22 pm
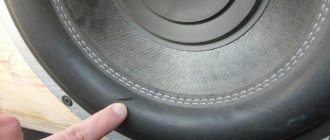
makar-glumakov, thank you, I read it, but I have a hole not in the diff, but in the rubber band between. howbeee. between the iron mount and the diff. like in the photo:
Added after 59 seconds:
What to seal the rubber with, it’s not cellulose.
Messages: 761 Registered: June 18, 2009, 00:00 From: Moscow tr-k Car: Mazda6 :
Awards: 1
| Rating: 761 |
| Reputation: 0 |
Post by enzow » Dec 30, 2009 02:26 pm
Messages: 362 Registered: Sep 14, 2008, 00:00 From: Tumen Auto: TYT CROWN JZS155_RSG :
Awards: 1
Possible faults
Repair of subwoofers by Vostok-Polyus specialists will be carried out in different ways. Most often, restoring the functionality of such devices involves replacing power supplies, control boards, power cords and other numerous body parts.
Subwoofers need repair when they are subject to various mechanical damage (shocks, falls, shocks, etc.). Long-term operation of the unit implies the accumulation of dust inside the housing, which over time damages individual operating components. To resume their operation, they will need periodic cleaning or lubrication, but this should only be carried out by a professional.
Failure of any electronic components, as well as power supplies, is the most difficult to repair and therefore their restoration always requires maximum effort and attention.
There can be many reasons why a subwoofer breaks down, but the most common are unstable voltage in the electrical network and improper operation of the equipment.
Steps
1Get to the speaker. Ideally, you should remove the speaker to gain access to both sides of the cone
Remove door panels and grilles or trim to remove mounting screws or fasteners.
2Hold the speaker. If the diffuser is old, it may be fragile, so work carefully. Hold the speaker so that it does not fall out after the last pair of screws are removed.
3Carefully pull the speaker out of the socket. If the speaker has been sitting in the socket for long enough, it may stick to the sealant or paint.
4Inspect the connectors on the speaker. The speakers receive the signal from the source or amplifier through two wires
Polarity (the order in which the wires are connected to the connectors) is important. Take a photo (on your phone), draw a picture, and write labels on the wires or connectors so as not to confuse the connection order when installing it back.
Fix the holes
1Get repair material. Most diffusers are made of paper or thin plastic. To seal a hole, you will need material of approximately the same density and type, but slightly larger than the hole itself
If you can't find thin plastic, like some speakers, you can use paper.
2Prepare the speaker. Carefully remove dust, dirt, etc. from the front of the diffuser. If the diffuser is old, it may be fragile, so be careful.
3Use scissors or a razor to remove any overhanging edges near the hole. The smaller the hole and the smoother its edges, the better the repair will be.
Find the sweet spot between the size of the hole and the evenness of its edges.
4Cut the patch from the material chosen for repair. The patch should be slightly larger than the hole and roughly follow its shape.
5Apply nail polish to the edges of the hole. Apply a generous coat of nail polish around the edge of the hole on the diffuser.
6Apply nail polish to the edges of the patch. Apply a generous coat of nail polish to the edges of the patch.
7Connect the patch and diffuser. Align the patch with the hole and stick it in place. Press on both sides at the same time. Don't press on just one side or the hole will break even bigger.
8Allow to dry completely.
9Tweak it. Check the areas that have not stuck and add just enough varnish to fill the void. Securely adhere the edges that are not glued with varnish.
10Install the speakers back into place in the reverse order of their removal, remembering to maintain the correct polarity of the wires.
Repair of Breaks
- 1 Remove and prepare the speaker.
Follow the steps above to prepare your speaker. Do not cut or tear anything from the diffuser. - 2
Apply a generous coat of nail polish to the tear.“Paint” the break itself and around it with nail polish. Apply polish to both sides of the diffuser.
- 3
Let dry completely. - 4
Apply a second coat of varnish. - 5
Let dry completely. - 6
Reinstall the speakers in the reverse order of removing them, remembering to maintain the polarity of the wires. - 7
Ready.
Depth
For various types of wind organs in halls specially renovated for musical instruments, the sub-bass has a significant influence on the timbre of the sound. It is for the sounds of nature and various man-made disasters, such as unexpected explosions, that quite strong sub-bass components are characteristic.
It is worth noting that most people either do not hear sub-bass at all, or they hear it, but not well enough. For example, if you filter out the fundamentally different sounds of a nuclear explosion and a strong hurricane, like a tornado in the tropics, from everything except sub-bass, then we can say with absolute certainty that it is unlikely that any of the listeners will be able to understand what is actually happening.
Failure of the tweeter
To the question of whether it is possible to repair a speaker if one of its speakers is burnt out, we will answer - it is possible. But in the case of a “tweeter”, that is, with a high-frequency speaker, this can only be cured by replacement, since such speakers have a closed diffuser basket and it is not worth trying to disassemble it. This item is disposable.
The damage is determined by hearing. If the speaker stops clicking, that is, producing high frequencies, or the top speaker produces a grinding noise, then the problem is in the “beeper”. What we do:
- Open the cover by unscrewing the fastening screws.
- We check the integrity of the soldering on the contacts of the low-frequency speaker, that is, whether the wires have fallen off from the contacts of the speaker. If everything is normal, then the problem is 100% in the tweeter itself.
- We unsolder the conductors from it, noticing which wire was on the plus and which on the minus (there are symbols on the side near the contacts).
- We take a new (or used, but working) tweeter from a radio equipment store or from friends, if someone has one lying around. The main thing is that the speaker matches the power. It's best to take it with you to the store. People there, if anything, will find an analogue in size.
- Let's put it in place. In order for the speaker to work without extraneous noise and produce high-quality sound, it is best to seat the speaker around the circumference on the sealant, making sure that it never gets on the diffuser funnel.
- Solder the wires. Plus - to plus, minus - to minus.
- Close the column cover by tightening all the screws.
- Let's check. Everything works great.
Discount cards
Subwoofer not working? Doesn't work at all or wheezes? This could very well happen. What happened? Where to look for the reason? In electronics boards or in electromechanical devices? There is no clear answer to these questions. The reason could be either electronics or speakers. Despite its apparent simplicity, a subwoofer is a combination of a perfectly tuned amplifier, crossover and speakers. Testing a subwoofer is not difficult. Just listen to how it sounds at low frequencies at extremely high power. Of course, this is far from a complete test, which requires hearing or at least an approximate idea of what exactly should be heard during normal operation. However, if a sufficiently strong and clear sound is heard, in most cases this indicates a high-quality setup and good performance of the subwoofer. This, in fact, is the main task when repairing and subsequently adjusting a subwoofer.
Garbage coil getting caught in gap
This can also be treated, but here you will have to tinker longer and it is not a fact that you will be able to properly remove the diffuser and clean the slot from dirt, and then put it back on the glue. How can you repair the column in this case:
- Open the lid.
- Unsolder (disconnect) the wires and remove the speaker.
- We take a cotton or other rope, soak it in acetone and place it around the perimeter of the contact of the upper part of the diffuser funnel with the basket body.
- We do the same with the centering washer, since the diffuser will have to be completely dismantled.
- When the glue softens enough, carefully tear off the diffuser from the upper rim of the basket, and the spider from its bed circle.
- Remove the diffuser and clean the slot from debris. This can be done with a compressor, a vacuum cleaner, or various mechanical devices, for example, cardboard. Under no circumstances should you poke into the slots of the magnet with pieces of iron. If you scratch the surfaces of the walls, the speaker will squeak as the coil rubs against the burrs.
- When everything is clean, we reassemble the speaker in the reverse order as we disassembled it.
- After immersing the coil magnet into the slot, before firmly seating it on the glue, the diffuser should be carefully centered so that no squeaks are heard when the diffuser is immersed down. The coil should move silently in the slot.
- Next, let the glue dry for 24 hours, assemble and test. If everything sounds great, you're doing great. If not, then you're still great. At least they tried. But the speaker will have to be replaced with a new one.
Plug
Very often the problem is in the plugs. In this case, you will need to test with a multimeter. Here's how to fix the column in this case:
- First, let's diagnose the problem. To do this, first of all, remove the cover by unscrewing the fasteners.
- We set the multimeter (tester) to ring and, one by one, touching all the contacts of the plug in the places where the conductor is soldered, coming from the plug to the speaker board, we look for matches. If at least one of the contacts does not ring, that is, does not deflect the arrow or deflects barely, then the problem is either in the wire or in the plug.
- We change the wire and plug together so that “your head doesn’t hurt.”
- We tighten the column cover and check that the repair is complete.
Current speakers do not have plugs. Therefore, you need to ring the wire itself by squeezing out the contacts (clothespins) on the speaker and on the amplifier. If at least one wire does not ring, change the wire, and everything is in order.
Glue selection
When choosing glue for speakers, pay attention to its composition and scope of application. Take the appropriate one, taking into account the nature of the damage
Diffusor SL is a universal adhesive consisting of one component. Its main constituent element is polychloroprene. Originally created to correct defects in dynamic loudspeakers. A good choice for assembling speakers. Thanks to special technology, this composition forms a colorless, neat, high-strength seam. It sets within two hours, complete drying is completed after a day, and then you can use the speaker for work. The choice of specialists involved in the repair of subwoofers.
DKD is a modern choice of adhesive material. Its composition is distinguished by a single-component structure with low viscosity. Used to restore the turns of the winding enameled wire necessary for gluing the voice coil. Complete drying takes about two to three hours, and can be accelerated with a hair dryer.
Akfi 705 is suitable for quick assembly. It is distinguished by its versatility. This two-component composition is suitable for quick speaker repairs. Well proven for rubber and plastic surfaces.
Interbond is a two-component viscous composition based on ethyl-2 cyanoacrylate. Used for repairing centering washer, coil gluing, flexible leads.