A microphone is an essential item for musicians, sound engineers, journalists, and many other professions related to sound recording and amplification. For professionals and simply experienced sound engineers, the question of choosing a microphone is not worth it, but what should “dummies” do? How to choose a microphone? What are they like? What characteristics and features should you pay attention to? It is these questions that we will try to answer in this article.
So, a microphone is a device that converts an audio signal into an electrical signal for its subsequent processing and transmission to other devices: amplification, recording, playback, etc.
To make the right choice in favor of purchasing this or that microphone, you need to clearly understand its purpose and the tasks that it needs to solve. The characteristics that determine the microphone model depend on the tasks assigned to the microphone.
Microphone types
To begin with, there are three main types of microphones: dynamic, condenser and ribbon, which have different mechanisms for converting sound waves into electromagnetic vibrations.
Dynamic microphones
This is the most common type of microphone due to its versatility. The membrane of a dynamic microphone picks up sound waves, which, in turn, drive a coil located in a magnetic field. As a result of the phenomenon of electromagnetic induction, an alternating current appears in the coil, which is transmitted further along the cable. Electromagnetic waves describe sound waves, accurately conveying phase, frequency and amplitude, which is why the signal is called analog.
Advantages:
- Durable and reliable, not subject to changes in humidity and able to withstand high sound pressure.
- Can be used for recording in noisy places and various environmental conditions.
- They have a simple design.
- Does not require phantom power.
- Affordable.
Flaws:
- Limited frequency range, frequencies above 12 kHz are poorly perceived and processed, which can sometimes work to your advantage when there are a lot of high frequencies or extraneous noise in the received signal.
- Slow response to changes in sound pressure.
Dynamic microphones are often used during live performances.
The most popular models of dynamic microphones according to POP-MUSIC:
- SHURE SM58
- SE ELECTRONICS V7
- SENNHEISER E845S
Condenser microphones
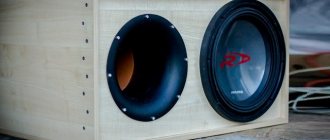
Typically, condenser microphones are used for sound recording in studios, which is due to the completeness and detail of the sound picture they transmit. A metal membrane consisting of plates (capacitor) vibrates under the influence of sound air currents, converting the sound wave into an electromagnetic one. This physical phenomenon is based on the dependence of the electrical capacity of the capacitor on the distance between the plates, and therefore on the frequency of the generated electromagnetic oscillations. To create and maintain an electric field in a capacitor, a voltage source, so-called phantom power, is required. Almost all condenser microphones have a built-in preamplifier designed to amplify the weak signal transmitted by the membrane.
Advantages:
- Detailed and spacious sound
- High sensitivity, especially in the high frequency range.
- Frequency response covering the entire range perceived by the human ear.
- Fast response to changes in sound pressure.
Flaws:
- The need for phantom power (from a battery, mixer, amplifier, etc.)
- High sensitivity to the acoustic characteristics of the surrounding space (noise, air currents, echo).
- Additional use of pop filters and spider holders.
The most popular models of condenser microphones according to POP-MUSIC:
- SE ELECTRONICS X1 S
- AUDIO-TECHNICA AT2020
- AKG PERCEPTION 120
- RODE NT1-A
Ribbon microphones
Ribbon microphones are losing their popularity with the increasing popularity of condenser microphones, although you can find a considerable number of their fans. Such microphones also use the phenomenon of electromagnetic induction, but the movable conductor element is a thin metal strip folded like an accordion, which moves when the air vibrates. A feature of ribbon microphones is the same sensitivity on both sides of the capsule, which explains the type of polar pattern (figure eight). Ribbon microphones are often used to record electric guitars due to their softening of high tones.
Advantage: natural sound, pleasant to the ear.
Flaws:
- Limited frequency response.
- Dependence of sensitivity on frequency (as frequency increases, sensitivity decreases)
The most popular models of ribbon microphones according to POP-MUSIC:
- SE ELECTRONICS VR1
- SE ELECTRONICS VR2
Master class on making a paper microphone at home for children
Children also want to play with the microphone. But you shouldn’t trust them with it – they might break it. Therefore, it is better to make an imitation of a paper product.
To do this you need:
- make a tube out of cardboard;
- crumple a ball from sheet A4 and wrap it with colored film or paper;
- stick the ball onto the end of the tube;
- Glue a thick thread simulating wire to the opposite end.
Main characteristics of microphones
Having decided on the type of microphone, and thereby significantly narrowing the range of proposed models, we will focus on the main technical characteristics that you should rely on when choosing a microphone.
Main characteristics:
- frequency range and frequency response
- sensitivity
- radiation pattern
- impedance (resistance)
- maximum sound pressure level
- equivalent noise level
- food type.
1. Frequency range
- this is the range of sounds that the microphone is able to perceive and transmit. It is measured by frequency interval, expressed in hertz (Hz). The ideal human ear perceives frequencies in the range of 20 – 20,000 Hz. The human voice fits into a much narrower range (60-1300 Hz), the range of musical instruments is much wider, but is individual for each type of instrument. Usually, beginners choose a microphone with the widest possible frequency range, which is correct, because then the microphone becomes universal. If we discard versatility and select a microphone for a specific instrument, then you can choose a model with a frequency range that maximally covers the entire sound spectrum of the instrument.
Amplitude-frequency response (AFC))
and the level of distortion determine the sensitivity of the microphone over the entire operating frequency range and the nuances of sound characteristic of a particular microphone model. The frequency response is influenced by the characteristics of the membrane, the weight and material from which it is made, and the design features of the internal circuits and microphone units.
In this regard, microphones are divided into two types: those that have the same level across the entire frequency range, and those that have peak levels or, conversely, dips at certain frequencies. The latter are used for specific tasks, for example, to enhance a specific sound source (intelligibility of vocals or a specific instrument).
The frequency response is a graph on which you can see at what frequencies and by how many decibels the signal amplitude deviates from the original. Sometimes the frequency response can be represented not by a graph, but by numerical values. For example, the entry 80Hz - 20kHz (+/- 2dB) indicates that in the specified range the deviation from linearity can be a maximum of 2 dB, without indicating the specific frequencies at which this deviation occurs.
2
.
Sensitivity is a value equal to the ratio of the voltage (in V) at the microphone output to the sound pressure (in Pa) acting on its input.
This parameter shows how quiet a sound (expressed in dB or mV/Pa) the microphone is able to capture and convert into an electrical signal. The closer the indicated value in decibels (dB) is to zero, the more sensitive the microphone is, which is able to pick up even a very quiet sound signal; for values indicated in mV/Pa (millivolts per pascal), the figure, on the contrary, should be maximum. How do you know if you need an ultra-sensitive microphone or if you can get by with less? Assess the intended environment in which the microphone will work: if in a studio, the sensitivity should be high, if there is extraneous noise (concert, street, club), then the sensitivity of the microphone will not work in your favor, catching all unnecessary noise and interference. 3.
Directivity
determines the sensitivity of the microphone at certain distances around it, forming a specific pattern (diagram). The directionality of the microphone is determined by the design of the capsule and affects such microphone parameters as noise suppression, the effect of rotating the microphone relative to the sound source, and determining the optimal distance to the source. If it seems to you that the sensitivity of the microphone is the same throughout the entire radius, that is, the microphone is located as if in the center of the sound circle, then such microphones are called omnidirectional
or
omnidirectional
. They are used infrequently, as they capture a lot of extraneous noise and are sensitive to feedback; they are usually used for stereo recording or recording sounds of wildlife.
Typically, microphones have directivity, the diagrams of which form the following patterns:
- Cardioid
- Supercardioid
- Hypercardioid
- Semicardioid
- Eight.
Cardioid
— the name of this diagram suggests that its shape resembles the shape of a heart. With this diagram, the microphone records sound entering the front part of the capsule with an operating angle of 130 degrees, cutting off extraneous noise. This is why cardioid microphones are commonly used for recording vocals in the studio. It is important to remember that such microphones should not be placed near speakers or too close to the sound source.
Supercardioid and hypercardioid
differ in a narrower coverage area in the rear, the operating angle is also narrowed and amounts to 115 and 105 degrees, respectively. The supercadiode isolates extraneous sounds well in the front part, but at the same time picks them up in the rear part. In hypercardioid, lateral zones appear with minimal sound capture. Microphones with hypercardioid perfectly pick up two sound sources, the directions of which form a certain angle. Supercadiodic microphones are suitable for recording a single sound source in a noisy environment, while being resistant to feedback.
Semicardioid
cuts off everything that is located behind the microphone, perceiving only the front. In this case, there should be no sound sources on the sides. Ideal directivity for microphones used in lectures and conferences.
Eight
- a diagram whose name speaks for itself. Equal sensitivity in the front and back, zero on the sides. Such microphones are most often used for stereo recording, as well as for simultaneous recording of two vocalists.
Some microphone models are universal and their directionality can be switched.
4. Impedance
or microphone impedance (symbolized by Z) affects the quality of sound transmission between the microphone and the preamp. For flawless operation, it is recommended to select a microphone-preamplifier pair so that the input impedance of the amplifier is 10 times higher than the output impedance of the microphone. If you already have a preamplifier, select a microphone for it, and vice versa, taking into account this recommendation.
Professional microphones always have a low output impedance (Lo-Z), not exceeding 600 Ohms, so that they can transmit a signal without loss of quality over distances of up to 100 meters.
5. Maximum sound pressure level (dBSPL)
– the value (in dB) of the maximum sound strength that the microphone is capable of transmitting without loss of quality. This is an important parameter for scoring, for example, drums and wind instruments.
6. Equivalent noise level
or self-noise level (dB/dBA). Of course, the lower this parameter, the better. Typically its value is not higher than 30 dBA.
7. Power type
: phantom (from an amplifier or mixer), batteries, accumulator, etc.
Assembly steps
To assemble the device, you will need to perform the following steps:
- cut off the ends of the marker body so that you get a hollow tube;
- solder a two-wire wire to the capsule;
- wrap the capsule with 2-3 turns of electrical tape (this is needed for better fixation in the case) and insert it into the tube so that the wire comes out on the other side;
- Solder the opposite end of the wire to the 3.5 mm plug.
Features of using microphones
Very roughly, the use of microphones can be divided into three areas:
- sound reinforcement (concerts, shows, stage performances),
- studio recording,
- television and radio broadcasting
Each area has its own specifics and certain requirements for the microphones used.
When performing on stage, there are usually several microphones used at once, so the microphones are selected to be single-directional to capture only the desired sound, avoiding extraneous noise and feedback. Choice of microphone directionality – supercardioid and hypercardioid. Each sound source requires its own microphone, with individually selected parameters. Dynamic microphones are the most commonly used microphones due to their versatility, affordability, and reliability. And although there is a conventional division of microphones into vocal and instrumental, they often turn out to be universal. However, some instruments, such as bass instruments (double bass, trombone, kick drum), require a special frequency response and require specialized microphones.
Studio recording is usually done with condenser microphones with their high sensitivity, although dynamic microphones are used to record, for example, drums. It is interesting that the relative position of the sound source and the microphone (distance, angle) gives various effects that are discovered only in practice.
Television studio microphones are unidirectional, compact, with a wireless headset. For radio broadcasting - dimensional, located on a stand, with a switchable radiation pattern and a frequency range that is most suitable for speech transmission.
Content
- 1 Microphone device
- 2 Classification of microphones 2.1 Dynamic microphone 2.1.1 Coil microphone
- 2.1.2 Ribbon microphone
- 2.2.1 Electret microphone
- 3.1 Sensitivity
Microphones for special purposes
There are microphones that have a strictly defined purpose and specific tasks that they are called upon to solve. Let's look at some of them.
1. Boundary Layer Microphone
designed for sound reinforcement in the theater, for piano sound, with the ability to attach a microphone to the cover of the instrument. Its peculiarity is that the microphone capsule is located above a metal surface, which prevents reflected waves from hitting the diaphragm and, as a result, phase distortions.
2. Stereo microphone
, the peculiarity of which is the presence of two capsules at once, oriented in opposite directions. This microphone allows you to record surround sound, where one microphone can replace a pair or even three microphones.
3. Shotgun microphone
designed for use in open spaces, therefore it is widely used in cinema and journalism. This is a condenser microphone with a very narrow directivity, it perceives sound coming only from the front side, other sounds are muffled due to the front shift.
These are not all types of special-purpose microphones, but only the main ones. Additional functions, such as the ability to switch the polar pattern, change the output signal level, built-in filters for cutting low frequencies are a pleasant bonus, and sometimes a necessity for professional work, but at the same time they increase not only the complexity of the microphone design, but also its cost.
What tools and materials will be needed for the job?
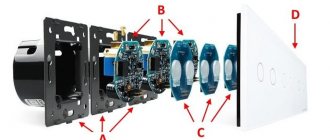
To make a simple electret mono microphone for a PC without a preamp, you will need the following materials:
- Electret capsule. This part can be pulled out of an old tape recorder with recording capabilities. It can also be purchased separately. It costs only 40-50 rubles.
- Thin wire with two cores. Needed to connect a microphone to a computer.
- Audio plug with a diameter of 3.5 mm. Required to connect the device to the audio input of a PC.
- Frame. A hollow plastic cylinder will do. It can be made from an old thick marker.
- Small office clip. Needed to attach the device to the buttonhole.
Tools and consumables you will need:
- soldering iron;
- rosin and solder;
- insulating tape;
- screw with a wide head.
Microphone selection
A properly selected microphone is the key to high-quality sound recording. Having previously studied the characteristics described above, we proceed to choosing a microphone model.
First, we set tasks for the microphone and determine its area of application: karaoke (clear sound transmission is needed), instrumental or vocal recording in the studio (high sensitivity, a certain frequency range), concert performance (reliability and resistance to external conditions). The prioritization of characteristics depends on the assigned tasks.
Stage microphones, for example, must be small, ergonomic and versatile. Reporters - reliability and ability to withstand any weather conditions, narrow focus. Although studio musical microphones must be particularly sensitive and stable, they must also be selected according to their intended purpose: vocal or instrumental.
Don’t neglect such a characteristic of a microphone as its appearance; it’s not about the attractiveness of the device, but about the comfort of its use: how the microphone fits in your hand, does it not slip, are there any unpleasant odors, protruding parts, etc.
Find out what's included in the microphone you buy. This could be a headset, mount, wind protection, etc. Yes, these nice additions don’t affect the sound quality, but you won’t have to buy anything in addition, which is also nice. For example, for reporters, a windproof cap and a comfortable mount are a must-have accessory.
Choosing a microphone is a difficult and important decision. Sometimes the experience of choosing the right microphones comes over the years, as does the experience of using various sound recording and sound recording methods. Only practice will make you a pro, but you can start getting the theoretical foundations of working with microphones today.
What can it be used for?
A microphone is used wherever sound transmission is required.
It could be:
- voice recording or radio transmission;
- communication using programs designed for video conferencing;
- negotiations in voice chat of online games.
The device can also be used to record vocals and musical instruments. But the sound quality will not be up to par. A homemade device is not suitable for this. You need at least a capacitor.
Standards
The International Electrotechnical Commission Standards Committee (IEC 61938:2018) provides parameters for microphone phantom power supply, Multimedia Systems - Guide to Recommended Analog Interface Characteristics for Interoperability. The document defines three options: P12, P24 and P48. In addition, two additional options (P12L and SP48) for specialized applications are mentioned. Most microphones now use the P48 standard (maximum power available is 240 mW). Although 12-volt and 48-volt systems are still in use, the standard recommends 24-volt power supplies for newer systems.
Rating of popular models
Portable devices with a speaker and complete with a receiver are distinguished.
Portable with speaker
Model Tuxun (MicGeek) Q9.
It has bluetooth 4.0 and supports ios and android, there is a usb and microusb slot. There are stereo speakers, supports Bluetooth connection at a distance of up to 10 m, and operates for up to 9 hours.
Tuxun (MicGeek) Q9.
Magic Karaoke YS-86.
The brand is used as a speaker or plays songs. There is a slot for memory cards, aux-in, usb, LED backlight, battery life up to 6 hours.
Magic Karaoke YS-86
Included with receiver
Defender MIC-155.
Budget brand with a receiver. The working distance reaches 30 m.
Defender MIC-155.
Sennheiser XSW 1-825-B.
Unconditional leader. Bluetooth device. Includes 10 channels in uhf mode, produces clear sound, no crackling or interference. Thanks to the receiver, you can achieve a professional sound effect.
Vocal wireless radio system Sennheiser XSW 1-825-B
Where is it built in?
Such sources are most often built into receiving devices. They can be mixing consoles, microphone preamplifiers and other similar devices. However, in some cases, phantom power may not be provided by the manufacturer, or much lower power is needed, for example, 24 or 12 V. Then you need to purchase phantom power separately, and its use must be pass-through. In other words, it must be connected to the microphone, and the output from the unit must be connected to the receiving device.
If the power was purchased separately, then you should know that it should be attached in any convenient and accessible place, since the device has a button with which phantom power can be turned on or off.
Purchasing phantom power is also necessary if a person is not satisfied with the quality of the element that is already built into the equipment. It is possible that the available power is humming or causing unpleasant noise effects. Usually such problems occur in cheap equipment.
The unit itself is usually powered by batteries or rechargeable batteries, and it must have a built-in low-pass filter, which is responsible for the absence of low-frequency hum. Conventional condenser microphones also use power for polarization.
How to make an amplifier
The simplest unregulated preamplifier can be made using 2 capacitors and 1 BC547 transistor.
To assemble the circuit using the surface-mounting method, you need:
- connect the negative output of the electret capsule directly to the emitter of the transistor, and the negative output to the collector through 2 resistors of 1 kOhm each, connected in series;
- Solder a ceramic capacitor parallel to the positive and negative outputs of the capsule (capacitance is not important);
- parallel to the second resistor and the emitter of the transistor, solder a 47 mF electrolytic capacitor (the minus should be on the emitter);
- Wires leading to the output plug are soldered to the collector and emitter of the transistor.
If you couldn’t find BC547, no problem. It can be replaced by the domestically produced transistor KT3102, which is easier to find.
Where is it built in?
Such sources are most often built into receiving devices. They can be mixing consoles, microphone preamplifiers and other similar devices. However, in some cases, phantom power may not be provided by the manufacturer, or much lower power is needed, for example, 24 or 12 V. Then you need to purchase phantom power separately, and its use must be pass-through. In other words, it must be connected to the microphone, and the output from the unit must be connected to the receiving device.
If the power was purchased separately, then you should know that it should be attached in any convenient and accessible place, since the device has a button with which phantom power can be turned on or off.
Purchasing phantom power is also necessary if a person is not satisfied with the quality of the element that is already built into the equipment. It is possible that the available power is humming or causing unpleasant noise effects. Usually such problems occur in cheap equipment.
The unit itself is usually powered by batteries or rechargeable batteries, and it must have a built-in low-pass filter, which is responsible for the absence of low-frequency hum. Conventional condenser microphones also use power for polarization.
How to make soundproofing
If you plan to use the microphone to record voice, soundproofing will not hurt. It is made from special foam plates, which can be bought at a hardware store, and plywood.
For this:
- a rectangular box without 1 wall is made from plywood;
- The inside is covered with foam rubber plates.
During recording, the microphone is placed inside the box. A person is also located there. As a result, 80-90% of extraneous sounds do not make it onto the audio track.
If you don’t want to make a box, you can cover one of the corners of the room with foam rubber plates. Sound insulation will be somewhat worse.
When phantom power is not needed
While phantom power is mandatory for condenser microphones, it is contraindicated for ribbon microphones. Applying current to such devices inevitably leads to their breakdown.
The way ribbon microphones work was invented long before the advent of phantom power in the music industry—the first ribbon microphones appeared in the 1920s. To record a signal, ribbon microphones use a thin metal strip that vibrates with incoming sound waves.
Devices of this type do not require additional electricity to operate. Under the influence of a current with a voltage of 48 V, the tapes tear and the microphone stops working. Modern ribbon microphones are less sensitive to this problem, but the rule remains the same - phantom power cannot be supplied to ribbon microphones.
Brief power supply can also cause damage if an unbalanced power supply is connected to the microphone input. Balanced sound sources are not afraid of incoming electricity.
Classification of medical simulators
Alexander Suvorov said: “Theory without practice is dead.” This statement accurately describes the main purpose of simulation training. Modern technologies make it possible to achieve a high degree of realism of a simulated object for practicing skills in conditions as close as possible to reality, since phantom simulators are able to convey tactile perception, real mobility and the ability to study organs with pathological changes, as when working with a real patient.
In 2012, the Russian Society for Simulation Education in Medicine (ROSOMED) developed a classification of simulation equipment according to levels of realism (Table 1).
This parameter was taken as the fundamental principle of classification, since it affects the goals and results of educational work. Table 1. Classification of simulation equipment according to ROSOMED
| Level of realism | What's being played | Examples | What is being worked out | Learning task |
| Visual | Appearance of a person, his organs, demonstration of the technique of performing manipulations | Classic and interactive textbooks | Understanding the sequence of actions without practical practice | Visualization of the upcoming exercise |
| Tactile | Simulation of the physiological or pathological state of organs and tissues, passive reactions | Phantoms-simulators of practical skills, tissue-simulating phantoms, mannequins for CPR and intubation | Manual skills, motor skills with a low level of realism and formal assessment of the quality of performance | Bringing motor skills of individual manipulations to automatism |
| Reactive | The simplest active reactions without physiological imitation (the inclusion of indicators in response to the correct action) | Mannequins for CPR and intubation, “simulator + instruments + dummy” complexes | The same as in the previous one, but without the need for constant supervision of the instructor | The same as in the previous one, but without the need for constant supervision of the instructor |
| Automated | Automated complex reactions of a mannequin to a variety of external influences | Mannequins and surgical phantom simulators with complex but standard types of responses to the actions of trainees | Cognitive and sensorimotor skills | Complete collection of information and conclusions in the form of diagnosis and adequate manipulations |
| Hardware | Medical unit environment using authentic simulation of medical equipment | Automated class simulators or biomaterials in a simulated hospital setting | Sensorimotor and cognition in specific contexts. Teamwork skills. Movements in the operating room | Confident ability to function in realistic environments. Testing the operation of devices |
| Integrated | Integration of various simulators (for example, surgical and anesthesiological) within a single complex | Complex integrated systems (“EidosMedicine”) | Sensory and psychomotor skills in teamwork and challenging environments | Development of complex behavioral reactions during situational work in a team |
When making a diagnosis, a practicing doctor relies not only on his own experience, but also on the results of medical diagnostics. In modern medicine, the rate of development of new imaging techniques depends on the availability of inexpensive, customizable, and easily reproducible biological tissue standards that replicate the imaging environment. These objects include tissue-mimicking phantoms and provide a standard for evaluating, characterizing, or calibrating a diagnostic system (Figure 2). The phantom is selected in such a way as to imitate the properties and characteristics of tissue in a certain spectral range of wavelengths characteristic of a particular medical equipment (Fig. 3). The rest of this article will be devoted specifically to tissue-simulating phantoms.
Figure 2. Brain phantom as a standard for ultrasound scanner and magnetic resonance imaging (MRI) calibration. The drawing is adapted.
Figure 3. Electromagnetic spectrum for medical equipment
, drawing adapted
Various types of tissues and their pathologies have a large number of different properties, for example: magnetic, acoustic, x-ray, thermal, etc. Accordingly, medical equipment needs to be adjusted to a certain property, strengthening or weakening the phantom’s abilities (to transmit, absorb and reflect radiation in one or another different wavelength range) with various additives for better image quality.
Nuances of making a holder
The simplest holder is a buttonhole. It can be made from a small office clip, which is screwed to the body with a screw with a wide head in the right place.
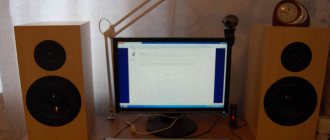
The second holder option is a stand. Not only an old table lamp is suitable for making it. The accessory can be made from chipboard and aluminum tube.
For this:
- a rectangle is cut out of chipboard;
- a hole is made in it equal to the diameter of the tube;
- the tube is wrapped with electrical tape and inserted into the hole;
- A clamp is attached to the end of the tube.