There are many programs for this, the vast majority of which are free, but we also have high-quality paid options that are distinguished by their ability to offer a recording of all the musical instruments in a concert in the highest quality without losing detail in any of them. All programs, both free and paid, have the ability copy your vinyls with the highest quality audio to MP3 and other types of formats, so the only investment needed is a USB vinyl reader.
If you want to know what options you have to save your vinyls in a high-quality audio format, today we will tell you which of the best options are available, both free and paid, so that you have other alternatives than trusting the recording. ,
Contents [show]
- Free programs for transferring vinyl to MP3 audacity
- Free audio editor
- Soundtrap
- Wavepad sound editor
- Wavosaur
- Acoustics
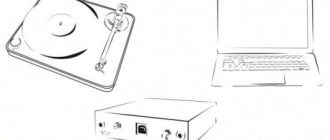
Connecting the player to the computer
If your player was made in the USSR, then with a 99% probability there is a 5-pin tulip as a connector. If this is so, then you will need to make/buy an adapter from the Soviet tulip to the standard today jack 3.5.
Let's assume that you already have one. Great, now we connect the vinyl player to the line input of your computer. If you have a laptop or netbook, then we plug it into the microphone input.
Let's not worry too much about the quality of the conversion. This is a separate big topic. One of the main aspects of digitization is the quality of your sound card. Therefore, if the sound quality does not satisfy you, you should think about a more solid sound system.
If your player has any tone controls, then you need to set them to the middle position in order to eliminate their influence. The volume control, if available, is best set to maximum.
If no one has used the player for a long time, it would be a good idea to turn all the controls back and forth several times in order to get rid of possible poor contact and the accompanying crunch. You should also check with the strobe that the rotation speed is set correctly.
A stroboscope is a glowing triangle and special marks on the end of the disk. If the speed is set correctly, then the marks marked on the disk under the plate will “stand” in place; if not, they will move. In this case, it is necessary to adjust the speed by turning the regulator.
If you are using a microphone input, then you should not set the volume above 100% - the noise will be terrible. It's better to try recording and evaluate the result.
If the volume is too high, clipping will occur, i.e. trimming the recording from above and below. In this case, the volume should be lowered until the clipping stops. Keep in mind that vinyl, especially old vinyl, has a very large dynamic range, i.e. the range of volume between the quietest and loudest sounds.
Before digitizing, it is advisable to clean the record from dust and other contaminants. How to do this is described in the article: How to properly store and wash vinyl records
Now we need a program for recording and subsequent small processing of the recording. In my case, this role will be played by Audacity, which is free and has all the functions of a full-fledged audio editor.
Copy Software
Then you need to get the necessary applications for your computer. There are quite a few of them on the market, some specifically designed for recording from vinyl. Channel D's Pure Vinyl (pictured above) is one of the best flexible software packages out there.
For example, it has a built-in RIAA equalizer, so you can connect the player directly to your computer and do without a phono stage. Powerful editing features improve the quality of your recordings. Everything would be fine, but it costs as much as £250 - however, a 15-day trial period is offered.
A more affordable alternative is VinylStudio, which includes many of Pure Vinyl's features, including a built-in RIAA EQ, for just $30.
But for many, this option will be too unaffordable. In this case, we recommend Audacity software - it is free and works quite well. The interface seems complicated at first; learning some editing functions will take time, but after mastering the program you will be able to easily navigate it.
Vinyl digitization
To digitize vinyl, place the record in its proper place. Launch the player and enable recording on the computer by clicking on the red circle. A new track will be created for recording and, if all is well, you will see a range of recorded sounds.
Didn't register?
If this does not happen, then the problem is likely that the microphone input is turned off in the system sound settings or its volume is turned down. Another could be an incorrectly selected audio input device in the Audacity settings. The reason may also lie in problems with the drivers for the sound card.
So the signal is recorded. Adjust the volume so that it does not go beyond the track. Don’t be afraid, if it seems too small to you, we’ll strengthen it after recording.
We start recording on the computer, turn on the turntable. To stop recording, click on the rectangle (stop). Great, we've digitized the vinyl. Now let's level out the volume and clean it up a bit.
Completion: Export Audio
Once your tracks are tagged and the audio is cleared, File > Export > Export Multiple . Select a format to save audio. Uncompressed WAV files are lossless and therefore the closest to "master" quality, but take up a lot of space.
You may want to save a copy of the WAV to an external drive and then export the MP3 or M4A version for listening on your portable devices. FLAC is another good choice; Despite the losses, it is a high-quality compressed audio format
this does not result in any noticeable loss of sound.
Post-processing
Select the entire recording, select Effects→Normalization . Leave the effect settings as they are by default.
In principle, after this you can export the recording into a convenient format and listen to it. But we'll go a little further. As you can see from the picture, my recording has sharp emissions that are louder than the main signal and one channel is a little thicker than the other.
Removing noise
There will likely be some persistent noise present in the recording. Therefore, it’s worth starting recording processing with a little noise removal. To do this, select a section of noise, go to Effects → Noise Reduction:
and click ' create noise model '. After selecting the entire recording, go to the same effect and click OK . After which it is better to repeat the normalization.
Removing clicks
One way or another, various specks of dust probably got onto the record, or, due to the will of some other otherworldly forces, various clicks appeared on it, which should not have been in the recording. Therefore, go to Effects → Click Removal
It is advisable to select the settings so that clicks are removed as much as possible, but without damaging the recording. This is what the recording looks like after removing the clicks.
Of course, there were fewer spikes, but unfortunately not all of them left. Particularly severe cases can be treated manually.
To do this, we zoom in on the recording in the peak area and select it. The program might simply not understand that this is a click, as in this case:
There are two ways to deal with it. The first option: go to Effects → Signal Gain and set it there, for example -6 dB. If this doesn’t seem enough to you, then you can set it to -12 dB.
Option two is to level the peak to the ground. The duration of the peak is negligible and you simply won’t hear any difference with or without it. So we just turn it down to zero.
There is a special button in the toolbar for this:
Also, using the Ctrl+R combination, audacity will apply the last used effect with the selected settings.
Audio tagging and cleaning
In Audacity, click Tracks > Add New > Tag Track to create a track under your audio recording. Zoom out so you can see the full recording (or a decent portion of it). On the track labeled, click and drag the entire length of the track, then press Cmd + B (or Ctrl + B ) to create a shortcut.
Enter a track title, ideally with a track number at the beginning, to make exporting your recording easier. Repeat until you have checked all the tracks.
At this point, you can clean up the audio if you wish, using Audacity's various built-in tools.
This includes removing cracks and cracks in the audio, reducing hiss, or increasing the overall volume if you think it's too quiet.
Click removal removes clicks and pops from the audio, which is a common problem with vinyl recordings. To use it, look for a click in the track (they look like vertical lines) and listen to confirm that this is what you want to remove. Now with the audio selected, head to Effects > Click Remover . Play with the settings until you are happy with the results.
Hiss removal is another tool at your disposal. First, select a few seconds of audio between tracks where only background hiss is heard. Then head to Effects > Noise Reduction and click Get Noise Profile .
Now select your entire track with Cmd + A (or Ctrl + A ). Finally, go back to Effects > Noise Reduction then click Preview to see what the results sound like. Configure your settings, then click OK to Apply.
Finally, Effects > Boost will allow you to increase the volume if you think your recording is too quiet.
IMAGES
To obtain images of record labels, I decided to use a scanner. Because using a camera requires creating the right lighting, filters and is more labor intensive. Grand format plate (25cm) does not fit on a standard scanner. A4 format. And large format scanners have a high price. So I took an old Canon MP-150 MFP, broke out the restrictive sides and got a device quite suitable for scanning labels. Labels are scanned at 600 dpi resolution, 24-bit color depth and saved in JPEG format.
CHANGE from 05/08/2017 . Since the old scanner began to work poorly, it became necessary to replace it. Several used CCD scanners were tested (Plustek OpticPro S28, Epson Perfection V33, Canon Canoscan 4400F). Epson is in no way suitable for scanning shiny surfaces, since the tracks from the backlight LEDs are visible on the scan of the plate. Plustek is fine, but it doesn’t work under modern versions of Windows, so I had to install an XP virtual machine. The disadvantages also include the image being too contrasty. However, the last few scans were performed by him. The best results are obtained by Canoscan 4400F. It will be used in the future.
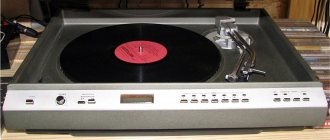
EPU
Initially, to digitize records, I intended to use a converted VEGA-106 player based on the Polish Unitra G-602 electronic control unit. This is the option that can most often be found on the Internet. I remade two versions of VEGA-106. Installed stabilized power supplies and toroidal network transformers. In one version, I even replaced the tonearm tube with a model equipped with an SME connection, which made it easy to change heads. In principle, the hardware version based on the Unitra G-602 EPU is quite suitable for digitization, but it also has a number of disadvantages. The spinner slowly spins up to the desired speed; it takes some time to stabilize the speed. In addition, the EPU has a fairly high level of mechanical noise at a speed of 78. It should be noted that the problem of mechanical noise at a speed of 78 rpm is typical for almost all EPU. Which, however, is quite understandable.
I decided to try other models that have a speed of 78 rpm. On the Internet, I often heard from many vinyl gurus that roller drives are the best solution for EPU drive. Therefore, from the old turntables, the DUAL1215 with a roller drive was tested. It must be said that the level of mechanical noise of the DUAL1215 is higher than that of the converted Unitra G-602 EPU. Even taking into account the fact that a completely new roller was installed and a complete preventive maintenance was carried out on the mechanics of the device.
Of the modern models, I tried the Thorens TD170-1 with a belt drive. The spinner upset me. It's quite suitable for playing long-playing records, but for 78 it's a stretch. And this takes into account the rather high price of the product. Later I found out that Thorens uses OEM turntables, which are also sold under the DUAL and other brands.
We also tried other less well-known brands. I won't list everything. Finally, the decision was made to focus on turntables for DJs. I tried several different models and finally settled on the Numark TT-200. This model is equipped with a Direct Drive motor and quartz rotation stabilization. Although, in fact, this model is also built on an OEM turntable, which was produced under different brands. The inherent level of mechanical noise at speed 78 is higher than at speed 33. But, in my opinion, it is quite acceptable.
It should be especially noted that the spindle can be removed from the Numark TT-200 turntable. As you know, the old standard for gramophone records sets the diameter of the mounting hole to 7 mm with a tolerance of -0.1 mm, and the new one - 7.24 mm with a tolerance of +0.05 mm / -0.15 mm. They machined the top of the spindle and made attachments for two different sizes of mounting holes for the plates. The tips they made for me have a diameter of 6.98 mm and 7.1 mm (standard size).
The turntable's tonearm is height adjustable. Which is important, since different heads have different heights. This adjustment allows you to set the tonearm parallel to the record.
The TT-200 turntable had one serious drawback, which is typical for all turntables that use this OEM version of the ECU. Namely, a network transformer. The transformer has a high level of mechanical noise and electromagnetic interference. I solved this problem quite simply. I took the transformer and high voltage units outside into a separate box.
Of course, you could buy a Technics SL-1200 with adaptation to 78 speed from KAB. But it seems to me that the price exceeds the result.
I use a shelf with a metal frame as a stand. The shelf is installed on a vibration-proof carpet. The two bottom shelves are weighted for stabilization. There is another vibration-proof carpet on the top shelf and a turntable on top of it. Experience has shown that this design behaves quite stably. Even a strong knock on the floor is not transmitted to the player.