What does a subwoofer consist of?
On this page we will briefly go over the elements that make up any woofer and midrange speaker. This will help you better understand the structure of the subwoofer and more fully imagine the process of sound reproduction.
So, what is a subwoofer or low-frequency speaker? A subwoofer is a device that converts the signal frequency into air vibrations, which we perceive as sound.
The operating principle is as follows - the signal from the amplifier is transmitted through wires to a coil, which, when interacting with a magnet, moves and moves the speaker diffuser, which creates sound waves (air vibrations).
Now that's enough definitions, let's look at the pictures.
Making a subwoofer
This instruction was written specifically for those who dream of having a 5 1 speaker system with a subwoofer installed in their car, but for one reason or another they are unable to purchase a subwoofer. Making an acoustic subwoofer yourself is not at all difficult, and due to the fact that the human ear does not recognize the direction of low-frequency waves, you can install a subwoofer in a car in any accessible place.
Tools
In order for your thought to materialize into the image of a subwoofer, in addition to wild desire and “stubbornness”, we need a couple more little things:
- Wood hacksaw;
- Chisel;
- A set of files (triangular, round, flat... whatever else there are...);
- Sandpaper of different calibers (grit);
- Screwdriver or set of screwdrivers
- Electric drill;
- A jigsaw, preferably with a “non-manual drive”;
- A set of stationery, where the compass has a “span” of at least the diameter of the selected speaker (20...25 centimeters);
- Wood glue;
- Construction material for the body (plywood, chipboard, MDF 10…20 mm thick);
- Wooden blocks (for stiffening ribs) with a cross-section of 20x20...40x40 millimeters;
- A bunch of screws (from 10 to 50 millimeters);
- Program for calculating subwoofer parameters (JBLSpeakerShop, WinISD 0.44, etc.).
So, we begin the creation of a low-frequency speaker by choosing a speaker (see How to choose speakers for a car radio on your own).
Components
Below are the main elements that make up the subwoofer.
Hanging – attaches the diffuser to the basket. Together with the length of the coil winding, it affects the stroke of the speaker, and elasticity and strength depend on the material.
Mounting ring - acts as a seal; in some models it can attach the suspension to the basket.
Wire output - a modern solution is to route the wires from the coil along the centering washer, which eliminates the possibility of damage and extraneous sounds during operation.
Terminal - acoustic wires from the amplifier are connected to the terminal block; in some models it may be absent, offering the owner a direct connection or a connection through the housing terminal.
Voice coil - located in the gap between the core and the upper flange , where the magnetic field is formed. A coil is a cylinder ( sleeve ) on which a thin copper wire is wound ( coil winding ). The sleeve is connected to the diffuser , due to which it is set in motion.
The basket is the speaker housing and the frame for all the elements.
Dust cap - prevents dust from entering the voice coil gap.
A diffuser is an area that creates air vibrations that we hear as sound.
Centering washer - centers and holds the coil in the gap.
Magnetic system. The magnet is made from special alloys or magnetic ceramics - powders pressed and “sintered” in a special way. The power of the speaker depends on the mass and material of the magnet.
The magnet is located around the core and secured between the upper and lower flanges . All this together makes up the subwoofer's magnetic system.
Ventilation holes and an air exhaust channel are used to remove heat and protect the coil from overheating. Cooling can be passive or active, both options are used in speakers. With passive cooling, heat is dissipated due to the heat transfer of materials, and with active cooling, hot air is removed due to the movement of the diffuser, respectively, when accelerating or increasing the range of motion, the cooling intensity also increases.
Speaker selection
Since you are not the first music lover on this earth, we must assume that some established canons in the world of music already exist, the same applies to the use of speakers:
- Six inch ones are used as an additional source of mid-bass;
- Eight-inch are responsible for front bass;
- High-quality acoustics in a car are obtained with ten inch speakers installed in a 15…20 liter housing;
- The best option is a twelve-inch speaker in a 25..35 liter housing;
- Well, a fifteen-inch one housed in a 60..90 liter case, as a rule, is in the hands of true “maniacs” and is put on display to the honorable public during the SPL competition.
By the way, there is still no agreement among both amateurs and professionals regarding the power of the speaker. But at the moment it can definitely be argued that the speaker should definitely be more powerful than the amplifier, since no system is able to reproduce an audio signal for a long time at maximum volume without the appearance of nonlinear distortion and a significant decrease in sound quality, everything here must be balanced . We select a speaker that suits us, of course, the more powerful it is, the louder the sound will be. It doesn’t matter how you got it, how it got to you, we need to know its technical characteristics, because a very important stage—the design of the case—depends on them.
Calculation of parameters
If you do not have accompanying documentation with the technical data of the speaker, and there is no way to find out these parameters from the manufacturer, then we will have to calculate them ourselves. We will have to find out information about:
- Rated power of the speaker (usually indicated in the head marking - 75GDN-1 75 W) - Pnom;
- Natural resonance frequency - Fs;
- Natural resonance frequency in a closed space – Fc;
- Equivalent speaker volume – Vas;
- Maximum diffuser displacement - Xmax
- Effective diffuser diameter – D;
Well, about the readings of the quality factor of resonant frequencies:
- Full - Qts
- Electrical – Qes;
- Mechanical – Qms.
To get the necessary parameters we need:
- Digital multimeter (voltmeter);
- Calculator;
- Any low-frequency generator, for example GZ-109 (instead, you can use a low-frequency generator program on a computer, since there are a great many of them on the network);
- 20 liter, hermetically sealed box.
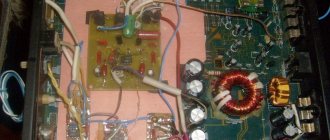
So, we connect an “amplifier” to the sound card through the linear output, and from its outputs, through a resistor with a nominal value of 1 KOHM, a speaker is connected (see photo):
Connection diagram
- In order to avoid the influence of third-party objects on the quality of measurements, we hang the speaker in the middle of the room on a chandelier. Next, we launch the LFO “program”, set the frequency to 1000 Hz and set the volume control on the computer to the middle position;
- To avoid signal distortion, connect the multimeter to the amplifier output and, adjusting the volume on it, set the voltage to 20 Volts;
Attention! Next, you should absolutely not touch the volume control on either the computer/generator or the amplifier!
- Connect the multimeter to the speaker;
- We increase the generator frequency (starting from a frequency of 5...10 Hz), monitor the voltmeter data until the desired speaker frequency at maximum voltage (Umax) reaches its maximum, after which it begins to decrease. The generator readings at which Umax reached its maximum on the voltmeter are recorded as Fs data;
- We gradually increase the frequency relative to Fs until the readings stop changing. We write down the value of Umin (a further increase in frequency, of course, will cause an increase in amplitude, but this data is no longer important to us);
We can already express the obtained data in the form of a graph of the amplitude-frequency characteristics of the speaker:
ABC schedule
When viewing the graph, you can observe new input Uav, F1 and F2, these are the frequencies with which we will determine the quality factor of the speaker using the formulas Qes, Qts, Qms and Uav. Previously, calculations were done manually, but now everything is extremely simple - download the TSCalc program, insert known values and get the result:
- Value Rmax=Umax*1000;
- Re value = speaker DC resistance value;
- Substituting these values into the program we get Rx;
- Uav = Rx/1000
- We look for F1 by decreasing the frequency down relative to Fs until the voltmeter shows the value Uav;
- We look for F2 in the same way, only we raise the frequency up;
- Substituting the obtained values of F1, F2 and Fs, we obtain the required data on the quality factor of the resonant frequencies.
- Next, we need to find the resonant frequency of the speaker in a closed space - Fc. To do this, we fix the speaker with the magnet outward (not important, it’s just more convenient) in a pre-prepared box, and look for what we are looking for, similar to the Fs value.
- Substituting the values of the box volume already known to us, as well as the found data Fc and Fs, we obtain the values of the equivalent volume – Vas;
- We find the effective diameter and maximum displacement of the diffuser using a ruler.
Drawer selection
Now that we know all the necessary parameters, we can begin to select the type of subwoofer enclosure.
Attention! No matter how much I would like to upset you, only the parameters obtained (and not your desires) are the main factors determining the type of case. This does not mean that you will not be able to assemble the type of enclosure you have chosen, but whether it will produce the sound we need is the question...
Free air (free emitter)
Subwoofer type
This type of speaker is suitable when Fs > 100 Hz. As you might guess, it will not make a traveling subwoofer, since it has almost completely no low-frequency range. The maximum where it can be identified is the rear acoustic shelf of the car, but the best option would be to look for another speaker.
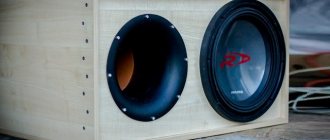
Acoustic subwoofer yourself
Closed Box
We choose this type if the Qts value is less than 0.8-1.0 (optimally 0.7), and Fs/Qts is equal to 50. It is not at all difficult to calculate.
Vented Box (bass reflex)
Optimal for Qts less than 0.6 (optimal indicator 0.39), and Fs/Qts equal to 85. More difficult to design.
Band Pass
It has the greatest efficiency, and at the same time is the most difficult to manufacture. Optimal with Fs/Qts value equal to 105.
PassiveRadiator (passive radiator)
DIY acoustic system 5 1 with subwoofer
The same bass reflex, only a membrane emitter is installed in place of the pipe. The calculation of its parameters is similar to a bass reflex, but manufacturing is a little more complicated. Although if you take an old speaker, remove the magnet, diffuser and basket from its body, glue a plexiglass plate (getinax, etc.) to the rubber ring, and screw a weight (bolt and nut) into the center of it, with which you can adjust Fc, then You will get a very good and not expensive PassiveRadiator. Any of the presented options can be made with either one or two speakers. So, we know the parameters, we have decided on the type of housing, it’s time to start calculating the housing.
Box calculation
In this case, I decided to use the JBLSpeakerShop program.
Acoustic subwoofer yourself
Don’t expect details from me, this “program” is very simple and understandable (by the way, video instructions on the Internet are always at your service). But I’ll still tell you the procedure:
- Download the program and run it through the “setup.exe” file located in the first disk, after which we indicate the path to the second part of the installation file;
- We launch the program and go to the “Loadspeaker” menu where we enter the head parameters;
Entering parameters of the acoustic head on a car
- We select the type of box and go to “Box - Parameters”, where in the selected option we enter the frequency and volume of the desired resonance (when entering these parameters, you can improvise and observe the result on the graphs);
- Next, after the parameters have been selected, if your subwoofer has a bass reflex, activate the “Vent” key and enter the pipe parameters;
- In the “Dimensions” submenu, select the shape and dimensions of the box;
Choosing a box shape
- In the “Graphs” menu, select the displayed graph;
- Print the result - “Ctrl + P”.
Making a subwoofer box
Preparation
As you know, practice is the criterion of truth, but since the calculation is completed, we proceed to the most interesting part of our instructions, where one rule reigns - measure seven times, cut once.
Advice! When choosing a housing material, it is necessary to take into account that the greater the power of the speaker, the thicker its wall should be, and the stiffer the fastenings.
So:
- We take a prepared sheet of high-quality (not dried or old) plywood, which is an order of magnitude stronger than chipboard, and draw all sides of the box on it.
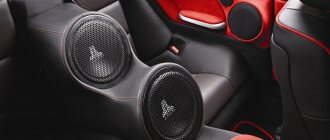
Floor-standing speakers and subwoofer
- There is no point in saving at this stage - then there will be nothing to correct the mistakes.
Car acoustics
- If you have a “manual drive” hacksaw, then it is better to choose one with small teeth and a guide. To avoid delamination and cracks, you should cut slowly, at an angle; the above is also true when working with an electric jigsaw.
- Using a file, we process all the protruding fragments of plywood and compare the humps and depressions resulting from sawing.
- We measure out the blocks and saw them to size, for which we will “estimate” the body from the sawn parts and take measurements.
One of the critical moments is making a hole for the speaker. Since it’s somehow problematic to find a drill with a diameter of 150...300 millimeters, we’ll think with our heads:
- We measure the diffuser with a rubber clip and, taking a slightly larger value, use a compass to measure a circle on the plywood. Next, we step back from this line inward by the radius of the selected drill (adding a couple more millimeters) and mark a circle of smaller diameter.
Method one
Using a drill, drill 10…15 millimeters into the line of the small circle, insert a jigsaw file into the resulting hole and cut out the hole, running the saw in a large circle.
Speaker system 5 1 with subwoofer
Advice! Before starting drilling, place the plywood on some hard surface - this way, at the exit, the drill will not “tear” the back wall.
Method two
It is not necessary to draw the second circle - we drill a hole anywhere inside the circle, insert a jigsaw file and smoothly bring it to the line of the drawn circle.
Car acoustics
Tips for setting up a subwoofer
A car subwoofer is an important element in speaker systems. It is important not only to select and connect the subwoofer correctly, but also to configure it.
Introduction
It is important to understand that a subwoofer is a speaker for reproducing low frequencies, i.e. a woofer. In fact, a woofer has a cone that vibrates up and down, creating compression and release of air.
Bass is the lower range of sound vibrations (from 20 to 150 Hz). Subwoofer diffusers, as well as midbass speakers, have this oscillation frequency.
- Low Bass (15 - 50 Hz)
- Mid Bass (50 - 100 Hz)
- Upper bass (100 - 150 Hz)
After purchasing a subwoofer and amplifier, you should start by designing the box according to the characteristics of the speaker itself. Choose the style and type of music that will be listened to most often. The right approach allows you to get good sound.
Setting up the LPF filter
The LPF (Low Pass Filter) filter is used to remove high frequencies (vocals) from the subwoofer and leave only low frequencies. It is best to configure LPF on the head unit. This way you can get precise settings (we recommend a cutoff of 50 or 63 Hz). If this is not possible, then the cutoff is adjusted on the amplifier itself.
We do not recommend using a filter on the amplifier and head unit at the same time.
On the amplifier, you need to unscrew the LPF all the way, then turn it counterclockwise (backward) until the subwoofer stops reproducing high frequencies. Since the frequency filters on amplifiers are different (30 - 180 Hz, or 35 - 250 Hz), there are no recommended slider positions. Rely on your hearing or consult a specialist.
Setting up the SUBSONIC filter
The ultra-low-pass filter (SUB SONIC) serves to remove the lowest frequencies (20 Hz and lower), which will prevent the speaker from exceeding the permissible excursion. Working at such frequencies without cutting, you can noticeably increase the diffuser stroke, the coil can come out of the gap and be damaged. By turning this filter clockwise, you make the subwoofer's job easier, raise the volume limit at its normal frequencies, and avoid the risk of damage.
Please note
, subsonic is not present on all amplifiers. It is advisable to immediately select an amplifier for a subwoofer that has the specified filter.
Setting GAIN (LEVEL)
Setting the subwoofer input sensitivity level and adjusting it is carried out on the amplifier. The Level or Gain control allows you to match the signal level of the head unit with the amplifier to avoid distortion and interference to the speaker.
Please note
that the GAIN control is not a volume level. Don't be confused.
1. Setting on the head unit:
- The GAIN (LEVEL) control on the amplifier is set to zero;
- An audio signal with the adjusted frequency is supplied;
- Increase the volume on the radio until distortion appears;
- We leave the volume level to distortion and move on to the amplifier.
2. Settings on the amplifier:
- We increase the signal level with the GAIN (LEVEL) control on the amplifier until distortion occurs;
- Turn the knob back a little to make the sound clear.
To more accurately adjust the subwoofer, use an oscilloscope. This solution allows you to adjust the levels flexibly, eliminating even subtle distortions.
Setting the delay
Delays can only be set on processor-based radios, or when connecting an external processor.
This setting is needed if the bass is “lagging.” In simple terms, the front has already played back, and the subwoofer plays back a little later, that is, with a delay. It is for this reason that delay adjustments are needed to allow the front speakers and subwoofer to play in sync.
Phase adjustment (PHASE)
The adjustment allows you to shift the sound from the subwoofer in phase relative to the main acoustics - in most cases by 180°. Phase adjustment eliminates phase skew, which improves bass quality.
Please note
, when choosing an amplifier, it is advisable to purchase it with this adjustment if it is not in the head unit.
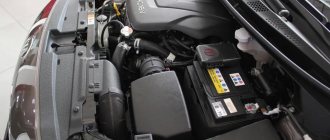
Control and drawdowns
After all the settings, be sure to monitor the operation of the subwoofer and drawdowns (lack of power from the car’s generator). We recommend using a voltmeter to monitor voltage. Be sure to connect to the input terminals of the amplifier. The normal voltage at the amplifier input must be at least 12.5 V during operation.
The operation of the subwoofer is accompanied by heating of the voice coil. If the cap is warm, then everything is set up normally. If the cap is hot, then the coil gets very hot, which is why the subwoofer often and quite quickly fails.
Reasons for rapid heating:
- Not configured correctly;
- Poor quality design;
- Not enough power (clip);
- Bass amplifiers are used (bass boosts and low-quality tracks);
- Weak amplifier (clip).
Please note
, it is easier to control the speaker with a more powerful amplifier. We recommend choosing an amplifier that is 25 - 100% more powerful than the selected subwoofer in the impedance in which it will be connected.