Dear Datagorians, I would like to propose an acoustics project (AS) for connoisseurs of the wonderful speakers produced in Soviet times for the sound of cinemas, clubs and places of mass entertainment.
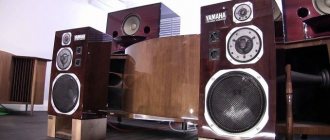
I had a long-standing desire to have good speakers at home; I listened to everything from 10MAS to S-90 and Corvette. But somehow their sound didn’t resonate with me. Bass speakers are mainly with a rigid suspension and a heavy diffuser, as a result of lower sensitivity and low output at low power, and high input power is required for driving. In addition, all this was stuffed into a rather small box, part of the volume of which was occupied by a bunch of parts from which the filters were sculpted.
↑ Prologue
The idea of technical implementation matured back in the mid-90s, but due to the housing problem, it was not possible to implement it in a one-room apartment.
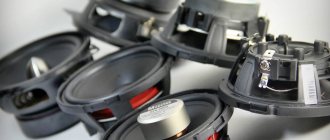
It was then that my fellow lamp enthusiast and entertainer bought me four 2A-12U4 low-frequency drivers and a pair of 1A-22 tweeters for cheap. Why are these 2A-12U4 attractive?
I will not give all the characteristics, but will focus only on the main advantages: - large diameter of the paper diffuser - 300 mm; — soft sinus-shaped suspension with impregnation; - AlNiCo magnet (aluminium-nickel-cobalt) - a very strong magnet!; — power — 25W; - flair - 95db!
↑ Plan
↑ Connection diagram
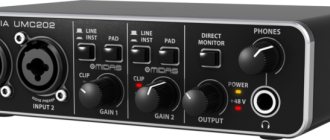
I figured out the speaker under a bridge transformerless (OTL) push-pull (PP) on a 6C33C, the woofers are connected in series (the resulting 30 Ohms are connected directly to the output of the amplifier), and the HF head is parallel to the bass drivers through a separating conduit. The speakers are not connected inside, and 2 pairs of wires from them are routed outside.
↑ Material for boxes
Without further ado, I chose standard laminated countertops 600x3000mm and 28mm thick. At first I thought of “strengthening” the enclosure with a marble slab placed inside and installing the speakers on spikes (after the speaker was manufactured, I abandoned these ideas, more on that later).
↑ About sizes and volumes
Speaking about the size of the body, I would like to note that the 2A-12U4 sound great at home and produce good bass even when not placed in any closed volume. My friend and I were convinced of this when we mounted the speakers in pairs on a steel corner and leaned them against the wall. But, nevertheless, it was necessary to put the speakers somewhere and decorate them beautifully. Accordingly, I didn’t bother too much with calculating the volume of the box. The body dimensions turned out to be WxDxH - 410x400x1400, with a volume of approximately 200 liters.
↑ Method of mounting speakers
As a rule, the typical mounting of speakers is by the basket to the front wall of the speaker. However, there is a significant drawback - vibration. Vibration is also amplified by the movement of air in a closed volume and the use of thin walls of the box, but this is easy to combat. The most significant factor, in my opinion, is the “energy leakage” through the diffuser holder (basket). Since the diffuser is glued to the basket, even through a soft suspension, some of the energy during the movement of the diffuser still goes “to the plywood”. This means you need to attach the speakers to non-inertial elements - that is, a magnet, but better to the back wall! The tweeter is installed on top of the speaker cabinet.
How to make a gramophone with your own hands
First, perhaps, we will have to answer another question: what is a gramophone?
After all, you have hardly seen this car. But you probably know from your parents’ stories about the gramophone. So, the gramophone is almost the same. Only in appearance he was different. The gramophone had a large tin horn with a bell sticking out from above. Then they came up with a portable gramophone. Instead of a box, we made a convenient lockable suitcase with a carrying handle. The horn was rolled up and hidden inside the suitcase. It turned out much more beautiful and convenient. For the first time such a portable gramophone was released by the French. They called him by their last name “Pathefon”, or “Pathefon”. And gramophone records are still called gramophone records.
The gramophone and gramophone replaced the record player and radio, and they were replaced by tape recorders. The ancestor of the record player, the gramophone, appeared a long time ago, back at the end of the 19th century.
At that time there was no cinema, no radio, no television. Only living people sang. It never occurred to anyone that the machine could also sing. And even the inventor of the “singing machine” Thomas Alva Edison himself had some doubts: would he sing or not?
The mechanic made an incomprehensible device based on Edison’s drawing. All the laboratory staff gathered. Give it a try! Edison put a wax-covered roller into the machine, cleared his throat and hesitantly sang an old children's song: “Our Mary has a ram, He is more faithful than dogs. Wherever Mary goes, the Ram follows her!”
The staff chuckled. Edison had no talent for singing. But it was too late to retreat, and he sang the song to the end. Then he placed the needle at the beginning of the track on the wax roller and turned the handle. And then a miracle happened. The car started singing! Not the one or two vague words Edison was hoping to hear. No, the whole song, from beginning to end, flowed from a black megaphone!
The employees froze. Then they screamed in delight and danced in a round dance around Edison and his wonderful invention. Then everyone at once, interrupting each other, began talking, shouting, singing into a bullhorn. All night until the morning they recorded and listened to their voices. After all, on Edison’s first device it was possible not only to listen to sound, but also to record it. But this device - it was called a phonograph - sounded much worse than the current gramophone. The sound was quiet, intermittent, rattling in places. But still it was an unheard of miracle!
Later this miracle became the most common thing. Looking closely at the gramophone record, you can see that the grooves on it are uneven. They are dotted with convolutions, and for long-playing records - with indentations. As the record rotates, the needle slides along the groove. Convolutions or depressions make it tremble and hesitate. These vibrations are sound.
↑ Assembly
Construction began last year.
Having sketched out a drawing of the speaker casing, I went to the construction base, where a pretty girl drew the layout of the tabletop on her computer. It took four tabletops. There, everything was cut to size for me exactly (by the way, I used the remaining 20 cm scraps for my mother-in-law on the kitchen cabinet). At first I planned to mount the walls through a steel angle, but when I looked at it in the store, I decided that the bull
the fat is much straighter than these crooked corners are rolled. I had to splurge (150 rubles per linear meter) on aluminum corners 25x25mm.
Before assembly, it was necessary to prepare the speakers.
Since the diameter of the basket is large (400 mm), and so that the cases do not turn out to be too wide, I slightly narrowed the baskets on both sides to 350 mm, cutting off their “ears” (the baskets in my case are non-load-bearing structural elements and a slight deterioration in rigidity does not does not cause any trouble). I must say this “resection” was such a song! I picked up the grinder, set the disk rotation speed to low (aluminum is a soft material), turned it on... Vzhzhiiiiik! Said the Austrian "Bulgarian". “Fuck you!” - answered the Russian aluminum basket and sent the burnt stator of the saw to burn out! Conclusion: guys, saw off the lumina by hand with a hacksaw. Note: while filing, you must tightly cover the diffuser so that the sawdust does not stick to the impregnation of the suspension.
Next we had to take care of mounting the speakers. In a construction store, I picked up furniture consoles with reinforcement and bought a 2x20mm steel strip, from which I bent clamps on the frame in a vice, with which I pulled the consoles (3 pieces per head) to the magnets.
The holes in the consoles had to be drilled out to 10 mm for strong, thick bolts.
The next item was the manufacture of elements for the front panel of the drawers. I cut out the curves that followed the line of the basket with a jigsaw. Then I assembled a frame from the sides, top and bottom, connecting the walls with 10 mm furniture ties for strength. pre-coating the ends with silicone.
The further stage of assembly is very labor-intensive and tedious, requiring large reserves of patience, swear words and an intact eye. This is the marking of the holes for fastening the speaker consoles on the rear wall. In other words, in order to accurately position the speakers, you need to adjust them in depth (so that the edges of the baskets do not protrude beyond the front panel and do not fall into the depths), in height and width, and azimuth.
It’s quite easy to level the planting depth using a square and a level. But the placement of the speakers in place is done alternately with the fastening of the facade elements. First, I attached the top piece with one arched cutout to the corners.
Then, placing the back wall on the already screwed back corners, he placed the speaker on the console on it and began to move it around, paying attention to the fact that the consoles with their “legs” rested on the surface with their entire plane, and an equal gap formed around the speaker (1, 5-2mm) between the sidewalls and the arc of the upper element of the facade. Finally, having caught the target, I used a marker to mark the holes for six bolts. This was the real hemorrhoid, because I had to insert and remove the speaker several times, loosening and tightening the clamp that fastened the consoles. Next, having received the six treasured marks, I removed the back wall and drilled 10 mm holes for the bolts.
Then I screwed the speaker back into place and put the back wall back into the box. I made sure that the position of the speaker was correct, and proceeded to attach the second element of the facade with two arched cutouts, departing the same 1.5-2 mm from the speaker basket. The installation of the second speaker and the third element of the facade was carried out in a similar way. At the bottom of the body I left a 10 cm high gap, something like a bass reflex.
Thus, I received an assembled box frame and a back wall with speakers installed on it. The next step was to line the inner walls with sound-absorbing material. I didn’t fork out the money to buy imported pieces of “anti-sound foam rubber” for 500 rubles / 1 m², having decided that I wouldn’t see Rockefeller’s daughter, I bought a roll of bitumen-based waterproofing material, which also has sound-insulating and vibration-absorbing properties. A 20-meter roll of TechnoNIKOL type cost only 800 rubles.
I cut the canvases with a stationery knife (leaving a 5 cm overlap on the back panel) and thickly smeared the walls with rubber-bitumen (you can also use rubber-bitumen) mastic, glued these canvases, shooting them with a furniture stapler for reliability.
I coated all joints and cracks with mastic. When gluing the back wall, I left a 20 mm indentation around the perimeter for mounting on the corner. In the center between the speakers I drilled a 10 mm hole, where I brought out two pairs of speaker wires from the speakers. I chose a thicker wire with a flat profile.
To absorb standing and reflected sound waves, I placed 3 cotton bags around the speakers, the production of which took half a soldier's cotton mattress and 10 m of gauze purchased at a pharmacy. I tore the cotton wool apart to make it fluffier and, without squeezing it too hard, wrapped it in gauze. Then I stapled all this crap to the walls of the “vessel”.
The crucial moment has arrived - attaching the back wall with the speakers to the body. It wasn't easy to squeeze in! Two huge separate parts of the speaker had to be “married” with a gap tolerance of 1.5-2 mm around the speakers and, practically, the chipboard parts themselves had to be pulled together. In some places the speaker baskets caught on the insulation and we had to trim it a little.
Well, everything fell into place! I fixed the back wall around the perimeter with furniture ties, coated all the cracks with silicone, and laminated the sawn-off ends of the slabs with edge tape using an iron. I filled the gaps around the speaker baskets with black silicone.
I would like to draw your attention to the fact that the mastic does not emit a very appetizing smell until it dries completely (3-4 days), and it is better to deal with all this daub outside the home.
↑ Installation of the RF part
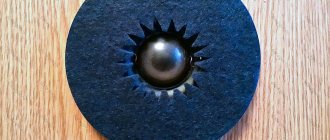
I decided to use the 1A-22 high-frequency speaker without horns (it’s an apartment, after all!), the speakers are already squealing oh-ho-ho! We had to figure out how to attach the tweeters to the roof of the speaker. And then an old selenium photo-shaft on an aluminum cylinder from an ancient copier turned up under my arm at work. I carefully cleaned it of the photosensitive coating, sanded it, sawed it in half and got two excellent parts where the HF head, through a rubber gasket, fits tightly, like a native one. I made the holder for all this from 2 mm thick aluminum sheet. The design of this thing is very similar to the wand that railway workers use to wave at passing trains at crossings, only the handle, at a distance of 20 mm from the circle, is bent at a right angle. In the center of the circle there is a hole cut out to fit the diameter of the emitter and four holes for mounting countersunk screws.
Inside the cylinder on the bracket there is a coupling capacitor and a wirewound resistor for adjusting the RF level.
I chose the capacitor K-72P6 - 1μFx300V. The linings of this condenser are made of rolled aluminum foil, which does not interfere with the sound. Wirewound resistor PPB-15E - 510 Ohm, switched on by a potentiometer. After painting the cylinder and bracket with black nitro enamel, I screwed the entire 1A-22 structure onto the roof of the AC with four self-tapping screws.
What does military topics include?
Even girls today know that the military theme is, first of all, different military equipment and weapons:
- tanks and infantry fighting vehicles (IFVs);
- military trucks;
- ships and submarines;
- aircraft;
- guns and gun (missile) installations;
- machine guns, machine guns, pistols and other weapons.
But if you look at the topic a little broader, then also include in the list soldiers of various branches of the military, nurses and military doctors, orders and medals, military equipment (caps, caps), auxiliary equipment (binoculars, daggers) and even the eternal flame, which is a symbol in memory of all the soldiers who fell in battle. As you can see, not only tanks and airplanes can be made for holidays that reflect the military glory and power of the Russian army. There is wide scope for creative imagination and applied skills.
Creative works in various installations can depict either military actions or monuments of military glory.
But even to recreate a three-dimensional picture of battles, you need to learn how to make different combat vehicles, soldiers and weapons. Even kids in kindergartens participate in exhibitions dedicated to May 9 or February 23, making various crafts together with their mothers or fathers. Below we will tell you how to make various military equipment from different materials.
- Fold a sheet of green paper (20x12 rectangle) in half lengthwise.
- Then, having straightened the sheet, bend its edges towards the middle and get a narrow rectangle, the upper corners of which are folded, as shown in the photo above.
- But, on the contrary, you bend the lower corners to the sides.
- From the bottom edge of the workpiece, measure 7 cm with a ruler and bend it.
- Bend down the top strip of the folded part of the rectangle.
- Cut out a 5x10 strip of white cardboard and cut off the corners at the top, rounding the piece. Now glue the white rectangle into the middle of the green blank, bending the previously folded edge of the rectangle. Glue the upper part - budenovka - to white cardboard.
- Glue the green “uniform” to the white blank. Also glue the white folded collar so that it does not stick out. Cut out a star from red cardboard and glue the soldier onto the budenovka.
- Cut out shoulder straps from yellow cardboard and glue them to the soldier. With a marker and pencils you draw his face, clothes and shoes. Such a good soldier can be used as decoration on a greeting card or on a three-dimensional craft.
- There is another version of a paper soldier using the same technique, but not in one step, but in three. The head and boots are made separately from the body, and then glued on.
The photo shows the whole process very clearly, so good luck with your implementation.
Other war-themed crafts are also made using the origami technique. Watch the video to see how to make a cap and a pistol out of paper.
But that's not all. If we are already talking about paper soldiers, then watch another video where they are made from toilet paper rolls and colored paper.
↑ Connection and listening
As I already wrote at the beginning, I built the speaker for my OTL cyclotron, so in addition to the possibility of connecting to a standard 8 Ohm output (two 2A-12U4 in parallel with 7.5 Ohms), I also provided for a 30 Ohm connection (speakers in series) to the output of my amplifier. To do this, all pairs of speaker wires are output separately to the rear wall, where I can connect them on a terminal block as required.
I also didn’t spend any money specifically on an speaker cable. My friend brought me 10 meters of annealed copper braid with a diameter of 5 mm. It is used to connect graphite brushes in powerful engines. I cut the “blades” from the plates of a variable-capacity air capacitor - good silver-plated copper.
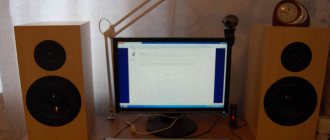
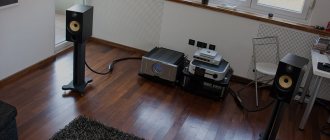
Since I didn’t have a working lamp maker at hand, I made my first listening session on an old transistor Radiotekhnika.
I listened to different music - Vivaldi's "The Seasons" on CD, Tchaikovsky and Bach's organ on old vinyl, Slade, Gary Moore and Pink Floyd on branded vinyl, and even played MP3 from my computer. Impressed! I was especially pleased with the bass, which, as a rule, is always lacking. And then sometimes I even wanted to remove it a little. The output of the 2A-12U4 is very high, and at 95dB, the speakers sound very loud with only 3-5W (the indicator just starts blinking between -20 and -18dB) of input power. The next day I invited my downstairs neighbor for a beer - I had to assess the threshold for the emergence of damaged relations with neighbors.
At first we just listened to different music, washing it down with beer, and then a warm neighbor suggested: “Let’s go full out!” It was not possible at full (2x62W), because the amplifier is only 20W and then for a 4 Ohm load. I turned the volume up to +3dB according to the indicator (about 12-15 W), the crystal tinkled cheerfully, the neighbor swallowed sips of beer, pushing it with bass from the “barrel”, everything was bubbling in his chest. A couple of minutes later the neighbor’s wife called and asked if everything was okay with us?
We carried out an experiment - we placed a filled glass on the speaker, the water didn’t even flinch. What pleased me was that I did not hear the box playing, but only the speakers; there was no overtone, resonance or vibration. It was after this that I abandoned the marble slab on the bottom of the speaker and the spikes. The speakers were already quite heavy (I think more than 60 kg), I remember how we carried them on foot to the 5th floor. Instead of spikes, I used a rubber gasket from the 6С33С package, cutting it into 4 parts. Rubber is thick, soft and porous.
During operation, the speaker revealed two shortcomings. The first is that the impregnation of the diffuser suspension (despite the 20-year age of the speakers) smells rather unpleasantly of either rubber or petroleum products. The second is the danger of damaging the diffusers, for which I cut out shields from chipboard that are inserted into the front panel with Velcro. I used a stapler to shoot two leather tongues from the top of an old boot to the upper end.
Making a gramophone from jute
What can you come up with and give to our veterans on May 9, music teachers or simply connoisseurs of antiques? I suggest you try to make a gramophone with your own hands.
To create a musical instrument you will need:
— glue for ceiling tiles (I used “Titan”);
— brown acrylic paint and a hard brush;
Let's start with the box. I used polystyrene. I apply the disc and cut out 1 large square 10x10cm and cut it into 3 even layers (if it’s 2 layers, it turns out a bit thick) and 1 smaller square 7.5x7.5 cm. I process it with sandpaper.
Then I proceed to wrap the large squares with jute rope using glue. I start with the rib. I wrap only the sides of the square that will be located between the large squares.
I glue 3 squares together: large, small, large. I'll start with the mouthpiece. At the tip of the horn I use a knife to make a hole for the cable. I wrap the inside and outside of the wine glass, covering it with glue.
To make the cable easier to attach to the wine glass, I expose the wires and insert them into the hole.
I wrap the resulting joints with electrical tape, and then wrap them with jute.
Next, I make a needle holder (tablet shape) and glue it onto the wrapped cable. I don’t cut the rope and continue to wrap the “tablet”.
The main details are ready.
Now I’m starting to make a loop that will hold the horn and attach to the box.
First I wrap the middle, then I connect the legs on both sides and wrap them all together. I insert it into the box and attach it with glue.
↑ Epilogue
Don't believe those who say that KinUp speakers are junk.
These are excellent-sounding speakers; it’s not for nothing that the developers were even awarded the Stalin Prize at one time. It is advisable to have a separate room, and a larger one (mine is only 15.5 m²). It’s good when your wife doesn’t swear and doesn’t threaten to throw you out of the house after the speakers because the speakers stink, the drawers blocked the room, covering the entire interior and in general...! But this is all the prose of life, the main thing is that the goal is achieved! Thank you for your attention.