During the process of installing a new speaker system, the owner may have the following problem: how to connect tweeters (tweeters) so that they work efficiently and without problems?
The essence of the issue is the complexity of modern stereo systems. For this reason, in practice there are often cases when installed tweeters either work with distortion or do not work at all. By following the installation rules, you can avoid possible difficulties - the procedure will be as quick and simple as possible.
In what places is it recommended to install tweeters?
Manufacturers recommend many places to place tweeters, most commonly at ear level. In other words, aim them as high as possible at the listener. But not everyone agrees with this opinion. This installation is not always convenient. It depends on the specific circumstances. And the number of installation options is quite large.
- Corners of mirrors. During the trip they will not cause additional discomfort. Moreover, they will fit beautifully into the interior of the vehicle;
- Dashboard. Installation can even be done using double-sided tape;
- Podiums. There are two options here. The first is to install the tweeters in a standard podium (which comes with the tweeter), the second is to make the podium yourself. The latter case is more complicated, but it guarantees a better result.
Where is the best place to point tweeters?
When designing car audio, you can choose one of two options:
- each tweeter is directed at the listener. That is, the right tweeter is directed at the driver, the left one is also aimed at him;
- Diagonal installation. In other words, the tweeter on the right is routed to the left seat, while the speaker on the left is routed to the right.
The choice of one option or another depends on the individual preferences of the owner. To begin with, you can point the HF speakers towards yourself, and then try the diagonal method. After testing, the owner himself will decide whether to choose the first method or give preference to the second.
Connection features
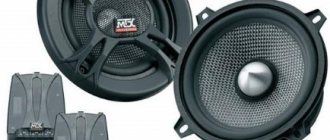
A tweeter is an element of a stereo system whose task is to reproduce sound with a frequency from 3000 to 20,000 hertz. The radio tape recorder produces a full spectrum of frequencies, ranging from five hertz to 25,000 hertz.
The tweeter can only reproduce high-quality car audio with a frequency of at least two thousand hertz. If a lower-frequency signal is applied to it, it will not be reproduced, and if the power for which the mid- and low-frequency speakers are designed is high enough, the tweeter may fail. At the same time, there can be no question of any quality of playback. For long-lasting and reliable operation of the tweeter, you should get rid of the low-frequency components that are present in the general spectrum. That is, make sure that only the recommended range of operating frequencies falls on it.
The first and simplest way to cut off the low-frequency component is to install a capacitor in series. It passes well the high-frequency frequency band, starting from two thousand hertz and more. And does not pass frequencies below 2000 Hz. In fact, this is a simple filter, the capabilities of which are limited.
As a rule, the capacitor is already present in the speaker system, so there is no need for additional purchase. You should think about buying it if the owner decided to acquire a used radio and did not find a capacitor in the tweeter kit. It may look like this:
- A special box to which a signal is sent and then transmitted directly to the tweeters.
- The capacitor is mounted on the wire.
- The capacitor is built directly into the tweeter itself.
If you do not see any of the options listed, you should purchase the capacitor separately and install it yourself. In radio stores their range is large and varied.
The range of filtered frequencies depends on the type of capacitor installed. For example, the owner can install a capacitor that will limit the range of frequencies supplied to the speakers at three or four thousand hertz.
Note! The higher the frequency of the signal supplied to the tweeter, the more detailed the sound can be achieved.
If you have a two-way system, you can choose a cutoff from two to four and a half thousand hertz.
Connection
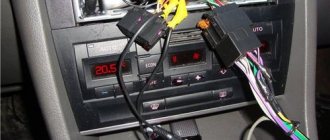
Connecting the tweeter looks like this: it is connected directly to the speaker that is located in your door, plus the tweeter is connected to the plus of the speaker and the minus to the minus, while the capacitor must be connected to the plus. This is a practical tip for those who don't know how to connect tweeters without a crossover.
An alternative connection option is to use a crossover. Some models of car speaker systems already have it included. If not available, you can purchase it separately.
Tweeter characteristics.
Prices for various tweeter models differ tens of times – from a thousand rubles to tens of thousands. Both the brand of the tweeter and its characteristics contribute to the price - you can choose a model to suit any budget, but you should keep in mind that the class of the tweeter must correspond to the class of the other components of the audio system. Just as there is no point in installing expensive tweeters next to simple cheap broadband speakers, there is no point in saving on tweeters in a Hi-End audio system.
The diameter of tweeters varies from 2 to 10 cm, models with high power usually have a larger diameter, but there is no obvious relationship here, and the diameter of the tweeter should be considered as a purely geometric characteristic: a small tweeter, as a rule, has an easier place to find.
The maximum tweeter output power (PMPO) is the short-term (up to 2 seconds) signal power that the speaker can withstand without damage. If the maximum power of the amplifier is higher than the maximum power of the tweeters, you should refrain from listening to music at close to maximum volume - especially music with sudden and prolonged changes in volume. But it should be borne in mind that there is no standard procedure for measuring maximum power and when choosing speakers it is better to focus not on it, but on the rated power.
The power rating of a tweeter (RMS) is that at which it can operate for an hour without danger of damage. It is this characteristic that should be used when selecting. You should also focus on the power of the amplifier to which the tweeter will be connected. The tweeter power should be comparable to the power of the amplifier (radio tape recorder). If there are large differences in the power of the tweeter and amplifier, you should refrain from listening to music at high volumes: if the power of the amplifier exceeds the power of the tweeters, loud music can simply burn the latter. And if the tweeter power exceeds the amplifier power, it can enter “clipping” mode, delivering an extremely harmful high-frequency high-power signal to the speaker. When wheezing, crackling and clicking appear in the tweeter sound - clear signs of “clipping” - you should immediately reduce the volume and do not increase it further to this level. For high-power systems, it is better to use tweeters with ferromagnetic fluid suspension - in such tweeters, thermal energy is removed much more efficiently and it is better able to withstand peak loads.
Tweeters are highly sensitive - even the cheapest models provide 95 dB. But if the sensitivity of tweeters is greater than the sensitivity of full-range speakers, then the volume of high frequencies will be noticeably greater than the volume of other frequencies. In this case, either the tweeters should be moved further from the listener's ears, or the level of high frequencies on the head unit should be reduced.
impedance or internal resistance must be exactly matched by the amplifier. If you connect a speaker with an impedance of 2 ohms to an output rated for at least 4 ohms, the amplifier's output stage may burn out, unable to withstand twice the current. If, on the contrary, you connect an 8 ohm load to an output designed for a maximum of 4, then the sound of the speaker will be much quieter than if the connection were made correctly.
Tweeters are often connected in parallel to a full-range speaker. It should be remembered that the overall impedance changes! It is calculated using a formula corresponding to the connection type.
When selecting a tweeter, remember that the minimum frequency of the tweeter should be lower than the maximum frequency of the full-range (or mid-range) speaker - this will ensure an even amplitude-frequency response of the entire system.
The maximum tweeter frequency cannot be lower than 20,000 Hz. As a rule, all tweeter models meet this standard. But some have a much higher maximum frequency - 22,000, 30,000 and even 50,000 Hz. What's the point of this? Of course, the human ear cannot hear such frequencies. Such frequencies are rather an indicator of the perfection of the equipment and some guarantee that in the audible region up to 20,000 Hz the frequency response of the tweeter will be as smooth as possible.
Before purchasing a tweeter, pay attention to the diffuser of the selected model. Dome-shaped diffusers provide a wider sound cone and reduce the requirements for maintaining the direction at the listener's ear, but they also generate more reflections in the space of the car. The diffuser itself can be made of silk (most often), paper (a budget option, fraught with a short service life) and metal (the most expensive option).
How to connect beepers in a car is one of the most common questions when planning the audio system of your car. The difficulties are due to the specifics of modern stereo systems. It is their complexity that often leads to serious distortions or malfunctions in the operation of high-frequency speakers.
Such “surprises” are not included in our plans, so the work must be carried out taking into account possible difficulties and aspects. Some dexterity and theoretical preparation are enough to not only buy acoustics in a car, but also to reveal its full potential when playing your favorite compositions.
Other Features
Today, the most common tweeter option is the electrodynamic system. Structurally, it consists of a housing, a magnet, a coil with a winding, a diaphragm with a membrane, and power wires with terminals. When a signal is applied, current flows in the coil and an electromagnetic field is formed. It interacts with the magnet, mechanical vibrations occur, which are transmitted to the diaphragm. The latter creates acoustic waves, and sound is heard. To increase the efficiency of sound reproduction, the membrane has a specific dome shape.
Car tweeters typically use silk membranes. To obtain additional rigidity, the membrane is impregnated with a special compound. Silk is characterized by its ability to more effectively cope with high loads, temperature changes and dampness.
In the most expensive tweeters, the membrane is made of thin aluminum or titanium. This can only be found on very prestigious speaker systems. They are found quite rarely in a typical car audio system. The cheapest option is a paper membrane.
In addition to the fact that the sound is worse than in the two previous cases, such equipment has an extremely short service life. And this is not surprising, since paper cannot ensure high-quality tweeter performance in conditions of low temperature, high humidity and high load. When the car increases engine speed, an unusual sound may be felt.
Don't forget that you can also set up the tweeter using the radio. Even the cheapest models have the ability to adjust the high frequencies. In particular, mid-price models have a built-in equalizer, which greatly simplifies the task.
After installing the tweeter, you need to configure the audio system, and how to do this, read the article “How to configure a radio.”
What kind of speakers are there?
Today, almost every car has a radio with speakers located in the front and rear and capable of pleasing the owner with decent sound. The market offers a variety of speaker systems that can satisfy the needs of even the most demanding music lovers. One simple option is to purchase a radio complete with speakers. A more difficult way is to correctly select and install acoustics that will match a specific car.
To get truly high-quality sound, you need to find out what types of dynamic heads exist. They are conventionally divided into:
- broadband;
- coaxial;
- component.
Wideband speakers reproduce the entire spectrum of sound frequencies that human hearing can perceive. It is precisely this kind of acoustics that, in most cases, is equipped with cars from the factory today. If you are a lover of good sound, then preference should be given to coaxial dynamic drivers. The set consists of several columns, the installation of which is carried out along one axis. The entire frequency spectrum, divided into low-frequency (LF), mid-frequency (MF) and high-frequency (HF), is reproduced by separate speakers. By dividing and expanding the frequency range, the sound quality can be improved. For lovers of high-quality music with powerful bass, you should consider a component system, which is usually used as front speakers. In addition to different types of acoustic systems, speakers are divided by standard sizes, the choice of which depends on the installation location and the goals pursued.
Acoustic systems are divided into broadband, coaxial and component. You need to give preference to one or another speaker depending on your goals.
What are tweeters used for?
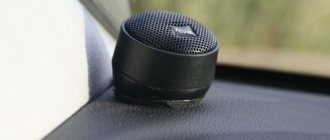
Car audio systems often use tweeters or tweeters. Their main purpose is to reproduce high-frequency sounds. You can purchase the elements either separately or as a set with a multi-component system. In appearance, such devices are small speakers that can improve the sound in a car, making it even louder and more voluminous. They are usually installed at the back or front, which depends on the speaker system circuit used.
Tweeters in a car are designed to reproduce high-frequency sounds, and they are installed in the side pillars of the windshield, doors, and dashboard
What are tweeters or tweeters?
If you have not used speakers before or made do with the classic versions, then most likely you are not familiar with the equipment called Twitter. Before buying it and installing it, you should understand the main purpose, advantages when listening to music and the operating features of this system.
From the name itself it is clear that during operation the equipment reproduces characteristic sounds of a certain frequency, similar to squeaking. This is achieved by incorporating high-frequency sound vibrations into the work. Since standard models have a wide range of usable frequencies, they make the music sound monotonous and desaturated. Therefore, special variations have been developed that can be used to emphasize high-frequency sounds, providing volume and expressiveness to audio recordings.
Twitter is a small speaker that is installed together with the main speaker system in order to improve the parameters and characteristics of the audio recordings being played.
ATTENTION! Depending on your preferences, you can install the desired number of such devices. For comparison, you can try listening to music through different speaker options to choose the best sound configuration.
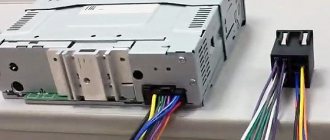
How to connect speakers to a car radio
Before you begin installing and connecting the speakers, you need to decide on the location of their installation. Depending on the vehicle, there may be space provided for the speakers from the factory. It is recommended to mount the front speakers on the edges of the dashboard or in the doors. Both options are good, but the second is the most popular, since the dynamic heads can be secured more reliably. In addition, an acoustic podium can be built into the door body. The diameter of the columns must be measured, after which the dimensions are transferred to the doors, for example, with a sharp knife. It is advisable to use patterns to transfer dimensions.
As for the second pair of speakers, they are located in the rear of the cabin. Basically, the rear shelf or doors are used for these purposes. In any case, installation requires some modifications. The standard shelf of the car is a decorative element and to install the speakers you will need to remove it and install speakers with podiums. Only in this case can you count on high-quality sound and the absence of squeaks, rattles, etc.
Wire selection
To connect speakers, it is recommended to use speaker wires with a cross-section of 1.5–4 mm². Despite the fact that compared to a radio and speakers they are low in cost, their quality should not be neglected. First of all, you need to know and take into account that the wires that come with the speaker system are unsuitable for normal operation of the speakers: they have a cross-section of 0.25–0.5 mm². Such wiring will be sufficient only for connecting low-power dynamic heads (up to 15–20 W). The thing is that the RF signal in the wire spreads across its surface. Using wires of small cross-section, not only the quality, but also the volume of the sound deteriorates.
Speaker wires should be selected with a cross-section of 1.5–4 mm², which depends on the signal strength. You should not use the wires that come with the speakers due to their small cross-section, which will negatively affect the sound quality
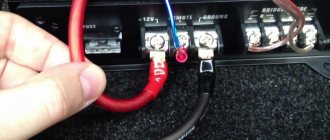
It is also necessary to take into account the fact that the speaker wires are marked, can have either two or four pairs, be plain or with a black stripe. The connection of a single-color conductor is made with a wide contact of the speaker, with a black marking - with a narrow one. If the acoustics have low power (up to 20 W), then the minus for the side and rear speakers can be used. For higher power systems, “+” and “-” must be supplied to each speaker separately, while the negative wire cannot be connected to the car body. Otherwise, the sound will be distorted. The main materials used for making acoustic wire cores are copper and aluminum. It is preferable to use copper, since it oxidizes less on connections, but it is also more expensive compared to aluminum. There are also more expensive wires - silver.
The speaker has positive and negative terminals that differ in size. When connecting, you must observe polarity
Soundproofing doors
When deciding to install speakers in the door, you should take into account that it will not be possible to achieve good sound without sound insulation. In this case, the following conditions must be met:
- carry out measures aimed at vibration isolation of doors, which will avoid rattling when playing low frequencies;
- a closed volume is made inside the door, which will provide detailed sound;
- the speaker is securely fixed to the surface of the door;
- soundproof the door to reduce noise levels from outside;
- they carry out treatment against vibrations and squeaks of the door trim, which will avoid rattling and overtones when listening to music loudly.
During installation work, one must strive to preserve both the appearance of the interior and the integrity of the trim, which requires care when removing the trim material. Standard speakers are attached directly to the trim. This option is not correct, since the required rigidity is not provided. The casing sways during sound, overtones and resonance are created, and the response to the low frequencies decreases. To achieve the required level of vibration and noise insulation, a Bimast spacer is applied to the outer part of the door body. The section of metal located opposite the hole for the standard dynamic head is covered with bitoplast to avoid standing waves.
In order for the sound to be of high quality, it is imperative to prepare the doors, namely soundproof them. This process will avoid rattling, squeaking and extraneous noise.
Tools and materials
To install the speakers you will need the following tools and materials:
- high quality speaker cable;
- plastic and rubber corrugation;
- multimeter;
- insulating material;
- drill and drill bits;
- spacer rings;
- wire cutters;
- Screwdriver Set.
How to lay wires
If the doors do not have holes for laying wires, make them yourself, while avoiding contact between the wire insulation and metal or plastic. For these purposes, special rings or rubber corrugation are used. To lay the cable to the rear speakers, it is most convenient to place the wires parallel to the standard wiring, which will require removing the decorative interior trim and disassembling the dashboard. The procedure is labor-intensive, but it is better to do everything wisely right away than to later face possible problems by laying wires, for example, under a rug.
The working process
1. First, you need to dismantle what the podiums will be mounted into, some make the podiums in plastic covers for the body pillars, others prefer to install the podiums in plastic plugs for the rear-view mirrors. In the second case, problems often arise with blowing glass in winter; due to the protruding podium, the area is poorly blown and the glass often remains frozen, which impedes visibility. I chose the first option, because IMHO it looks better and more aesthetically pleasing.
2. So, let’s dismantle the linings, here again this process will happen differently for everyone, so I can’t give any practical advice. If you doubt the correctness of your actions, try to find instructions on the Internet for dismantling these parts or seek help from those who know how to do this.
3. Next we carry out the markings. First of all, you need to find out for yourself how you see your future catwalks. There are many options for placement; you can make them “look” at you, you can simply embed them, so to speak, into the plastic and not unfold them. In this matter, everything is individual, and what also plays a big role is what configuration of the stands you have, how developed your imagination and ability to hold a spatula are. If you are not confident in your abilities, then it is better to do something simpler.
4. When the markings are applied, it is necessary to secure the plastic tubes at the installation site; this can be done using metal fasteners, or using regular glue. In the process, nylon and epoxy will tie everything together and the issue of fastening reliability will be resolved by itself.
5. Now that the seat for the podium is secured, you can cover it with nylon; it will allow you to make a smooth transition from the podium to the plane of the plastic lining. We stretch the nylon and fasten it with metal clothespins or simply sew it tightly. Make sure that the tension is even and the shape is the same on the two podiums.
6. The frame is prepared, now you can give it the necessary elasticity and strength; to do this, coat the nylon with EPD glue or epoxy resin using a brush. We go over everything in one layer, after everything has dried we coat everything again to be sure.
7. When everything is dry, take coarse sandpaper and sand the surface, removing excess. After the large one, we take smaller ones and bring the surface to an ideal state. Next we proceed to puttying. We apply a layer of putty on the frame of the podium as carefully and evenly as possible to give it greater strength. We wait until it dries and sand everything, if necessary, correct it again and clean it again. We clean with coarse sandpaper and constantly switch to a finer sandpaper.
8. When the surface is brought to a “smooth” state, you can begin priming. We apply the primer in several layers with an interval of several minutes or hours, depending on how quickly the primer dries. You can sand between layers.
9. After priming, you can start painting; how and with what to paint is up to you; for clarity, I will give several articles that describe the painting process in detail:
10. If you don’t want to paint or the interior of your car is leather, you can choose leather to match the interior color and use it to cover your newly made podiums for the tweeters. Instead of leather, some car enthusiasts use carpet or other material that they like. You can cover it with flock or, for example, a film of the desired color, it will turn out no worse, provided that the work is done professionally.
11. After the podiums have been brought to the condition you require, you need to install previously prepared tweeters in them. The installation process is different for everyone, everything, as I said above, depends on the complexity of the design of the podiums themselves and the specific model of tweeters. In general, we fasten it, install it in place and connect everything to an “amplifier” or a crossover, depending on your choice. Actually, that's all.
Types of speakers for cars
Any speakers intended for use inside a car belong to one of the following types:
- broadband - manufacturers usually equip their cars with such speakers at the factory;
- coaxial (coaxial);
- component.
The single speaker of a wideband speaker reproduces the entire spectrum of sound frequencies. This is the cheapest solution, usually used in standard audio systems.
The single speaker of a full-range speaker is capable of reproducing a wide range of sound frequencies
The sound quality will improve if you divide the sound spectrum into several bands and entrust the reproduction of each of them to a separate emitter.
The coaxial speaker has several sound emitters installed in a single housing, which significantly improves sound quality
In a coaxial speaker, several (2–5, usually 3) emitters are installed in a single housing, usually on the same axis, along with filters that highlight the audio frequencies that are optimal for each head.
The speakers of the component system are spaced throughout the vehicle
Component speaker systems have the widest range of high-quality reproduction capabilities. In them, as in coaxial speakers, the sound signal is reproduced by several emitters, but each is made in the form of a separate speaker.
Two-component systems: tweeters and crossovers
Tweeters or tweeters are high-frequency speakers whose task is to reproduce the frequencies of the upper band of the sound spectrum. Conventional tweeters are flat or slightly convex. Horn tweeters are slightly larger than usual ones, as they are equipped with an element that forms a clear polar pattern - a horn.
Tweeters or tweeters are called high-frequency speakers
To highlight bands in component systems, crossovers, audio frequency separation filters made in the form of separate blocks, are used.
Crossovers can have from one to four stages: the more stages, the better the sound quality
Component sound systems are the most difficult to install. However, the separation of speakers in space provides the highest quality and surround sound.
Choosing the right speakers and radio
First of all, specialized audio equipment is intended for installation in the car interior. Manufacturers of car speakers take into account not only sound quality, but also difficult operating conditions: vibration, dust, temperature changes, etc.
Is it possible to install household or variety speakers in a car?
Computer and concert speakers are designed for more gentle conditions. They most likely won't last long in a car.
In addition, computer speakers usually require not only a sound source, but also a separate power supply, without which they will not work, while car speakers are connected only to the output of an amplifier or radio.
Where is it placed?
Considering that the crossover cannot be installed in any place, it is worth noting those places that are suitable for installing speakers and amplifiers.
Requirements for installation sites:
- Absence of any leaks or dampness;
- Free and comfortable access for both connection and configuration;
- Excellent air circulation for cooling;
- The absence of any inconvenience or interference that is in any way related to the operation of the vehicle;
- Good visual appearance.
Installation of car speakers
In household speaker systems, the right and left speakers are usually located at the same distance from the listener and approximately at the level of his head. It is unrealistic to meet such conditions in a car, therefore, when installing a component speaker, the need to achieve possible approximation to the ideal comes to the fore.
Speaker placement options: where to install speakers
It was experimentally established that for front acoustics, the optimal placement of speakers is on the edges of the dashboard and the adjacent part of the A-pillars. In this case, you need to ensure that the speakers are brought forward as far as possible.
Experts also advise placing speakers of different frequencies belonging to the same channel in close proximity to each other. This will ensure sound integrity and consistency. The speakers can be oriented in opposite directions: one should be directed at the driver, the other at the windshield of the car, so that sound waves are reflected from it.
Unfortunately, large speakers are difficult to place along the edges of the dashboard. Therefore, many car owners choose a compromise option.
It makes sense to place the woofers and midrange speakers in the lower front corner of the door, and the tweeters on the A-pillar or in the same corner of the dashboard. This scheme provides acceptable sound quality with less time and money.
Only the most desperate music lovers will appreciate such a creative option for placing speakers on a car door.
Making a podium for high-frequency acoustics (tweeters) in a car in our studio will allow you to:
- get a correctly constructed audio scene in the car;
- achieve an epic design that fits perfectly into the car interior;
- ideally integrate a new audio system into the car interior;
- significantly save time;
- implement an exclusive individual project;
- use the best materials in production;
- use the best materials when reupholstering;
The process of manufacturing podiums for high-frequency acoustics in the triangle of a car door takes on average from 1 to 3 days (per pair). Making a podium for the high frequencies and mid frequencies in the windshield pillars will take from 2 to 4 days. An individual podium project takes from 3 to 7 days.
Do-it-yourself replacement of standard speakers
The least expensive way to improve the sound inside a car, both in terms of money and effort, is to replace the standard wideband speakers with two- or three-way coaxial ones.
The standard place for the “native” speakers is the lower front corner of the doors. For replacement, it is advisable to select speakers of the same size as the standard ones. Larger speakers generally sound better, but they will require a larger mounting hole in the door.
Installation Tools
To replace the speakers you may need the following tool:
- jigsaw,
- electric drill,
- Phillips and flathead screwdrivers,
- knife,
- soldering iron,
- pliers,
- set of car keys,
- panel puller,
- file,
- insulating tape,
- plastic clamps for fastening wires.
Video: learning how to independently connect speakers to a car radio
Preparatory work: how to remove the trim
Before carrying out work, turn off the ignition and disconnect the negative cable from the battery. Then do this:
- Often there is no speaker panel, and the speakers are hidden behind a non-removable mesh (grid) of the door trim. In this case, remove the door handles that interfere with dismantling. If there are fastenings with self-tapping screws, remove the protective plugs and unscrew the screws. Then remove the trim.
Slowly rocking, remove the panel, releasing one fastener after another.
Remove door handles and other body parts that interfere with dismantling
How to remove a standard speaker and attach a new one
Further work will require patience and attentiveness from you. Only compliance with the sequence of actions below guarantees correct installation of the speakers.
- Once you have access to the speaker, unscrew the fasteners and pull the speaker out towards you. Disconnect the connector with wires.
Unscrew the fasteners and pull the speaker towards you. Disconnect the connector with wires
It is advisable to cover the door (the area of the door near the speaker) with sound insulation, vibroplast or something similar
How to connect speakers to the front or back door
It happens that the new column, coinciding with the old one in diameter, does not “sit” on the standard podium (ring or protrusion) or turns out to be thicker and begins to stick out too much. Sometimes the stand is completely missing. In this case, proceed as follows:
- Install a new podium: it is necessary in order to raise the speaker if the latter rests on the door mechanisms. It also plays the role of a rigid and elastic support for the diffuser, improves the radiation pattern, preventing sound from “escaping” under the casing. You can buy the podium in the same place as the speakers, or make it yourself.
- Use suitable plastic housings from faulty speakers as a base, or use a jigsaw to make a podium out of plywood. If necessary, cut out several rings and glue them together.
It is advisable to impregnate a wooden podium with a protective compound and cover it with a sealant
Video: how to install acoustics on a car
Step-by-step instructions on how to make podiums for tweeters at home:
1. First of all, you need to dismantle the plastic covers; to do this, just unscrew a few screws.
2. Next we proceed to marking. To do this, it is necessary to designate the future location of the podiums.
3. Based on the size of the tweeters, we make rings from chipboard according to the diameter of the tweeters. Looking ahead, I will say that these rings will serve as the basis for installing tweeters.
4. Using self-tapping screws or other convenient fastening methods (I, for example, used toothpicks), you need to secure the resulting rings to the plastic pad where you made the markings
Here it is important to calculate everything properly so that both tweeters face the same direction and are located at the same level
5. Now we take the tights and stretch them over the resulting frames. Then, using epoxy, we begin to impregnate the resulting form. When everything has hardened a little, take the fiberglass and glue it on top of the formed shape. Fiberglass will act as a reinforcing (binder) material. Each new layer must be impregnated with epoxy and applied only after the previous one has dried. There should be approximately 3-4 layers of all, after soaking the last one, let the entire “sandwich” dry. It should look something like this, see photo below.
6. Once the frame is created, you can begin sanding and puttying it. Before puttying, take coarse sandpaper and sand the “fresh” podiums, so to speak, prepare them for puttying.
7. When the surface is more or less flat, apply the first, thin layer of putty. Then we let it dry and sand it with sandpaper, removing all excess and forming future podiums for the tweeters. Here, as they say, a complete flight of imagination, sculpt, sculpt the form that in your opinion is the most attractive. This is how I did it, see photo below.
8. After the first layer, we sand everything thoroughly with several sandpapers from coarse to fine, removing all unevenness, bringing the surface to perfection. Then we take the putty again and level the surface for painting, sealing the slightest pores in the “putty.”
9. The second layer of putty is sanded and ready for painting. I painted it with matte spray paint, after priming the podiums with a base primer. The primer can be different, so it’s difficult to recommend anything, the only wish is that it be quick-drying and less thick. The primer should be applied in 2-3 layers, allowing each layer to dry.
Component Audio Source Locations
The sound quality of coaxial speakers satisfies most motorists, but not all. The design disadvantage of coaxial sound is that high-frequency tweeters are placed in inaccessible places along with the front speakers. To overcome this disadvantage, component systems with speakers spaced apart in space are used.
The peculiarities of high-frequency sound propagation require that, firstly, the tweeters be oriented towards the listener, and, secondly, that there are no obstacles between them and the ear.
Due to the layout of car interiors, it is difficult to choose the ideal location for tweeters. The most acceptable compromise between price and quality is to place the low- and mid-frequency speakers in their standard place and move the high-frequency drivers to the dashboard or the A-pillar.
Connecting tweeters
The installation procedure for component speakers is given below:
- With the battery turned off, install the crossovers in a place protected from dust, moisture and vibration. Connect the crossover filters directly to the output of the radio. Place the wires under the casing.
When installing crossovers, make sure that they are reliably protected from dust, moisture and vibration
If you decide to use cabinet speakers, securely attach them to the corners of the dashboard
Purpose
The main purpose of installing tweeters is to reproduce high frequencies. They are small speakers that are installed in the front and rear of the car (or in one of them), depending on the audio system. For maximum effect, they are used as part of multi-component audio systems, but can be found in retail sales (for example, from Pioneer). The advantages of the speakers include ease of installation - every car owner can connect the tweeters correctly.
Speakers for better sound
When installed in speaker systems, motorists install tweeters through a crossover - this is a device that provides operating ranges for the speakers. It separates frequencies when working with a multi-component audio system. This allows you to get the maximum effect from the system and ensure high-quality sound quality in the car.
Connecting tweeters to the crossover is quite simple, and to do this, you only need to read the audio system instructions. But there are times when you need to connect the tweeters in your car directly to the radio.
Connecting tweeters to the radio
Attention: installing tweeters without a crossover or other filters may affect the sound quality! The signal coming out of the radio is the same and will not be distributed across frequencies. It is not recommended to connect speakers this way, but it is possible.
It is possible to connect tweeters to speakers that are already installed. To do this, you will need a 1st order filter (capacitor). The capacity will depend on the installed speakers and is selected individually in each specific case.
Connection rules
How to connect speakers in two-piece systems
Approximately 80% of car enthusiasts who install component sound systems are limited to installing additional tweeters. For some, this is not enough, since achieving the highest sound quality is impossible without “drawing” the lower frequencies of the sound spectrum to the point of the limits of human hearing.
Obstacles to the propagation of vibrations of the lowest frequencies degrade the quality slightly. Therefore, huge subwoofers operating in the lower sound band are placed in the trunk or on the rear parcel shelf.
A component car audio system can contain from 2 (including tweeter) speakers per channel to 4, 6 or more
Thus, a component car audio system can contain from 2 (including tweeter) speakers per channel to 4, 6 or more. Practical implementation depends on the aesthetic requirements of the car owner, his desire to spend money and time to achieve them.
Scheme of channel-by-channel connection of speaker components
All components of the audio system are connected to each other by wires. Weak tweeters can be connected with almost any wire. Subwoofers are a completely different matter. With a power of 100 W, the speaker will require a current of about 8 A. To avoid mistakes, it is best to use a specialized speaker cable with a wire cross-section of at least 2.5 square meters. mm.
To connect the wires to each other and to the speakers, depending on the design features, use standard connectors, terminals or twisting with mandatory soldering
Wires for connecting speakers are laid in inaccessible places, covered under removable casings as far as possible from other wiring harnesses. The sound lines are inserted into the doors through standard rubber accordion covers.
By following the recommendations outlined above, any owner will be able to equip their car with good sound. How many speakers will be used and where exactly they will be installed depends on the design features of the car and the desires of its owner. And the secret of success lies in the availability of the necessary components and accuracy when performing work.