In this article we will look at connecting a Pioneer car radio with our own hands, since this issue is quite relevant. Connecting a car radio will not be much of a problem if you understand at least a little about auto electrics, and it will take very little time.
The issue of connection may be of interest to those drivers who have just decided to purchase it, or if it is already too outdated and needs to be replaced, or if it is broken and its repair is not possible.
PIONEER car radios meet the modern requirements of modern music formats, and also occupy one of the leading positions in terms of quality and quantity of purchases. Their popularity can also be easily explained, since these radios can be easily installed by yourself, and they are also highly reliable and have good sound levels.
What you need to know about wire markings?
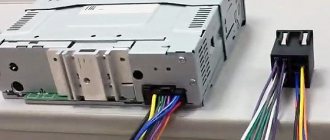
Connecting a pioneer car radio with your own hands must begin by studying the markings of the wires. First of all, the radio comes with 2 standard ISO connectors. The connectors consist of a group of contacts of 8 pieces. every. One of them is used to connect the power circuit, and the other for acoustics. Connecting a pioneer can be done in two ways.
In the first case, you will need to buy a special adapter for connection. Usually they do it much simpler: the connector is simply disconnected from the wires, and they are connected to the mating part by twisting the wires.
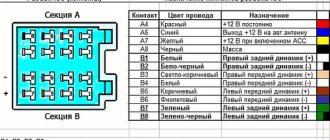
To connect a car radio, as well as to connect receivers from other manufacturers, use a standard circuit. The radio has a number of wires of different colors. Let's look at what they are intended for and how they are connected to each other.
A wide yellow wire is connected to the battery through a fuse, and the same red wire is connected through the ignition switch so that the radio only works when it is turned on.
It is unacceptable to connect these two wires to each other, since such a connection can cause rapid discharge of the battery. A thick black wire serves as a negative wire and is attached to the car body.
Each wire has its own color
and performs certain functions. The white wire with a blue stripe is responsible for the operation of the antenna, subwoofer and amplifier. A gray wire is connected to the positive terminal of the front right speaker, and the same wire with a longitudinal black stripe is connected to the negative terminal of this speaker. Accordingly, the white wire goes to the positive terminal of the left front speaker, and the white wire with a black stripe is connected to the negative terminal of the same speaker.
Now let's move on to connecting the speakers located at the rear. To the rear speaker on the left, connect the green wire to the positive terminal, and the green wire with a black stripe to the negative terminal of the speaker. And finally, we connect the purple wire to the rear right speaker to the positive terminal, and with the black stripe the purple wire to the negative terminal.
Setting the cutoff frequency
Now we begin to adjust the cutoff frequency. Tilt the joystick to the left and you will exit the fader to the main menu (Keep in mind that tilting the joystick to the left will always move you from the functional settings to the main settings).
Start turning the joystick to find the front speaker filter adjustment. The menu for these settings looks like this: HIGH PASS FILTER. Then push down the joystick and HPF OFF will appear on the screen. This alert indicates that the filter is turned off, causing all the sound to go to the front speakers, which, of course, entails unnecessary distortion.
Press the joystick again, and instead of HPF OFF, HPF 50 will appear (if this value was adjusted before, the number may be different). The number 50 means that at the moment a signal with a frequency of at least 50 hertz will begin to arrive at the front speakers. This is the subwoofer frequency, and it is worth saying that only powerful speakers can cope with it.
To exit the settings, use the BAND button, which is located in the lower left part of the panel. Now, by rotating the joystick and thus adjusting the volume, you can check the sound for distortion. If the setting was unsuccessful and you didn’t like the result, go back to the filter menu and, by rotating the joystick, change the number to the next indicator and check the sound again.
Let's start connecting
You should know that all ISO connectors, as well as wire color pinouts, are standard, so it is extremely difficult to make a mistake. It is clear that it will not be difficult to take the connector and connect it to the mating part. But, as we have already said, quite often they resort to a more labor-intensive procedure, such as manually connecting the wiring. For these purposes, we disconnect the wires from the connector plug and connect them according to the functionality of the wires.
Having connected the wires, they will need to be insulated carefully to avoid possible damage due to a short circuit. To prevent the wires from becoming disconnected over time, it is recommended to secure them with a plastic clamp.
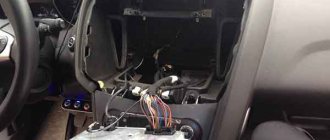
In all vehicles on the center console
or the dashboard provides mounting positions for a car radio. Often this place is covered with a decorative panel. Before installing the radio, it will need to be removed using a screwdriver.
In the resulting compartment you can easily find the mating part of the wires necessary to connect the Pioneer radio. Then the wires or connectors are connected according to the connection diagram. Now the radio can be installed in the slot in its seat.
The radio comes with an instruction manual with a detailed diagram for connecting the device, as well as a pair of steel plates with eyes. They are necessary so that the car radio, if necessary, can be easily removed from the slot. These plates are installed on the sides of the radio, and the eyes can be bent with a screwdriver and covered with a panel.
Loudness compensation
I would like to end here, but we forgot about something - loudness compensation. This is such a regime. It is easy to find it in the audio settings menu by rotating the joystick. Find the inscription LOUDNESS. Press down the joystick, and the same LOUDNESS will light up on the left, and three levels will be reflected on the right: low, medium and high.
This setting adjusts the high and low frequencies at low volumes. That is, the quieter the sound, the more clearly the effect of this setting is felt. However, if you turn the sound up to full power, this mode will not be felt at all. Therefore, you can fix a high level, which is indicated by the inscription HIGH.
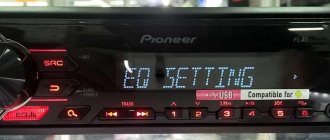
Well, now go to the audio settings in the EQ SETTING1 menu. Press down the joystick until the display shows EQ SETTING1 and three options in columns, adjusting bass, mid and treble. You can move through the columns by tilting the joystick to the right, and the adjustment itself is carried out by rotating the joystick handle.
Using these options, adjust the frequencies to your liking. However, we do not recommend exceeding the low frequency parameter by more than one. From 0 to 1 will be quite enough - take pity on your acoustics. Although, if your speakers are powerful enough, then you can experiment.
That's probably all for now. This time your “Pioneer” will sound at a professional level. I must say that there are still a few settings left in this radio, but only real music lovers with an ear for music will need them - and that’s a completely different story. We wish you a fun and safe journey!
How to disable
If there is an old device in the car, it must be removed.
This can be done according to the following scheme:
- First of all, you need to disconnect the battery. This is done to ensure safety.
- The decorative trim of the device is removed. The easiest way to do this is to move from right to left.
- Using a screwdriver, unscrew the screws that secure the air duct cover and the radio. The cover does not need to be removed, but its absence will make further actions easier.
- After removing the device, the on-board computer screen is turned off and removed from the bracket. Immediately after this, you can proceed to installing a new radio.
Popular models of the manufacturer
When choosing a Pioneer car radio, the buyer should pay attention to the model range and technical characteristics of each device. First of all, you have to choose a standard. The size, set of functions and cost of the device depend on this indicator. There are 2 options:
- 1 din (single-block) - such models have smaller dimensions and a limited set of functions, but their cost is lower:
- 2 din (two-block) - you can recognize such tape recorders in cars by their wide screen and advanced capabilities.
The second option is in great demand, as it provides the car enthusiast with a high level of comfort.
In addition, there are standard and non-standard radios. A standard product should be understood as a model intended strictly for a particular brand of car. Such devices have an original housing and plug. This feature does not allow the installation of standard radios in cars of other brands.
How to install
Installing the radio consists of several sequential steps:
- Connecting wires.
- Place the device in the slot.
- Setup.
Each of these points should be carried out in strict accordance with the instructions for the Pioneer radio. Incorrect installation or configuration may cause the device to malfunction.
How to connect
To connect the Pioneer car radio, you can use 2 methods.
- Through a standard ISO connector.
- Without using standard connectors.
The first option using ISO connectors is preferable, but it may not be used in all cases. So in some car models there are simply no suitable connectors for connection. If this option is chosen, then there should be no difficulties. In this case, based on the color connection diagram, you need to correctly connect the connectors to the mating parts.
If there are no connectors for connection, you can go in other ways. For single-unit and dual-unit devices, the process for connecting the Pioneer radio will be slightly different.
How to check if the buzzer is working?
Are there ways to determine the functionality of the tweeter without resorting to disassembling the speakers (for example, tactilely, by vibration, or something else)? The simplest option is to turn on the speakers one at a time and, while playing HF signals from an existing test disk, cover the midrange speaker with a rolled up towel.
Interesting materials:
How to parse the word according to the composition of the feeder? How to parse the word frosty? How to parse the word pedestrian? How to parse a word according to the composition of a story? How to parse a word according to its composition? How to parse a word based on its wool composition? How to parse a word based on its composition? How to parse a word based on its composition? How to make out a word by sounds? How to parse the word rise?
Which acoustics to choose
The main car audio device is the radio. The selection of other elements should be made based on the technical characteristics of the head unit.
Speakers are the second most important element of the system. They are responsible for sound reproduction and are installed in the front and rear parts of the cabin. In this case, you should pay attention to the fact that manufacturers offer front and rear speakers.
An amplifier is an optional component, but it is desirable if increased demands are placed on sound quality and power.
You can choose a device from an assortment in the middle price category. These models have good performance and do not require extra expenses.
Subwoofer. This device should complement car speakers for bass lovers. Making the bass more expressive is the only skill of a sub, so many music lovers can do without it.
Selection of connecting wires
Installing audio leads is different from normal electrical connections. The fact is that an alternating sound signal propagates through the conductors going to the speakers and speakers. It has a frequency ranging from 20 Hertz to 20 kilohertz. In principle, the frequency is low, but linear distortions, electromagnetic interference, and interference are possible. They degrade the sound quality. Therefore, along with observing the rules for choosing the cross-sectional area of the wire, the type of conductor is selected.
The cross-section is usually chosen from the following consideration: for every 10 watts of amplifier power - approximately 1 sq. mm of wire cross-sectional area. That is, with a radio power of 40 watts per channel, the cross-section of the conductor leading to the speaker must be at least 4 sq. mm.
You should think about choosing the type of speaker cable if the radio is capable of providing high-quality sound. On the Hi-end equipment market you can find many different speaker cables with unique parameters and prices.
The feasibility of installing such expensive conductors for a middle-class car radio is zero. The main thing when connecting is to ensure that the phases of the speakers and speakers are synchronized. Otherwise, the interior will be filled with cacophony instead of high-quality sound.
How to turn it on and off
To turn on the device, hold down the Source or SCR button until the display activates.
To turn off the Pioneer radio, you should also hold down the Source or SCR key for a while. In addition, some other button, for example, Func, can be programmed to turn off. To make sure that the actions are correct, you should look in the instructions on how to turn off the radio of this model.
How to reboot
To reboot the device, the Pioneer instructions recommend using the Reset button, which is located on the case.
Setting up the subwoofer mode
To configure the mode, we will have to work with the preliminary settings, which Pioneer, fortunately, has available. Finding yourself in the menu for these settings is easy. To do this, you need to turn off the radio and then press the power button (top left) and hold it in that position until the display lights up. Fired up? That's it, you are now in the preset menu.
How to set it up correctly
According to the instructions for the Pioneer car radio, before setting it up, you must disable the demo mode (it is available in most device models). If this action is not performed, all settings will be active only until the device is turned off. The next time you turn it on, you will have to configure it from the very beginning.
Disabling demo mode can be done in several steps:
- The device must be turned off (press and hold the SRC button until the display turns off).
- The same key is pressed again to call up the start menu.
- From the menu, select the “System” tab (using the volume control). After that, go to the Demo tab. The On position will be indicated next to this text.
- The position must be changed to Off (using the arrows on the sides of the handle).
- To save the changes, press Band. Immediately after this, you can proceed to controlling the radio and settings.
To translate the device control into Russian, you should go to the start menu.
To do this, perform the following steps:
- To configure the Pioneer radio, go to the system settings (System). This can be done by long pressing the Source or SCR button.
- Find the inscription Language in the list.
- Choose Russian (or any other desired language).
- Changes on the radio are saved.
To set the clock in the radio, repeat the first step from the previous description.
- rotate the knob to select the clock settings tab;
- go to settings using the right arrow;
- The time is adjusted by rotating the “Volume”;
- Confirm the settings by pressing once;
- You can exit the settings using the left arrow.
After the device is fully connected, you can proceed to setting up the radio and speakers. To do this, it is recommended to set the volume to no higher than 30 units:
- Go to the main settings menu, find the “Audio” tab.
- When you press the handle, you go to a new list of functions, where you need to find the Fader tab and select it.
- In the factory settings, this indicator is 0; when configuring, you need to specify 15 units.
- When this parameter is configured, return to the “Audio” menu (swing the knob to the left).
- The next step is to adjust the high frequencies HPF (High pass Filter).
- This indicator is also 0 in most cases. It should be set to 50.
- After setting, you need to swing the handle to the left and exit the menu.
You should definitely check how well the acoustics play. Additional configuration may be required.
Radio
There are several ways to configure the radio in your car to receive radio signals. The simplest one is suitable for automatic search.
When the receiver is turned on, you can switch to it by pressing Band once:
- In receiver mode, press the right button. It must be held for about 1 second.
- After this, the device will begin automatically searching for a radio station.
- Immediately after finding the first radio wave, the signal begins to play.
- If the user is satisfied with the radio wave, he can save it by pressing the buttons located below the display.
- To search for further stations, repeat steps 1 to 4.
How to reset settings
To reset the settings, the instructions for the Pioneer car radio recommend completely turning off the power to the device.
Joystick positions
First, let's characterize all possible movements of the joystick. The positions of its handle can be as follows:
- up;
- down;
- left;
- right;
- recessed position.
So, let's begin. We set the volume to about 30 units, not paying attention to possible wheezing during playback. After that, press down the joystick and go to the list of settings.
You'll see a lot of options here, but don't let that scare you: for now you'll only need one setting. Start turning the joystick to the left or right until you find the “Audio” item. Found it? Now you need to press the joystick again and enter “Audio”, and there you will look for the item where the balance and fader are indicated. It looks like this: FADER / BALANCE.
Press the joystick again so that the words FAD 0, BAL 0 are displayed. If instead of zeros there are other numbers, it’s okay. It just means that adjustments have already been made here before.
If you tilt the joystick to the right, you will go from the fader settings to the balance settings. Rotating the joystick will allow you to adjust these settings. At such moments, the current menu will flash.
Set the fader to position + 15. In this case, the sound must be passed only to the front speakers so that the rear speakers do not interfere with the setup of the front speakers.
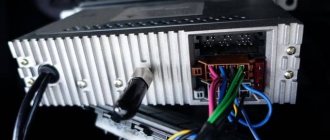
How to remove the radio
It is recommended to remove the device using a set of keys.
After removing the frame and front panel, the standard keys are inserted into the holes on the sides until they click. After this, you need to pull it towards you, and the device will be easily removed.
How to remove the panel
The panel of the radio is removed when performing the following steps.
First you need to hold down the Open key. After this, the panel moves and is removed towards itself.
Malfunctions and their elimination
The list of the most common problems includes the following.
Pioneer car radio does not turn on. If the head unit does not work, there may be several reasons (a fuse has burned out, the wiring has failed, the acoustic equipment has broken down). In any of these options, it is better to contact a specialized center. There they will carry out diagnostics and determine the exact reason why the power button on the car radio goes out.
The radio does not turn off completely. This may be caused by poor grounding. Difficulties in disconnecting also occur if the device does not fit tightly to the socket. In this case, it is enough to securely fasten the device and the problem will be resolved.