⭐ ⭐ ⭐ ⭐ ⭐ During the installation of a new speaker system, the owner may have the following problem - how to connect tweeters (tweeters) so that they work efficiently and without problems?
The essence of the issue is the complexity of modern stereo systems. For this reason, in practice there are often cases when installed tweeters either work with distortion or do not work at all. By following the installation rules, you can avoid possible difficulties - the procedure will be as quick and simple as possible.
In what places is it recommended to install tweeters?
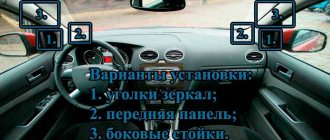
Manufacturers recommend many places to place tweeters, most commonly at ear level. In other words, aim them as high as possible at the listener. But not everyone agrees with this opinion. This installation is not always convenient. It depends on the specific circumstances. And the number of installation options is quite large.
For example:
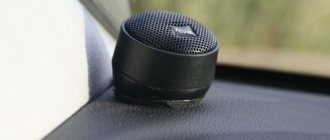
- Corners of mirrors. During the trip they will not cause additional discomfort. Moreover, they will fit beautifully into the interior of the vehicle;
- Dashboard. Installation can even be done using double-sided tape;
- Podiums. There are two options here. The first is to install the tweeters in a standard podium (which comes with the tweeter), the second is to make the podium yourself. The latter case is more complicated, but it guarantees a better result.
Where is the best place to point tweeters?
When designing car audio, you can choose one of two options:
- each tweeter is directed at the listener. That is, the right tweeter is directed at the driver, the left one is also aimed at him;
- Diagonal installation. In other words, the tweeter on the right is routed to the left seat, while the speaker on the left is routed to the right.
The choice of one option or another depends on the individual preferences of the owner. To begin with, you can point the HF speakers towards yourself, and then try the diagonal method. After testing, the owner himself will decide whether to choose the first method or give preference to the second.
How to connect tweeters in a car - where is the best direction?
- Point each tweeter at the listener.
Consequently, beepers in the car are directed at the driver from both sides. - Diagonal connection of tweeters.
The left one will be directed towards the left seat, while the right one will be oriented towards the right one.
The specific option for connecting the tweeters depends on personal preference. You can experiment - first direct it towards yourself, and then implement the diagonal option. It is this comparison that will allow us to determine the most comfortable and suitable option.
Connection features
A tweeter is an element of a stereo system whose task is to reproduce sound with a frequency from 3000 to 20,000 hertz. The radio tape recorder produces a full spectrum of frequencies, ranging from five hertz to 25,000 hertz.
The tweeter can only reproduce high-quality car audio with a frequency of at least two thousand hertz. If a lower-frequency signal is applied to it, it will not be reproduced, and if the power for which the mid- and low-frequency speakers are designed is high enough, the tweeter may fail. At the same time, there can be no question of any quality of playback. For long-lasting and reliable operation of the tweeter, you should get rid of the low-frequency components that are present in the general spectrum. That is, make sure that only the recommended range of operating frequencies falls on it.
The first and simplest way to cut off the low-frequency component is to install a capacitor in series. It passes well the high-frequency frequency band, starting from two thousand hertz and more. And does not pass frequencies below 2000 Hz. In fact, this is a simple filter, the capabilities of which are limited.
As a rule, the capacitor is already present in the speaker system, so there is no need for additional purchase. You should think about buying it if the owner decided to acquire a used radio and did not find a capacitor in the tweeter kit. It may look like this:
- A special box to which a signal is sent and then transmitted directly to the tweeters.
- The capacitor is mounted on the wire.
- The capacitor is built directly into the tweeter itself.
If you do not see any of the options listed, you should purchase the capacitor separately and install it yourself. In radio stores their range is large and varied.
The range of filtered frequencies depends on the type of capacitor installed. For example, the owner can install a capacitor that will limit the range of frequencies supplied to the speakers at three or four thousand hertz.
Note! The higher the frequency of the signal supplied to the tweeter, the more detailed the sound can be achieved.
If you have a two-way system, you can choose a cutoff from two to four and a half thousand hertz.
Connection
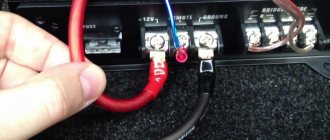
Connecting the tweeter looks like this: it is connected directly to the speaker that is located in your door, plus the tweeter is connected to the plus of the speaker and the minus to the minus, while the capacitor must be connected to the plus. For more details on which wire color is suitable for which column, see the radio connection diagram. This is a practical tip for those who don't know how to connect tweeters without a crossover. An alternative connection option is to use a crossover. Some models of car speaker systems already have it included. If not available, you can purchase it separately.
Do-it-yourself replacement of standard speakers
The least expensive way to improve the sound inside a car, both in terms of money and effort, is to replace the standard wideband speakers with two- or three-way coaxial ones.
The standard place for the “native” speakers is the lower front corner of the doors. For replacement, it is advisable to select speakers of the same size as the standard ones. Larger speakers generally sound better, but they will require a larger mounting hole in the door.
Installation Tools
To replace the speakers you may need the following tool:
- jigsaw,
- electric drill,
- Phillips and flathead screwdrivers,
- knife,
- soldering iron,
- pliers,
- set of car keys,
- panel puller,
- file,
- insulating tape,
- plastic clamps for fastening wires.
Video: learning how to independently connect speakers to a car radio
Other Features
Today, the most common tweeter option is the electrodynamic system. Structurally, it consists of a housing, a magnet, a coil with a winding, a diaphragm with a membrane, and power wires with terminals. When a signal is applied, current flows in the coil and an electromagnetic field is formed. It interacts with the magnet, mechanical vibrations occur, which are transmitted to the diaphragm. The latter creates acoustic waves, and sound is heard. To increase the efficiency of sound reproduction, the membrane has a specific dome shape. Car tweeters usually use silk membranes. To obtain additional rigidity, the membrane is impregnated with a special compound. Silk is characterized by its ability to more effectively cope with high loads, temperature changes and dampness. In the most expensive tweeters, the membrane is made of thin aluminum or titanium. This can only be found on very prestigious speaker systems. They are found quite rarely in a typical car audio system. The cheapest option is a paper membrane.
In addition to the fact that the sound is worse than in the two previous cases, such equipment has an extremely short service life. And this is not surprising, since paper cannot ensure high-quality tweeter performance in conditions of low temperature, high humidity and high load. When the car increases engine speed, an unusual sound may be felt.
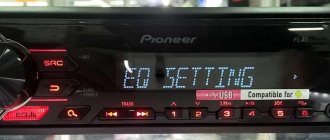
Don't forget that you can also set up the tweeter using the radio. Even the cheapest models have the ability to adjust the high frequencies. In particular, mid-price models have a built-in equalizer, which greatly simplifies the task.
After installing the tweeter, you need to configure the audio system, and how to do this, read the article “How to configure a radio.”
Choosing the right speakers and radio
First of all, specialized audio equipment is intended for installation in the car interior. Manufacturers of car speakers take into account not only sound quality, but also difficult operating conditions: vibration, dust, temperature changes, etc.
Is it possible to install household or variety speakers in a car?
Computer and concert speakers are designed for more gentle conditions. They most likely won't last long in a car.
In addition, computer speakers usually require not only a sound source, but also a separate power supply, without which they will not work, while car speakers are connected only to the output of an amplifier or radio.
As a rule, it is advisable to buy speakers where it is possible to evaluate the sound quality. Appearance does not play a special role, since in the car's interior the speakers are usually covered with a decorative mesh or grille.
Choosing suitable speakers for a car consists of determining the basic requirements for them and comparing the technical characteristics of several models of the same price category
Installation
In many cars where there is no designated space for a tweeter, it is usually installed in the upholstery of the front pillars. However, this is a very, very labor-intensive process, because you have to cut holes for the speakers, putty, etc.
Fortunately, installing tweeters in Lada Vesta is much simpler - owners usually install them in factory corners - in the cabin, opposite the side mirrors. This allows you not to spoil the interior and greatly simplifies the work. The disadvantage of this option is the need to buy tweeters whose diameter will fit the specified angle.
Removing the Vesta front door trim
Initially, you will need to remove the plastic corners, as well as the front door trim. Before starting work, you need to prepare some tools - a Torx 20 socket with a ratchet and a plastic spatula for removing handles and other components. If you don’t have a spatula, you can use a knife or a thin screwdriver, covering the sharp edge with a cloth.
First, the plastic triangle is removed, into which the tweeter will then be placed. It is held on by one clip and a pair of guides. You need to pry the element from above, snap it off and remove it.
There will be a plug under it (the wires go to the mirror) that needs to be disconnected.
When the triangle is dismantled, you need to remove the backlight, which is located at the bottom of the door card. It is hooked from the side, removed, and the wires going to it are disconnected.
Lamp in the door of Lada Vesta
Next, you need to remove the 3 screws from below that secure the casing.
Three bolts on the bottom of the door card
Another screw is unscrewed from the outer end of the door - it is located at the top, not far from the glass. The screw itself is covered with a plastic plug, which must first be removed.
Next comes the turn of the internal handle, interlocked with the keys for the windows, mirrors and central locking. First of all, you need to unscrew the screw that is located inside the handle itself.
Next, the entire element must be pryed from above and removed, then disconnect the plug
According to the owners of the sedan, it is this moment in the process of installing tweeters in the Lada Vesta that is the most difficult, since it is easy to damage the handle through negligence
Removing the entire plastic element
Then the fastening screw is unscrewed.
Lastly, unscrew the mounting bolt.
When all the screws and elements are removed, all that remains is to unclip the latches that hold the door card in place. This is done using a knife or screwdriver wrapped in cloth. It is recommended to start from the bottom, gradually moving up.
The video clearly shows how to remove the front door trim of a Lada Vesta
Tweeter Installation
Everything is ready to install the tweeter you Lada Vesta
Before installing the tweeter in the Lada Vesta, you need to make sure that the speaker is equipped with a capacitor.
Next, you need to try on the tweeter itself and see if it will stand evenly if it is secured. In this case, it all depends on the parameters and configuration of the tweeter.
If it stands crooked, you will have to make a platform for it. As practice shows, it is easiest to make it from hot melt glue.
After the tweeter is installed in the Lada Vesta, all that remains is to connect it directly to the speakers.
Done - tweeters installed
To do this, use either a speaker connector adapter, which can be purchased under article number ZRS-AG-22, or connected through special terminals. The price of the adapter is low and is about 150 rubles.
- https://lada-vesta-shop.ru/shop/osveschenie-i-yelektrika/perehodnik-dlja-kolonok-lada-vesta-zrs-ag-22.html – 150 rub.
Choosing an adapter for connecting tweeters to speakers in Lada Vesta is preferable, as this allows you to avoid cutting wires.
After installing the tweeter, the door is assembled in the reverse order. Work with the second door is carried out in the same way.
Purchasing and installing tweeters in Lada Vesta will significantly improve the sound quality of music. However, it is worth understanding that tweeters are usually installed last, after the acoustics, radio have been replaced, sound insulation has been done, etc.
Purpose
The main purpose of installing tweeters is to reproduce high frequencies. They are small speakers that are installed in the front and rear of the car (or in one of them), depending on the audio system. For maximum effect, they are used as part of multi-component audio systems, but can be found in retail sales (for example, from Pioneer). The advantages of the speakers include ease of installation - every car owner can connect the tweeters correctly.
Speakers for better sound
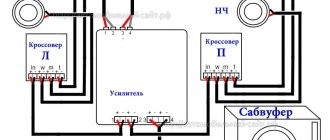
When installed in speaker systems, motorists install tweeters through a crossover - this is a device that provides operating ranges for the speakers. It separates frequencies when working with a multi-component audio system. This allows you to get the maximum effect from the system and ensure high-quality sound quality in the car.
Connecting tweeters to the crossover is quite simple, and to do this, you only need to read the audio system instructions. But there are times when you need to connect the tweeters in your car directly to the radio.
Connecting tweeters to the radio
It is possible to connect tweeters to speakers that are already installed. To do this, you will need a 1st order filter (capacitor). The capacity will depend on the installed speakers and is selected individually in each specific case.
Connection rules
Component Audio Source Locations
The sound quality of coaxial speakers satisfies most motorists, but not all. The design disadvantage of coaxial sound is that high-frequency tweeters are placed in inaccessible places along with the front speakers. To overcome this disadvantage, component systems with speakers spaced apart in space are used.
Due to the layout of car interiors, it is difficult to choose the ideal location for tweeters. The most acceptable compromise between price and quality is to place the low- and mid-frequency speakers in their standard place and move the high-frequency drivers to the dashboard or the A-pillar.
How to connect tweeters to a car - the main stage of work
The tweeter is connected directly to the speaker in the door. The minus is connected to the minus, and the plus to the plus of the speaker. The capacitor must be connected to the positive side.
An alternative is to connect tweeters using a crossover. In some speaker systems it is supplied directly in the kit. Otherwise, additional purchases are possible.
"AutoAudioCenter" brings together a team of connoisseurs of high-quality sound. Therefore, we offer not only to buy a subwoofer for your car, choose acoustics or components, but also carry out an individual calculation of the audio system for personal tasks and budget. Our installation centers in Kyiv, Kharkov, Dnepr and other cities of Ukraine carry out the correct connection of tweeters and manufacture suitable podiums to save space and ideal sound direction.
How to connect speakers in two-piece systems
Approximately 80% of car enthusiasts who install component sound systems are limited to installing additional tweeters. For some, this is not enough, since achieving the highest sound quality is impossible without “drawing” the lower frequencies of the sound spectrum to the point of the limits of human hearing.
Obstacles to the propagation of vibrations of the lowest frequencies degrade the quality slightly. Therefore, huge subwoofers operating in the lower sound band are placed in the trunk or on the rear parcel shelf.
A component car audio system can contain from 2 (including tweeter) speakers per channel to 4, 6 or more
Thus, a component car audio system can contain from 2 (including tweeter) speakers per channel to 4, 6 or more. Practical implementation depends on the aesthetic requirements of the car owner, his desire to spend money and time to achieve them.
Scheme of channel-by-channel connection of speaker components
All components of the audio system are connected to each other by wires. Weak tweeters can be connected with almost any wire. Subwoofers are a completely different matter. With a power of 100 W, the speaker will require a current of about 8 A. To avoid mistakes, it is best to use a specialized speaker cable with a wire cross-section of at least 2.5 square meters. mm.
To connect the wires to each other and to the speakers, depending on the design features, use standard connectors, terminals or twisting with mandatory soldering
Wires for connecting speakers are laid in inaccessible places, covered under removable casings as far as possible from other wiring harnesses. The sound lines are inserted into the doors through standard rubber accordion covers.
By following the recommendations outlined above, any owner will be able to equip their car with good sound. How many speakers will be used and where exactly they will be installed depends on the design features of the car and the desires of its owner. And the secret of success lies in the availability of the necessary components and accuracy when performing work.
Many car owners equip their vehicles with music systems. In order for the level of sound quality to be enjoyable, it is important to choose good speakers, install them in pre-prepared or factory grooves in the car and figure out how to connect the tweeters in the car from the radio
Learning to distinguish between plugs
How to install an audio system in a car, how are the wires connected and is an amplifier needed? Let's figure out which plugs can be used for installation. Plugs may have different markings depending on the standard. ISO marking is typical for multimedia systems and wiring in cars; if such a device is used for other purposes, it may break. Most manufacturers make their own adapters for the ISO standard, so there are many different plugs available commercially.
Before you install speakers in your car, you need to understand which plugs to use. Each individual car is characterized by original adapters with which the speakers must be connected to the radio in the car. If standard wiring is installed, it is possible that the audio system can be connected to it. To connect the speakers in the car to the new radio yourself, use a Euro standard adapter.
Making podiums for tweeters
Over the weekend, my husband made podiums in his Chevrolet and posted the text on the Lacetti Club website. I decided, with his consent, to post this text here, maybe someone might be interested in reading it (the text is preserved in the original).
So, they gave me a set of Ural AS-P1629K acoustics for my birthday. And since I already had the amp (Ural 3-channel) and sub (DLS Matador 12″) installed, all that was left was to install the donated kit. The midrange/bass speaker was installed in the front doors without any changes in the door design, only a complete shvi was first made. It was decided to place the tweeters on stands. After listening for a long time, the optimal place was chosen to be the bottom of the stand with the speaker facing the glass. Next, we proceed to making the podium.
The tweeter body is attached to the stand with self-tapping screws, we sand the surface of the stand, degrease it, and foam everything around it with construction foam.
We wait for everything to dry and use a knife to give the original look to our podium:
Next, we make the surface smooth and even by applying putty. After drying, sand it. I used putty with fiberglass, the last layer was finishing putty, which hid all the cracks and holes.
The final stage is covering the stand with vinyl. For this purpose, vinyl itself and 4 tubes of Moment glue were purchased. The technology of wrapping is not too complicated, it is advisable to do it together, it is more convenient. Having sanded the entire stand and degreased it, we apply glue to the part of the surface that we want to seal. Next, take a regular hairdryer and heat it until the glue begins to bubble. Then we lay down the vinyl, stretching it if necessary and pressing firmly. With this method of gluing, the glue sets instantly, which means you don’t have to wait for it to dry. The most difficult part was to cover the podium itself, since its surface is quite complex. I had to suffer here. As a result, there were some small mistakes, in the form of vinyl wrinkles in the lower corner of the rack. Analyzing what happened, I concluded that it was necessary to make the shape of the podium more even and so that the surfaces touched at small angles.
When everything was dry, I made a cutout in the center of the podium and placed the tweeter there. As a result, the final look became like this.
For those who are planning to do something similar, I will give some tips:
1. Work in the open air or in a well-ventilated area (the smell of solvent and putty spread throughout my apartment with terrifying speed, for which my wife, of course, did not thank me, and threatened to go live with her aunt if the experiment continued).
2. Do not create a too complex shape for the podium, this will make it much easier to paste over.
Now all that’s left is to put this whole “collective farm” in the car and enjoy the music. Good luck to all!!!
Lada Vesta Snow White neVESTA › Logbook › Installing tweeters
In general, I continue to improve the sound in the car. After this upgrade, the next in line is the installation of tweeters and a subwoofer.
In my configuration there are no standard tweeters, there are only the “triangles” themselves for them. Without hesitation, I decided to add tweeters there in addition to the original speakers. It’s clear that our native speakers in the doors are broadband and installing tweeters on them is not a good idea, but I still decided to try. Here, of course, it would be necessary to at least install normal crossovers or, even better, buy component acoustics, but I still decided to try this for now. Twitter decided to purchase the Kicx ST25. I got them for a ridiculous 250 rubles and according to reviews it seems like nothing.
Having tried the tweeters in standard triangle holders, we see that the body of the tweeters protrudes quite far beyond the edges. We take wire cutters in our hands and begin to remove excess
I wanted to leave the standard tweeter grid, but with it the “triangle” didn’t want to fit into its place normally, so the grid was removed and the Twitter sat in its place almost like a native one :)))) I attached the Twitter with a glue gun. It’s a cool thing - it’s easy to apply, hardens quickly, holds well and can be removed quickly and without a trace if something happens.
I forgot to say. As a filter, these tweeters have a standard 4.7 microfarad electrolytic conductor soldered into them, but... We are rummaging around in car audio, it was decided to replace this condenser with a more “correct” film condenser of the same capacity
I decided to connect to the speaker wiring in the following way: just above the speaker plug, I removed the insulation from the wire and simply soldered the tweeter wires in parallel. Theoretically, with this option, if I suddenly decide to contact the dealer under warranty with the wiring (ttt), then I can simply remove the tweeter wires and rewind the speaker wires as it was originally, and in this case, at first glance, it will not be noticeable that someone is somewhere I got drunk))) Well, okay...
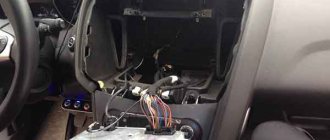
Next, along the way, we remove the door trims and do what we have planned.
Next, disconnect the plug from the speaker and remove it a little
Then we remove the insulation from the positive cable and tin
We take our far from small film condenser and solder
Next, we wrap everything with everyone’s favorite blue and red electrical tape.
And finally, like “but no one climbed here or did anything”, let’s wrap up this matter with a madeline
I did the same for the passenger door. The wire from the Twitter itself was also wrapped with madeline all the way to the top. Next, put everything back together in reverse order and you're done!
From observations. In comparison with my previous grant, I noted that there is door noise and it’s not bad at all. As you can see, the technological holes are at least sealed with pieces of splen + the door card itself is half pasted over with some kind of material (unfortunately, I didn’t take a photo of the card). There are finally no metal rods in the doors, instead we see a cable. Of course, you can make additional noise on the doors, which would be absolutely great, but we have to admit that the factory noise is no longer just an empty phrase, it is there and it works! On the downside: I broke one clip on each door, and the same clip on both doors. Naturally, I didn’t have any spare clips on hand, so I pulled them off the tweeters’ casings. The next day I visited all the auto stores and couldn’t find the original clips. They say they are not cheap and they are not easy to find. In the end, the Priorov ones fit perfectly - they don’t have elastic bands, but they fit very tightly and cost 4 rubles apiece, a must-have in short)))
Well, that’s how it happened guys. In principle, I am satisfied with the work done. With tweeters, the sound definitely became more interesting, so this modification was useful for me. In the future, perhaps I’ll replace the standard acoustics with something component-based, but for now let it be, I like it.
In the second part I will describe the wiring for the subwoofer and its installation.
Where can I buy?
If you live in a large city and are not very well versed in such issues, the easiest way is to go to a large car acoustics store and choose tweeters for Vesta there. It would also be a good idea to consult with the seller, who can recommend the best option.
Regarding the cost, it depends on many factors, including the prestige of the manufacturer, power, sensitivity, resistance and other characteristics. In general, the cost range is very large - from several hundred to several tens of thousands of rubles.
| Brand | Model | vendor code | Rated power (W) | Maximum power (W) | Price, rub.) |
| ARIA | TL30-66 | 4376 | 20 | 500 | |
| Ural | AS-C0114 | 1886 | 70 | 590 | |
| Airtone Audio | ART-S25T | 6423 | 50 | 990 | |
| KICX | ND-25S | 3399 | 70 | 140 | 1900 |
| Ural | AS-W1625K | 3223 | 90 | 1950 | |
| Dynamic State | NT-7.2 NEO Series | 6553 | 40 | 150 | 2100 |
| Focal | Integration TIS 1.5 Tweeter | 5650 | 15 | 100 | 2990 |
| CDT | DRT-26 | 2776 | 10 | 100 | 11200 |
| CDT | ES-1200iScw | 5769 | 50 | 100 | 22500 |
As for the standard high-frequency speakers of the Lada Vesta, they can be found under article number 281489095r.
In addition to the tweeter itself, you also need to purchase terminals for plugging into Vesta’s factory wiring or a special adapter.
Stories from our readers
How to connect tweeters to speakers: what are tweeters or tweeters, features of connecting tweeters. The advantages of speakers include ease of installation - every car owner can connect tweeters correctly. Holes are made in the door and body for rubber corrugation, which will prevent chafing and breaking of wires. Pull the acoustic wire into the corrugation using steel wire.
The location of the amplifier and equalizer on an additional shelf under the glove box allows you to minimize the length of the power cable.
Tools To connect the tweeters to the radio or crossover you will need: cable;. Subwoofers of the closed type, having a sealed housing closed Subwoofers of the bass reflex type vented, are characterized by the presence of a bass reflex - a slot or pipe that serves to adjust the frequency response in the low frequency region Subwoofers of the bandpass type - differ from the above in that the speaker itself is retracted inside the subwoofer housing, and the sound radiated through a bass reflex subwoofer with a passive radiator have an additional diffuser or speaker without a magnetic system, which serves to lower the overall resonant frequency of the loudspeaker.
Choosing a location Initially, you will need to decide on a location for the future speaker system. Another option is to route the wires using a crossover frequency filter. We strongly advise you to do this so that your passengers are not irritated by rattling plastic, which will react this way to loud music coming from the speakers.
Related article: How to restore electrical equipment on
To help car enthusiasts
It is enough to use the correct connecting cables and not make the wrong polarity when connecting. In order for the sound from both sides to be perceived at the same volume, you can use balancing to increase the sound volume of the right speakers. The driver of the car sits on the left, and is closer to the left speakers.
Bridged connection of amplifier channels is a connection in which 2 amplifier channels operate on 1 speaker. Compared to the previous class, the efficiency of this is almost 2 times higher, but high distortion in the output signal makes it rarely used. The photo shows a cross-section of a classic low-frequency electromagnetic loudspeaker.
There is one more problem. A subwoofer is a large-sized element, very labor-intensive to manufacture and install. First, let's look at the characteristics that are indicated in the passport.
These can be the following components: Amplifier Speaker systems Subwoofer This set of technical means allows you not only to increase the sound volume, but to significantly improve the quality of music playback. Rated electrical power is the power that the speaker can reproduce for a long time without distortion. How to connect an odd number of speakers
Cost of services
Fault diagnostics 0 / 500–1500 rub. Selection of audio system components 5 min – 1 hour free Adjustment of acoustics (during installation) free
Tweeter setup 30 min 300–1500 rub.
Usually, the tweeter is installed together with other acoustics and is configured together with it. If you order speaker installation from us, the setup is always free.
— in the dashboard 1-2 hours 1500–3000 rub. — in the corners of mirrors 1-2 hours 1500–2500 rub. — in racks (standard) 1-2 hours 1000–2500 rub. — at the door (standard) 1-2 hours 1800–2000 rub. — in the rear shelf 1–3 hours 1500–2500 rub. — on the sides 1-2 hours 1500–2500 rub.
Other car audio services
Construction of an acoustic system (complex) from 4000 rubles. Audio training from an hour from 1000 rubles. Installation (installation) of coaxial acoustics 2–4 hours from 1400 rub. Installation (installation) of broadband acoustics 2–4 hours from 1600 rub. Installation (installation) of two-component acoustics 2–5 hours from RUB 3,500. Installation (installation) of three-component acoustics 3–6 hours from 4500 rub. Installation (installation) of subwoofers 1–4 hours from 500 rub. Installation (mounting) of a 1DIN radio 1 hour from 1500 rub. Installation (installation) of a 2DIN radio 1–3 hours from 2000 rub. Organization of linear RCA outputs from an hour from 1000 rubles. Installation of a sound amplifier from an hour from 1000 rubles. Installation (installation) of the processor with configuration 4–6 hours 1500–4000 rub. Podium for tweeter (HF tweeters) 2–5 hours 2500–4000 rub. Manufacturing of spacer rings 1–4 hours from 400 rub. Manufacturing of subwoofer housing 1–7 days from RUB 3,000. Making a shelf from a composite 1–7 days 10,000–25,000 rub.
Lada Vesta SW › Logbook › Lada Vesta sound replacement: NOEMA wideband + DSP amp
My configuration did not have tweeters. The standard sound was quite good, considering that there were wide-range speakers. But I lacked detail in the HF range.
The sound refinement began with Shumkov.
Having removed the door cards, I pasted a couple of sheets of vibration and noise.
I pasted anti-squeak on the door cards.
A power cable KG35, shielded twisted pair CAT6 5m, PVS 2*1.5 25m were purchased.
From the radio, FL FR channels and signal +12V from the antenna amplifier power supply go to the amplifiers via twisted pair cables.
Pokanalka
For finer tuning, I decided to make channel-by-channel amplification. For the speakers I used 2x1.5 PVA wire without external insulation. To make the harnesses similar to the standard ones, Tesa 51608 fabric insulating tape was purchased.
Amplifiers
To fine-tune the front I used a 4-channel DSP processor amplifier KICX SC 135.4
Midas
NOEMA 100GDSH 65-4 broadband speakers were used as mids. In the photo they are on the right (standard ones on the left)
I decided not to bother with spacer rings, bought plastic adapters and glued them to black polyurethane sealant, it turned out quite strong and reliable.
D&M PSS (Denon & Marantz Premium Sound Solution) Diffuser diameter: 31 mm Power: 30 W (nominal), 120 W (maximum) Reproducible frequency range: 3 - 23 kHz Impedance: 4 Ohm Produced by their former Philips plant, bought by the D&M PSS group in Ukraine.
The subwoofer design is closed. The speaker is Pioneer TS-W311D4 with two 4 ohm coils. At first there was a parallel connection, but I didn’t really like the 2 Ohm operation. So I wired the coils in series to make it 8 ohms for more control and less heat on the amp.
The box is 40 liters, after listening and testing, the volume of the box turned out to be large, I had to put a 15-20 liter cloth bag with sand inside to reduce the volume. I was pleased with the result. The bass became very collected, fast and not booming.
Raised floor
How could we do without it? All these wires had to be hidden so that you could safely load the stroller and other things. Everything is standard here. I ordered cutting 12mm thick plywood. I applied universal glue and rolled the carpet. It turned out well.
Setting up a 4-channel amplifier with DSP
NOEMA is cut from below (HPF filter) from 85 Hz.
The top is loose. The tweeters at the bottom are cut (HPF filter) from 6 kHz. The top is loose. I set the time delays (Delay) by ear and they are approximately the following: Right broadband 2ms Right tweeter 2.7ms Left broadband 4.1ms Left tweeter 4.2ms Amplifier settings
Here is the principle. The closest speaker should play last. The subwoofer should play first, then the right door speakers, and lastly the left door speaker and tweeter. After manipulating the delays, the sound stage shifts from the left door to the center of the front panel, in the area of the rear view mirror and there is no feeling as if you are somewhere on the side. But these settings are relevant only for the driver. If you are traveling with a passenger, then it is better to make a preset with only delays relative to the subwoofer. Which is very convenient to do with a wireless remote control with 4 sets of settings.
Setting up a single channel subwoofer amplifier
HPF filter 40Hz LFP filter 80Hz
Budget
The subwoofer with amplifier cost 440 BYN, NOEMA 100GDSH 65-4 + DSP amplifier 680 BYN + noise-vibration insulation 180 BYN Total spent 1300 BYN
Bottom line
I am very pleased with the result. NOEMA was especially pleased with its detail in the mid-frequency range. There is a lot of bass, I listen with minimal gain.
What is a crossover
Crossovers are specialized devices in sound systems that create the necessary frequency ranges while the speakers are operating. In simpler terms, these are several filters for sound.
Externally, it is a housing with dimensions of approximately 12x6x4 centimeters, and inside this housing contains filters that are responsible for transmitting sound signals depending on their frequency. According to their main function, crossovers are divided into:
- High frequency (adjustable to frequencies from 80 to 100 Hz);
- Low-frequency (adjustable to frequencies from 2-5 kHz).