Many people really like vinyl records. Undoubtedly, they attract with their appearance, large covers, easy-to-read texts, and they are also pleasant to pick up and touch. But what we love and appreciate most of all is their smooth, wonderful analog sound. When playing a great record on a high-quality turntable, feelings and movements of the soul arise that cannot be compared with what digital technology offers us.
However, in certain situations, such as when listening on an iPhone or computer, recordings in this format are not suitable. You can easily buy the album you need as a file, because many vinyl disc reissues include a download code. But in this case, you will have to pay again for the music you have already purchased, which, in general, is not very reasonable. And then you can (or even need) to use vinyl digitization. This technology is far from cutting-edge, but the feeling of the real thing, colorful cover and soft sound create a feeling of realness. Making a copy of a vinyl disc is not nearly as easy and simple as copying information from a CD. There is no way you can just put a record on the player and press the “copy” button; the digitization process will take much longer and require some effort. However, the result will justify all the costs. The portability your vinyl collection has been missing is now at your fingertips.
Necessary equipment
There are a lot of suitable tools for processing vinyl, but the most important and necessary thing is to have a vinyl player, a phono stage, an analog-to-digital converter with USB output and a computer with the necessary software.
You should not be intimidated by the above list; you can find a way to make it easier. There are a large number of turntable models on the market that have a built-in phono stage, ADC and USB output. Typically called "USB players," they offer a convenient way to transfer signals from a disk to a computer. However, there is a disadvantage that you should pay attention to. These models represent the budget segment of the market and are poorly focused on quality of work. The final result will most likely not convey the true sound of your discs.
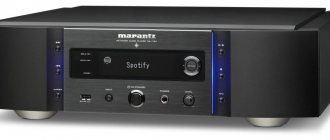
If you already have a turntable, then it is best to invest in a good USB phono stage. Excellent model Rega fono mini A2D. There are also good and inexpensive Pro-Ject models. Such systems are already equipped with a phono stage, analog-to-digital converter and USB output.
Next, you'll need the right computer software. There is quite a variety of them on the market, some are specifically designed for recording from vinyl. Channel D's Pure Vinyl is one of the best flexible work packages around. It is equipped with a software equalizer, which makes it possible to directly connect a computer to the ADC output and easily do without a phono stage. Advanced editing features help improve recording quality. Please note that the package has a 15-day trial period.
Another worthy alternative is VinylStudio, which includes almost all the features of Pure Vinyl, including a built-in RIAA equalizer.
If this option turns out to be unsuitable, we recommend Audacity software, it is free and works quite well. The interface may seem complicated at first, and certain editing functions will take time to learn. But, after mastering the program, you can easily cope with it.
Features of our audio digitization process
- The 10-channel sound card M-Audio Delta digitizes sound and captures recordings onto a computer - this is a modern instrument with 24 bit / 96 kHz parameters, a unique combination of superbly thought-out architecture and high-quality converters, an instrument that is in many ways superior to professional systems of the past. Even a layman can hear the difference in sound.
- After capture, the audio recording undergoes additional processing by an audio specialist. Noise removal, amplitude equalization, elimination of wheezing and crackling noises typical of the media - the master himself chooses the necessary actions to achieve the best quality, all this is already included in the price of digitization.
- Digitization of audio cassettes or records may be accompanied by a breakdown into tracks. This is an additional service that is considered separately. Breaking down music and language courses are tasks of different complexity, so they also cost differently.
- We even take on small orders. The lead time for small orders is 2-3 days. The fastest way is to digitize audio cassettes if you don’t need a breakdown into tracks. Urgent orders are also possible. If you want to receive your records the next day, the additional payment will be 100%. For large orders, the lead time can reach several weeks.
- We also charge an additional 100% for digitizing audio letters on paper - cardboard plates like “Greetings from Kislovodsk”. This is due to the fact that the thin cardboard of the record becomes warped over time and requires additional straightening procedures before installation in the player.
- We charge an additional 50% for digitizing professional-type audio coils. They are easy to distinguish from ordinary household ones. Actually, these are not even reels at all - the film is wound around a wide core and nothing keeps it from falling off. Therefore, such film is used exclusively in a horizontal position on studio equipment.
- The processed material is stored in the studio for 1 month - during this period you can order an additional copy or, for example, ask to apply a filter to the sound.
Breaking down audio into tracks
Cover and CD design
Overlaying music and titles
Soviet tape recorders with Japanese filling: all for the sake of quality!
If you think that you know everything about Soviet audio equipment and see an ordinary Olympus 004 reel-to-reel tape recorder in our studio, then this time you will be wrong.
Not ordinary at all! Although Olympus belongs to class zero and is not bad in itself, behind the usual outer shell there is a surprise, and more than one. It's no secret that real fans of retro music come across Soviet devices with modified internals: most often they replace electrolytic capacitors that dry out over time with more modern imported ones, and sometimes the power supply, amplifier and heads. All this is designed to improve the sound of the good old Soviet design. And it works. Moreover, in such a way that foreign analogues remain far behind.
In all our copies, in addition to standard improvements, amorphous heads from the Japanese company Teac (Tokyo Electro Acoustic Company) are installed, and the amplifier is modified. The tape recorders are tuned using special measuring equipment and reference samples and undergo annual maintenance so that we can provide customers with the highest possible quality audio digitization. In fact, the result of our digitization is aurally on par with more advanced sound sources.
REN TV story with our participation about the digitization of sound and video
Let's get down to business
Make sure your player is performing optimally before you start recording. If you've been tuning a long time ago, now is the time to do it. The result can be influenced by any little things - from the level of disk seating to the amount of lubricant in the bearing. Be sure to check the cartridge - is the needle dull, and how accurately are the clamping force and offset set? All these factors will help improve the quality of the recording.
Songs from a CD are copied in a few seconds. With vinyl the situation is completely opposite; information is read from it in real time. If the composition lasts seven minutes, then you will also take seven minutes to write it. So you should be patient, keep everyone away from the player while recording, and lower the volume level to avoid sound deterioration due to speaker feedback.
Be sure to clean the discs from dust and stains. It would be ideal to use completely new discs for recording. But in practice this happens extremely rarely. Just know and keep in mind that all clicks, jumps and hisses will be recorded along with the music.
If there are not too many of these sounds, they add a characteristic and inherent charm to the sound of vinyl. However, listeners are much less likely to overlook and forgive them when playing a digital file. You can purchase editing software, but this is a very time-consuming process and, among other things, excessive editing will not benefit the recording and may harm it.
Attention to detail
So, what format is most suitable for saving music? Disk space is cheap these days, so it's better to use a high resolution. 24bit/96kHz is the standard for most studios and a reasonable balance between quality and volume. WAV, AIFF or FLAC - the format is not so important, the main thing is that your system supports it.
Both CDs and digital files most often have embedded metadata that contains song information and album art. Vinyl records do not have this feature and metadata will have to be entered manually. This is a very tedious process, especially when copying a large number of records, but it is very important because only by this process will it be possible to distinguish the files in the shared folder on the PC.
The computer cannot recognize individual songs, and you will need to copy each one to its own track. Compositions that flow into one another are also a problem. For continuous playback, you must mark them, otherwise there will be seconds of silence where there should not be any.
It happens that a computer or NAS server failure leads to damage or loss of data. It’s especially annoying if this happens after finishing work. Therefore, we recommend making at least one backup copy of your digital library. Or better yet, two. After spending so much effort digitizing vinyl, you probably won't want to go back to repeating the process right away.
[FAQ] Grabbing and digitization
The EAC program interface has been translated into Russian, so its installation and configuration does not cause any special problems. So, we launch the installer and leave the checkboxes on all components, except for the useless link to the eBay online auction. After launching the software, you need to go to EAC > EAC Settings and in the “Extraction” tab, change the error correction level from medium to high, and also uncheck the second item - “Non-use of zero samples.” The neighboring first (offset) and third (synchronization) must be activated. Next is the “Normalization” tab. Here it is enough to make sure that the corresponding flag is not set, that is, the normalization function, which is detrimental to sound, is not enabled. We change the settings in subsequent tabs to taste, since they have nothing to do directly with extracting audio data. After completing this stage and clicking OK, we begin the next one: from the main program window, go to EAC > Drive Settings and open the first tab, “Extraction Method.” Here we select “Trusted mode” and make sure that the flag on the Accurate Stream option is set, while the other two features (audio data caching and C2 error messages) should be deactivated. In the “Reading” tab, you need to set the extraction algorithm. To do this, insert any CD into the drive and start the auto-tuning procedure. Having waited for the result, we go to the adjacent submenu “Offset and speed”, where we set the offset value in samples introduced by the drive when reading data. It is necessary to use such a correction, otherwise the copy of the disc will not match the original in terms of the length of the tracks. The required offset value is determined by the test built into EAC or taken from the table on the website www.accuraterip.com/driveoffsets.htm. As a result of all the settings, your combination of an optical drive and the EAC program is ready for precise grabbing - of course, provided that the CDs do not have obvious damage to the working surface. Only a little remains to be done. Go to EAC > Compression Options . On the first tab, select the encoding format - “Microsoft PCM Converter” and the sampling format - “16 bit, 44.1 kHz, stereo”. Finally, in order not to enter track names yourself, you can request information from a network database before grabbing each CD. If the CD is branded or licensed, then it is almost guaranteed to have all the necessary information on it on the Internet, which will subsequently facilitate cataloging the collection on the hard drive. The corresponding settings are located in the EAC > freebd and EAC database settings section. By and large, you just need to indicate any work e-mail there, otherwise access to the database will be denied. Now everything is ready! And the most important thing begins: transferring the contents of your compacts. We insert the discs into the drive one by one, request the names of the album and tracks from the Internet by pressing Alt+G and start converting to WAV. If everything was done correctly, the output should be files that are technically and aurally indistinguishable from the original tracks on the CD. Actually, after grabbing, the program will report the successful completion of the process. Since the extraction accuracy was 100%, it means that no errors were made.