The radio is an all-wave tuner, a circuit for recording and playing sound on magnetic tape, and a low-frequency amplification path. A cassette recorder without a radio receiver is often called a cassette recorder. Car interiors are equipped with compact radios. The most vulnerable point of such a device is the tape mechanism, cassette receiver and magnetic heads, which wear out, while the low-frequency part remains fully functional. Therefore, assembling a sound amplifier from a car radio with your own hands is not at all difficult.
How to make and connect a sound amplifier from an old radio with your own hands
There are several simple ways to make an amplifier from a radio with your own hands. To do this you will need a minimum amount of additional materials and a few hours of free time. If everything is done correctly, the finished device will work effectively for a long period.
What devices can be used to make an amplifier?
In order to make an amplifier yourself, you need to find a suitable old device and remake it. This work should be carried out only after studying all its nuances and familiarizing yourself with the recommendations of professionals. Otherwise, it will be almost impossible to achieve success.
The amplifier is made from the following devices:
- Radio tape recorder. There are several options available for upgrading an older device. The choice of one of them should be made based on the state of the technology and the ability to connect various adapters. To make an amplifier from an old radio, you need to have the skills to work with a soldering iron and have a little knowledge of microcircuits.
- Cassette recorder. In most cases, such equipment does not have connectors for connecting to modern equipment. A special adapter made in the form of a cassette will help correct this situation. To do the job, it is enough to know how to use a tape recorder and have all the required equipment.
- FM transmitter. A properly connected device will become an additional sound source that will be synchronized with the existing one. As a result, the sound volume can be increased several times. An FM transmitter is used only in cases where the car radio does not have the ability to play audio cassettes.
- Bluetooth adapter. It is used only when a person plans to listen to music downloaded to the memory of a smartphone, tablet or any similar gadget. In this case, the selected device must have a Bluetooth connection function, and the car radio must have an AUX-IN port.
Algorithm for embedding a module into a music center
To integrate a purchased module into an audio system, you must correctly determine the location of its installation. When choosing the location of this node, you must also take into account the possibility of remote control of the created music system using the remote control.
Important! It is most appropriate to mount the module in a compartment for audio cassettes or instead of a CD drive. If the old drive is still working, then you can leave it
As a result, the device will be able to work with both a flash drive and a disk.
To convert an old music player into a flash drive, you need to follow the following algorithm of actions.
When choosing a different location for mounting the USB connector, you should make a hole in the case for it. In this case, you can bring the port for the flash drive to the rear panel of the tape recorder.
Module and center diagrams are usually included with purchased devices, otherwise they can be easily found on the Internet. The audio module must have a constant 5 V power supply
. From 12 volts it will need to be connected via a power supply (12-5 V). All remodeling work must be carried out in compliance with safety regulations.
Such homemade players can be used as portable ones: it is much easier to transport a small music center around the house than a desktop computer. From an old cassette player you can make a miniature ( micro) music center with USB
.
All the subtleties of the alteration are shown in detail in the video below.
How to do
There are several ways to make an amplifier from a car radio. Each of them has its pros and cons, so you need to make your final choice only after studying all the available options. The simplest of them is the following:
- Making an amplifier with your own hands begins with dismantling the old device.
- Remove the protective cover from it and get to the cassette block.
- Using a soldering iron, carefully disconnect the positive wire. It is not recommended to tear it off, as this rash act can lead to equipment failure.
- After this, it is wrapped with electrical tape. This simple action will help avoid unwanted noise during operation of the device.
- Then the AUX-IN output is soldered.
- At the next stage of work, an empty audio cassette is inserted into the unit.
- Turn on the sound and touch each wire with a screwdriver one by one. Contact with one of them will result in a cracking sound.
- One of the 3 outputs of this audio cable is soldered to the body of the radio, and the other two are soldered to the right and left channels.
- The finished car radio amplifier is checked for functionality and then covered with a protective cover.
How to connect
In order to connect a car radio to a self-made amplifier, you need to follow a few simple steps. It is important to follow the correct sequence, which will reduce the likelihood of making mistakes.
- The first step is to choose a location to install the device. It must be reliably protected from moisture and high temperatures.
- After this, a signal and additional wire is laid that will go from the device to the radio. In this case, they should be protected from contact with the vehicle wiring.
- The power cable is pulled from the battery to the amplifier.
- Then connect the fuse.
- One end of the signal wire is connected to the Line-in port (on the amplifier), and the other to the Line-out port (on the radio).
- Connect the power cable in the same way.
- An additional wire is connected to the B+Ant connector on the signal source, as well as to the Remote port (on the amplifier).
- The amplifying device is connected to the speakers.
- If necessary, install a capacitor near the device.
- After this, the amplifier is set up and its operation is checked.
Advantages and disadvantages
A homemade sound amplifier has many advantages compared to purchased devices. Moreover, its operating efficiency exceeds that of industrial models.
- low financial costs for manufacturing the device;
- no need to buy additional equipment for sound amplification;
- long service life;
- good quality of the resulting sound;
- there is no need to connect the device to the cigarette lighter socket (typical only for some devices).
Despite the many advantages, homemade amplifiers also have several disadvantages.
They must be taken into account before starting to manufacture the device.
Among the disadvantages are the following:
- less reliable than a purchased device;
- there is a possibility of extraneous noise;
- can only operate at maximum voltage;
- not very convenient for daily use.
Anyone can make an amplifier from an old radio. To do this, you need to carefully study all the intricacies of the work and take into account the recommendations of professionals. If you manage to finish the job you started, the device will perform its functions well.
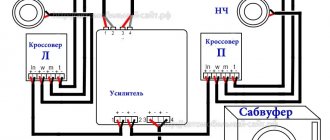
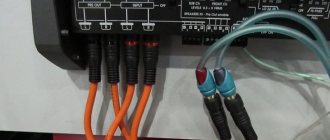
Electrical connection diagram
Although most radio tape recorders have a different number of outputs and inputs, it is not difficult to find a method for connecting them to a 220 Volt network when making a home audio system. The standard electrical diagram for connecting cables looks like this:
To power the system, a regular power supply from an old PC is used. Before connecting it to the system, you need to check that the device has enough power to receive 5 amps.
Required connectors for connection:
ATX type power supplies must be connected via control connectors. They are on a 24-pin comb.
The image shows which wires need to be connected to the car radio.
The back of the device looks like this:
For different types of radios, the location of the power supply, the number of sound outputs and other parameters may differ. Only the color designations of the cables do not change.
Amplifier selection
Since the car only has 1-2 12 V batteries, it is necessary to calculate the audio connection to a low-power network. It is to this that the device is connected so that the voltage is increased to 100 V.
When choosing an amplifier for your radio, you need to pay attention to the following factors:
- unit of power - it is necessary that it corresponds to the values of other automotive equipment;
- rated power - should be slightly less than the power of standard acoustics for the highest quality sound;
We disassemble the radio
- equality of load resistance on the amplifier and the system;
- l minimum frequency range – must be at least 20 Hz.
If you have a fairly modern car, then it may be equipped with a crossover - this is an auxiliary device that will ensure the operation of the amplifier in different modes. Typically, in such cars you can connect not one, but two amplifiers to the standard radio if desired. Most car owners give their preference to Pioneer devices.
Rating of the best amplifiers for cars 2018
Not every consumer is able to assemble an amplification device in a garage. By purchasing a branded amplifier, the car owner receives a guarantee that the equipment will work efficiently, which cannot be said about self-made devices.
Pioneer GM-D8601
The Pioneer GM-D8601 model is made in a small case, which will ensure ease of installation of the device in a car. The single-channel device belongs to category D and is characterized by high stability to low output impedance. This allows for approximately 300 watts of power at 3 ohms. If the resistance value drops to 2 Ohms, then the rated power value will be 500 W. The price of the amplifier is 7590 rubles.
In reviews, consumers complain about an increased harmonic distortion parameter, which amounts to up to 0.5%. In fact, this does not particularly affect the sound quality, since amplification devices are used to work with subwoofers.
Advantages of GM-D8601 models:
- high power, which is confirmed by consumer reviews;
- the optimal range of reproduced frequencies is from 10 to 240 Hz;
- the device is equipped with a high-quality filter element for low frequencies;
- small body dimensions;
- using the model provides the ability to connect up to four subs;
- large outputs for connecting the power supply circuit;
- low resistance of 1 ohm.
The main disadvantages include the lack of heat sinks, which will cause the amplifier to overheat, as well as the lack of customization options.
You can learn more about this model from the video of the Autosound Factory channel.
Pioneer GM-D9601
The single-channel model allows you to connect up to four subwoofers, which allows you to squeeze maximum power out of the latter. With a resistance value of 2 ohms, the device can produce up to 1600 W of maximum power. If the operating parameter is doubled, then the peak power will decrease to 1000 W. In the case of the nominal indicator, the operating value will be 800 W at 2 Ohms of resistance.
The Pioneer model GM-D9601 is equipped with a low-pass filtering device that operates at 40-240 Hz. The main feature of a D-category amplifier, whose distortion is no more than 0.5%, is the presence of a remote bass control. This model is optimal for lovers of low frequencies.
Advantages of the model:
- availability of short circuit protection;
- the power parameter is increased to maximum values;
- high-quality low-frequency filtering device;
- working with several subs is allowed;
- small dimensions of the case, allowing installation of the amplifier anywhere in the cabin;
- presence of a regulator for changing the bass volume;
- The device consumes a minimum of electricity during operation, which prevents rapid battery drain.
The main disadvantages include the inflated cost, which amounts to 11,499 rubles.
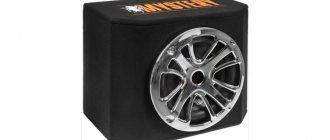
Mystery MR-2.75
The Mystery MP-2.75 model has a low cost, but the power of this amplifier is low. The device is designed to work with a two-channel speaker system. Its use will provide deep low frequencies. Small dimensions allow you to install the device almost anywhere in the cabin. The equipment belongs to the AB category, so it is characterized by increased energy consumption when the radio is activated at full power.
Advantages of the model:
- a high-quality two-channel sound system is implemented;
- availability of protection against voltage surges and short circuits;
- if the connection of the device to the subwoofer or speakers is bridged, then the power parameter can be up to 225 W;
- it is possible to adjust low frequencies;
- the presence of filter elements for bass and high frequencies;
- the harmonic distortion coefficient parameter is 0.03%;
- high range of playable frequencies, ranging from 20 to 20 thousand Hz;
- an affordable price for many car owners of about 3,599 rubles.
Cons of Mystery MP-2.75:
- the rated power value with a resistance of 2 Ohms will be no more than 120 W for one channel;
- connectors and plugs that are inconvenient to connect;
- high electricity consumption;
- minimum settings.
More details about the technical features and functionality of the Mystery MP-2.75 model can be found in the video filmed by the TAZavod 42 channel.
Pioneer GM-A5702
The cost of this device model is quite high - 7910 rubles, but the Pioneer GM-A5702 fully justifies the price. The rated power at a resistance of 4 Ohms is 150 W for each channel. When connecting equipment via a bridge circuit with a similar resistance value, the power value will increase to 1000 W. If this Pioneer model is installed in a car equipped with high-quality acoustics, it will be able to produce deep low frequencies and clear sound in general.
The model works with harmonic distortion, but this parameter is no more than 0.05%. It is possible to independently adjust the bass. As a result of the fact that the device belongs to the AB category, when operating at full power, the load on the battery will be high.
Advantages:
- the presence of a low-pass filter operating in the range from 40 to 500 Hz;
- the possibility of maximum sound reproduction at a frequency of 70 thousand hertz, sound quality depends on the installed audio system;
- the maximum power value at a resistance of 4 ohms will be 300 W per channel;
- good value of rated power, ensuring high-quality playback;
- the presence of a two-channel system, its implementation at the highest level;
- minimum amount of harmonic distortion;
- presence of a low-frequency regulator;
- compact dimensions of the device.
The disadvantages of the model include the absence of a high-frequency filter device.
Kicx RTS 4,100
This model costs 7,790 rubles. allows you to “squeeze” the maximum out of car speakers and subwoofer. It is possible to bridge the device, as a result of which the number of channels is reduced to 2, but the power value of each will be 190 W. The nominal power parameter at a resistance of 4 Ohms is 100 W for each channel. If the resistance is 2 Ohms, then the operating parameter will increase to 200 W.
In general, the technical characteristics are no different from other models. This device reproduces sound at a frequency in the range of 20-20000 Hz. The consumer has the opportunity to activate the Bass Boost option, which allows you to increase the low-frequency parameter. There is a built-in crossover, and the low-pass filter device is complemented by a filter element for higher frequencies. There is protection against power surges, overheating and short circuits; safety devices rated at 35 amperes are used for protection.
Advantages of the Kicx RTS 4.100 model:
- high power value for multi-channel equipment;
- small dimensions allowing for simplified installation;
- various options for protecting the device from failure;
- possibility of amplification of low frequencies;
- presence of a crossover;
- reduced harmonic distortion parameter.
This model has no disadvantages, but some consumers note a lack of equipment power.
The Team Sound Quality Rtishevo channel provided a detailed overview of the characteristics and features of the Kicx RTS 4.100 car amplifier.
Sony XM-S400D
Consumers trust the Sony brand because this company made a name for itself in the production of audio equipment. The Sony XM-S400D model is characterized by increased reliability and compact dimensions. Users do not like the design of the device, which is made in the form of a regular black box with several outlets on the sides. But this drawback is insignificant, since no one will look at the device during operation.
Installing an amplifier in a car will provide deep and accurate sound, which is due to the presence of filtering devices for all types of frequencies. The rated power parameter is 45 W for each channel, provided that the resistance value is 4 Ohms. If the connection type is bridged, then the power will increase to 100 W for each channel, while the number of channels will not decrease. Features of the device include reduced harmonic distortion of 0.08%. Due to the fact that the model belongs to category D, the amplifier consumes a minimum of electricity during operation.
Advantages of the model:
- high rated power;
- obtaining deep and clear sound when connecting an amplifier;
- the ability to reproduce frequencies over a wide range;
- the presence of filtering components that provide high-quality sound;
- reliable protection of equipment from failure; various systems are used for this.
Cons of Sony XM-S400D:
- lack of ability to adjust low frequencies;
- consumers note the difficulties that may be encountered when installing equipment;
- high price - 9990 rub.
Complete set of amplifier model Sony XM-S400D
Genesis Profile Four Ultra
This model costs 18,990 rubles. cannot boast of an original design, but it looks quite elegant, which is achieved thanks to the narrow radiator devices installed inside. The maximum power setting can be up to 400 W, which is quite enough to set up a loud audio system. The presence of a fan will provide effective protection of equipment from overheating, and thanks to the crossover, unnecessary frequencies can be removed. The Genesis Profile Four Ultra model is considered the best option for installation in a car where front speakers play.
Advantages of the Genesis Profile Four Ultra amplifier:
- increased equipment power;
- possibility of functioning with a regulatory device;
- using a bass equalizer that allows you to adjust parameters;
- the presence of a fan inside the structure;
- small body dimensions.
Disadvantages include the sensitivity range. Some consumers note that it is not as extensive as it could be.
Audison SR 4
This model costs 21,700 rubles. It is considered universal and, judging by reviews, has a long service life. When developing the device, the manufacturer implemented a configuration configured for the most commonly used circuit, which will eliminate installation problems. The device is enclosed in an aluminum housing, which prevents physical damage to the equipment. The developer used a competent design in manufacturing, which ensures high-quality cooling of the device. The functionality that this model has indicates the need to install an amplifier on a front speaker system with a subwoofer.
Advantages of the Audison SR 4 model:
- Durable aluminum housing ensures long-term operation of the device;
- the ability to flexibly customize the device to suit specific needs;
- ease of equipment management;
- effective cooling system that prevents the device from overheating.
Flaws:
- the model cannot boast of small dimensions, difficulties arise when installing the device;
- no bandpass filter device.
Connection
Many car enthusiasts prefer to take care of their cars themselves, so they ask the question: “How to connect the amplifier to the radio with your own hands?”
Actually, it's not very difficult. The main thing is to follow a number of simple rules and follow the instructions.
First of all, you need to choose a place - it must be dry and have sufficient heat transfer. This is necessary in order to maintain the functionality of the device. Usually it is placed deep in the trunk.
Connecting the amplifier to the radio is as follows:
- Step 1. Laying the signal cable. Usually carried out under firmware to ensure its safety. The owner of the car chooses the route independently as it is convenient for him.
- Step 2. Laying additional cable. Carried out in conjunction with a signal cable. It is worth noting that they should not come into contact with live wires responsible for the on-board network.
- Step 3. Laying the power cable and installing the fuse. Powered by battery. In this case, the fuse must be placed as close to it as possible. You can lay the power cable close to the main wiring of the machine.
- Step 4. Connect the signal cable. Naturally, there are only 2 connectors to which it can be connected. Directly on a standard device this is the output - that is, Line-Out, and on the amplifier, accordingly, the input is Line-In.
- Step 5. Connecting an additional cable. There are also 2 connectors. On the radio it is B+Ant, and on the amplifier it is Remote. It is imperative to do this, because otherwise the system simply will not work.
- Step 6: Connect to speakers. If you have a bridge Pioneer, then it has 2 channels. They are connected respectively to the “plus” and “minus” of the speaker.
- Step 7: Installing the capacitor. A storage capacitor is a kind of stabilizer that serves as an auxiliary device for the car's network so that there are no problems with increasing load. It protects both the on-board network and the amplifier from voltage surges.
- Step 8. Setup. This stage is strictly individual for each device and depends on the amplifier itself, the radio and the presence of a subwoofer.
If an amplifier is not enough for a music lover, then there is another device to improve sound quality at high volumes - a subwoofer.
Headphone device
Mobile phone amplifiers are powered mainly by batteries, so it is important to assemble a device with low energy consumption. The instructions below meet this requirement.
If portability is not so important to the owner, you can build in a connector for power from the mains
The instructions below meet this requirement.
If portability is not so important to the owner, you can build in a connector for power from the mains
It is not recommended to use impulse parts as they may cause interference and degrade sound quality.
To create a homemade device, it is better to select the following elements:
- copper cable 30-40 cm;
- adapter input;
- microcircuit KA2209;
- plug input;
- 4 capacitors 100 µF.
The assembly circuit can be used from a similar TDA2822 board. You can avoid using a radiator by mounting the device on a wall-mounted unit.
What types of subwoofers are there?
- Passive. Connect it to an additionally installed amplifier. However, experts do not recommend using it, since the filter present in its device removes some frequencies. To prevent this from happening, connect a separate device for the subwoofer.
- Active. It has a built-in amplifier, so the passive problem solves itself.
Connecting a subwoofer
- Step 1. Selecting and connecting the power cable. It is very important to make the right choice because it will directly affect the sound quality. There is a special table that allows you to select a cable that matches your device in terms of power. Experts recommend making two wirings at once - to the plus and minus, however, the minus is often attached to the body.
- Step 2: Install the fuse. This step will help you keep your subwoofer working if a power surge occurs. The fuse must be placed as close to the battery as possible. Moreover, its minimum power must be 40A, otherwise it simply will not perform its function.
- Step 3. Connect to the radio. There are two options here - with or without a special output on the standard radio:
- In the first case, everything is simple. The subwoofer output is specified in the instructions and is usually labeled Out.
- In the second case, you should connect the subwoofer through the speaker output, and use a filter.
- There is a special jack on the subwoofer itself to perform this step, labeled In.
- Step 4: Installing the capacitor. If you already have a capacitor installed and you can connect a subwoofer to it, then that's just great - you don't need to purchase an additional device. This step cannot be avoided - it is necessary to relieve the load on the on-board network. Therefore, if there is no capacitor, then you definitely need to purchase one. You can notice the effect of a subwoofer without a capacitor on it with the naked eye - the indicators on the dashboard will glow more dimly.
The choice of amplifier and subwoofer, as well as their connection, is a decision that every motorist must make independently. You can choose a high-quality and proven device, such as Pioneer, or something less reliable - it’s up to you. It’s always worth remembering that choosing an update and connecting it can directly affect the operation of your car - if you do something wrong, your dashboard may simply stop working, or the entire on-board network may malfunction. Therefore, if you are not sure that you can make the correct connection yourself, then it is better to entrust the work to professionals.
Level three. Upgrade without replacing the standard head unit
If all these “flowers” with speakers seem frivolous to you, it’s time to move on to the “berries” - touching on the amplification part of the system. The main problem that has to be solved in this case is where to get the original uncorrected linear signal from which to start building a new audio system.
In fact, you won't find it anywhere just like that. And there is simply no single recipe for all cars; in any case, you will have to turn to professionals who specialize in “voicing” cars. By and large, it all comes down to four options.
The first option is to “pull out” the linear signal from the electronic bowels of the head unit. For many models, this process, by the way, is well established, and for a relatively small amount your standard head unit will acquire a tail with RCA connectors on the rear side.
The second option has to be used when it is not possible to display “linear lines”. In this case, we leave the standard amplifier in the system, decisively disconnect the standard speakers from it and connect its outputs to the inputs of the new amplifier. The only requirement for the latter is the presence of so-called high-level inputs.
High-level inputs are a feature exclusively of car audio equipment; at home, it would hardly occur to anyone to connect one amplifier after another. In a car this is a necessary measure, and although technically it is not very elegant, it still makes sense. After all, it is no longer low-impedance speakers that will be connected to the standard amplifier. Its output stages will operate in a completely different mode, with lower currents, so the signal quality will be somewhat different. In any case, you will get better sound than in the state.
But this option is also not always applicable. A little higher, I already said that many systems introduce intentional signal correction. In this case, there is no point in simply passing the “crooked” signal from the standard amplifier to a new one. And if the standard system has channel-by-channel amplification, then you won’t even find a curved signal - only frequency “cuts”.
For such cases, there is a third option, using a digital processor like Audison bit One, Audison bit Ten, Helix DSP, etc. The trick of these devices is that they can combine the original audio signal from these separate frequency pieces, remove the correction (or rather , adjust the signal “in the opposite direction”) and send such a restored signal to a new amplifier. In the right hands, by the way, it’s quite an effective thing.
Well, the fourth option is applicable in cars in which the standard system is built using the MOST bus (Media Oriented Systems Transport). By the way, there are quite a few of them these days. The peculiarity of the MOST structure is that all devices (source, amplifiers, monitors, changers, etc.) are united by a single digital bus through which data circulates around the ring. It is impossible to take and remove anything from such a system; the data transfer is interrupted and everything simply stops working.
Despite the apparent complexity at first glance, this option is actually one of the most convenient for installing a new system. All you need is a MOST adapter. It is included in the MOST ring as another device, pulls the digital audio signal out of the bus and gives it to us “on a silver platter” - in the form of the usual SPDIF.
And then we can do whatever our heart desires with it - from an economical “processor + amplifier in one package” solution (MD.Lab AM-60.6DSP, Audison Prima AP8.9 bit, Helix P SIX DSP, etc.) and to extravagant systems with an external DAC and other audiophile tricks.
Advantages and disadvantages
The pros and cons of the resulting device depend on the method by which the old radio was turned into a sound amplifier.
The advantage of a homemade device is savings. You don't have to buy a special device to help improve the sound. In addition, this option allows you to extend the service life of equipment that for some reason has become unusable or has been partially broken.
The sound obtained with such a device is also an advantage: its quality will be as good as that purchased in a store. If used correctly, the service life can be several years. In addition, in some cases, the gadget will not require a connection to a cigarette lighter socket to operate.
Some options can read various media containing music files.
Self-made devices also have disadvantages. The design has a less reliable layout than devices from the store. A cable that often sticks out during self-assembly is also inconvenient. If a person has assembled an amplifier from a car radio unprofessionally, extraneous noises, crackling noises, and sounds during operation may appear. Sometimes such unpleasant effects appear only when the volume is greatly increased.
It should also be remembered that the maximum voltage possible in the on-board network of the machine is not always sufficient to obtain the maximum power of the low-frequency audio amplifier. This difficulty is eliminated by connecting capacitors with a large capacity.
Often tape recorders are installed in cars during assembly, the quality of which is not very high. For this reason, the sound may not be of very good quality if you increase the volume. The sound, however, in this situation will be bad even without connecting a homemade amplifier.
Tools and materials
For models assembled from scratch, use:
- set of speakers for a stereo system;
- ready-made mp3 player;
- ready-made radio receiver (it is advisable to choose a professional model);
- computer (or homemade) power supply;
- a ready-made pre-amplifier with an equalizer (a device from any musical equipment is suitable, for example: an electric guitar, a DJ sampler, a mixer, etc.);
- radio components for the amplifier - according to the selected circuit;
- cooling radiators or fans for the amplifier;
- enamel wire for filters of multi-way speakers;
- network cable ShVVP (2*0.75 sq. mm.);
- non-flammable cable KSPV (KSSV, 4*0.5 or 2*0.5);
- 3.5-jack connectors for connecting speakers.
A passive speaker - usually a subwoofer - that can be easily disassembled and rebuilt, perhaps replacing the top, bottom and side walls with longer ones, is suitable as a finished enclosure. Refer to the drawing. It will be difficult to install an amplifier and power supply in the “satellites” (high-frequency speakers) - a radiator or cooling fans will take up a lot of space. If the center is small, use the housing and supporting structures from the car radio. For a self-made case you need:
- chipboard, MDF or natural wood (the latter option is most preferable - unlike MDF, where there are often voids);
- furniture corners - will make the structure easily disassembled;
- sealant or plasticine - eliminates cracks, making the structure impenetrable to the air pressure produced by the speaker;
- damping material for speakers – eliminates the resonance effect;
- epoxy glue or “Moment-1”;
- anti-mold impregnation, waterproof varnish and decorative paint;
- self-tapping screws, bolts and nuts, washers of suitable sizes;
- rosin, soldering flux and solder for a soldering iron.
Instead of paint, you can also use decorative film. Tools you will need:
- a classic installer's set (drill, grinder and screwdriver), a set of drills and a cutting disc for wood, a grinding disc for metal and a set of bits included;
- a mechanic's kit (hammer, pliers, side cutters, flat and figured screwdrivers, a hacksaw), you may also need hexagons of different sizes;
- To make sawing easier and faster, you will also need a jigsaw;
- soldering iron - it is advisable to use a device with a power of no more than 40 W; for the safety of the work being carried out, you will need a stand for it;
- sandpaper – needed in places where you can’t get to it with a grinder.
It is ideal if the home craftsman has a lathe. It will help to perfectly produce any rotating elements.
How to do
There are several ways to convert an old radio into a subwoofer. The choice of option should be made taking into account the state of the technology, the availability of inputs for different adapters, and your own abilities.
To implement this method, you must know how to use a soldering iron. You can remove the old device for listening to music. Then remove the top cover. In this case, the cassette block becomes visible. The pole wire should be unsoldered and insulated: this will help prevent the occurrence of extraneous sounds. You should not tear it off, as this may cause the equipment to break. After this, you need to find where to solder the AUX-IN output.
Then, to make an amplifier from a car radio, you should find the audio channels. To do this, you need to insert a cassette on which there are no audio recordings, and put the player in playback mode. After this, the screwdriver is pressed against the wires. Upon contact with the sound channels, a soft cracking sound will be heard. One of the outputs of the audio cable is soldered to the body of the device, the other to the right, and the third to the left channel.
If the mechanisms are very worn out, the radio itself cannot be used; you can remove the built-in amplifier from it and use it for other devices.
From a cassette recorder
This method allows you to make an amplifier from a radio or a simple tape recorder. Often older devices do not have a USB port. In this case, an adapter in the form of a cassette, which is placed in a special mechanism, is suitable for sending a signal. After this, you should turn on the audio playback mode on the device. The plug of the wire coming from the conductor should be connected to the signal source.
From FM transmitter
Another technique that allows you to make a sound amplifier from a radio tape recorder requires the presence of an FM transmitter, which will become an alternative source of sound reproduction. This method is used in cases where the car radio does not have a cassette tray or this part is faulty or broken.
For the device to work correctly, you need to insert a flash drive with audio recordings into the USB port. If this is not available, you can use another source connected via AUX-IN. After this, you need to make room in the cigarette lighter. Then the car radio and transmitter are tuned to a common frequency.
The disadvantage of this option is that the cable is always connected to the power port of the cigarette lighter: it will not be possible to charge the phone in the car.
From Bluetooth adapter
This version of a sound amplifier can be used in situations where you plan to listen to music using tablets, mobile phones, laptops and other devices that have Bluetooth adapters. It will be possible to connect the car radio as an amplifier only if it has an AUX-IN port: otherwise it will not be possible to connect the adapter. In some situations, you can use other types of adapters or some kind of FM modulators.
Non-standard paths
Home craftsmen who do not have such a ready-made solution as a car radio can safely use their imagination. There are a lot of options:
- The power supply can be a computer power supply or a switching power supply suitable for power and voltage: from household appliances, mobile phones.
- Computer drives with audio output are suitable. Such a device is usually equipped with a start button, which also serves to go to the next track; double-clicking it stops it. Some older drives, such as the Creative brand, are equipped with a full set of control keys, as well as a volume control on the front panel.
- Do you want to listen to the radio? A small radio the size of a matchbox, receiving a signal from a retractable antenna, will sound perfectly high quality.
- There are no problems with digital formats either. An inexpensive FM transmitter paired with the already mentioned tiny receiver is an ideal tool for obtaining high-quality sound.
- For the truly lazy, there is an ideal donor - an old but working electronic alarm clock. Chinese models easily act as radios and read digital formats from memory cards.
You won't have to do much to fit all of these devices into your old media center. The devices need to be freed from their cases, maybe a little work with a soldering iron to bring the control buttons, slots for memory cards and USB to the front plastic panel of the center. The answer to the question of how to make a power supply circuit becomes clear if you count the number of outputs in a computer power source - there are enough of them for everyone.
How to assemble a sound amplifier from a simple radio tape recorder
The radio is an all-wave tuner, a circuit for recording and playing sound on magnetic tape, and a low-frequency amplification path. A cassette recorder without a radio receiver is often called a cassette recorder. Car interiors are equipped with compact radios. The most vulnerable point of such a device is the tape mechanism, cassette receiver and magnetic heads, which wear out, while the low-frequency part remains fully operational. Therefore, assembling a sound amplifier from a car radio with your own hands is not at all difficult.
How to make a sound amplifier from a radio
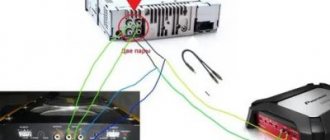
Many car enthusiasts use a low-frequency amplifier from a car radio to connect external sound sources to it. This could be a phone, smartphone or tablet. Connecting these devices can be done in several ways. The easiest option is to use a cassette adapter.
This device is a standard cassette, inside of which there are several plastic gears to simulate the operation of a tape mechanism and a magnetic head. A wire is soldered to the head pins, ending with a 3.5 mm Mini jack connector. This connector plugs into the AUX OUT jack of any external device. The audio frequency signal from the source arrives at the magnetic head of the adapter, which acts as a transmitter. The sound signal arrives at the adapter head, and an alternating magnetic field is formed around it, which is perceived by the magnetic head of the car radio. The signal is then amplified and sent to the car's speaker system.
This design has the following advantages:
- low price;
- no power supply required;
- can be connected to any device;
- good sound quality.
The main advantage of this device is that the car radio does not need to be opened and soldered additional wires. Almost any car owner can use a cassette adapter. The disadvantage is the need to turn on the radio in playback mode, and you can hear the sound from the operating tape mechanism and adapter gears. To get rid of this, it is enough to unsolder one of the power wires of the electric motor, since it is not needed in this design. The cassette adapter can be used with any car radio.
If the cassette receiver assembly is broken, then make a sound amplifier from a car radio in other ways. On older types of car radios there is no additional AUX-in input, but if there is one, it can be used to connect external sound sources. To do this, you need to purchase a Wireless Bluetooth Music Receiver. This is a small plastic box with a 3.5 mm Mini jack plug installed on it. It is inserted into the input socket of the car radio. This device allows you to listen to music or radio broadcasts from any device via Bluetooth. All smartphones and tablets, as well as most models of older mobile phones, are equipped with this channel.
The adapter is available in two versions:
- powered by cigarette lighter;
- with built-in battery.
The second option is preferable, since the GPS navigator is usually powered from the car cigarette lighter socket, and if you need to install a DVR, you will have to install a splitter on the cigarette lighter. The result will be too many wires. A system with a built-in rechargeable battery or lithium battery is free from these disadvantages. It is enough not to forget to change the power source in a timely manner.
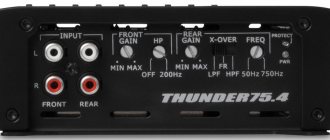
Another option is to use an FM transmitter. This device allows you to listen to music from external media if the car radio is equipped with an FM tuner. The transmitter is a transition link between a memory card on which your favorite pieces of music are recorded and an audio amplifier for a car radio. This device receives power from the car's cigarette lighter. On its front panel there is a small display on which the operating frequency is displayed.
The transmitter has a USB connector for placing a flash card and a slot for installing Micro SD memory cards. Some models are equipped with a remote control. The electronic unit of the transmitter converts the information recorded on the memory card into an analog high frequency signal in the FM range. Next, the transmitting unit transmits the signal to the FM receiver of the car radio. The carrier frequency of the transmitter must be away from the frequencies of transmitting radio stations to eliminate the influence of interference on the signal.
Homemade music center power supply
The supply voltage of the computer power supply is ideal for modern devices being designed, +5 and +12 V. The microsystem is powered from the first line, and the battery is charged from the second (you will need to purchase additionally). In the absence of a network, the music center operates autonomously. To provide the required 5 V and not overheat the microcircuit, a ready-made 12-5 V DC voltage converter circuit is presented on the website sinava.ru.
Chip LM7805
The figure shows that the LM7805 chip converts the voltage to the desired format. Capacitors are soldered in to filter harmonics. Electrolytic ones have a breakdown voltage of 25 V, others (with straight plates in the diagram) - 50 V. Do not forget to place the elements with the correct polarity. In the diagram, for convenience, the positive electrodes of electrolytic capacitors are indicated by plus signs. And it is better not to turn on the microcircuit at high voltage so as not to overheat.
Other interesting things: on YouTube they suggest making separate power switches in the music center for the low-frequency amplifier and the built-in microsystem, and connecting the jack connector to the amplifying stage. As a result, it becomes possible to use the box as an amplifier for an electric guitar. Think for yourself which chips to add for effects inside. It is not prohibited to use the aux input at the same time. This gives you a chance to play along with your favorite artists or sing karaoke. The accompaniment, of course, should already be present on the flash drive.
Please note that the low-frequency amplifier gets very hot during operation. The host chip must be located on a large heatsink made of aluminum or another metal that conducts heat well (copper). Using a similar feature, it is possible to isolate the required element from the design of an old factory music center: if you are looking for the heaviest loaded key (with a massive radiator), it is most likely the most necessary one.
It remains to understand what supply voltage was used in the old equipment in order to connect everything together. It is necessary to calculate the input and output voltages:
- We believe that professionals designed devices based on generally accepted standards in order to assemble complex systems piece by piece.
- In the case of over-amplification, this can be heard in the sound distortions generated by the meander. Any music performed in this manner is reminiscent of thrash metal; the cut off tops when the transistors exit linear mode are hard to miss by ear.
- The modern element base supports wide ranges of signals.
By the way, take a power supply from a Soviet portable tape recorder (if the computer one doesn’t suit you). It is not a fact that the indicated voltages will be found there, but we have already provided a 12-5 V conversion circuit (you will find others by analogy). We believe that it is possible to get something similar for every occasion. Do this, the computer power supply is not lightweight, therefore, carrying the hardware is not much fun. The PC unit is designed for power consumption above 350 W, which simply by definition is not useful in a homemade music center.
FM modulator
How to make your own sound amplifier for a radio on a chip
Some older car radios do not have such useful inputs as USB and AUX, so to use them as an amplifier you will have to remove the device from its seat and open the printed circuit board. If you have no experience working with electronic circuits, then you should not take on this work. First, you need to find a low-frequency amplifier integrated circuit on the car radio board. This is a large part and the only one that is installed on the heat sink. On the circuit diagram and on the board it may be designated AMP or POWER AMP. Next you need to determine the input pins of the amplifier. There are two of them on the chip - the left channel input and the right channel input. The left channel can be designated Line L or L-in, and the right channel – Line R or R-in. You can determine correctness by touching each contact with your finger. A hum will be heard from the corresponding speakers. In this case, the power of the car radio must be turned on. The ground or common wire is marked with Line GND.
If there are no markings on the diagram, you can find the channel inputs directly on the chip. To do this, you need to sequentially touch all the terminals, focusing on the appearance of hum in the speakers. You cannot solder the connector to these contacts. It is necessary to determine the connection points for the coupling capacitors and solder the wires to them.
The wiring of channels on the plug and socket must be done using shielded wire according to the following diagram.
A homemade sound amplifier from a radio can be used with any external sound source. There are no tone controls in this design, since the signal is fed directly to the input of the final amplifier, bypassing the equalizer. In order to reduce the noise level, you should cut off the tracks going to capacitors C1 and C2 from the pre-amplifier of the playback head.
If your car has a new radio, you can make a compact audio amplifier from the old one. To assemble a sound amplifier from a radio, you need to remove everything superfluous and unnecessary.
How to assemble a sound amplifier from a radio can be understood from the figure. The ZXM8330-PA car radio is assembled on two microcircuits and three transistors. The FM tuner is assembled on a TA2003 chip, and the final amplifier is built on a TDA2003 chip. The radio receiving part and the first transistor in the stage of pre-amplification of the signal from the magnetic head can be immediately eliminated. The power supply wire to the electric motor also needs to be cut. The printed track of the tuner power supply, coming from the “Radio” - “Tape” switch, and the track from the output of the microcircuit to the collector of the second transistor are also cut. You can experiment with the remaining elements of the circuit. If the external device that will be connected to the amplifier has a sufficiently powerful output signal, then it should be connected to the upper terminal of the variable resistor “VOLUME” in the circuit.
To supply a weak signal, you can use the collector of the second transistor, that is, the point where the signal was supplied from the tuner. In this case, the tone controls and the volume limit switch “Mute” will work. The power supply circuit of the first and second transistors must be broken. In a car, all electronics are powered by a battery. If the amplifier is to be used as a standalone device, it will require a simple 12-18 V power supply. The amplifier provides an output power of 6 W on a 4 ohm speaker and 10 W on a two ohm speaker. The maximum current consumption is 3.5 A. Using a similar principle, you can make an amplifier with your own hands from any car radio . The main thing is to correctly identify the input circuits and disconnect from the input all unnecessary stages that may be sources of noise. This is especially true for the amplification stages of the playback path. Working with stereo systems is a little more complicated, but the technique remains the same.
Simple DIY car amplifier — Lada 2112, 1.6 l., 2005 on DRIVE2
It’s probably no secret to readers of my blog that I like all sorts of electronic crafts, lights, etc. And now the idea arose to assemble a car amplifier with my own hands. To begin with, I chose a simple scheme with a minimum number of parts and this is what happened:
Power amplifier and filter
The amplifier is assembled on just one TDA8560Q chip, the circuit is very simple and common (exactly for the first amplifier)), this chip is also used in car radios and has the following declared characteristics: output power 25 W per channel in 4 Ohm, and 40 W per channel in 2 Ohm, voltage power supply 6-18V, reproduced frequency range 20-20000Hz. I’ll say in advance that, in principle, I was pleased with the sound quality, the sound is clear without wheezing with sufficient volume, in 4 ohms the volume is like a radio, but in 2 ohms I was very surprised - it plays noticeably louder, and the sound is the same clean. Can be used both at home and in the car. In the car, you need to add a power filter from interference created by the ignition system and the generator. It also plays well from the phone, connect it to the headphone jack and get an original budget car radio capable of driving 4 speakers (2 per channel in 2 Ohms). The microcircuit has built-in protection against short circuit at the output and overheating (as in all car amplifiers), you can add an error indication system (the LED will light up if there is overheating or short circuit).
Let's move on to practice: We look at the diagram and purchase the necessary components.
circuit diagram
We draw a printed circuit board (it is preferable to use LUT technology, but I don’t have a printer, so I drew with a marker and a clerical touch) We drill holes for the components (I recommend drilling first and then etching) and etching with ferric chloride (dilute in hot water to obtain the color of strong tea). We tin the board and begin to solder the components (it is better to cover the power paths with a thicker layer of solder or solder a wire into them so that there are no power drawdowns) and include an electrolytic capacitor with a large capacitance and the corresponding voltage in the power circuit (I have 4700 µF 16V)
printed circuit board
soldering components
in the end we get something like this
The microcircuit must be installed on a radiator, the radiator in the photo is small, it is necessary to use 2-3 times more or organize active cooling - a cooler. With a radiator like the one in the photo, it goes into overheating protection in less than a minute at high volume
a radiator is needed and 2-3 times larger than in the photo
The amplifier has been assembled, now to connect it to the car’s on-board network, you need to assemble a power filter (see diagram below):
power filter, if not enough, you can install 2 of these in series
The choke is wound with a 1-1.5 mm2 wire on a ferite ring with a diameter of 20 mm and contains 5 turns. The ring may vary in size and you can get it from a computer power supply or a transformer for powering 12-volt halogens, or you can buy it)) I think everything is clear with the other components.
here's a thing
I think you can use such a filter if your radio picks up interference
In conclusion, a small video demonstration of the operation of the amplifier, everything was assembled, of course, using snot, but it was done to make sure that the circuit is working.
PS DO NOT REVERSE THE POLARITY of the power supply otherwise the microcircuit will burn out immediately!! was sad
experience)))) .
Page 2
It’s probably no secret to readers of my blog that I like all sorts of electronic crafts, lights, etc. And now the idea arose to assemble a car amplifier with my own hands. To begin with, I chose a simple scheme with a minimum number of parts and this is what happened:
Power amplifier and filter
The amplifier is assembled on just one TDA8560Q chip, the circuit is very simple and common (exactly for the first amplifier)), this chip is also used in car radios and has the following declared characteristics: output power 25 W per channel in 4 Ohm, and 40 W per channel in 2 Ohm, voltage power supply 6-18V, reproduced frequency range 20-20000Hz. I’ll say in advance that, in principle, I was pleased with the sound quality, the sound is clear without wheezing with sufficient volume, in 4 ohms the volume is like a radio, but in 2 ohms I was very surprised - it plays noticeably louder, and the sound is the same clean. Can be used both at home and in the car. In the car, you need to add a power filter from interference created by the ignition system and the generator. It also plays well from the phone, connect it to the headphone jack and get an original budget car radio capable of driving 4 speakers (2 per channel in 2 Ohms). The microcircuit has built-in protection against short circuit at the output and overheating (as in all car amplifiers), you can add an error indication system (the LED will light up if there is overheating or short circuit).
Let's move on to practice: We look at the diagram and purchase the necessary components.
circuit diagram
We draw a printed circuit board (it is preferable to use LUT technology, but I don’t have a printer, so I drew with a marker and a clerical touch) We drill holes for the components (I recommend drilling first and then etching) and etching with ferric chloride (dilute in hot water to obtain the color of strong tea). We tin the board and begin to solder the components (it is better to cover the power paths with a thicker layer of solder or solder a wire into them so that there are no power drawdowns) and include an electrolytic capacitor with a large capacitance and the corresponding voltage in the power circuit (I have 4700 µF 16V)
printed circuit board
soldering components
in the end we get something like this
The microcircuit must be installed on a radiator, the radiator in the photo is small, it is necessary to use 2-3 times more or organize active cooling - a cooler. With a radiator like the one in the photo, it goes into overheating protection in less than a minute at high volume
a radiator is needed and 2-3 times larger than in the photo
The amplifier has been assembled, now to connect it to the car’s on-board network, you need to assemble a power filter (see diagram below):
power filter, if not enough, you can install 2 of these in series
The choke is wound with a 1-1.5 mm2 wire on a ferite ring with a diameter of 20 mm and contains 5 turns. The ring may vary in size and you can get it from a computer power supply or a transformer for powering 12-volt halogens, or you can buy it)) I think everything is clear with the other components.
here's a thing
I think you can use such a filter if your radio picks up interference
In conclusion, a small video demonstration of the operation of the amplifier, everything was assembled, of course, using snot, but it was done to make sure that the circuit is working.
PS DO NOT REVERSE THE POLARITY of the power supply otherwise the microcircuit will burn out immediately!! was sad
experience)))) .
How to make an amplifier from a car radio: detailed instructions
Make your own amplifier from a car radio
For some reasons, many car enthusiasts are in no hurry to get rid of old car radios that have served their purpose. They are not at all embarrassed by the outdated design of this antediluvian device, nor by the fact that its cassette receiver has not been used for its intended purpose for a long time and the equalizer settings are so primitive that the purity of the sound is regulated only by the volume knob of the car radio itself. In this case, there are only three reasons for the car owner’s enduring love for his “gramophone”:
- Sentimentality;
- Deafness;
- The price of a new and good car radio is a significant part of the cost of the car itself.
Since purely medical workers are competent in the first two reasons, I propose to consider the third option, which contains real instructions on how to make a sound amplifier with your own hands from a car radio that you were about to throw away.
Creating a home speaker system
So, the essence of the issue is clear to us. A car radio with speakers (see How to choose speakers for a car radio on your own) have been lying nearby on the table for a long time and are “asking for battle.” Now we are the only ones who don’t understand how we can “connect” 12-volt equipment with a 220-volt alternating network? I must tell you that this problem has several solutions, which are contained in the instructions below on how to connect a car radio from a 220 network.
Method one: connection via a homemade step-down transformer
This method is the most complex and time-consuming
Although the level of modern electronic technology allows us to completely abandon it, due to the fact that we are considering all the ways on how to connect car radios to 220 V, we will still pay due attention to it
Preparation
So, before connecting the car radio to the 220 network, we will have to create a transformer that steps down to 12 volts with our own hands. Why do we need:
- A similar (see photo) transformer that converts the standard network voltage to a lower one (in our case, 36 volts);
- Insulating material;
- Wire of suitable cross-section and length;
- Multimeter/voltmeter;
- A calculator, although the calculations are not at all complicated, you can get by with a piece of paper and a pen.
Step-down transformer 220/36 Volt
Creation
In order to make the task as easy as possible and not disassemble the transformer winding itself, we use the free space of the magnetic core area. We wrap the free area of the magnetic circuit with insulating material and wind a piece of the wire of our choice onto it of any length. Let's say we got seven turns. In order to calculate the number of turns and wire length required to reduce the voltage, we need to perform the following procedures:
We assemble a circuit for switching on a transformer using a piece of wire wound around a magnetic conductor and measure the output voltage;
We take readings from seven turns of wire
- The multimeter gave a value of 2.9 volts. This means that we have 0.41 volts per turn of the secondary winding. From this ratio we obtain the number of turns required for an output of 12 volts: divide 12 by 0.41 and get 30 turns;
- We measure the length of the wire spent on the experimental seven turns, we get 126 centimeters. That is, there are 18 centimeters per turn (126 divided by 7), which means that for 30 turns we will need 540 centimeters of wire.
- Next, we wind this whole “thing” onto a magnetic circuit, assemble the circuit and check our calculations with a multimeter.
Resuscitation of the car radio - Method one
So, in order to make an amplifier out of a car radio, we need to ask ourselves the last two control questions:
- Am I satisfied (if I have a conscience and want to ask my passengers) with the output power and “cavity” of the radio?
- Is the sensitivity of the FM tuner sufficient?
If in both cases you put “pluses”, then you can be congratulated, you have just appreciated the internal contents of this music box, namely:
- Digital tuner;
- Sound control unit;
- Stereo - Quad amplifier.
Well, now let's get to the fun part - how to make an amplifier from a car radio? In solving this dilemma, thanks to modern technologies and technical characteristics of the old, but necessary, head unit, we will significantly facilitate our task by connecting a digital sound source to the old radio . Well, here we have several options to choose from.
If your radio is really old, then this means that it does not have such currently needed outputs as AUX-IN and a USB port. For this we can use the Car Cassette Tape Adapter Transmitter for MP3.
Adapter for cassette car radio
As you can see in the photo, this adapter is made technically and visually as an analogue of a regular cassette - 100.5 * 63.8-12.0 millimeters. I agree, when you saw this device for the first time, at least you had a slight feeling of surprise and a smile, but wait and judge, you will now understand all the charm and genius of this device. The principle of turning on this adapter is that you insert it like a regular cassette into the “deck” of a car radio, its head is in contact with the head of the player and by connecting a sound source (player, TV - smartphone, laptop, etc.) via a mini-jack, we We get pretty good sound from the speakers, at least better than some FM transmitters. In general, everyone is happy - we saved a decent amount on the purchase of a car radio (see Installing a Pioneer car radio on your own), the tape recorder thinks it is playing a real cassette)))
Advantages
- The idea itself;
- Price;
- Not bad sound;
- It does not pretend to be a cigarette lighter socket, which, you see, is very important!
Flaws
- Unreliable layout (if you do not use a hammer and screwdriver and do not pull the cable, it will last long enough);
- Another protruding cable.
- When playing, you can hear the sound of a running tape mechanism (this can be eliminated either by turning up the volume or turning off the mechanism itself).
Method two
If the cassette tray in your car radio is faulty or missing (do such things really exist?), the FM transmitter mentioned above may well become an alternative sound source.
How to make an amplifier from a car radio
For its full operation, you will need to insert a flash drive with music files through the USB port or connect another sound source via AUX-IN, then make room for it in the cigarette lighter and tune your car radio to the same frequency as the FM transmitter.
- Easy to connect and use;
- Extensive possibilities for connecting various sources with music files.
- Constantly occupied standard port for powering the cigarette lighter;
- If the performance is poor, there is extraneous noise and periodic “glitches”.
Method three
In this method, I would also like to talk about one option, how to make an amplifier from a car radio for more modern devices, such as smartphones, tablets, laptops and the like with Bluetooth adapters.
Bluetooth car radio amplifier
In this case, the WirelessBluetoothMusicReceiver adapter will help us out, as long as your head unit has an AUX-IN port. Otherwise, you can always use other adapters, adapters and FM modulators capable of simulating additional stereo audio inputs of an audio power amplifier. Well, if you consider yourself to be one of the normal guys who are not afraid of difficulties and always take a detour, then I can offer you an option not for the lazy in the following method.