Today, almost any laptop can compete on equal terms with traditional CD transports. It just needs to be configured correctly.
Save and read later -
Your personal computer may or may not have a CD drive - one way or another, it is capable of storing a library of audio files in its memory or receiving them by streaming from any resources. In either case, a PCM (or less commonly DSD) music signal can be output for digital-to-analog conversion by third-party means. Most often this is done via a USB connection from the PC to an external sound card or audio DAC. You can listen to music from the headphone output of the computer itself (we won’t consider its speakers), but in this case the result will leave much to be desired. There are several reasons for this, but the most important one is that the built-in sound card simply does not provide quality corresponding to Hi-Fi status. Therefore, the most obvious way is to entrust this procedure to a specialized component.
But simply connecting with a USB cable does not guarantee bit-accurate audio transfer to an external DAC. This operating mode must be configured accordingly.
Need ASIO
Driver ASIO4ALL WIN\MAC - latest version
Need ASIO! If your sound card does not support built-in ASIO, use the generic ASIO4ALL driver. The performance of your entire system (the entire computer, the entire mini-studio) directly depends on whether your sound card / audio interface supports ASIO drivers or not.
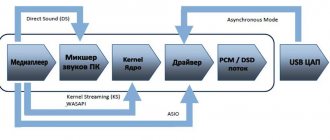
ASIO is a software device driver standard that allows FL Studio to access the sound card directly , rather than having to go through the Windows operating system (as with a standard Windows driver).
This approach provides a significant advantage and a huge increase in productivity when working with FL Studio . Look for a sound card for which the manufacturer has written custom ASIO drivers (check the specifications and look for mentions of ASIO or ASIO2 support).
Note: ASIO's job is to communicate between the software and the hardware itself, while ensuring maximum efficiency and performance, however, if the sound card's capabilities are not initially sufficient, ASIO will not be able to help. I repeat once again, ASIO is the fastest link in the SOFTWARE-HARDWARE combination .
AllFrets
Author : Burillo (https://forum.gitarizm.ru, https://guitarcity.ru)
I decided to create the most complete instructions for using ASIO in order to once and for all solve the problems of asking the same questions. However, before we begin, I would like to tell you a little theory so that the reader can better understand the purpose, capabilities and limitations of ASIO.
Yes, the article is bold. But useful. So it is advisable to read it all.
Since I have the English version of Windows 7, the translation may not be accurate, so if something is not exactly the same as in the Russian version, please let me know or correct it yourself. Also, I have never personally used Windows Vista, and I do not know the specific settings for this operating system, but theoretically they are no different from the settings in Windows 7.
Read carefully. Do everything step by step, everything as in the text. There are no “insignificant details” here; every little detail is important. Check the correctness of each movement of the sliders three times. If you follow these instructions absolutely exactly, the sound will work in 99% of cases. If it doesn’t work for you, don’t count on the fact that you are the same 1 percent, check it ten more times, and only then contact me.
WHAT IS ASIO?
ASIO technology was developed by Steinberg (the authors of the VST standard and one of the most popular audio sequencers in the world - Cubase) in order to solve some problems associated with the architecture of the Windows operating system (which are absent in operating systems of the *nix family, such as Mac OS and Linux - which is reflected in the lack of specialized audio drivers for these OS). The fact is that before getting directly into the program, the sound first went into the mixer and went through a bunch of different “instances”, which negatively affected the time after which the sound could be output to the audio output. Simply put, if you try to play NOT through the ASIO driver, you will have wild delays, and you will not be able to play normally (it is worth noting that starting with Windows Vista, this problem was solved due to the new architecture of the sound subsystem, but at the moment this new The subsystem is supported by a tiny amount of software, so you still have to use ASIO).
Simply put, ASIO is not some magic program designed to solve all your problems. ASIO is just a standard for audio drivers for accelerated exclusive access to hardware. The speed of ASIO is limited by the capabilities of your processor - even if you have the coolest audio card in the world, it will not save you if you have a Pentium II. You must also understand that no process takes zero time - there were, are and will always be delays, the only question is how noticeable they are. The human ear is not capable of recognizing delays of less than 10-15 milliseconds, so anything below this limit we accept as “no” delays. The amount of delay can be adjusted by the size of the buffer - usually 256 samples are enough (more on that later). However, do not forget that the smaller the buffer, the faster the processor must be able to process the sound - and this, in turn, imposes restrictions on what minimum delays (and under what loads) can be achieved without audio “dropouts” (typical crack).
A small note. If you want to say that you hear a delay of 10 ms and it prevents you from playing, either your delay is greater than 20-30 ms, or you are simply trying to blame your own crankiness on the software. Don't forget that sound has a finite (and fairly small) speed, so a 10ms latency is comparable to the latency of playing a couple of meters from a real amplifier.
ASIO DRIVER TYPES
Strictly speaking, there are no types of ASIO drivers, because this is a standard. However, it just so happens that drivers are distinguished into “native” drivers (provided by the manufacturer) and the ASIO4ALL driver. The difference between them is that ASIO4ALL is theoretically suitable for any audio cards (although it is primarily designed for built-in realtecs), while “native” drivers are suitable only for certain card models. Of course, if you have native drivers, it is best to use them, because the audio sequencer is “under one roof.” Well, for fans of playing with Winamp, nothing prevents you from importing audio into an audio sequencer and playing it from there (the same goes for GuitarPro adherents - you export the audio and import it into the audio sequencer). I repeat, I highly do not recommend performing this operation, but since this is an extremely popular question, this issue will be covered in the section on configuration for Windows Vista and higher (as far as I know, it works by default in Windows XP). And by the way, be prepared for the fact that this may not work for you - I have already encountered cases where, no matter how hard I tried, I could not configure ASIO to work simultaneously with everything else. This is due to the fact that the ASIO driver is not designed to work in such conditions .
ASIO BUFFER
What is a buffer? A buffer is the number of sound samples (fragments) that the sound card accumulates before sending the sound for processing or output. The signal delay directly depends on the size of the buffer. The latency size is calculated very simply - the buffer size is divided by the sampling frequency. For example, with a sampling rate of 44.1 KHz and a buffer size of 256 samples, we get 256/44100 = 5.8 milliseconds. However, do not forget that the buffer size regulates two quantities - that is, the size of the input and output buffer. Accordingly, with a buffer size of 256 samples and a sampling frequency of 44KHz, after 5.8 milliseconds the sound just arrives for processing by the processor - then it goes through processing and is sent to the output buffer, where 5.8 milliseconds also pass before the sound is sent to the output. That is, the total delay is about 12 milliseconds. Please note that these figures do not take into account processing delays. Different plugins can add their own delays (for example, some really cool limiter like PSP Xenon). It is better to disable such plugins while recording parts.
Many external sound cards have the so-called. "iron" monitoring. This function allows you to cut delays in half (due to the fact that only the audio intended for output gets into the buffer). However, it is worth remembering that the word “monitoring” means that the input signal is not converted in any way - that is, only “background” sound from the computer is output (phonogram, for example) and unprocessed sound received at the input (since for processing the sound must travel to the processor, which means it gets into the buffers with all the consequences). This kind of hardware monitoring is useful when recording live signals to minimize latency, but is not suitable for use with ampsims (due to the fact that ampsims by definition process the signal), so I would recommend turning off any monitoring in your cards unless you know exactly what the hell you need him for.
COMMON ASIO ISSUES
And finally, I’ll tell you about the most common problems that inexperienced users encounter. There will be a lot of bold text, but since users stubbornly refuse to read everything, I will highlight all the most important parts. If you have no sound, first check if you are listening to the correct input . Do not forget that the guitar is a mono instrument, and the sound goes only into one of the channels - it may happen that you are listening to the right one, and the guitar is in your left. Secondly, check that the correct inputs are specified in your program - it may well be that you are trying to listen to a microphone input while your guitar is connected to a line input. Third, check whether the input you need is plugged - that is, check the volume of the input signal and whether the input is turned on at all (this is especially true for ASIO4ALL users). Fourth, check if your driver is configured for the correct input (again, mostly for ASIO4ALL users).
If there is sound, but it’s not what you would like to hear, the following options are possible:
1) if there is a guitar sound, but it’s somehow “strange” (as if overloaded) - check the input level
2) if there is the sound of a guitar, but it is constantly accompanied by a characteristic “crack” - check the buffer size, sampling frequency - in general, everything that affects the delays, perhaps your processor simply cannot cope with the load. It would also be a good idea to check the input levels.
3) if instead of the sound of a guitar there is some noise (or whistling) - most likely the wrong recording input has been selected - go tinker with the mixer.
VERY IMPORTANT NOTICE FOR OWNERS OF EXTERNAL SOUND CARDS
If your levels are scaled, turn the knobs on the audio device , not the sliders in the mixer. Otherwise, an overloaded sound will come to your sound system, which will simply be made quieter.
Important notes regarding the operating system - stay away from various “builds” and “optimizers” of the operating system. If we disable unnecessary things, then we only disable services with our bare hands (via services.msc). No registry cleaners, no memory/startup optimizers, preferably no “mods” (new loading screens, etc.). It would be a good idea to completely disconnect the machine from the Internet and not have any firewalls or antiviruses (and of course check all flash drives before inserting them into the computer). Well, just in case, always have a backup.
APPLYING THE PREVIOUS PIECE OF WRITING TO ASIO4ALL
For those who have not yet understood : if you have native ASIO drivers for your audio device, you do not need to read everything that is written below, because it only relates to using the ASIO4ALL driver.
Since ASIO4ALL is a rather unusual driver by design, many people unfamiliar with all this digital mutiny will not be able to isolate the grain of truth and guidance for action from the previous few paragraphs, so now I will try to chew on the whole thing in order.
So, preparing the ASIO4ALL driver. To begin with, enable advanced mode (button with wrench) in the driver settings, this will help avoid many questions. From a logical point of view, everything that was written a few paragraphs above also applies to ASIO4ALL, so I will simply comment on the text.
In the context of ASIO4ALL, everything that was written a few paragraphs earlier means the following - since ASIO4ALL deals not directly with real hardware, but with its logical representation (“virtual” if you like), all its inputs and outputs are not on the sound card, but in a Windows mixer. And this is where the specificity of ASIO4ALL comes into force. The fact is that what you see in the ASIO4ALL settings dialog directly depends on your sound card - that is, there may (or may not be) a microphone input, line input, digital input, plus some other incomprehensible inputs and outputs. Some of them can be turned on, some can be turned off, and some can show an error (more on errors later). There may be only one of them, or there may be several - in general, what you see in yourself, with a considerable degree of probability, may differ from what I see in myself.
Attention! In connection with several questions that I received in a personal message, I will clarify that ASIO4ALL is not a replacement for standard drivers - it is an addition that works on the basis of standard drivers. That is, there is no need to demolish your own firewood.
In ASIO4ALL, you can only turn inputs on/off - of course, they are not actually turned off, but simply disappear from the list of inputs/outputs available to programs. In reality, all inputs and outputs are controlled from a screw mixer. The first thing you need to do is check if there is audio output through ASIO4ALL. To do this, you can launch any ASIO-dependent software (Guitar Rig, Amplitube, audio sequencers) and try to make them sound - for example, import some audio file and play it. If sound is output, then there is a 90% chance that everything will work for you.
Next, the most difficult and tricky part of the setup is the input. Despite its simplicity, this is exactly the place where many people stumble. So, first we need to connect the guitar to the computer. However, before we do this, I would like to note something regarding the built-in audio speakers. There is a widespread opinion that built-in audio, by definition, cannot be good, that its sound is always crap, that all recordings will sound terrible, and that in general Realtek is not Kommersant. From a purely technical point of view, this is not entirely true. The sound box does not in any way affect the quality of the audio data produced - in fact, the sound box has nothing to do with it at all, you can easily collect MP3 files from your mixes even without drivers for the sound box, it’s just not used there. Therefore, your sound system will not affect the quality of the output files in any way.
The main problem with built-in audio speakers lies elsewhere. Firstly, interference. Try to give a clean signal when there is a processor, memory and who knows what else around you, and all this creates interference, makes noise and interferes with the work in every possible way. If an external sound box stood next to the processor (and if, for example, you put it next to an old ray TV), it would produce exactly the same interference and distortion.
But the main problem of the built-in audio system is the inputs, which are not suitable for connecting a guitar there. The fact is that instrument inputs (which are found on amplifiers, preamplifiers, amps and external audio speakers) have a very high input impedance. The microphone input of the built-in audio speaker has negligible resistance. The line input has a higher impedance than the microphone input, but it is still not enough to adequately receive the signal from the guitar.
How to avoid these problems? Well, either buy an external audio speaker with normal resistance, or use something to equalize the resistance to the level of the linear input. How can this be achieved? There are many ways - connection through a lotion, connection through the output from the amp, through a DI box. However, in this case, additional distortion is introduced into the signal chain, which can affect the sound quality and processing capabilities (roughly speaking, if you play through a Marshall pre, everything will sound like Marshall). It is worth noting that even if you connect to the linear input directly (one end of the cord goes into the guitar, the other into the linear input through an adapter), the sound will still be more or less acceptable. In any case, regardless of your connection method, always connect your guitar to the line input, if you have one and it works.
After we have connected the guitar, we need to select a recording device. This is done again in a Windows mixer.
WINDOWS XP
Just to begin with, I suggest that owners of Realtek sound cards fuck off that Realtek software (so green, it still appears when you connect headphones) - a considerable part of the problems arise due to the fact that it is very smart. Therefore, I strongly recommend demolishing it and letting Windows deal with the sound on its own. Then you need to run the sndvol32 program (typed in the “Run…” dialog). This is the notorious Windows mixer. By default, it is enabled in playback mode (that is, it shows audio output devices). Here you need to make sure that all input devices (microphone, line input, etc.) are checked (that is, muted). Yes, you heard right - you need to plug the microphone and/or line input - that is, the connected guitar should not be heard unless Guitar Rig/Amplitube/other software is running.
Next, you need to put the mixer into recording mode (that is, make it show the audio input devices). You can directly launch the mixer in recording mode by typing "sndvol32 -R" in the "Run..." dialog, or you can get there through the menu in the upper left corner of the mixer. Once you're in the mixer in recording mode, you'll be presented with input devices - typically mic input, line input, and Stereo Mix. You need to check the box next to the device you are going to use (usually a line input). Do not close this window yet, you will need it later. Next, make sure that you see your input(s) in the ASIO4ALL dialog. Then it would be a good idea to turn again to some ASIO software and try to see if there is sound at the input. The easiest way to do this is to use Guitar Rig - just remember to mark both channels (L and R buttons at the top of the window). Once you're sure the sound is working (seeing how the levels move in response to your guitar playing), you can begin adjusting the input level. As a rule, an extremely low level is needed at the line input - literally one iota above zero. To adjust the level normally, you need to lower it to zero and adjust it using the up and down arrows on the keyboard - and carefully monitor the levels of the incoming sound. As soon as it starts to scale, we lower it by one division, and your levels are adjusted - you can play.
WINDOWS VISTA AND HIGHER
Thanks to the new sound kernel and general changes to the operating system, the sound setup in Windows Vista/7 is somewhat different from what it was in XP - but from a logical point of view, everything is the same. Again, a warning about the Realtek/any other software that came with the kit - there is a good chance that it will cause all sorts of problems, so it’s better to get rid of it and let Windows deal with the sound itself. Next, you should go to the audio settings. To do this, right-click on the speaker icon (usually located in the lower right corner of the screen) and select “Playback devices”. There we will see several devices, one of which is responsible for outputting sound to speakers/headphones. You need to select this device and click “Properties” (bottom, right button). In the dialog that opens, you need to go to the “additional” section and check both boxes. These checkboxes will allow the operating system to allocate this device for exclusive use to some processes, and give these processes higher priority. All this helps reduce delays. If you want audio playback to work in other programs while ASIO applications are running, do not check these two boxes!
Next, click OK, return to the window with playback devices and go to the recording devices section. There you also need to select the device that you are going to use for recording. One of the convenient features of Windows 7 is that you can pluck the strings on your guitar, and you will immediately see which device is receiving sound. You need to select this device as the default device (middle button) and also go to its properties. In the properties, you need to go to the “listening” section and make sure that the “listen to this device” checkbox is not checked. Next you need to go to the “additional” section and check both boxes again. Now click OK (to save everything) and open the properties again. It would also be a good idea to make sure that your input is in the list of inputs in ASIO4ALL. Next, launch some ASIO program (for example Guitar Rig) and see if there is an input signal (just don’t forget to mark both channels (L and R buttons at the top of the window)). If there is, great, display the dialog for setting up your input, select the “levels” section and adjust the level so that it does not scale when you play with all your might. That's it, you can play!
ERRORS IN ASIO4ALL
Several times people came to the forum with questions - why ASIO4ALL shows that their input is blocked or gives an error. The fact is that some programs (such as Skype, TeamSpeak, all sorts of voice changers, etc.) have the habit of completely taking over the audio for their use. If you have this error, turn off all third-party programs that you have running. If it doesn’t help, look in the services (services.msc), maybe you’ll find something there. In short, this is usually a sign that some smart-ass program has taken over the sound system.
If you have any additions or questions, please ask, this post will be supplemented in accordance with questions and wishes.
____________________________________________
[*] — I would like to note something regarding the sampling frequency. Sampling rate is not audio quality , it is just a measure of how many times per second the signal value is measured. There is such a thing as Niquist frequency, which tells us that the maximum frequency that a digital system can reproduce without the so-called. “aliasing” (replacing some frequencies with others), is two times less than its sampling frequency. Accordingly, since our hearing threshold is around 20 KHz, 44 KHz is quite sufficient for our purposes (44/2 = 22). Accordingly, a sampling rate of 88KHz is capable of reproducing sound at a frequency of 44KHz, but a) this sound is far beyond the threshold of audibility, let alone humans - not even bats will hear this sound, and b) no speaker will reproduce sound at such a frequency frequency, since everything above 22-24 KHz is usually stupidly cut off by the amplifier. Accordingly, we can say that, in principle, 44KHz is more than enough for recording. There is also an opinion that it is better to write with a sampling frequency of 88-96KHz. However, in my opinion, if the use of 96 KHz can still be justified by some reasonable arguments, then everything above 96 is already a show-off. Also, do not confuse the sampling frequency with the so-called. Oversampling (essentially an artificial increase in the sampling rate several times) - this process is used only for internal sound processing (in particular, Oversampling settings are available, for example, in Amplitube), and serves a very noble purpose - it gives smoother sound processing due to more detailed processing signal, and also makes it possible to avoid aliasing.
[**] - I would also like to say something about the depth of sound. Bit count is not audio quality , it's just dynamic range. Every 8 bits gives us 48dB of dynamic range. For most popular music, even 16 bits are much more than enough, and 24 bits are not even close to necessary. However, do not confuse the bit depth of the final recording, the bit depth of the recorded material, the bit depth of audio processing by an audio sequencer and the bit depth of the operating system - these are all completely different things. As a rule, the final product can easily get by with 16 bits, but it’s better to record in 24 bits (thanks to the laws of physics, no audio interface in the world can provide a dynamic range of more than 20 bits, so anything above 24 bits is a show-off). As for the processing bit depth, this is again a completely independent value - this is the bit depth with which the audio sequencer processes sound. Many modern audio sequencers process audio at 64-bit, which simply means that it is not possible to overload them. However, this does not mean that sequencers that process sound in 48- or even 32-bit are somehow worse in sound quality - this is completely false. And of course I would like to note that the bitness of your operating system has absolutely no connection with all this. No one will forbid you to record in 24 bits on a 32-bit operating system in an audio sequencer with 64-bit internal processing.
I won't record the sound
At the moment, built-in audio from laptops and motherboards is usually not very bad. However, we can make it a little better, both in terms of processor efficiency and sound quality.
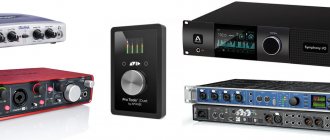
If you do not record external instruments or vocals, for which you need to buy a separate special audio interface, then in this case we offer the following audio card options :
- Audigy RX ~ $70
- Sound Blaster Z ~ $100
You might be a little surprised that we recommend a consumer sound card, but in this case the ASIO drivers are so excellent that they literally work wonders (there's also a very useful "What U Hear" recording option).
Sound Blaster Z has very wide compatibility with Windows, from version XP to Windows 10 64bit, while working stably with the widest range of software, as well as A/D, D/A converters.
Flaws:
Perhaps the only drawbacks are the poor reliability of the connectors and the lack of professional connection standards, such as XLR and balanced “line-in”. If you don't know what they are, then you probably don't need them.
I will be recording audio and/or using professional monitor speakers
If you want to record live instruments/vocals and use professional quality microphones (XLR connectors) and professional audio equipment (using balanced cables and connectors), then you should look closely at an external audio interface (possibly USB) to connect all your sources.
Expect to pay between $200 and $400 for something “good” depending on how many “inputs” (microphone, lines) you need. We recommend the following brands :
- Avid
- PreSonus
- Focusrite
- Roland Motu
- R.M.E.
- Alesis
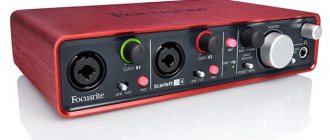
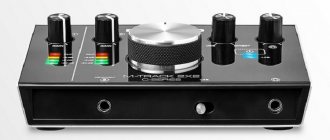
If your tasks are not too complex, then we can recommend the Focusrite 2i2 audio card or any other Focusrite card from the Scarlett line.
Description and features
Before continuing, we provide the most curious users with additional information on this issue. To do this, you just need to run the help file, which will be located in the same archive as the program itself. A detailed manual will open in Russian, from which you can get any information related to this topic.
Without delay, we’ll get to the heart of the matter and tell you how to download for free and then install this sound driver for our Ten.