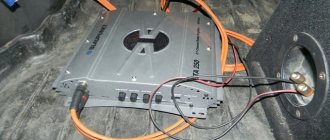
Using an RCA cable
If you have tried connecting speakers to a computer, then you can install a stereo amplifier quickly and correctly:
- Locate the sound card connectors on the back panel of the system unit. You will need a light green socket that accepts a 3.5mm plug.
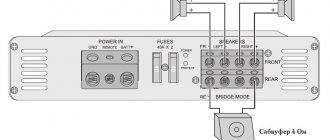
- Find the paired connectors labeled “AUX” on the rear panel of the stereo amplifier and connect the RCA cable to them. Observe the color ratio of the plugs and connectors (red plug to red connector).
- Turn on the amplifier and set the switch to AUX mode.
If you have an old amplifier from the pre-digital era, then to connect it you will need a special minijack - 5DIN adapter. You can find it on any radio market, or, as a last resort, solder it yourself using 5DIN and minijack connectors.
After turning on the computer and adjusting the volume, you can proceed to checking the quality of the sound broadcast, which is done by turning on music in any player.
How to connect an amplifier and speakers to a computer?
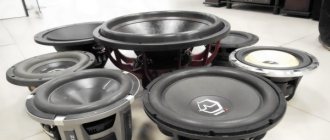
Budget speakers and amplifier for a computer
This article is about how you can use old Soviet acoustic speakers and amplifiers to output sound from a computer.
When I bought my first computer, it came with small plastic speakers. When I connected the TV to the computer, it seemed self-evident to connect an amplifier and speakers to it. And although this system has only two channels, it is fully justified as a budget solution. More details at https://oldoctober.com/ru/
Nowadays there are quite powerful and good acoustic systems on sale, but their price exceeds $100, or even $150. If you are interested in serious bass, then the price of the system can be much higher.
Old Soviet speaker systems can hardly compete with modern advanced Hi-End devices, but they can be used as a budget solution, especially if you already have them.
Well, if you still have similar high-class devices, then they can still compete with some Chinese crafts.
The only problem that arises when using these “dinosaurs” is connecting to a computer.
To connect, you will need a cable with a 3.5 mm jack or the same adapter and a low-frequency cable with a five-pin audio connector. https://oldoctober.com/ru/
Old amplifiers did not come with long cables for connecting the audio signal, and it is likely that you will have to make it yourself. You can read about how to solder a shielded cable to the plugs here. >>>
To make a cable, you will need the cable itself and two connectors - a jack and a five-pin audio connector. The cable itself must be shielded, and the wires connecting the left and right channels must each have their own shielding braid.
This is what the plugs we need look like:
Cable termination:
Audio connector pinout:
Scheme for connecting the plugs to each other:
Modern budget connectors sold on radio markets require the use of active flux when unsoldering. This is due to their nickel plating.
Such solderings should be washed with at least water so that residual active flux does not cause failure over time. (Rosin-based flux does not require rinsing.)
Now about connecting the amplifier to the computer itself. It is important!
It is best to connect the amplifier when both the computer and the amplifier are completely de-energized.
This is due to the fact that switching power supplies, which are used in computers, do not provide complete AC isolation between the case and the network. As a result, an alternating current voltage of up to 110 Volts may be present on the case of the system unit of an ungrounded computer. And although this current does not exceed 1 mA, it can damage a pre-amplifier that has a high input resistance.
Since when connecting a Jack plug, the left and right channels are first connected to the housing, this voltage can be applied to the high-impedance input of the connected amplifier. Which can lead to its failure.
The only condition for completely safe connection of an amplifier with a computer “on the go” is a reliable electrical connection between the computer case and the amplifier case BEFORE connecting the audio connector.
However, it is better to turn off everything.
Summary table of some Soviet power amplifiers:
| Model | Class | Power (Watt) | Frequency range (Hertz) | R load (Ohm) |
| Amphiton-002 | 0 | 2 X 25 | 20…25000 | 4 |
| Amfiton-35U-101S | 1 | 2 X 65 | 20…20000 | 4 |
| Amfiton-50-UM104S | 1 | 2 X 50 | 20…25000 | 4 |
| Amphiton-A1-01-2 | 1 | 2 X 20 | 20…20000 | 4 |
| Amphiton-A1-01-U | 0 | 2 X 50 | 20…30000 | 4 |
| Amfiton-U-002M | 0 | 2 X 35 | 20…25000 | 4 |
| Amphiton-UM-003 | 0 | 2 X 50/90 | 20…25000 | 8 |
| Arcturus-001 | 0 | 2 X 40 | 20…20000 | 4 |
| Arcturus-002 | 0 | 2 X 25 | 30…20000 | 4 |
| Arcturus-101 | 1 | 2 X 15 | 20…18000 | 4 |
| Bark-001 | 0 | 2 X 50/? | 20…25000 | 8/4 |
| Brig-001 | 0 | 2 X 50/? | 20…25000 | 8/4 |
| Helios-001 | 0 | 2 X 100 | 20…20000 | 4 |
| Corvette-200UM-088S | 0 | 2 X 180 | 20…20000 | 4 |
| Corvette-50U-068S | 0 | 2 X 60/80 | 10…70000 | 8/4 |
| Corvette-UM-048 | 0 | 2 X 100 | 20…25000 | 4 |
| Corvette-UM-068 | 0 | 2 X 60/80 | 10…70000 | 8/4 |
| Idol-101 | 1 | 2 X 35 | 20…25000 | 4 |
| Laspi-005 | 0 | 2 X 25 | 20…20000 | 8 |
| Laspi-005-1 | 0 | 2 X 40 | 20…25000 | 4 |
| Lorta-75U101 | 1 | 2 X 40 | 20…25000 | 4 |
| Nota-35U120 | 1 | 2 X 50 | 20…20000 | 4 |
| Odysseus-001 | 0 | 2 X 30 | 20…30000 | 4 |
| Odyssey-002 | 0 | 2 X 20 | 20…20000 | 4 |
| Orbita-UM002 | 0 | 2 X 50 | 20…25000 | 4 |
| Radio engineering-020 | 0 | 2 X 70 | 20…30000 | 4 |
| Radiotekhnika-U-120 | 1 | 2 X 15 | 20…20000 | 4 |
| Radiotekhnika-U-7111 | 0 | 2 X 50/100 | 10…30000 | 8/4 |
| Radiotekhnika-UM-7011 | 0 | 2 X 200 | 4…16000 | ? |
| Rostov-Don-101 | 1 | 4 X 16 | 63…18000 | 4 |
| Trembita-002 | 0 | 2 X 60 | 20…20000 | 4 |
| Phoenix-50U-008S | 0 | 2 X 50 | 20…25000 | 4 |
| Forum-180U-001 | 0 | 2 X 90 | 20…20000 | 4 |
| Forum-U-001 | 2 X 100 | 20…25000 | 4 | |
| Edektronika-T1-040 | 0 | 2 X 25 | 20…20000 | 4 |
| Edektronika-U-104 three-way | 1 | HF 2 X 25 | 5000…20000 | 8 |
| SCH 2 X 35 | 500…5000 | 4 | ||
| LF 2 X 35 | 20…500 | 4 | ||
| Edektronika-UK-043 | 0 | 2 X 20 | 20…20000 | 8 |
| Edektronika-UK-045 | 0 | 2 X 25 | 20…25000 | 8 |
| Electron-103 | 1 | 2 X 15 | 40…16000 | 4 |
| Electronics-D1-014 | 0 | 4 X 25 | 20…31500 | 4 |
| Electronics-T1-002 | 0 | 2 X 24 | 20…20000 | 4 |
| Estonia-35U-016 | 0 | 2 X 35 | 20…25000 | 4 |
| Jupiter quadra | 0 | 4 X 27 | 30…20000 | 8 |
Summary table of Soviet-made acoustic systems:
| Basic electroacoustic characteristics | ||||||||
| Model | Difficulty group | Type of low-frequency acoustic design | Type of emitters used | Reproducible frequency range, Hz… KHz | Level of characteristic sensitivity, dB | Maximum noise (nameplate) power, W | Volume, dm* | Weight, kg |
| 100AC-063 | Highest (zero) | Bass reflex | Electrodynamic | 25… 25,0 | 88 | 100 | 120 | 50 |
| 50AS-061M | Higher | Bass reflex | Electrodynamic | 25 …31,5 | 90 | 75 | 92 | 30 |
| 35AC-013 "S-70" | Higher | Closed case | Electrodynamic | 25… 25,0 | 86 | 70 | 50 | 25 |
| 35AC-0I2 “S-90”, (“S-90B”, “S-90D”, “S-100B”) | Higher | Bass reflex | Electrodynamic | 25… 25.0 | 85 (89) | 90(y"S-100B" ...100) | 75 | 23 |
| 50AC-022 | Higher | Bass reflex | Electrodynamic | 25… 25,0 | 86 | 80 | 83 | 24 |
| 75AC-001 | Higher | Bass reflex | Electrodynamic | 25 …25,0 | 91 | 100 | 92 | 30 |
| 35AC-029 | Higher | Passive radiator | Electrodynamic | 25 …35,0 | 86 | 130 (for 35AS-015…90) | 70 | 25 |
| (35AC-015) | ||||||||
| 35AC-021 | Higher | Bass reflex | Electrodynamic,LF-cellular | 25 …31,5 | 85 | 50 | 57 | 19,5 |
| 35ASDS-017 | Higher | Bass reflex | LF - electrodynamic, HF - electrostatic | 25… 25,0 | 84 | 50 | LF block 68 | 30 |
| 35AC-16 | Higher | Bass reflex | Electrodynamic | 25 …25,0 | 85 | 90 | 70 | 23,5 |
| 35AC-018 | Higher | Bass reflex | Electrodynamic | 25… 25,0 | 85 | 90 | 75 | 27 |
| 35AC-028 | Higher | Closed case | Electrodynamic, | 25… 25,0 | 86 | 90 | 99 | 30 |
| 25AC-027 | First | Bass reflex | HF - isodynamic | 25 …31,5 | 86 | 50 | 61 | 25 |
| 25AC-033 | First | Bass reflex | Electrodynamic, HF - isodynamic | 25 …31,5 | 86 | 50 | 61 | 25 |
| 25AC-131 | First | Closed case | LF - electrodynamic, HF - isodynamic | 40… 25,0 | 85,5 | 50 | 26 | 14,2 |
| 25AC-126 | First | Closed case | Electrodynamic | 40… 20,0 | 84 | 35 | 40 | 14 |
| "S-50B" | First | Bass reflex | Electrodynamic | 40… 20,0 | 85 | 50 | 46,6 | 15 |
| 25AC-132 | First | Closed case | Electrodynamic | 40… 25,0 | 84 | 35 | LF block 29 | 18 |
| 35AC-130 | First | Passive radiator | LF - electrodynamic, cellular, HF - isodynamic | 40… 25,0 | 84,5 | 50 | 26,2 | 12 |
| 15AC-109 (15AC-I10) | First | Bass reflex | Electrodynamic | 50 …20,0 | 84 | 25 | 15 | 6,8 |
| 25AC-109-I(2) | First | Bass reflex | Electrodynamic | 40… 25,0 | 84 | 35 | 36 | 15,6 |
| 15AC-111 | First | Bass reflex | Electrodynamic | 40… 25,0 | 88 | 35 | 42 | 11,2 |
| 25ASE-101 | First | Bass reflex | Electrostatic | 40… 20,0 | 84 | 35 | 28 | |
| 50AC-125 | First | Symmetrical load | Electrodynamic | LF blocks: 35.5…200 Hz MF-HF block: 160…22.4 kHz | 89 | 35 | LF block 99 | LF block 28 MF-HF block 3.8 |
| 15AC-213 | Second | Bass reflex | Electrodynamic | 63 …20,0 | 82 | 25 | 7,3 | 4,3 |
| 15AC-214 | Second | Closed case | Electrodynamic | 63 …18,0 | 85 | 25 | 10,3 | 7 |
| 15AC-216 | Second | Closed case | Electrodynamic; LF - cellular | 63… 25,0 | 89 | 15 | 19 | 7 |
| 10AC-213 | Second | Closed case | Electrodynamic | 63… 20,0 | 89 | 10 | 14 | 3,9 |
| 10AC-22I, 222 (“S-30”, S-30B”) | Second | Bass reflex | Electrodynamic | 50…18.0 (“S-30B” 50…20.0) | 84(y"S-30B" ...85) | 30 | 15 | 5,5 |
| 10AC-230 | Second | Bass reflex | Electrodynamic | 63… 20,0 | 88 | 25 | LF block 14.6 | 8,5 |
| 6AC-320 | Third | Bass reflex | Electrodynamic | 70… 16,0 | 86,5 | 10 | 8 | 2,8 |
| 15AC-3I5 | Third | Closed case | Electrodynamic | 63… 26,0 | 82 | 20 | 4,5 | 3 |
| "S-20B" | Third | Bass reflex | Electrodynamic | 63 …20,0 | 86 | 20 | 6 | 2,6 |
| 15AC-306 | Third | Closed case | Electrodynamic | 100…20,0 | 78 | 15 | 2,5 | 2 |
Amplifier and speaker circuits can be downloaded from here.
Below I will add links to the diagrams that were requested in the comments to make them easier to find, since the comments have already stretched over several pages.
Amfiton 35U-101C (Amfiton 35U-101C)
Lorta 75U-202S aka Amfiton 75U-202C (Lorta 75U-202C alias Amfiton 75U-202C)
Amfiton A1-01 (Amfiton A1-01)
Acoustic systems: 25AC-209, 25AC-209-1, 25AC-209-2
Amplifier Electronica 20-stereo (Electronica 20-stereo)
Amplifier Phoenix 50U-008C (Fenix 50U-008C)
Homemade amplifier and speakers for a computer, player or mobile phone from available parts. Part 1.
How to solder a plug to a shielded audio cable.
How to measure the output power of a low frequency amplifier.
How to properly connect and phase speakers.
Repairing headphones from a player on your own.
October 6, 2008 (23:20) in Audio equipment
oldoctober.com
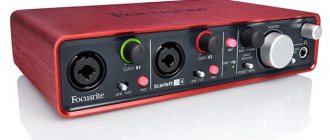
USB interface
Modern devices are equipped with a USB interface, so the process of connecting them becomes even simpler and more convenient. Such amplifiers consist of three elements:
- USB sound card.
- Digital-to-analog converter.
- Amplifier.
The procedure for installing such equipment will not raise any questions even for a person who has never tried to connect a sound card to a computer:
- Take the USB cable and install one end of it to the port on the back wall of the system unit.
- Look at the back of the amplifier and find the USB connector here. It may have a slightly different shape, as some devices have a mini-USB interface. Pay attention to the labels: the required slot will definitely be marked accordingly.
- Turn on both devices (computer and amplifier).
- Right-click on the speaker icon in the system tray and open the list of playback devices. Check that the stereo amplifier is displayed in the list of audio devices. Open its properties to make sure that it is detected by the system and works correctly.
- Right-click the speaker in the system tray again and open the mixer. Set application volume to moderate.
- Launch the player and play a song to check the sound quality.
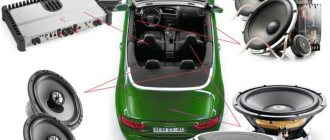
How to connect a laptop to an amplifier
To reproduce sound, the laptop has built-in speakers, which themselves sound good, but sometimes convey low-quality bass. When using it in stationary conditions, it is better to connect an external amplifier to improve sound quality. Connection methods may vary depending on the type of amplifier.
1
Make your own cable to connect your laptop to the amplifier. The first way to make it is to change the stereo cable. You will need: shielded wire (2 pcs.) and a mini-jack plug - a connector with a diameter of 3.5 mm. Solder the windings of both wires to the common pin of the connector. Connect the central core of one wire to the contact of the left channel, and the core of the second to the contact of the right channel.
2
To make the cable using the second method, you will need old stereo headphones from the player. Separate the sound emitters from them. Strip then tin the ends of the wires. When connecting the wires correctly, take into account the color of their braid: blue or green wire is the left channel, red is the right, colorless or yellow wires are common. Before connecting, check the cable for breaks; they must be eliminated.
3
If the amplifier's input plug is RCA, then two plugs of the same type are needed. Connect the yellow or white wires of the headphone cable or braided shielded wires to the end contacts of the plugs. Solder the green or blue wires from the headphones or the central core of one of the shielded conductors to the pin contact of one of the plugs. Solder the red wire from the headphones or the central core of the second shielded wire to the other plug to its pin contact.
4
The amplifier can be equipped with an input jack with five pins - DIN type (ONTs-VG). In this case, only one plug of the same type must be installed at the end of the cable. Connect the cable made by any method to the middle contact of the connector with common conductors. If the amplifier is old, manufactured before 1984, then attach the conductors corresponding to the channels to the connector pins to the left and right of the middle one, turning the solder towards you. In this case, the middle terminal looks up, and the notch on the block looks down. If the amplifier was released later, then solder the conductors corresponding to the right and left channels to the contacts located to the right of the middle contact.
5
Insulate all joints and soldering points. Disconnect the amplifier from the power source. Connect one end of the cable to the laptop port intended for headphones, and the other to the input of the amplifier with the worst sensitivity. Select the input using the switch. If the amplifier does not have a low sensitivity input, then you will have to add one resistor with a resistance of 10 kOhm in series with the cable conductors that correspond to the channels.
6
Set the volume on the amplifier and laptop to minimum, then connect the amplifier to power.
7
Launch any sound file on your laptop. Gradually increase the volume on the amplifier and laptop until you hear sound. Achieve a balance between volume and sound quality by adjusting the sound on both devices so that there is virtually no sound distortion.
Before connecting the amplifier to the laptop, both devices must be completely de-energized. Otherwise, the preamplifier may fail, since it has a high input impedance.
SovetClub.ru
Important Tips
Before turning on, set the volume control on your stereo amplifier to its minimum level. Once the equipment is connected and configured, gradually increase the volume to a moderate level. Doing this will help protect your hearing from unnecessary shock and will also prevent loud pops that could potentially damage your audio device.
If you only hear music from one speaker, check the RCA jacks on the back of your audio device. Most often, this problem occurs when the plugs are placed incorrectly in the sockets.
Another reason for sound distortion may be the excessive power of the signal coming from the computer. To reduce the volume settings, click the speaker icon in the system tray and adjust the audio settings.
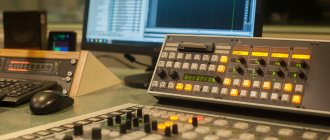
Connecting the Radiotehnika U-101-Stereo amplifier to a computer
2011-06-29 at 02:19
They gave me a radio equipment amplifier from 101 as a spare part. First, I wanted to check its performance. It turned out that it is absolutely working, but requires some modifications. The modernization plan is not big. Let's add a mini-jack to the input with a regular 3.5mm connector to connect to a computer or phone. Let's make a linear “AUX” input, so to speak. We will also supply “pedals” for connecting an acoustic system (AS). The first thing I did after disassembling was to take a vacuum cleaner cloth and clean it from dust, dirt and cockroaches (their dried bodies)). Afterwards the modernization itself began:
Actually the first problem discovered. The sound was "wheezing". I supplied sound bypassing the channel selector board, and everything worked as it should. I soldered the audio signal wires onto the tone and volume control board.
Naturally, the input board itself was removed as unnecessary
We also had to get rid of the influence of the protection board on the amplifier, which blocked the signal supply to the amplifier. From here the output signal goes to the speaker output itself and the sound level indicator. Here's a complete diagram of the amplifier itself to help you, just in case:
I also removed all the extra wires so they wouldn’t dangle.
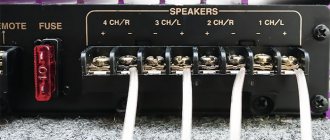
I installed “pedals” at the back to output sound to the speakers.
To connect the 101 radio amplifier to the network, the following wire worked perfectly:
Well, that seems to be all, if you have any questions, write, I will answer. Good luck with your amp!
Get a percentage back on purchases in online stores.
TehnoPage.ru
A little history
Radiotehnika S90 speakers were first released in the early eighties of the last century. They were produced by a plant located in Latvia, which became an additional incentive for citizens to buy them. Despite the rather high price, the speakers sold like hot cakes. People saved for a long time, did not eat enough, hiccupped them wherever possible. They even purchased used speaker systems. Just to decorate your closets with “Radio Engineering”.
Nowadays, many audiophiles are still chasing this speaker system. Radiotekhnika speakers are the dream of every connoisseur of high-quality sound. But now they can only be purchased on the secondary market. And it is far from a fact that their condition will be acceptable (the “dashing nineties” have an effect). Nevertheless, this speaker system can give odds to many modern speakers. And after appropriate modification it completely turns into Hi-End class acoustics. And this is a completely different level.
Sound quality
As mentioned above, Radiotekhnika speakers with standard components cannot boast of very clean and correct sound. But the quality is enough for not very demanding listeners. The acoustic system copes well with instrumental music (light rock, jazz, blues), and the electronic system also works well. But heavy metal and other subgenres of great and terrible metal - not so much. That is, the speakers reproduce it as expected, but the woofer jerks so much that it could easily break. Especially when listening to those groups that often abuse the cardan on the kick drum.
The classics also go well. This is probably the only genre that the Radiotehnika S90 copes with very well. All instruments sound crystal clear. Nothing gets ahead of itself. Even audiophiles may enjoy listening to classics on these speakers. However, it is impossible to call this speaker system a Hi-End item. To achieve this level, the speakers will have to be modified. As standard, this is an average but confident Hi-Fi. But the Soviet people didn’t need more.
Specifications
So let's get down to the hard numbers. Normal speaker power is 35 watts. But these beauties can easily give out 90. That is why they were called “the neighbors’ nightmare.” However, to fully exploit them, stereo amplifiers of appropriate power are required. Only then will this speaker system really sound. The frequency range starts at 20 hertz and ends at 25,000 hertz. This wide range allows the speakers to reproduce almost all instruments quite reliably. The frequency response is quite acceptable for an acoustic system of this level. You can't expect any miracles from her. But the sound is quite decent.
Now comes the fun part - the woofer. This is the legendary "Din 75 GD". The thing is, of course, good, but it does not produce perfectly reliable bass. If the low-frequency speaker is at least something, then the mid-frequency and low-frequency drivers, although they cope with their task, can not be called “kosher”. Ordinary paper bubbles. It would be much better to replace them with Kevlar or silk canopies during refurbishment. That's when the big speakers will start sounding. And it’s better to rewind the subwoofer, since in used speakers it often burns out due to “super-mega bass.”
Negative reviews from owners
However, there are also snobs who are not satisfied with the sound quality of this speaker system. They note insufficient definition of mid and high frequencies (and this is true). After so many years of use, the case is simply rattling. The subwoofer thumps out of place. But, comrades, any thing needs to be monitored and timely prevention carried out. This also applies to speakers. After the appropriate procedures, they will sound completely different. Dissatisfied S90 owners - take note!
Positive feedback from owners
Now let's look at the reviews about the Radiotehnika S90 speaker system. The amplifier is a separate topic, so we will not consider it here. So what will the owners say? Positive and negative reviews about these speakers go neck and neck. Competent audiophiles have long since finalized their “nineties” and therefore their reviews are laudatory panegyrics addressed to Soviet speakers. There is clear sound, clearly defined bass, wide range, versatility (for all genres) with some equalizer adjustment. Also an important advantage for many was the completely wooden body. And the power of these speakers is the talk of the town. Everyone noted this quality.