Come on, spin!
Save and read later -
Vinyl is a long-lived format that is not going to die. From the beginning of the CD revolution in the mid-eighties until the end of the last century, it was barely alive, but since then, slowly but surely, sales of vinyl records have been growing.
Which is great because it can produce fantastic sound if you put some effort into tuning. This is precisely its main feature in relation to other formats. Unlike digital media and devices, carelessness during installation can completely distort the sound.
There are many excellent plug-and-play models on the market, and you can order the setup of a more capricious player from the seller. But if you are not afraid to “get your hands dirty,” you can do a lot yourself and realize the full capabilities of your turntable.
So, whether you want to know all the secrets to better sound, from installing a tonearm to tuning a cartridge, or are preparing for Black Friday shopping, you will find everything you need in this review.
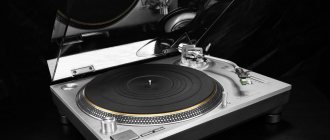
How do vinyl records work?
Take a close look at the disc. The spiral groove is filled with many tiny tubercles that drive the stylus of the pickup head (cartridge). Using an electromagnetic mechanism in its body, this movement is converted into an electrical signal.
The thin diamond tip of the needle must respond to bumps the size of a micron (one thousandth of a millimeter) - this is a very difficult task! Any vibrations coming from outside impair the cartridge’s ability to transfer information from the disk.
Disturbances can be caused by various reasons: it can be sound from speakers, footsteps transmitted on the floor, and even street traffic if the walls of the house do not protect against vibration caused by its movement. And this is not a joke at all.
Try an experiment: install the cartridge needle on the disk, but do not turn on the motor. Raise the volume of the amplifier and lightly tap the stand under the turntable and the turntable itself, and then walk near the place where it is installed. The booming sound you hear from the speakers is generated by the mechanical energy received by the turntable. It's awfully loud, isn't it?
When playing a vinyl disc, this “extra” energy is still transferred to the player, not only making it harder to operate, but also contributing to the sound. As a result, at best, its quality will decrease slightly; at worst, ominous feedback will completely ruin the whole thing.
That is why, if you dream of high-quality sound, first of all, take care of the reliability of the player installation.
We are engaged in suspension: caution comes first
The sound quality largely depends on the correct setting of the tonearm.
When adjusting the suspension of a vinyl record player, you must strictly follow the manufacturer's instructions (they are always included with the unit). If the instructions have been lost, it is best to contact a specialist. This will probably be the best decision. But if you know how to set up this type of equipment, then you can try to adjust the suspension yourself.
So, when you need to adjust the position of the chassis suspension springs, first of all, you need to free access to the lower part of the equipment. Lift the player and place it on 4 supports, which in this case can even be cans. When adjusting the springs, the position of the chassis and weight must be set as accurately as possible. To do this, as a rule, the movement of the suspension system is adjusted (down - up). Rotate the nut on one end of the spring or turn the entire spring, adjusting the horizontal position and height.
These actions must be carried out step by step, very carefully and slowly, checking the result after each change. Adjustment of the springs should be done until you reach the following result in the behavior of the suspension: over its entire surface, the support disk should be raised as evenly as possible above the body of your unit; the platform on which the tonearm is mounted must be in a horizontal position and must be in the same plane as the body of the vinyl player; By pressing on the center of gravity of the suspended part of the chassis of the equipment, you can cause it to oscillate freely (strictly down and up, rotational or lateral displacements are not allowed). If you constantly encounter errors and difficulties at at least one of the stages, then you should not continue to suffer. Take the player to a specialist.
Everything you need to know about the drive belt
Drive belts (if the player has one) are different: there are options that require talc treatment, others must remain slippery, others have a soft matte base, and other types. To properly install, adjust or clean this part, you should refer to the instructions, in which the manufacturer stipulates all the requirements for care methods that guarantee good belt adhesion and safety.
When working with a drive belt, always remember that the turntable must have everything necessary to play vinyl - mat, record, platter and clamp. Then installation or replacement of the belt will be successful.
Choosing a location for installation
The ideal stand for a turntable is completely horizontal, low-resonance and installed as far as possible from vibration sources, including speakers.
For a hard concrete floor, a floor stand is optimal; but on a suspended wooden floor it will enhance the impact of footsteps. In this case, we recommend a special wall shelf; it will completely eliminate the problem of steps. Just don't forget about reliable bolts and fasteners, otherwise the consequences may be too destructive.
Most turntables come with some form of insulation, from simple rubber feet to elaborate full suspension systems. The better it is, the less capricious the turntable is at the installation site. A model of any design always benefits from proper placement and solid support.
How to place the player
The player requires careful handling, which begins at the moment of its placement.
The player must be in a horizontal position. The optimal place will be a flat surface, isolated from external vibrations. This is necessary so that you don’t have to calibrate the device before each listening. Ideally, you need a separate shelf attached to the main wall.
Use a bubble level to level the platter and the four corners of the table. Next, you should open the instructions that came with your player model or its components. If there are methods other than those described below, follow them.
Player alignment
Once the ideal location for the turntable has been found, it needs to be leveled. You need to make sure that all its elements are strictly horizontal, then the needle can be accurately lowered into the groove. Use a spirit level to check.
Start with the table. If the post itself is horizontal, as it should be, the rest will not be a problem. But if for some reason you need tweaking, many turntables come with adjustable feet.
Now it's time to check the levelness of the platter. For most models, its position is fixed relative to the table - they are parallel to each other, unless something unexpected happens. Turntables with suspension allow you to slightly change their relative position.
Usually the alignment is done on site, but some models require a special device, which you will have to go to the seller to obtain.
Levels for vinyl in our catalog
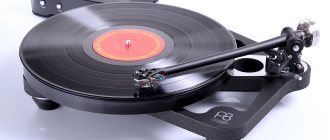
Player design
A turntable is an electromechanical device in which each component has its own function and affects the sound being reproduced. To correctly and accurately install the player, we will analyze its design. General diagram of the player:
- table (or chassis);
- support disk;
- drive unit;
- tonearm;
- pickup head.
The mechanism works like this: the support disk on the chassis rotates using a drive. A tonearm with a pickup head attached to the headshell (the so-called mounting platform for the cartridge) hangs over the disc. The pickup moves along the grooves of the record, the stylus reads the tracks and converts the vibrations into a signal that is sent to the built-in or external phono preamplifier, and from there to headphones or speakers.
The claims made by companies and sellers about fully pre-configured devices may be partly true, but should still be taken with a grain of salt. Manufacturers of entry-level plug and play audio equipment often try to free the user from setup. But don't forget that limited adjustment options mean that everything will sound mediocre too.
Adjusting downforce
During the heyday of vinyl, many people loved to change and compare turntables, tonearms and cartridges. Nothing prevents adherents of this approach from using it today, however, most models are already supplied with tonearms; all that remains is to select a cartridge for them. And in the most budget price segment, the pickup head is often included in the kit, which makes life even easier. However, even in this case one cannot do without some fine-tuning.
Setting up the tonearm and cartridge is usually done at the same time. If the cartridge is already installed on the tonearm, you only need to set the tracking force (by moving the counterweight at the rear end of the tonearm) and set the offset to compensate for the rolling force acting on the inside of the groove.
The cartridge manufacturer specifies a recommended range of tracking force values—typically 1.5 to 2.5 grams—and one basic value. This is a good place to start, but given the different technological tolerances of companies and the use of different tonearms, it is worth experimenting. However, try to stay within the recommended range.
If the sound seems flat and lifeless, then the tracking force is too high; a loose and aggressive sound indicates that its value is too low. If you go too light, the needle will jump from groove to groove, damaging them in the process. When in doubt, set the weight a little higher, no matter how strange it may seem. The stylus position in the groove will be more stable, introducing less distortion into the sound and causing less damage to the platter.
Most counterweights are marked; if you want to achieve maximum accuracy, buy special scales for the cartridge. They come in different varieties: expensive digital ones provide highly accurate measurements, but plastic ones do the job just fine and only cost a few pounds.
Stage 2: Configuring the cartridge
Each pickup head must undergo a pre-tuning procedure immediately before use. The area and angle of its contact with the tracks of the record, and, accordingly, the depth, saturation and frequency characteristics of the sound being recorded, depend on how the sound-producing needle is positioned.
Although needle alignment can be done using a regular ruler, a professional protractor is available for proper cartridge alignment. The optimal distance from the stylus to the pickup leg is 50 mm .
To adjust the stylus extension level, there are two mounting screws on the pickup head (depending on the specific model). By loosening them a little, you can move the carriage. With the needle at 50mm, secure the clamping screws.
The next important point is to correctly set the azimuth of the pickup head . For this procedure we will need a mirror .
- Place the mirror on the faceplate.
- Place the tonearm and lower the cartridge onto the mirror.
- Make sure that the head lies strictly perpendicular .
To adjust the azimuth, pay attention to the tonearm . At the base of the pickup head on the tonearm leg (in its lower part) there are mounting screws. Having loosened them, turn the cartridge so that the angle between the pickup stylus and the faceplate (mirror) is 90 degrees .
Azimuth adjustment is also provided in some models of pickup heads. In this case, there is no need to adjust the azimuth using the tonearm.
Adjusting tonearm height and cartridge orientation
Most mid- and high-end turntables allow you to adjust the tonearm height. Most often it is located parallel to the plane of the record, although this depends on the design concept of the manufacturer. In general, if the tonearm is set too high, the sound becomes bright and punchy when the volume increases; if the volume is set too low, the opposite is true.
If the cartridge is not installed in the tonearm, you will have to do a little work. Most models are secured with two bolts. Be careful: they are very small and easily lost. Some models have cage nuts built into the body to make the process easier.
After installing the cartridge into the tonearm, it is necessary to attach thin and fragile wires to it. For convenience, they are painted in different colors. There is very little space in the head housing, so you will need small long-nose pliers for installation. Be careful: it is not that difficult to damage the contacts and even the wires themselves.
Next, you need to align the cartridge. This is done using a template. You can buy an expensive metal one, but the simple cardboard one included in the package will do the job. It usually has two dots surrounded by parallel lines.
By placing the stylus at each of the two points, make sure that the pickup body is aligned with these lines. The process requires patience, but once the cartridge is installed properly, the stylus will be positioned at the correct angle to the platter groove, reducing distortion and record wear.
Take the time to set it up; a one degree error can significantly increase distortion.
Stage 1. Set the player level
After installing the vinyl player, you need to set the device to the optimal level . The faceplate (the disk on which the records are placed) must be positioned strictly horizontally. The main assistant in this will be a building level of the “cross” type, or an iPhone with the Compass , open on the Level tab. As an additional accessory, you can also find a specialized bubble level from manufacturers such as AudioTechnica, Clearaudio, Ortofon.
Adjustment can be made using the player's legs , twisting them in height. Please note that the level of deviation from the “ideal horizon” should be measured not only on the faceplate, but also at several points on the player deck itself:
As soon as the level shows a strictly horizontal position, we move on to the next stage.
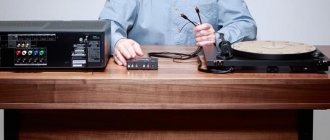
Choosing the Right Phono Preamplifier
By doing all of the above, you will ensure high-quality operation of the player; however, that's not all. One of the side effects of the move to digital music formats has been the lack of a phono stage on many amplifiers.
And even when this or that plug-and-play turntable has it, it is the last thing they think about during development, and you shouldn’t count on optimal sound quality.
What is a phono stage used for? It provides additional amplification (the signal from the cartridge can be a thousand times weaker than from a CD player) and evens out the tonal balance.
A vinyl disc is physically unable to convey the volume of low frequencies that musicians produce when recording, so the tonal balance of the signal taken from it is greatly shifted towards higher frequencies. During playback, the phono stage compensates for this flaw. The right choice of this accessory will allow your player to perform at its full potential; wrong - will give rise to suspicions that there is nothing special about vinyl.
Most models are capable of working with both moving magnet (MM) and moving coil (MC) cartridges. MM options are usually more affordable and produce a stronger signal.
With them, the phono stage has to spend less effort on sound amplification, and the shortcomings of the system are emphasized to a lesser extent.
Phono stages in our catalog
Tonearm setup
The tonearm is a high-precision mechanism that holds the pickup above the vinyl record and ensures smooth movement during playback.
It consists of several constituent elements: a tube, a leg or an arrow (this is the same thing) on one side is equipped with a headshell with a cartridge, on the reverse - a counterweight; a clip for fixation and a lever that allows you to smoothly lower and raise the handset.
A properly tuned tonearm will significantly improve the quality of the reproduced sound, as well as extend the life cycle of both the stylus and the vinyl. The tonearm is adjusted at the place where the player is planned to be used.
The task is to find the correct zero position of the tonearm. To do this, the tonearm must be balanced relative to the center of gravity, the mass of the part of the tonearm where the pickup head is located, and its reverse side, where the counterweight is located.
Use a measuring scale and set the tracking force according to the cartridge instructions. Please note that all manipulations are performed with a needle without a protective cap, so be careful not to damage the diamond.
If the tonearm is equipped with a counterweight with graduated downforce, then disable the anti-skating mechanism, bring the tube into a position parallel to the platter, and then set the jog wheel to zero. After this, fix the tonearm in the support and set the optimal tracking force that is recommended for your cartridge.
Depending on the specified downforce, set the anti-skating (a special system that prevents arbitrary movement of the pickup head under the influence of centrifugal force) to a value equal to the downforce.
What is the difference between MC and MM cartridges?
Any radio interface (in this case, between the cartridge and the phono preamplifier) requires both components to match certain electrical parameters, such as gain and impedance, in order to transmit information as completely as possible.
MM cartridges tend to have more uniform electrical characteristics, allowing manufacturers to design one circuit to suit almost everyone. For heads of the second type, everything is not so simple.
MC cartridges with a high output signal level are almost no different from their MM counterparts, while for heads with a low level it is many times less. To optimize the signal-to-noise ratio, the phono stage must provide variable gain. For most MM cartridges, 40 dB will be enough, MC models need from 50 to 70 dB.
Magnetic coils also vary in resistance, capacitance, and inductance, all three of which contribute to the overall impedance. Correctly selected, they ensure optimal connection of the cartridge and phono stage, as well as higher quality sound.
Most MC cartridge manufacturers specify acceptable values for these parameters; but as always, it's worth experimenting with.
It may turn out that in your system, a small change in one indicator will make the sound noticeably better. Typically, as resistance decreases, sound density increases and tonal expressiveness decreases. As a rule, its value is from 100 to 500 Ohms.
Capacitance ratings range from 200 picofarads to 1 nanofarads - the higher the value, the more the highest frequencies are filtered out. If your system is transparent enough, the changes will be clearly audible.
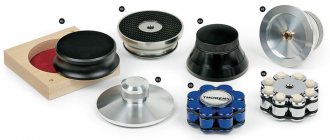
Needle care
To make records last longer, do not hesitate to regularly clean the stylus before and after playing. Maintenance does not require any special skills - just carefully walk the brush back and forth across the tip of the cartridge several times.
But be careful with accessories: no cotton wool or home-made solutions.
It is recommended to use original cleaning products from the same manufacturers as the needles themselves, or from companies that supply accessories.
Turntable setup
03 April 2009, 12:18
Article taken from www.audiophilia.com, author Andrew Chasin.
Turntable setup
“Special Conditions: The cartridge (phono head) tuning method described here is intended to be used as guidelines only and may not apply to all cartridges and tonearms. If the instructions below do not agree with those in your cartridge or tonearm manufacturer's manual (assuming you are lucky enough to have such instructions), then the manufacturer's recommendations should be followed. Moreover, Audiophilia is not responsible for any damage that may be caused during the setup process to your cartridge, tonearm, turntable, or anyone foolish enough to be near you while you are following these instructions."
With technical support for end-consumer turntables almost completely gone, audiophiles devoted to analog discs have no choice but to become adepts at fine-tuning cartridges themselves. And while properly tuning these delicate devices will undoubtedly require a great deal of both time and patience, the steps we've suggested will work even for the average audio enthusiast with a steady hand armed with the right tools.
The mission of a vinyl record player is to extract as faithfully as possible the very weak signal etched by the recording machine into the surface of the disc. If the stylus reproduces (in three dimensions) the path of the cutting head along a spiral groove, then the resulting signal must be an exact copy of what is engraved on the disk. Of course, there are many reasons why the exact geometry of the stylus in relation to the groove is not sufficient to guarantee accurate reproduction of the analog signal, such as the electromagnetic properties of the internal wiring of the head and the design of the magnetic circuit, and the shape of the stylus itself. Even with extreme care and patience during the tuning process, the best one can hope for is a good approximation of the original signal, but this approximation is in fact more than sufficient to produce outstanding musical results.
Brief overview of the tools.
Here is a short list of tools needed to install the phono cartridge (phono cartridge):
- Tweezers
- Toothpicks
- Non-magnetic screws, washers, and possibly nuts if the cartridge manufacturer did not supply them
- Small set of non-magnetic screwdrivers
- Needle pressure meter, type Sure SFG-2
- Coated magnifying glass with at least 10x magnification
- Measuring ruler type DB Systems DBP-10 (or any from your tonearm manufacturer)
- Test disc such as Hi-Fi News and Record Review's HFN-1.
1. Installation First, if your cartridge was sold with a protective cap that protects the stylus/holder system, please do not remove it during this step and the connection step below - this may prevent damage to the stylus holder on your $2000 head in a moment of careless loss of concentration!
Installing the cartridge begins with attaching the head housing to the mounting pad. The head mounting pads usually have either slots or holes through which screws (usually supplied with the head and necessarily non-magnetic) can be inserted through the head body. Slotted platforms allow the head to be slightly repositioned for precise adjustments. Fixed-hole pads (such as the venerable Rega RB300 and Naim Aro) assume that the geometry of the head being attached is already such that precise adjustment can be achieved with the existing holes. Unfortunately, tonearms whose pads contain fixed holes will not allow fine adjustment of the head. But they do make setting up compatible heads relatively simple (companies that make tonearms with pads for mounting heads through fixed holes usually have a specific head, or set of heads, in mind when designing, either their own or manufacturers whose products work well with this tonearm).
The holes in the head body for the screws that secure it to the pad are usually of two types: threaded or unthreaded. Threaded holes are more common because they eliminate the need for small, difficult-to-handle nuts that secure the head bolts to the head body. If your head is not threaded, then you will have to use nuts. If possible, insert the bolts from the bottom of the head with the nuts on top. Those lucky enough to have a threaded head can simply insert screws through the holder board into threaded holes in its housing (it's a good idea to use a washer between the head of each screw and the housing to prevent a tightened screw from ruining it). In any case, in the first stage the head screws should be tightened only lightly, so that it is secure, but at the same time it can be moved with moderate hand force. In the case of a fixed hole pad, the head screws may be fully tightened because no further adjustment is possible. Keep in mind that the head screws should be moderately tightened, but not overtightened. Over-tightening can deform the head body or, in the worst case, break it.
2. Wiring
Once the head is attached to the holder, connect the thin colored tonearm wires to the matching jacks on the back of the head housing. When connecting the tonearm to the cartridge connectors, always proceed with extreme caution - they are very fragile and can be damaged with surprisingly little force. Grab the small metal terminals of the tonearm wires with tweezers (never grab the wires themselves!) and attach the terminals to the head contacts. In some cases, you may need to gently push the terminals into place using a small screwdriver or toothpick. Just do not overdo it, otherwise you will get poor contact between the terminals and the clamps. If you push them too far, you can take them back out using tweezers.
3. Weight setting
(Please note that if the stylus is still covered by the protective cap at this point, remove it and do not put it back on until the installation process is complete.) In order to play vinyl records, the stylus must be in good contact with the walls of the record groove. The question is, how much force must be applied so that the needle does not lose contact with the wall of the groove, and at the same time does not get thrown off the track due to too much force? Manufacturers typically list the load force, or specified weight, for specific heads, usually as a range of recommended weights in grams. It is best to start the process of determining the optimal clamping force by setting the maximum value from this range. Contrary to popular legend, in reality a head with insufficient clamping force is more likely to damage the track than one that is clamped with the maximum force in the recommended range. This is because a head that is pressed too lightly can lose contact with the track in areas of high modulation, causing damage to the groove as the stylus starts to jump out of it.
There are currently several devices available to measure reduced weight. The Shure SFG-2 is the most popular scale due to its low price (about $30 from mail-order companies like Elusive Disc and Music Direct) and reasonable accuracy. The Shure scale is essentially a lever scale, with a needle located in a recessed groove on one side of the scale and a sliding counterweight on the other that moves along a calibrated scale to balance the head. Once complete equilibrium is achieved, the weight of the needle can be determined directly from the calibration scale. While the results on Shure balances are mostly approximate (results depend on the accuracy of the calibration scale as well as the user's ability to visually judge the degree of balance achieved), they are more than sufficient in most cases.
Shure claims the SFG-2 is accurate to 0.1 grams for a listed weight of less than 1.5 grams. For larger scales, the SFG-2 will likely measure within 0.2 grams. However, given that the listed weight can vary by a few tenths of a gram without damaging the track, the Shure scale should provide sufficient accuracy for most installations.
For those who want exceptional accuracy and convenience, the Winds ALM-01 Tonearm Load Meter has an accuracy of 0.01 grams. It costs about $800, being a coveted toy for vinylophiles with deep, non-empty pockets (a less expensive alternative is the ALM-1, accurate to 0.1 g. Costs about $500). Its competitor, which will soon be released by head manufacturer Clearaudio, will have a retail price of approximately $375, although its accuracy is not yet known.
The Winds scale is by far the simplest and most accurate scale I have ever had the pleasure of using. They are completely electronic and are thus not subject to the errors typical of SFG-2 type lever systems. Using them is very simple: the user must first zero the LCD display numbers using the built-in calibration wheel. The needle is then lowered onto the round sensor located on top. After a few seconds, during which the LCD gradually displays the exact value, the listed weight can be read off the display.
The only glitch I've seen with Winds is that they show very inaccurate results without any warning, which turns out to be when their 9 Volt battery is somewhat low. Considering their cost, the lack of a low battery indicator is simply unforgivable in light of the consequences for the needle holder from setting horribly incorrect reference weights.
Before attempting to establish the correct weight of a cartridge using a scale and/or test record, balance or in other words “hang” like a compass needle, the tonearm with the head attached. This gives a good starting point from which to begin increasing the reduced weight to the desired value. The position of the tonearm with the head is adjusted by moving the counterweight, either towards the head or away from it, until the reduced weight of the cartridge is about 0 grams, and the tonearm with the head and counterweight hangs in equilibrium. After this, it will be possible to accurately install it using scales similar to those previously described.
4. Tonearm Height: Part One
Once you have set the listed weight to the maximum value from the manufacturer's recommended range, it is time to adjust the height of the tonearm so that the tube is approximately parallel to the base. You will set the exact value later during the setup process, but if you roughly set it now, it will make later adjustments much easier. Most tonearms provide some height adjustment. Inexpensive tonearms, such as the Audioquest PT series, usually come with a set of screws that secure the horizontal arm tube, allowing a wide range of adjustments but making it difficult to return to previous settings. More expensive tonearms such as the Graham 2.0 and VPI JMW have a more sophisticated pitch adjustment mechanism that contains finely calibrated scales and allows you to easily return to previous settings. The Rega RB300 is one of the few tonearms in its class that does not have any height adjustment mechanism at all. However, you can place small spacers under the tonearm to raise it to your desired height.
At this stage, you should not pay too much attention to the height of the tonearm. You will have the pleasure of spending a ton of time on this subject later on.
5. Adjustment
Records are engraved on a vinyl record using a cutting head, the holder axis of which is located tangentially to the track being cut. The rotary tonearm, which moves the needle in an arc along the surface of the disk, only approximately reproduces the tangential path of the cutting head. Detailed work by Baerwald (1941) showed that the angular error of the needle can be minimized if the axis of the needle cantilever is located tangent to the groove at two points along the arc, namely, at two points located at a distance of 66 and 120.9 mm from center of the axis (keep in mind that these figures assume that the inner and outer radius of the groove are no less than 60.32 mm and no more than 146 mm respectively, which, fortunately, is the case for almost all records). These two points are usually called "null points" because they are where the zero horizontal angle of needle error is achieved. Commercially available rulers can be used to adjust the position of the cartridge so that it satisfies the tangentiality condition at the zero points.
Most modern rulers, such as the popular DB Systems DBP-10, are designed to perform two-point Bayerwald adjustments, although there are also rulers that use the less common single-point method (for example, the tuning template supplied with the VPI JMW tonearm). When adjusting the head tangentially using any tuning protractor, it is important to remember that you are trying to align the position of the stylus holder, i.e., the cantilever (and therefore itself), and not the head body. There is no guarantee that the holder is positioned perfectly in relation to the head body, so simply adjusting the head body will not necessarily produce the desired result. Moreover, many heads have non-parallel sides, which makes tangential adjustment along tangent lines drawn on the ruler almost impossible.
Most rulers are simply cardboard, plastic (or in some cases glass) scales on which are printed or engraved the zero points (or dot) and tangent lines by which the position of the head is to be established. The scale is placed on the axis of the turntable (using a hole in the template) and placed facing the disk. Then fine adjustments are made to the position of the head on the holder until the needle is parallel to the tangential lines of the scale at the zero points (point). This procedure can be made easier by using a small magnifying glass to allow a better view of the small, almost microscopic needle and its tiny holder, which are usually both in the shadow of the head housing. And this is the most unpleasant and time-consuming part of installing the cartridge. Small changes in the position of the needle to set it at the zero points invariably lead to its shift relative to the tangential lines - and vice versa. Leave the screws holding the head to the holder slightly loose so that you can make subtle adjustments to the position of the head.
Either way, the screws will hold the head in place while you check your progress using the scale. Once you have everything aligned, tighten the holder screws with one hand while securing the position of the head with the other. When you screw the head on, you need to hold it very firmly, since the turning force generated by tightening the screws will be directed to rotate the head relative to the holder, which will spoil the tangential position of the head.
And although it may sometimes seem that the installation of the head, which is now called only “this idiotic head” by “those idiotic lines and points” of “this idiotic ruler”, is almost impossible, console yourself with the thought that you still have some time left. then ten hours - and you can listen to an idiotic record.
6. Azimuth
Having adjusted the head and wiped the turntable from sweat, it’s time to set the azimuth of the needle, i.e. perpendicularity of the vertical axis of the needle to the plane of the plate. Without the correct azimuth setting, the output currents from the two head oscillators will be unequal (while reproducing a signal with equal amplitude in both channels), which will lead to imbalance across the channels and a shift in the sound stage to the left or right. However, keep in mind that not all tonearms allow azimuth changes, and the Rega RB300 is a prime example here. Other tonearms, such as those in the Audioquest PT family, allow coarse azimuth adjustment using an adjustment screw at the base of the headplate. More expensive tonearms, such as unipivot from Graham, VPI, Immedia, have sophisticated azimuth adjustment systems on board, using one or more weights, making setting and obtaining the correct azimuth a certain pleasure.
The azimuth can be roughly adjusted by looking at the end of the head housing while the needle is in the groove. See if it seems to you that one side of the body is closer to the surface of the record than the other? If so, use what the tonearm manufacturer provided to adjust the azimuth until the head body is parallel (to the extent of your vision) with the surface of the record. Once you make the rough adjustments by eye, you can make fine adjustments by measuring.
An optimally tuned azimuth is one that provides electrical signals of equal amplitude from the head's oscillators (i.e., its coils) when signals of equal amplitude are present in both recording channels. Thus, if we play a recording with the same signals on both channels (for example, a monaural recording), but connect one channel out of phase, then the precise azimuth setting is one that will give zero (or nearly zero) output when the two channels are summed ( Remember that summing two signals, one of which is out of phase with the other, results in no signal due to attenuating interference).
This "out of phase" or "null" test can be performed in several ways. If you have a test disc, for example from Hi Fi News and Record Review (which I highly recommend), then you can simply use the azimuth test track. This test track contains a mono signal where the channels are recorded in antiphase. If your preamp has a mono button (which sums the left and right channels), you can simply play a test track, use the mono button, and adjust the azimuth of the head until you hear minimal signal in the speakers.
If there is no test recording with a track “out of phase,” you can do this: play a mono recording through a phase-inverting production cable. To make it, buy a cheap cable from the nearest radio store, take one wire from a stereo pair and cut it in half, and slightly expose the copper wires from the insulation. Then solder the bitten wire “diagonally” - the positive wire to the negative wire and vice versa. Wrap the result with electrical tape and you will have a cable that inverts the phase of one channel. Connect this cable to the jack on your tonearm and the other end of the cable to the phono input or phono input of your preamp. Play a mono recording (I used the DCC reissue of Sonny Rollins' Tenor Madness album) and switch your preamp to mono. Now you can adjust the azimuth of the head until your speakers give zero (or at least minimal) signal.
If your preamp doesn't support mono switching (a feature that's kind of dying out lately, and I have to thank Audible Illusions for thinking of including it in their Modulus 3A), then you can communicate with the azimuth of your head using either an oscilloscope (if you have one) or an electronic millivoltmeter, or apply the rough eye test described above.
7. Pressure Weight: Revisited
Once the pressure weight has been roughly adjusted and the head position has been adjusted, a test recording such as the excellent one from Hi Fi News and Record Review can be used to optimize the tuning. In particular, the head's ability to pass difficult passages can be tuned using multiple tracks of a test disc. Test tracks consist of a test tone (300Hz on both channels at +15dB) equally distributed across the surface of the head to measure how well the tonearm/cartridge system handles tracking the groove. At the maximum clamping weight within the manufacturer's recommended range, the sounds produced should be clear, without any audible sign of distortion. Keep in mind that distortion in only one channel is more likely the result of an incorrect antiskate setting (see below) than a problem with the cartridge's clamping weight, keeping in mind, however, that the antiskating must be changed as the clamping weight changes (only for some heads in general anti-skating is not used). If the signal is stable in one channel, but not in another, then you should not increase the clamping weight in an attempt to compensate for the difference. Most likely, this problem needs to be solved by setting up an anti-skating system.
Now you can gradually reduce the clamping weight until it reaches the minimum value at which playing the test recording sounds good. The resulting weight is the happy medium between the weight of good grip and acceptable record wear. Of course, changes in the clamping weight change the deflection of the cantilever relative to the plane of the plate. (You will soon realize that when setting up a cartridge, changing any parameter affects all other parameters.) Lock the head position and recheck the clamping weight and azimuth before you get too tired of it. If the old CD player in the corner suddenly starts to look damn attractive to you, don’t despair, you can definitely do it!
8. Anti-Skate
The last critical setting parameter that can be optimized using a test recording is anti-skate. The so-called rolling force is the vector of force that drives the tonearm towards the center of the record when the head is angled to the arm tube (most modern tonearms use angled headplates in an attempt to minimize the previously described mismatched cutter and stylus path shapes). Unless this force is balanced, it can contribute to uneven and premature wear of the groove and stylus walls and compromise the proper spatial relationship between the cartridge coils and the magnet. Unfortunately, the rolling force gradually changes along the recording surface, and thus is difficult to overcome completely. Most tonearms have a spring device that directs the force in the opposite direction of the rolling force and is about the same in magnitude. Some tonearm designers, especially VPI's Harry Weisfeld, are wary of such anti-skating devices, arguing that they are sources of vibration and cannot accurately and uniformly counteract sliding forces across the entire recording surface. Bob Graham, designer of the Graham 2.0 unipivot tonearm, disagrees. Its tonearm contains a unique lever-weight system that produces a variable force, which, according to Graham, actually varies in the direct direction of the sliding force.
Using the anti-skating mechanism on your tonearm, adjust the anti-skating until the Bias Setting track on Side 1 of the Hi Fi News or Record Review test disc produces a clean, undistorted signal on both channels. Distortion in the right channel indicates that more anti-skid force is needed, distortion in the left indicates less.
9. Tonearm height: part two
You now have a cartridge tuned to minimize track error across the recording surface, and the head azimuth is adjusted so that the stylus is perpendicular to the recording surface. The last adjustment we can make when trying to get the stylus exactly along the path of the groove is to set the angle between the plane passing through the stylus and intersecting the groove and the surface of the record as close as possible to the angle formed by the plane passing through the recorder cutter with the plane of the disc , on which the recording was made. VTA (vertical tracking angle) is changed by adjusting the height of the tonearm support relative to the base. This angle increases as the height of the tonearm increases, and decreases as the height decreases. Most records are engraved (written) at 22°, although low angles, up to 18°, or high angles, up to 24°, are not uncommon.
Setting the head's VTA angle is best started by aligning the tonearm tube parallel to the head surface (if you followed my previous advice, you will have already done this before aligning the head). If the cartridge manufacturer was smart enough to release the cantilever at an angle of about 22° to the horizontal, then placing the tonearm tube parallel to the recording surface should set the VTA to about 22° - just fine for most disc playback. Unfortunately, cantilevers are not always manufactured at an exact 22° angle, so placing the tonearm tube parallel to the surface may not result in an accurate alignment. Since there is no accepted way to measure the vertical angle of a cartridge, the best thing to do is experiment with different settings to see what sounds best. If you like the sound you get with a tube parallel to the disk, then leave everything as is and enjoy listening. If you feel like experimenting with different VTA angle settings, be aware that setting the angle too high will result in a sharper treble and a bright, oversaturated presentation. Conversely, setting the angle too low results in a sharpening of the low frequencies and a droning, sluggish sound.
You can spend many days of your fast-paced life fine-tuning the vertical angle of your cartridge. Ultimately it also depends on the thickness of the plate. It may be worth investing a significant amount of time in finding the golden vertical angle that will suit one record in your collection, but don't bother with it. Life is short and there is still too much music to listen to.
10. Finishing touches
Congratulations! You're still alive! Go back and make sure that the tracking force, head position, and azimuth settings haven't gotten lost in the process of making other improvements. Pay special attention to the azimuth, as adjusting the arm height will likely have a slight effect on this parameter (although it is difficult to navigate in three dimensions, raising the arm height with an offset head will affect the perpendicularity of the stylus to the groove).
Continue listening to the result and making minimal adjustments until you are satisfied with the result. Then put away the pressure gauge and ruler, put away the test discs and return to your favorite records. I think you will find that your efforts have paid off.