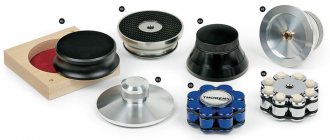
The tonearm is one of the most important elements of the player, along with the pickup head and chassis (table). It is impossible to overestimate the influence of the tonearm on the sound of the vinyl path, because it is the one that holds the pickup head above the surface of the record and provides it with the correct “operating conditions”.
There are a number of requirements for tonearms: they must be rigid, not have their own resonances, and not allow resonances and vibrations from the outside to reach the pickup. They must be sensitive enough to record irregularities, make vertical movements around the irregularities of the records caused by warping, and also monitor the audio track and the eccentricity of the record, without interfering with the pickup doing its job.
Despite the apparent simplicity of its function, the tonearm is a very complex and precise mechanism. At the moment, there are many designs of tonearms from the simplest to the very exotic, but even such a wide variety of tonearms can be easily divided into two main groups: lever and tangential.
The first group includes tonearms, the moving part of which (the tube with the head attached to the shell) moves relative to a fixed axis (the base of the tonearm, mounted on the player’s chassis). Thus, the pickup head moves freely along the surface of the record along the radius. It is the radial movement that is the main disadvantage of lever tonearms, which ultimately led to the emergence of tangential models.
The fact is that ideally, for the most correct and accurate reproduction of a phonogram recorded on a vinyl record, the pickup needle, when reading sound information, should be in exactly the same position relative to the audio track in which the recorder cutter was located, recording on the studio varnish master disk. This is where the main contradiction lies: the recorder cutter moves strictly along the radius, and its surface is always perpendicular to the surface of the audio track. Lever tonearms move the pickup heads not along a radius, but along an arc, the radius of which is equal to the distance from the axis of rotation of the tonearm to the pickup stylus. Thus, when the stylus moves along the surface of the record from the outer edge to the inner, the plane of contact of the stylus with the track changes its position, deviating from the perpendicular - this is called the tracking error. One way to combat tracking error is to increase the length of the tonearm, and at the same time increase the radius along which the pickup moves along the surface of the record. The larger the radius, the smaller the tracking error. At the moment, the largest of the common ones are tonearms with a long tube of 12 inches (longer ones are also found, but this is rare).
It is worth noting right away that as the length of the tonearm increases, the vertical inertia increases, which is also not very good (it is more difficult for the tonearm to quickly respond to record irregularities). It turns out we need to look for a compromise. The second and most common method is to use a horizontal correction angle (approximately 25 degrees towards the turntable spindle). This angle is obtained in one of two ways: either the head itself is installed at an angle in the shell, or the tonearm tube is bent at this angle. Despite the fact that the most ideal option would be to simultaneously use the horizontal correction angle and tonearms with the maximum length of the tube, in practice, 12-inch tonearms are used very rarely, giving way to the most common 9-inch ones.
Despite the common principle of operation of lever tonearms, they are still significantly different from each other. The main differences may be:
- Tonearm material. Basically, we are talking about the material of the tube, which can be metals and alloys, carbon, wood, polymers, etc. Each manufacturer explains in its own way the reasons for using a particular material, but in general, everyone strives to reduce vibrations and resonances, increasing the rigidity and lightness of the tonearm.
- The presence of a removable shell. The shell is a mounting platform at the end of the tonearm, designed to mount the pickup head and connect it with conductors to the tonearm. The shell can be removable (replaceable) or non-removable (integral with the tonearm tube). The removable shell allows you to quickly rearrange the pickup heads with minimal tuning steps. This is true if you have several heads that sound different on different recordings, and plan to sometimes change them during listening, a removable shell greatly simplifies this process.
- Wiring material inside the tonearm. The conductors inside the tonearm can be made of different materials: copper, silver or other conductive materials. The conductor material, its purity and other characteristics have a significant impact on the sound quality.
- Availability of damping materials. Damping materials are designed to quickly dampen existing resonances and prevent the entry of new ones. As a rule, damping materials are used in the most advanced models of tonearms and are usually placed inside the tube (for example, viscous silicone liquid inside the top models of SME Ltd tonearms), in some cases they dampen the base of the tonearm.
- Differences in the design of the rotating mechanism, which ensures free movement of the tonearm. This part of the tonearm shows all the creativity of the developers, because this is where the most exotic solutions can be found. The most common solutions are the use of high-precision bearings; the main and overwhelming majority of lever tonearms are based on this principle.
You can also find so-called “single support tonearms”. A single-support tonearm consists of two independent parts: a base mounted on the turntable chassis, and a tonearm tube. The essence of the design is simple: a cone with a needle at the end sticks out from the base; an inverted “bowl” is attached to the tonearm tube, which is put on the cone of the tonearm base. Thus, the tonearm tube, cartridge head and counterweight balance on the thin tip of a needle protruding from the base of the tonearm and being the only point connecting the two independent parts.
The advantage of this design may be the presence of only a tiny point of contact, allowing the tonearm to move in any direction without the slightest resistance and track any irregularities in the record. The disadvantages of the design follow from the advantages. Ideally, the tonearm should easily and naturally move the head up/down (compensating for warping and unevenness of the record) and right/left (as the stylus moves from the edge of the record to the center when playing it). In addition to these directions, a single-support tonearm allows the head to tilt to the right/left relative to the axis of the tonearm tube (short-term disturbances in azimuth, when the head tilts slightly to the right or left). Basically, this can manifest itself at the very beginning of playback, when the needle falls on the players, although similar situations cannot be excluded in the case of increased warping of the record. One of the most exotic designs seemed to me to be that offered by the Well Tempered Lab company. The essence of the design: the tonearm tube is directly connected to a real golf ball, this entire structure, in turn, is suspended on a fishing line to a bracket, and the lower part of the ball is placed in a bowl with thick and very viscous silicone.
The fishing line ensures the stability of the vertical position of the tonearm, and the silicone dampens all possible resonances, ensures smooth movements of the tonearm up/down and right/left, and also acts as a micro-lift, smoothly lowering the stylus onto the record. In addition to these options, there are many different solutions and each of them has its own justification.
Now we make a smooth transition to tangential structures.
The tangential tonearm is considered the most advanced in terms of “correct reproduction” of records. In this case, what is primarily meant is not the sound quality (a poorly tuned tangential tonearm can sound worse than a well-tuned lever tonearm), but the absence of that same tracking error that we mentioned earlier. The position of the pickup needle when playing records is exactly the same as that of the recorder cutter when recording a master disc.
Despite their technical excellence, tangential tonearms are not widely used due to the complexity of the design and very high cost. Currently, tangential tonearms are used mainly in turntables in the upper price category. There are also more budget models of tangential tonearms, but they are very imperfect, since they use ineffective systems that ensure the longitudinal movement of the tonearm when playing records. In particular, such imperfect models may not be accurate enough in tracking the disturbed eccentricity of the record, which can lead to periodic displacement of the stylus to one side of the sound groove and thereby disrupt the balance of the channels. Expensive models of tangential tonearms often use very complex systems for ensuring the movement of the tonearm. In particular, one of these systems is the presence of a compressor that supplies compressed air into the gap between the tonearm and the guide along which it moves.
Thus, there is no mechanical connection at all, and the tonearm floats in the air flow. It sounds nice, but the design is very complex and expensive. As simpler options, you can find bearings, rollers, etc., but this is a compromise. My opinion is simple - if you think about a tangential tonearm, then you need to take a high-quality, expensive mechanism. If we compare tangential and lever tonearms in the same price category, then lever ones will most likely be better (it turns out to be a comparison of a compromise version of a tangential tonearm and a lever one brought to perfection).
The tangential tonearm consists of a base on two supports mounted on the chassis of the player, between which there are guides along which the tonearm tube with the pickup head mounted on it moves. In this way, not just one part of the tonearm moves, but the entire tonearm. Another advantage of tangential tonearms is the absence of rolling force inherent in lever structures, which means that it does not need to be adjusted, and the balance of the channels will always be the same. Another advantage is the significantly lower vertical inertia compared to lever tonearms, but the horizontal inertia, on the contrary, is higher. The tangential tonearm does not have an axis of rotation, which equates its effective mass to the total mass of the tonearm, making it quite large. The large effective mass of the tonearm forces a more careful approach to the selection of the pickup head, in particular, paying special attention to the flexibility parameter of the needle holder suspension.
So which is better? There is no clear answer to this question, and everyone has to decide for themselves. The setup of the player will play a very important role; if it is of high quality, then a good lever tonearm will be enough to spare. If you don’t want to put up with compromises, and “money is burning your pocket,” then tangential tonearms await you.
Author: Maxim Shmelkov
COMPLIANCE AND TONEARM WEIGHT
I have assembled more turntables for different clients, and very often I had to explain that when trying to decide on a turntable, people follow the wrong algorithm.
As a rule, when deciding to listen to vinyl, a person first chooses a turntable, then looks at what kind of tonearm it has, and then thinks about which cartridge to install on this tonearm. Not only is this algorithm incorrect, but many people are too lazy to delve into the topic of combining tonearms and cartridges and get an absolutely depressing result.
I once bought a Micro DDX-1000 player through Avito for a customer from St. Petersburg. The owner of the turntable for sale turned out to be a pleasant person, and a whole collection of turntables, knowledge of a huge number of cartridge models and a serious, at first glance, system suggested passion and experience. I had with me several test records and a recorder with digitizations of the same records made on reference paths. I asked to turn on the turntable for sale and played a test track from Judas Priest's 1978 album Stained Class. The record sounded dull and muffled .
- Why such a dull sound? – I was surprised.
- So this is how your record was recorded. “All the rock records of the seventies were written like this,” the owner said with conviction.
“This is absolutely not true, and I can prove it right now,” I said, connected the recorder and played a recording of the same song made on a different path .
You should have seen the amazement of the owner of the turntable when the digitization from the recorder on the same system played an order of magnitude better than the player, immediately dispelling the myth about the “deafness of records of the seventies.” The owner remembered the VTA angle, began to adjust it, tried to clean the stylus and change the downforce - this did not have any positive effect on the sound. The turntable sounded as dull and lifeless as before.
I understood that all I needed from the player was proper, uniform rotation, and I could deal with the sound later, so I bought the Micra without talking, which caused a feeling of noticeable relief in the owner. It was clear that he was in a slight panic, completely not understanding why the digital recorder played better than a good turntable with an expensive two-block corrector.
Arriving home, I calmly sorted out the purchase and found the reason for the dull sound. This is a textbook case, and I started the article with it to immediately show the importance of following the basic rules of vinyl.
Any vinyl professional should know and understand an important term - compliance. Each phono cartridge has a specific value of dynamic compliance, or “compliance,” which is measured in micrometers per millinewton. The value of dynamic compliance (compliance) is usually indicated in the technical characteristics of the cartridge. Please note that there is also a static compliance, but we do not need it. We need dynamic.
An important point that must be taken into account immediately! You need to know at what frequency the dynamic compliance for the cartridge was measured - 100 Hz or 10 Hz. In past years, it was common practice for cartridges made in Japan to be measured at 100 Hz, and for European and American cartridges to be measured at 10 Hz. To convert a measurement taken at 100 Hz to units taken at 10 Hz, a factor of 1.8 is applied. For example, the compliance of the Denon DL 103 cartridge, made in Japan, is 5 X 10 µm/mN. To get the value accepted for Europe and the USA, you need to multiply 5 by 1.8 - we get 9 and this is exactly the value that will need to be substituted into the calculator, which will be discussed below, since it was developed in England.
Second important point! Some Japanese manufacturers decided that if they sell a lot of cartridges to Europe and the USA, then they need to measure at 10 Hz, and they began to measure compliance in this way. For example, at 10 Hz the compliance of cartridges and
Both pickups are low compliance cartridges - their compliance is 10 x 10 µm/mN at 10 Hz. Other Japanese manufacturers have remained true to tradition and continue to make measurements at 100 Hz - for example and . Moreover, American manufacturers began to actively invite the Japanese to cooperate, and indicate the value of compliance... at 100 Hz. All this often leads to confusion and unpleasant incidents when high-flex cartridges are mistaken for low-flex cartridges and placed on heavy tonearms. We will talk about what results this leads to soon, but first...
Third important point! The effective mass of the tonearm, which we will need for the calculator, cannot always be found out. For standardly installed tonearms, it is almost never indicated in the instructions for the player, but for tonearms that are installed optionally, the effective mass for the standard headshell is indicated. As an example, I will give the well-known SME tonearm. It comes complete with a very recognizable lattice shell - a signature feature of the company. The mass of this shell is about six grams, and the indicated effective mass of the classic SME 3009 is 9-12 grams, depending on the year of manufacture.
SME 3009 S2 Improved with standard headset. Eff. weight 9.5 g.
What will happen if instead of this shell you put, for example, a wooden Yamamoto HS1 shell weighing 11 grams? The effective mass of the tonearm will increase, but not by five grams, as you might think, subtracting the difference in the mass of the lighter shell from the mass of the heavier one. The effective mass of the tonearm is the inertial mass, which is calculated using a complex formula for adding all the masses of its parts. Empirically, we can assume that with an increase in the mass of the shell by five grams, the effective mass of the tonearm will increase by about two grams.
Now, keeping these three important points in mind, let's move on to the main thing - an explanation of why this data is needed and what to do with it.
Most mid-budget cartridges have average compliance, and most stock tonearms on vintage and modern turntables have average effective mass. This means that in 60% of cases, “any” cartridge will fit “any” tonearm, and for this reason, many music lovers do not even think that they can do something wrong.
The trap lies in wait for those 40% who take a step to the side - for example, they buy a Yamaha turntable with a heavy tonearm installed as standard, install a heavy SAEC tonearm, having read that it is “good”, try the famous ADC MM cartridges with high compliance, without having ultra-light ones tonearms, or finally decide that they have “grown up” and it’s time to switch to long 12-inch tonearms, forgetting to take into account that they have a higher effective mass.
To avoid problems, read this article carefully!
So, what is the effective mass of the tonearm and how does it compare with the compliance of the cartridge. The effective mass of the tonearm has nothing to do with downforce! Tracking force is the amount of mass with which the cartridge stylus presses on the surface of the record. Effective mass is, roughly speaking, the weight of the tonearm tube from the mounting axis to the cartridge. In fact, what is more complicated is the value of the inertial mass reduced to the tip of the needle, which is calculated from the masses of all moving parts, but for simplicity, consider that this is just the weight of the tube.
The stylus and tonearm form a single oscillatory system that enters into a certain resonance. Let's imagine that there is a bucket suspended at the end of a long bar and the whole thing is swaying in the wind. If in one case the plank is made of a board, in another of bamboo, and in the third of a steel beam, then these systems will sway in the wind differently. The stylus/cartridge/tonearm systems also behave differently depending on the compliance and weight of the tonearm tube. The resonant vibrations that such a system undergoes are called the resonant frequency, and ideally this frequency should be in the range of 8-11Hz.
The effective mass, as a rule, is indicated in the characteristics of top-end tonearms, which are sold optionally (separately), but is never indicated for standard tonearms of finished players. Anyone who has extensive experience in tuning various tonearms can empirically determine the effective mass of any tonearm with high accuracy. For those who do not have such experience, hiendmusic lists a few basic signs that can help you determine what type of tonearm you are dealing with.
If the turntable has a straight, thin tonearm, the tube of which is made of aluminum, carbon, magnesium alloy or plastic, and the counterweight is not heavy - less than 50-60 grams - you are dealing with a light tonearm with an effective weight of 7-9 grams. A lightweight tonearm can be S-shaped, but they are almost never found in the basic configuration of turntables. A list of popular turntables with lightweight standard tonearms is given in the article CHOOSING THE IDEAL VINYL PLAYER .
If the tonearm parts look massive, the tube (straight or S-shaped) is made of steel or a composite alloy, and the counterweight weighs 60 grams or more, then you most likely have a heavy tonearm with an effective weight of 17-20 grams. Even if you just swing the tube on your fingers, the sensations will be very “weighty”.
Nine-inch carbon and aluminum tonearms with 50-60 gram counterweights are typically rated as mid-range effective weight tonearms of 12-14 grams. The effective weight of 12-inch tonearms is 2-3 grams higher than that of similar short ones.
Cartridges with high compliance of 25 and above when measured at 10 Hz should be placed only on light tonearms with an effective mass of 3-8 g! Otherwise, they “suffocate” - they play without air, with loss of high frequencies.
Examples of high-flex cartridges: ADS XLM, Shure V15, Empire 4000, Audio Technica ART9.
Examples of lightweight tonearms: SME Series III, Mayware Formula IV, Infinity Black Widow.
Cartridges with low compliance 9-12 when measured at 10 Hz play well only on heavy tonearms with an effective mass of 18-30 g.
Examples of low-flex cartridges: Denon DL 103, Ikeda, Koetsu, Ortofon SPU, Fidelity Research Fr1.
Examples of heavy tonearms: Fidelity Research FR64, SAEC 407, ORTOFON RMG 309, SME M2R12.
Cartridges with average compliance in the range from 14 to 24 when measured at 10 Hz play well on tonearms of medium and medium-light effective weight 9-14 g. These are the majority - as a rule, these are all standardly installed tonearms (except for Yamaha turntables) and many optional ones.
Examples of cartridges with medium compliance: Lyra, Audio Technica AT33, Denon DL 301, Benz Micro, Sony XL 88.
Examples of medium effective mass tonearms: Tri Planar, VPI, Micro Seiki, SME 3009, SME 309, SME V.
And now attention: in order to find out whether the tonearm and cartridge are compatible, there is an excellent calculator! Follow the link, enter the mass value of the tonearm in the top field, select the compliance value of your cartridge at 10 Hz in the left column and see that the mass value of the cartridge assembled with screws and wiring falls into the green zone of the resonant frequency.
A seemingly insignificant nuance - the weight of the cartridge complete with screws and wires - is a tricky thing, because of which the records often do not sound 100% even for those who take the compatibility of tonearms and cartridges seriously. I listened to the compliant ADC XLM cartridge on a lightweight Mayware Formula IV tonearm for several years, confident that it was the perfect combination. But after checking the components on the scales, I was convinced that from the first day my cartridge was overloaded by 1.5 grams, which turned out to be significant for compliance 30. SCREWS! The total mass of the metal screws was 1.5 grams, and by replacing them with plastic screws with a total mass of 0.2 grams, I lightened the cartridge by 1.3 grams, receiving a noticeable increase in detail, HF response and overall intelligibility.
A difference in effective mass of 2-3 grams can be critical! For example, the Shure V15 type III cartridge goes well with the SME 3009 S2 Improved tonearm with an effective weight of 9.5 g. The Shure V15 with a compliance of 25 is considered highly compliant, and the SME 3009 tonearm is quite lightweight. Total synergy. But if we try to install an ADC XLM cartridge on the SME 3009, then there will be no synergy - the sound will be dull and suppressed. The ADC cartridge has a compliance of 30, and a tonearm weighing 9.5 grams is already too heavy for it. ADC will play noticeably better on the GRACE 545 tonearm, although the GRACE itself is a much lower class tonearm than the SME. It’s just that its effective mass is 7.5 grams and the difference of only two (!) grams of effective mass turns out to be decisive. Read more about flexible cartridges on lightweight tonearms here .
Grace 545 tonearm with light shell - effective weight 7.5 g.
To demonstrate the difference that just 5-6 grams makes, I did a few tests:
Let's install the Ortofon MC 30 cartridge on a Tri-Planar tonearm with an effective weight of 13 grams. Cartridge compliance 16 to 10 Hz. The weight of the cartridge with screws is 11 grams. We substitute 13 grams into the effective mass window of the calculator and look at the table: for compliance 16, the value of 11 grams is in the green zone. The cartridge plays well.
Now let's install the same cartridge on a SAEC WE 308 tonearm with an effective weight of 20 grams. Trying to make the task easier for the cartridge, I will install the lightest shell, take the lightest lead wires and plastic mounting screws with a total weight of 0.3 grams. Small scales show that the total weight of the cartridge/wiring/fastener assembly is 12 grams. Let's look at the table.
The calculator shows the yellow zone - resonant frequency 7Hz - overload. This means that you cannot install the Ortofon MC30 cartridge on the SAEC WE 308 tonearm - it will not play properly even on the lightest headshell. This is a clear example for those who still do not understand the difference between tracking force and effective tonearm mass. If the tonearm is heavier than necessary, the correct tracking force will not matter. What matters is the resonant frequency, which depends on the effective mass of the tonearm, and not on the clamping force. We check the result with our ears - the deterioration compared to the first test is immediately audible - the sound has become ponderous, compressed, with an obvious HF deficiency.
You can listen to these tests yourself through digitalizations. Below, via active links, all the tracks discussed in the article are posted. In the folders you will see two types of files - DFF (DSD) and WAV. I highly recommend listening to DFF, as these recordings convey the sound of vinyl with the least loss. The WAV format makes the sound flatter and “eats up” a lot of nuances. If you have nothing to play the DSD format on, download from the FOOBAR with a pre-installed DSD plugin.
TEST 1 - ORTOFON MC30
Track_1 - eff. tonearm weight 13 g.
Track_2 - eff. tonearm weight 20 g.
Ortofon MC 30 on a Tri Planar tonearm with an effective weight of 11 g.
Let's look at another case. Denon DL 103 cartridge. Let us immediately remember that this is a Japanese cartridge, which means that most likely the measurements were carried out at a frequency of 100 Hz. We check - it is true: cartridge 5 compliance at a frequency of 100 Hz. This means that to check compatibility with the tonearm using a calculator, you need to multiply this value by 1.8 - it turns out 9.
The cartridge/fastener/wiring assembly weighs 11 grams with lightweight aluminum screws. Let's try to put this cartridge on the SME 3009 tonearm with an effective weight of 9.5 grams. Enter 9.5 grams into the effective mass window and look at the table. Again an inappropriate value, but now on the other side - 12 Hz. The cartridge sounds shallow, with an obvious lack of depth and bass. However, literally 1-2 grams of mass of the cartridge/screws/wiring assembly separate us from the green zone. It can be seen that if you replace light aluminum screws with the heaviest steel screws, you will be able to add about 2 grams to the assembly, which will improve the situation and make the sound deeper. Just 2 grams can improve the sound in this situation!
Now let's put the same cartridge on SAEC WE 308 weighing 20 grams. We enter 20 into the effective mass window of the calculator, leave the same mass of the cartridge\screws\wiring assembly and see 9Hz - the very middle of the green zone. Denon DL 103 and SAEC WE 308 go together very well! We listen to the sound - the result is much better than in the previous test.
Low-flex cartridges can be safely placed on heavy long tonearms and get better sound, since long tonearms have less angular error and, in principle, play better than short ones. The Denon DL 103 is not the best example, as the cartridge itself is very mediocre, but even it plays noticeably better on the long, heavy SME 3012R than on the nine-inch SAEC. Below, all three tests are posted at the link in DSD and WAV formats. I highly recommend listening to DSD!
TEST 2 - DENON DL103
Track_1 — tonearm weight 9 g.
Track_2 — tonearm weight 20 g.
Track_3 — tonearm weight 30 g.
What was the problem with the Micro DDX-1000, which was discussed at the beginning of the article? The turntable was equipped with a heavy SAEC WE 407 tonearm and a Denon DL 301 cartridge, which, by the way, is noticeably better than the Denon DL 103.
The compliance of this cartridge is 13 at 100 Hz. We multiply 13 by 1.8 - we get 23 - this is almost a highly flexible cartridge! It is quite lightweight, so assembling the cartridge with screws and wiring is only 8 grams. Let's plug the data into the calculator.
We see that the value of the resonant frequency is in the red zone, and even the low weight of the cartridge does not help. Denon 301 is suffocating - the sound suffers from a lack of air and a deficiency of high frequencies. The tonearm of this turntable is absolutely not suitable for it. And such a mistake was made by a person with good equipment who had been fond of vinyl for a long time. What can we say about neophytes!
I hope this article has clarified for you what the compatibility of tonearms and cartridges is and taught you how to use the resonance calculator. You can find out the resonant frequency more accurately by tuning the CARTRIDGE ON THE COMPUTER. By the way, even the degree of tightening of the mounting screws affects the value of the resonant frequency. Never tighten them too hard, but don't leave them loose either.
Two more words about why choosing a player first and then selecting a cartridge for it is wrong. The fact is that in pursuit of a sophisticated turntable, many choose a cartridge based on the residual principle and are forced to adapt to what has already been purchased. Most often, this ends in doomed attempts to find a good cartridge for a heavy tonearm or the purchase of bad, cheap cartridges for decent turntables due to lack of money.
It is best to initially calculate your funds in such a way as to buy the best possible cartridge. If the budget does not exceed $1,500, turn to the best vintage MM cartridges like ADC XLM or Shure V15 - remember their high compliance and choose a player with a lightweight tonearm. Read more about this in this article.
A good option for a MM cartridge with medium compliance, which is compatible with most standard tonearms, except for heavy ones - Victor X1.
If your budget is $3,000, don’t be afraid to spend half the money on the cartridge, or even more. If you buy MC cartridges or even an inexpensive direct-drive turntable like the Micro Seiki DD7 with a standard tonearm of medium effective mass, it will sound great. And don’t be confused by the fact that the price of the cartridge is three times higher than the price of the turntable. This is much better than the other way around!
With higher budgets you can go wilder, so I invite you to read the article REVIEW OF TOP PHONO CARTRIDGES.
In order to best reproduce a large music library with different types of records, it makes sense to equip the player with two different tonearms with different cartridges. Read more about this in the article MASTERING A RECORD AND TWO TONEARMS.
We are always happy to offer you services for completing, assembling and configuring a turnkey player and audio system, write to
You can always listen to a perfectly tuned vinyl path in my workshop or in our Huge Sound showroom.
The Huge Sound showroom is a place where music sounds perfect!
Dedicated to all vinyl lovers...
Gramophone record - what is it?
So, for many, vinyl records as music media are obsolete. Despite this, more than ten million records are produced worldwide each year, and even more are sold.
A gramophone record (usually just a plate; slang plast, vinyl, disk, plate from Polish plyta) is an analogue carrier of sound information - a disk, on one or both sides of which, by one method or another, a continuous winding groove (track) is applied, the shape of which ( depth and width) is modulated by a sound wave.
In the photo: Various record formats: 30 cm with 45 rpm, 25 cm with 78 rpm and 17.5 cm with 45 rpm.
To “play” (extract sound) from gramophone records, devices specially designed for this purpose are used: gramophones, gramophones, and later electrophones and electric players. And now “turntables” (Jargon, colloquialism. A derivative word from “turntable,” that is, to play a gramophone record)!
When moving along the track of a record, the player's needle begins to vibrate (since the shape of the track is uneven in the plane of the record along its radius and perpendicular to the direction of movement of the needle, and depends on the recorded signal). When the stylus vibrates, the pickup's electromagnetic coil produces an electrical signal, which is amplified by the amplifier and then reproduced by the speakers, reproducing the sound recorded in the recording studio.
The words "record" and "record" are shorthand for "gramophone record" and "gramophone record", although gramophones themselves have not been widely used for a long time. At the end of the 19th and throughout the 20th century, the gramophone record was (before it was replaced by the CD in the mid-90s) the most popular means of distributing audio recordings, high-quality and affordable.
The main advantage of the gramophone record was the convenience of mass replication by hot pressing; in addition, gramophone records are not subject to the action of electric and magnetic fields. The disadvantages of gramophone records are their susceptibility to temperature changes and humidity, as well as the ability of records to wear out (lose their audio characteristics) with constant use.
Nowadays the trend in the music industry is to return to the good old “vinyl”.
To the amazement of the giants of the recording industry, the generation born with compact headphones in their ears is easily parting with state-of-the-art Hi-Res players, buying up vinyl records and listening to analog sound from home speakers.
The music industry, in turn, happily jumped at the opportunity to publish albums on media from which it is not so easy to copy information illegally. Modern stars have begun to release new releases not only in Hi-Res (DSD) and MP3 formats, but also on records.
Manufacturing
Classically, sound from a magnetic phonogram, using special equipment, is converted into mechanical vibrations of a cutter, which cuts concentric sound grooves on a layer of material. At the dawn of recording, phonographic records were cut on wax, later on phonographic foil coated with nitrocellulose, and later phonographic foil was replaced by copper foil.
The application of tracks on a thin layer of amorphous copper covering a perfectly flat steel substrate made it possible to significantly increase the accuracy of reproduction of the recorded signal, which led to a noticeable improvement in the sound quality of phonographic recordings. This technology, developed by Teldec in the late 70s and known as DMM (Direct Metal Mastering), is still used today.
DMM (Direct Metal Mastering) technology
The resulting copper disk is intended to be obtained from it by electroplating in several successive stages of the required number of nickel copies with both positive and negative display of the mechanical phonogram. The negative copies made at the last stage are called matrices, which serve as the basis in the process of pressing vinyl records; all intermediate nickel copies are usually called originals.
The galvanic shop produces originals and matrices. Electrochemical processes are carried out in multi-chamber galvanic installations with automatic stepwise regulation of electric current and nickel build-up time with a special electrolyte composition.
Mold parts are manufactured on CNC machines and undergo high-temperature vacuum soldering using special technology. The molds themselves ensure high uniformity of the temperature field on the forming surfaces, low inertia of the temperature regime, and therefore high productivity. Tens of thousands of records can come out of one mold.
The material for making a gramophone record is a special mixture based on a copolymer of vinyl chloride with vinyl acetate (polyvinyl chloride) with various additives to give the plastic the necessary mechanical and temperature properties.
High quality mixing of powdery components is achieved using two-stage mixers with hot and cold mixing. In the press shop, a heated dose of vinyl with labels already attached to the top and bottom is fed into the press, which, under pressure of up to 100 atmospheres, spreads between the two halves of the mold, after cooling, forming a finished gramophone record. Next, the disc edges are trimmed, inspected, and packaged.
The first gramophone record produced after installing nickel dies on the press, and then each specially selected one from the circulation, are carefully checked for dimensional characteristics and listened to in specially equipped sound booths. To avoid warping, all pressed records undergo the required temperature exposure, and before packaging in an envelope, the appearance of each record is checked.
Vinyl sales
According to the RIAA, vinyl sales have already passed their nadir more than 10 years ago. And now, there is a fairly steady growth in sales all over the world.
There are two main markets for gramophone records:
- Primary
- Secondary
In the primary market, the main buyers are music lovers and audiophiles who prefer music on analogue media. It is the pace of development of this segment that is of most interest to record companies.
Now records are produced on so-called “heavy” vinyl; such a record is really heavy and weighs 180 grams or more. These records are said to provide greater dynamic range and are less susceptible to vibration due to their weight and thickness. The quality of stamping and the material itself is higher here than on regular vinyl. Although the majority of users purchase music on modern media (whose convenience, portability and durability are much higher), many music lovers and audiophiles still buy vinyl records.
The secondary market is the trade in used vinyl. This segment trades collectibles and private vinyl collections. Currently, the cost of particularly rare records can exceed several thousand dollars.
The first releases (the so-called first press) of records traditionally receive special attention from collectors (for their best sound), as well as limited edition records and various collector's editions.
Since now a significant part of trade is carried out via the Internet, and the buyer cannot directly evaluate the quality of the product offered (on which both the sound quality and its price greatly depend), sellers and buyers use a standard system for evaluating records, for example from “Goldmine” .
Analog player
The goal of tuning is that you must align the cartridge stylus with the record track as close as possible to how the cutter initially cuts the die track.
The first link in the chain of devices for reproducing sound information stored in the form of mechanical vibrations of the groove of a record is the sound pickup.
Pickup head from Japanese manufacturer Nagaoka, model MP-500
The most common are moving magnet (magnetodynamic) or MM type heads. This is explained by the fact that their simple and reliable design is suitable for large-scale production. If the needle wears out, the insert with the needle holder can be replaced without the use of any tools.
Tonearm from the German manufacturer Clearaudio, model Tracer TA 044/B
The main components of a pickup are the head and the tonearm. The pickup head contains a transducer, a needle holder and a stylus. Stylus clamp issues apply to all types of pickups, so after understanding the requirements for pickups, the first thing we'll talk about is the stylus clamps.
The parameters of the pickups must meet the requirements of the standards of the manufacturing countries. In Europe this is usually the German industrial standard DIN45500. These requirements relate to linear and non-linear distortion, as well as mechanical and electrical performance parameters. One of these parameters is the vertical angle during recording and playback.
Settings
Support and vibration
It is very important to place the player on a securely mounted shelf or solid stand. Regardless of the design of the turntable table suspension, some stray vibrations will pass through and pollute the sound from low to mid-range. The stand must be level (horizontally) and on spikes.
Mounting the mount to eliminate vibration as much as possible will help minimize sound pollution. Very sensitive to location - turntables without suspension (vibration isolation).
When playing records, we can touch the table and feel some vibration of the support table by lightly touching it with our fingertips. If there is vibration, then our sound deteriorates greatly.
To get a hint of how strong the effect is, place a glass of water on a support (stand) and watch the surface of the water while playing music or walking around the table. This is a simple and visual way to see how much acoustic and mechanical vibration is reaching your system. Remember that your system is trying to reproduce the modulations of a track that is 1000 times thinner than the thickness of your hair.
Not an easy task in this vibrating environment.
Be aware that changing the stand to a more stable position, or replacing it with a more fundamentally massive one, can lead to an obvious decrease in bass. Since a more stable placement has less vibration, the base vibrates less and therefore less vibration is returned back into the system.
It's not a mistake. This is an improvement in playback.
The heavier and more rigid the stand design, and the more inert, the better the sound will be. Simple supermarket racks aren't too hard.
Tip: Experiment with the sonic differences of using a Sorbothane mat (a synthetic absorbent polymer) instead of spikes between the turntable and the stand. Sorbothane partially isolates while the spikes enhance bonding.
About vibration
Over time, turntable screws can become loose, causing spurious resonances to occur. Be aware that over-tightening may distort the mating surfaces and make the situation worse. This rule works for all screws that hold something together, be it a cartridge to a tonearm or a wire to a body. The design of some players requires adjustment of the degree of fastening of some elements; in these cases, also follow the manufacturer's recommendations.
Tip: Consider adding vibration dampening material between the two contacting parts to dampen vibration, especially over large surfaces. The idea is not to have a viscous interface, but to fill the smallest gaps due to manufacturer tolerances. Remove the parts, add a very small amount of any non-hardening putty, then assemble and press until the parts are firmly in contact with each other.
Horizontal plane
When a turntable is not accurately leveled, it usually has the most negative impact on the behavior of the platter bearings and the dynamics of the tonearm, especially as anti-skating works. Because the disc bearing is round and sits in a round sleeve-shaft, it is not horizontality that affects how the bearing slides on the sleeve; the better the bearing, the less the impact. Due to the player not being leveled, sound problems are greater with rotary tonearms and less with linear (tangential) tonearms, which are controlled by a motor.
So make sure the turntable platter and tonearm assembly are level. Don't do this by eye - use an accurate level. If the disc is tilted, then adjust the suspension (of course, when the chassis design has suspension). If the tonearm assembly is not horizontal (meaning the pivoting tonearm is not vertical), then return it to your dealer for repair or realign it yourself using thin shims between the tonearm assembly and the chassis.
Support plate bearing
Here you can only do one thing - replace (or add) lubricant. How often and what kind - you need to follow the manufacturer's recommendations. Lift the disc and blot the old oil with a lint-free cloth (or suck it up with a clean dropper or syringe). Then, so as not to overdose (almost all the space in the bearing sleeve is occupied by the spindle), carefully pour in a new one.
Passive drive
Some belts are sprinkled with talcum powder to make them smooth (slippery). Some need to be clean to have a soft finish (more matte than shiny). To maintain the inherent traction, check with the manufacturer regarding the need and method for cleaning the belt. Some turntables, due to their motors, require the belt to slip when starting and stopping, so these belts are more likely to become coated with talcum powder. Years of slipping will wear down the talc and polish the belt to a shine. In this case, replace it with the manufacturer's original.
Suspension
Suspension designs (vibration decoupling) vary slightly, so follow the manufacturer's instructions to set up your suspended chassis. Users and tuners are constantly discovering tricks specific to each player that can significantly improve the sound.
Tonearm adjustments
The tonearm is largely free of adjustments and maintenance. Secure the mounting screws. Check on a typical rotary tonearm that the bearings are normal. Grasp where the headstock mounts and very, very gently try to move the tonearm back and forth along the length of the tube and rotate it. If you feel any play, you have a serious problem - it needs to be repaired or replaced. The exception is free-hanging or non-swivel tonearms, where by doing so you may cause the tonearm to fall out of its support.
The main task of the adjustment is to align the cartridge stylus with the record track as close as possible to how the cutter initially cuts the matrix track. Those. trace with a needle what was laid by the cutter. The travel path requires optimization in three different planes. However, perfect tuning in all three is not possible, hence it must be optimized for the best overall balance. The final adjustment should always be made by ear and over a long period of listening time. Only here you need to know that each record is cut in its own way. So to fully balance good sound across a wide range of records, again optimize (or adjust) the VTA (vertical tracking angle) for each record, which some people do if they have a simple VTA control on their tonearm.
The three adjustment planes are as follows (be careful, it is the needle that is being adjusted, not the cartridge). First, looking from above, the arcing movement of the cartridge across the record should leave the stylus in the same position in relation to the track, this is the Lateral Tracking Angle (LTA), or Tangency. When viewed from the head, the needle should be perpendicular to the track, so as not to have a preference for one side of the track, in relation to the other side, this is Azimuth. When viewed from the side, the needle should sit perpendicular to the track, this is the Vertical Tracking Angle (VTA). However, VTA varies from recording to recording. Therefore, this adjustment, to a greater extent than was the case with other adjustments, must be audible.
The main tools for tuning are a template, a tracking force sensor (scale), a plate, which is not so valuable and there is an occasional possibility of damaging it, a bright light that can be focused where needed, not a magnetic screwdriver. Small pliers and a lens or monocular are also handy. It is very difficult to make an accurate template (don't rely on the accuracy of the template that comes with the tonearm), buy a good one. If it doesn't fit the spindle exactly, get rid of it and install another one.
Start
Securely attach the platter to the chassis as you see in the photo. If it is allowed to rotate during installation, your adjustment measurements will not be accurate. Just make sure that such fixation does not change the height or horizontality of the system. Attach the cartridge head to the holder (Shell) and the holder itself to the tonearm tube. The screws should be tightened with your fingers, this is enough to prevent the cartridge from falling out, but it is still free to move around. Whenever possible, work with a needle guard.
First step. Zero point.
Second step. First point.
Third step. Outer NULL, external zero point.
Fourth step. Inner NULL or internal zero point.
The diagram shows how the effective length of the tonearm is measured (at what points).
I would like to note that precise adjustment is required for any pickup head, but it is especially necessary for multi-radius styli that have a complex profile, in shape approaching the shape of a cutter. The incorrect position of such a needle in the groove negates all the advantages of the needle profile and, instead of reducing bending distortion, you can get a whole bunch of different distortions at the output.
The need for precise needle placement is shown in the attached scans in Fig. 12 and fig. 6-7, see below.
In the picture, outer NULL point is approximately 120 mm and 66 mm (inner NULL point). This is the key to the solution in building a template.
At these distances from the center of the disk (spindle) the needle holder (a thin tube in which the needle is held) if you look at it from above:
- must be strictly perpendicular to the radius.
- the straight line running along the needle holder must be tangent to the circle of the corresponding radius.
We set the vertical azimuth by eye first - the tonearm should be parallel to the table.
We will set the lateral deviation according to the mirror - we will place a kantelevir (needle) on it. The photo shows how Azimuth is configured. If the needle is not set crookedly, the easiest way is to adjust the azimuth using the mirror; with anti-skating disabled, place the cartridge with the needle on the mirror and set it to be perpendicular. You need to look at the stylus (from the side), it should be at an angle of 15-20 degrees to the surface of the record (VTA angle, found in the cartridge manual).
Measurement graph using the Baerwald, Lofgren or Stevenson equations. When using templates according to Lofgren or Stevenson, to maintain the geometry, it is necessary to move the vertical axis of the tonearm, which is not always convenient.
With a tuned (!) head, when listening to even virgin vinyl, distortion at a frequency of 400 Hz in the middle of playback is usually 0.5-1%. This is standard for a rotating tonearm.
Set the nominal downforce. Then make tangential and azimuth adjustments. Do not deviate from this sequence, as each step affects the next - change the order and the installation will be incorrect.
The picture below shows the position of the needle in the groove, side cut. Here we see the correct relationship of the diamond stylus sidewalls to the left and right grooves. Maintaining parallelism is the key to success when adjusting lateral deviation!
The figure below shows how the azimuth is not set correctly. The wear of the cartridge increases and the record is “filed.”
Downforce
This adjustment on the tonearm balances the weight of the tonearm and cartridge. Use a scale and set the tracking force according to the cartridge instructions (we'll make the final adjustments later by ear). If you do not have a scale, but the tonearm has a calibrated counterweight, disable the anti-skating mechanism or set it to zero. Install the counterweight so that the tonearm floats freely parallel to the platter and is in balance.
Be very careful with an unprotected needle as... you cannot make this adjustment with the protective cap installed. Once the tonearm is balanced, secure it in the holder and, using a calibrated counterweight, set the tracking force to the recommended weight of your cartridge.
Azimuth
The old technique of aligning with an azimuth mirror may work well for some cartridges, but a handmade moving coil cartridge does not lend itself well to this alignment. The needle may be offset several degrees from perpendicular to the top of the cartridge.
There are two precise methods for adjusting the azimuth. To get the best sound, one method uses your hearing to move the cartridge in both directions in tiny steps. Make sure you feel the maximum width and depth of the scene, etc. The disadvantage of this method is that until you gain enough experience, you will be confused by the changes in sound, be patient and work carefully - this will give you better results.
Grandfather's foolproof method requires the use of a voltmeter and a test plate. Set the azimuth so that the 1,000 Hz (!) signal is the same in both channels. Also, there is an excellent device for fine-tuning azimuth: Clearaudio Azimuth Optimizer. The plate is included in the delivery set.
German device for azimuth adjustment: Clearaudio Azimuth Optimizer
VTA (vertical needle tracking angle)
If your tonearm does not have a dedicated VTA adjustment, then the main problem may be adjusting the tonearm height. Especially if the tonearm stand is set to a certain height only with a locking screw. In these designs, changing the height requires releasing a locking screw, which usually causes the arm stand to plummet, leaving you unaware of the original position you started from when adding or decreasing height (I'm speaking from bitter experience). Wedge business cards or plastic cards into the gap between the stand leg and the flange so that the stand does not fall when released. Or find/make a part that fits exactly between the tonearm mount and the flange. See your tonearm manual for recommendations on adjusting the height of the stand.
The best approach to gradually tuning VTA is to listen to music. The tonearm should be lowered on the stand if the sound is generally harsh and bright, with weak or no deep bass, harsh highs and harsh midrange (this could also be due to insufficient tracking force). Distortion obscures low-level musical details; therefore, there is a decrease in dynamic range. Brief attacks may be too sharp. We raise the tonearm when we hear a sluggish and muffled sound, the highs are overwhelmed, the lower register is dirty and there is no clarity, short-term attacks are sluggish.
Start with the tonearm a little lower and little by little raise it until it is parallel to the record and then so that the back of the cartridge is raised. Keep a record of the piece you know handy, where you know all the details, so you can always return to it. The adjustment ranges can be extremely wide, at least 10 millimeters or even more (at the tonearm joint). Feel free to play around with the full range so you get an idea of the range of sound changes.
Anti-skating force (for rotating tonearms only)
During playback, a balancing force is applied, opposite to the natural pressure of the rotating tonearm inward. Left unchecked, the stylus will press against the inside of the groove, causing distortion from both mispositioning in the groove and misalignment of the opposite end of the stylus within the cartridge. To adjust this, lower the stylus onto the record near the label onto a wide run-out track. Increase the anti-skating force until the tonearm begins to slowly drift outward, away from the label. Again, this should be completed aurally as you listen to the music. If the placement of the sound image is a little off-center, or if the music doesn't feel cohesive, experiment with anti-skating. Watch the needle as you place it on the track. Does it move to the right or left relative to the cartridge body. This indicates that the anti-skating force is either too high or insufficient.
Fine tuning
So you have three gross adjustments: downforce, VTA and azimuth. The changes in sound with each of these individual adjustments may be similar. Therefore, optimization requires all three. In practice, by sequentially moving from one adjustment to another and then to the next, a balance is achieved in terms of optimization for all three. While working, listen to a woman's voice. Achieve maximum vocal imagery and tactile feel for the character.
Start with a small deviation from the recommended cartridge clamping force. Too much tracking force and you move the coil (or magnet) off center of their range. Small increments can be on the order of 1/100th of a gram or less; but deviations of + 0.2 grams from the manufacturer’s recommendation are also acceptable. Don't worry about damage to the record from heavier weights. Most record damage (in the mid to high frequency range) is actually caused by mispositioning with too little tracking force rather than too much (besides, 0.2 grams over is not much at all). It is assumed that the needle is sufficiently clean and in good condition. When you pick at the lowest tracking force and still get the best sound (on moderate signals), then you may have a dirty stylus, a bad record, dirt buildup in your cartridge, or the pickup stylus has audible wear.
Changes in downforce can change your VTA and azimuth settings. If the azimuth was initially set by ear, experiment with it. However, if it is adjusted by hardware, leave it and work on VTA and downforce.
Now, the main work is done. Final setup will take days or weeks and depends on listening to the system in a quiet environment. Ultimately, some nuances in sound reproduction from one record to another begin to irritate and spoil the overall picture of good sound. This can happen from too light downforce to VTA. By the way, many of the best cartridges are heat sensitive. When it's too warm, they create a cloudiness; when it's too cold, they can create a harsh sound. It is necessary to take into account the time of year or temperature for different adjustments. Excluding people who adjust the VTA on every record, most people will be happy with a VTA position that is a good compromise for their favorite records.
2-point adjustment on a special template
The circuit element is larger; here you can see the optimal position of the pickup relative to the template. Removing the needle and adjusting the approach angle.
That's all for now. The best result is when the music sounds and gives emotions!
Why do we need two tonearms, Vinyl Educational Program cycle.
The basis of Vinyl Educational Education is not theoretical speculation, but practical experience of many years of listening, testing, comparing, designing and producing stereo components. Each postulate of Vinyl Educational Program has been tested many times and, if necessary, can be confirmed experimentally.
In the first episode we will talk about the advisability of installing several tonearms on a record player and list the main types of pickups and phono stages. Our expert will also analyze in detail the best combinations of transistor and tube correctors with MM and MC needles and will address the issue of step-up MC transformers. Opening the cycle Vinyl Educational Program Audi is the author of the main Audiophiles section in StereoManClub. The Chief Editor is trying to express the sacred meaning of this extremely expensive hobby in StereoAphorisms.
In general terms, Audiophilia can be described as a passion for high-quality sound-reproducing equipment and media. The musical material recorded on these media is secondary. The main thing for Audi is the quality of recording and playback. As it is written in “Lurkomorye” - music lovers listen to music, Audiophiles - noise in pauses. And there is some truth in this cruel joke. Although the anger here is more likely due to misunderstanding and narrow-mindedness. If it makes noise during pauses, Audi will not listen to this recording. Of course, what he loves most is listening to music. But unlike the others, StereoManov does this at the highest possible volume. In any other way, you see, he doesn’t care. Although he himself does not consider himself picky. “I don’t need much. My vision of the ideal sound is this: the bass hits you in the gut so much that it hurts your ribs, and the bass is not just any random thing, but meaty, velvety, growling, rooted in the foundation. The middle is natural, not sharp, so that when the violins rise, a wave washes over me. The highs are airy, like a spring breeze, going far beyond the audible range.”
More than anything else, Audi doesn't like it when, in the midst of listening, neighbors call and ask to turn it down. A thin, slightly nervous man in full strength. Never married. He devotes all his free time to stereo components. Audi says this about his personal life: “I’m married to phono cartridges, my harem is an acupuncture shop.” He has been interested in musical equipment and media since childhood. While still in school, during the holidays at the pioneer camp I played discos. Then, having entered the Faculty of Radio Equipment Engineering, he was fully engaged in dubbing from vinyl records to magnetic tape, repairing, exchanging and selling stereo components and media. At the age of less than 17, he assembled a luxurious dubbing system using top-class equipment. After serving in the army, I did not lose my fighting spirit. He goes through life clearly with a song. Closely follows international innovations in the audio industry. Strictly attends all audiophile exhibitions. Takes an active part in the work of the NewArtVinyl design studio. There are no bad habits. Member of the StereoMan club since its founding in 2013.
— Salute to Audi! — Hello StereoM! What destinies? — The Editor-in-Chief decided to create a popular science audiophile almanac “Russian Sound”. As part of this project, together with the design studio NewArtVinyl, we will conduct a series of auditions, interview various representatives of the High-End industry, and also give a series of lectures “Vinyl Educational Education”. - A luxurious idea, I’m for it! - Well, that’s great. Since you are for it, lectures for the “Vinyl Educational Program” are from you. - Oh, how! You got me hooked quickly... What should the lectures be about? — We will suggest topics to you. Demonstrating our flagship two-tone arm Black Crystal at high-end exhibitions, we are constantly faced with the question - why are two tonearms needed? And in today’s lecture I will ask you to answer this burning question in an accessible form. - Well, I'll start with an axiom. All self-respecting audiophiles use two or more tonearms. - For what? — The short answer is to be able to use and compare different phono cartridges in combination with different phono stages. Now let's move on to the full answer. Let's start with phono cartridges. The sound from a gramophone record is extracted by a needle, and it is this needle, and not the rest of the tract, that determines the character of the sound. We changed MM to high-level MC - the sound changed. We changed the high-level to low-level MC - the sound changed again. And not just a little - barely perceptible, but dramatically, as if they installed floorstanders instead of shelves, or turned on a transistor instead of a tube amplifier. There are three main types of pickups. I have already listed them: MM, high-level and low-level MS. They all have their own characteristics, advantages and disadvantages. And if you are not focused on any one musical genre, but in your music library there are more than a couple of hundred vinyls, then in order to maximize the disclosure of musical material, you will have to operate with several phono cartridges. Once on one forum, Vlast-Kol mentioned that there were about a dozen pickups in his needle, to which someone Ole wrote: “Is it better to listen to music than to juggle cartridges? All that is optimal is to set it and forget it.” Vlast-Kol asked - optimal for what? Ole: “Tonearm, records, ears, what were you thinking about?” Vlast-Kol: “About musical genres, year of publication of the record, country and label of the manufacturer, stereo or mono, etc. and so on. Back in 1987, when I had a couple of hundred vinyls, I also thought that one “optimal” needle was enough. But when the music library exceeded 5,000 records, it dawned on me that they were recorded very differently and, by listening to all this variety on one needle, I was very much robbing myself. The grooves of a gramophone record contain enchanting sounds, and the task of the audiophile is to use a combination of needles and phonics to extract them to the maximum.” Let's move on to phono stages. There are three main schools of phonics use. The first one is the most common and I would call it old school. A combination of a MM needle and a tube phonic, without any adjustments. Listen to the way he plays, nothing can be adjusted or changed. And why? The load resistance of all MM cartridges is designed at 47 kOhm, so there is nothing special to adjust there. And if the phone is assembled by a conscientious manufacturer from high-quality components, then it is guaranteed to play well, with almost all MM cartridges. The option, one might say, is a win-win, and we install this combination on one of the tonearms. School number two. Although it is considered classic, it is much less common and there are objective reasons for this. A combination of low-level MC needles with the same tube phono preamplifiers, using step-up MC transformers. An extremely dubious decision, in my opinion, and I will now try to explain why. Unlike standardized MMs, all low-level MC cartridges have different internal resistance. The manufacturer recommends selecting the load resistance by ear, as a rule, indicating not an exact number, but a certain range. But, as you know, in tube phonics there are no adjustments - listen as you play.
In raising trances, at best, the range of adjustments will be 3-4 positions, such as 6 Ohms, 12 Ohms, 24 Ohms, and when they are switched, it is not the nature of the sound that changes, but the volume. Thus, the consistency of a specific trance with a specific MC needle remains a closely guarded secret - you'll be lucky or unlucky. There are exceptions to this lottery when a manufacturer produces a booster trance specifically for a specific needle model or generally sells them together, for example, the SPU Ortofon series. And one more reason against using step-up trances. In combination with tube phonics, MC needles lose their bright originality, and their sound smoothes out and becomes similar to MM. The goals and objectives of an Audiophile are to squeeze the highest quality sound out of a component. How to do it? Let's move on to the next school. Transistor MC phono stages with a wide range of adjustments for resistance and gain. As an example, I’ll give you a NewArtVinyl Twin Dec phonic. Input impedance adjustments: 14, 16, 18, 20, 46, 60, 66, 85, 100, 150 and 200 ohms. With this step, you will be able to select the optimal mode for any MC needle and squeeze out of it all the potential laid down by the manufacturer. Selecting resistance is reminiscent of twisting the head of a cassette recorder when you achieve the brightest sound possible by ear. The next point is strengthening. The output voltage of low-level MS varies between 0.1-0.7 mW. And for comfortable sound, two adjustments like +50 and +60 dB are absolutely not enough. On Twin Deck, gain control is implemented as follows: 100, 400, 800, 1000, 1250, 1500, 1800, 2100, 2400, 2800, 3000, 3600 and 4000 times. Thus, using a combination of an MC needle and a good transistor phonic, you are guaranteed to get high-quality sound and firm confidence that you have squeezed every last ruble out of the needle.
We put this combination on the second tonearm and together we get an almost universal system capable of qualitatively playing almost the entire world musical palette - from soulless techno to soulful, spiritual romance. - Bravo, Audi! You're on a roll!!! Summarize your resume. — Conclusion - the use of several types of needles in combination with various designs of phono preamps significantly expands the capabilities of your player, making the sound more diverse and allowing you to fully extract enchanting sounds from the grooves of gramophone records. And as a result, allowing you to enjoy the sound of your favorite albums to a greater extent. Happy listening everyone and remember - it’s very easy to distinguish a good vinyl path from a bad one. With a good vinyl sound - you should cry!
Anatomy of a vinyl player
No matter how complicated the design of a vinyl player may seem at first glance, I want to please you - everything is actually very simple. In this article, we will break down the structure of a typical vinyl record player, which you probably most often saw in stores, movies, or with your friends.
I also have a similar player model, so it will be as easy as shelling pears for me to talk about its components.
Review of the Audio-Technica AT-LP140XP vinyl record player
Hello! In this article I want to describe how and why I chose the Audio-Technica AT-LP140XP turntable for my setup. Briefly: because there are blue lights. In fact, in the price category from 30 to 50k I couldn’t find anything better that met my needs. Really a topper, I recommend it. About...
Vinyl Must LiveFRMCNTRS
What does a record player consist of and how does it work?
So let's take a look at what a typical turntable consists of.
1) Counterweight
An adjustable counterweight is an important element to consider when choosing a turntable. This is usually a rotating tonearm counterweight that allows you to independently adjust the tracking force (the amount of vertical pressure that holds the stylus to the surface of the record). Accurate tracking force is important for sound quality and preventing damage to the stylus and records. If the counterweight is set too heavy, the stylus will be too light and this will lead to “skips” during playback. If it is set too light, the stylus will be too heavy, which can damage the record grooves. Before setting the tracking force, it is important to balance the tonearm as much as possible. Watch this video on how to set up a tonearm using the Audio-Technica AT-LP140XP turntable as an example.
2) Anti-skating adjustment
Anti-skate is a force that prevents the tonearm from rolling (or sliding) towards the center of the record while it is being played. Stereo vinyl has two audio tracks, one for the left and one for the right channel. These are the two sides of the groove, and the pickup stylus goes between them. Without the correct anti-skate setting, your grooves may wear out faster on only one side, resulting in a much softer sound from one speaker. Typically, the anti-slip setting should be the same as the pickup's tracking force, but this may not apply in all cases. In the video above you can also see how it works and how to properly configure anti-skating.
3) Microlift
This element is optional and is not present on all turntable models, but it greatly simplifies the use of the vinyl player. The micro-lift allows you to carefully place and remove the turntable stylus from the record, reducing the likelihood of damage to it (or the stylus/cartridge).
4) Swivel mechanism
Allows the tonearm to rotate and move smoothly in any direction, both vertical and horizontal.
5) Tonearm
The tonearm is the critical link between the record and your speakers—the part that holds the cartridge cartridge above the groove. There are two main lever designs: straight and S-shaped. Both designs primarily value low weight and rigidity of the structure, which will dampen vibrations and allow the stylus to maintain precise geometry in relation to the grooves of the record. Most turntables come with tonearms made from some kind of alloy, especially aluminum, but some manufacturers often use carbon fiber, graphite, or even wood. Plastic tonearms should definitely be avoided!
6) Platen
The platter is a rotating component (direct drive or bevel drive) whose primary purpose is to hold the record in place, but also serves to smooth out speed fluctuations (keep the speed from changing) caused by the motor and to absorb possible vibrations and vibrations. Also, in most cases, a mat (slipmat) is placed on the support disk, which provides traction and also helps dampen high-frequency vibrations. You can learn more about the types of slipmates and their effect on sound from the Audiomania video review:
7) Start / Stop
Most turntables have a Start/Stop button that starts and stops the drive. Some players have an automatic start feature. For example, when you press the start button, it starts the turntable, raises the tonearm, finds the first track/groove and automatically plays it. These turntables also have an auto-stop feature that automatically returns the tonearm to the “storage” position when the support motor stops. This type of turntable is called “automatic” and is an ideal solution for those who are just starting their journey into the world of vinyl. And here I definitely know what I’m saying - my first player was an Audio-Technica AT-LP60X USB (full automatic), and I was not the least bit disappointed in it. This is what you need for your first player.
Setting the platter speed
Ability to switch blade speed between 33 rpm (revolutions per minute), 45 rpm or 78 rpm.
9) Pitch control
A regulator that allows you to precisely regulate the speed of rotation of the plate within a specified range, usually measured as a percentage (on average from +/- 6% to +/- 24%). It's not vital for home listening, but it's an essential part of any professional DJ turntable. For me personally, I found the benefit of this function when listening to records together with heavy clamps (clamps) - a heavy clamp can slightly slow down the speed of the platter, and by adjusting the tempo you can manually equalize the speed to the optimal one.
10) Cartridge/Pickup
This is the main element that influences your vinyl listening experience and has the greatest impact on the sound quality of the turntable. A phono cartridge is basically a transducer that converts mechanical vibrations picked up by a stylus (needle) into an electrical signal that is passed through an amplification and then converted into sound by a speaker. Many people often refer to the cartridge as a whole mechanism that picks up the vibrations of the grooves, but the cartridge is only a housing that supports the needle.
11) Stylus / Needle
The stylus or stylus is the component that attaches to the cartridge and moves between the grooves of the vinyl. They are precision ground and polished to match the grooves of the record. The two most common shapes are elliptical and spherical (conical). Each one makes contact with the groove differently - an elliptical stylus provides more contact with the groove, which improves accuracy, while a spherical stylus makes less contact with the groove and is unable to penetrate the very depths of the groove, resulting in inferior sound quality. It should be remembered that the needles need to be changed from time to time (after about 1500-2000 hours of play), as they tend to wear out. If they are not replaced, the sound quality will deteriorate and may damage the records. If the design of the cartridge does not provide for the possibility of removing the needle, then the entire cartridge will have to be replaced.
12) Headshell / Cartridge holder
Designed for mounting the cartridge on the tonearm. There are removable and integrated (non-removable) holders. The headshell is an important element in the design of the tonearm, which also determines the overall sound quality of the player. Very often, music lovers replace the standard headshell installed on the tonearm with another one that better meets their requirements. Holders can be made of various materials - metal, wood, carbon, synthetic resins. Each of these headshells has individual damping and resonance characteristics, which means it has an individual effect on the sound.
13) Slab / Base
The turntable plate is the foundation that supports the remaining components. Its main function is to mechanically isolate (dampen) all components from each other, so it is better if it is made of heavy material. For example, look at the review of the Acoustic Signature Maximus Neo player - Mikhail Borzenkov pays special attention to the base and its damping properties.
14) Insulating feet
The feet underneath the base of the turntable isolate the turntable from vibrations from the stand/shelf on which the turntable sits and the floor, preventing vibrations from passing through the turntable, ensuring stable playback.
15) On / Off
Try to guess for yourself...