The headphone cable is the weak link, as it has a small cross-section, often bends and is subject to mechanical stress. This may cause sound to drop out from one or both speakers, become distorted, and be interrupted (stutter).
Let's look at two different types of wire damage. In the first case, the cord remains intact externally, but the break occurs internally. The second option is simpler - you can observe damage to the outer sheath of the wire and know the location of the break.
I'll show you a way to repair a headphone cable with your own hands. At the end of the article there are answers to the most popular questions on the topic.
Speaker wire output
The second weak point after the plug is the cable exit from the headphones.
Most often, the wire here does not break, but comes off from the speakers. The user is to blame for pulling the earphone out of his ear by the cable. Even if the vacuum headset is deeply buried inside the ear, remove it by holding the body with your fingers. A wire break from the speaker contact occurs in cheap Chinese models. The wire inside the case is not secured by anything and dangles freely. The branded headset is designed differently. The cable connected to the speakers is tied in a knot before exiting the headphone body.
This creates a kind of stop that prevents the wire from breaking off the contact. However, you still cannot pull such an earphone by the wire. The core will not come off the speaker, but the cable itself will begin to stretch. Over time, a gap forms in the thinned area.
Near the entrance to the headphones, the wire is constantly suspended. Even if you don’t pull on it, over time the cable will tear the wires away from the speaker under its weight. You can ease the load by placing the wire behind the ear. In this position, no force is applied to the cable section near the entrance to the headphones.
Bifurcation section
The headset cable leading to the speakers splits into two. The separation point is secured with a plastic or rubber stopper. In this area, similarly, there is a threat of fracture of the veins, but this happens extremely rarely.
You can protect the split with a voltage reducer, but they are only installed on expensive branded headphones. For a cheap headset, the only salvation is the clip. The area where the bifurcation begins is secured to the clothing with a clothespin.
What does the sound in headphones consist of?
Many cores are channels, each of which outputs the content of a specific frequency band to the master bus in the speaker (the one that is inserted into the ear). Thus, it is clear that damage to at least one of these veins completely eliminates the frequency range for which it is responsible. Why can't you hear this?
It's about two things:
- stereo;
- the rest of the veins.
If one frequency is missing on the left, it will be heard on the right. In addition, when the frequency at which the channel was output loses it, the residual signal is transmitted through other wires. Thus, the overall load on the sound increases. It starts clipping and overloading. Why do cheap headphones for 30 rubles sound so bad? The number of people living there is minimal and they don’t listen to modern music at all. What can I say, even radio broadcasts are difficult to broadcast.
As for grounding, everything is simpler there. As long as at least one core is functioning, it exists. But as soon as she rubs it, the sound will change.
It is this factor that is the reason that the contacts are tinned and not exposed using a stationery knife.
A good example of frequency loss is an audio splitter. A device that divides one headphone input into two. Not only the volume sags, but also the frequency range. The sound stops pumping, it becomes quiet and flat, and the dynamics disappear. All for the same reason. The number of cores remained the same, but the number of outputs doubled.
From fountain pens to clumsy little hands, why do headphones break?
“Well, how long can I buy you things?!” - that’s how the picture stands before my eyes. I’m 5-6 years old, my mother picked me up from kindergarten and takes me home, simultaneously scolding me for my new shoes. Either I stepped in a poop, or walked through a puddle - my feet squelch unpleasantly, my face is smeared with tears and snot mixed in. At home there’s even more waiting: a nasty floor rag, which they’ll hand me and make me wash the dirty stuff off my shoes, then the obligatory itchy woolen socks so that I don’t even think of getting sick! And they’ll leave you without ice cream, but I saw dad bring it yesterday!
And of course, the obligatory lecture about starving African children, whose lifelong dream is to at least look at my new shoes. I feel like a bourgeois oppressor, although I have never seen a hungry black child, much less forced him to work on a plantation. But they exploited me - weeding strawberries in the country and doing homework. Righteous tears stretched to the knee, and the thought that things must be protected lasts a lifetime.
I think, based on the topic of my blog, you already understand that from boots to equipment there is only one step. I won’t say that I take great care of both, but sometimes I extend the life of my headphones - today I’ll share a couple of life hacks.
Features of headset restoration
Repairing a headset from a Samsung phone or another brand is a little more complicated than repairing regular headphones, because it is equipped with a microphone and a control button. There are usually four or five wires in a headset - one or two for microphone, two for headphones and ground. A control unit with a microphone is often installed where the cable branches to the left and right headphones. If a wire breakdown occurs above the area with the control unit, you will only need to repair one contact with or without a soldering iron
If the cable is deformed below the branching area, it is important not to make a mistake and connect the wires correctly
Thermal tube instead of tape
Using tape is not entirely kosher. Therefore, I propose to improve the technology a little, again without a soldering iron.
You will have to buy a heat-shrinkable tube, also known as thermal casing, at an electronics store or hardware store. This is such a clever tube that can shrink in diameter by at least half when heated. This miracle costs about $0.1 - $0.5 per meter.
We will need two thermal tubes with different diameters: 1-2 mm for the first and 4-5 mm for the second.
We put pieces of thin thermal tube on our twists. We cut the pieces with one and a half margin.
Now you need to heat the thermo tube. Usually I did this with a soldering iron, but we agreed that I didn’t have one, and the story was about how to fix headphones without a soldering iron, so I had to get out.
The method turned out to be quite effective and the thermo-tubes shrank. You can also use any other heater or put them in boiling water like Easter eggs. In principle, people can do it with a regular hairdryer.
While the thermotube is still hot, you can further flatten it with your fingers, then it will slightly stick together inside.
This thermo-tube must subsequently be put on the joint and also compressed with the heat of the lamp. In general, you can squeeze lighters on fire, but you can accidentally set fire to excess.
I used a piece 8-10 cm long. To strengthen the structure, the end of the thermal tube was put directly on the elastic band of the connector.
What to do if large headphones break
How to fix large headphones if they do not work. Sound loss or distortion is usually associated with a break in the conductor and mechanical particles entering the membrane of the sound capsule. If a wire is broken inside the structure, this can be easily determined by external inspection. It is enough to solder the broken wire back into place and the functionality of the product will be restored. Distortion occurs when small mechanical particles get between the membrane and the cover with holes. You need to carefully remove the capsule, remove small debris and remove dust from the holes with a soft brush. Sound distortion or wheezing occurs due to deformation of the membrane or misalignment of the coil. Such malfunctions are associated with a factory defect, which appears some time after the start of operation. Repairing a dynamic emitter at home is difficult or impossible, so it’s easier to purchase a new model. At home, you can repair and adjust headphones or a headset with a microphone.
The service life of AirPods wireless headphones, after which they stop working
Miscellaneous 08/18/2020 | 0
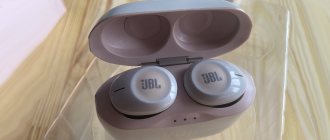
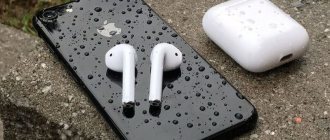
As you know, for several years now, Apple has been actively selling its branded wireless headphones AirPods around the world, which are extremely advanced, as much as possible, because it’s not for nothing that they manage to set more and more new records for total total sales. around the globe. Currently, this personal music playing device is the most popular device of its kind, that is, there are no more popular and widespread Bluetooth headphones in the world. However, the Apple product has at least one significant drawback, and that is their service life, after which they fail.
All portable electronics are powered by rechargeable batteries, and all of them have a certain lifespan, after which they lose their ability to store energy. Solving this issue in a smartphone or tablet is often quite simple, since you just need to simply replace the old battery with a new one, and such a procedure usually costs no more than 2,000 rubles (including the cost of the battery). However, in the case of AirPods, everything is different, since their case is non-separable, that is, it is impossible to disassemble these headphones in any way without damaging their structure. It is on this basis that we can conclude that they are disposable, because as soon as the batteries in each of the two headphones fail, it will be impossible to use them in any way.
Due to their design, these wireless headphones do not allow for battery replacement, so many people wonder how long they will last. The iPhones resource has calculated how long it will take for the batteries in the AirPods to completely “die,” that is, to make it absolutely impossible to use them in any way in the future. As it turned out, when used on a regular basis every day, the resource of these headphones, including the model with the Pro prefix, will last for a maximum of 36 months, that is, they can work for no more than three years, and this is the maximum period possible. When the headphones no longer hold a charge, they may discharge within minutes of being removed from the charging case.
You should be guided by the fact that Apple headphones in the form of AirPods can last 30 months or 2.5 years, but no more. Again, this figure is only relevant if the headphones are used every day for approximately three hours. Over time, the battery capacity will decrease, so at the end of its life cycle, each of the headphones from the Apple corporation will not work for more than one hour - you should also be prepared for this. The only way to once again get wireless headphones that can last about four hours on a single charge is to buy new ones. Thus, when buying any wireless headphones from the Apple corporation, you should be guided by the fact that they will not be able to last longer than three years with regular everyday use.
Recently, Xiaomi Air 2 SE was presented - new wireless headphones for 1,800 rubles, which are no worse than AirPods.
Attention! Until December 6, everyone can get Xiaomi Mi Band 5 for free, spending just 3 minutes. Join us on Google News, Twitter, Facebook, VKontakte, YouTube and RSS to keep up to date with the latest news from the world of future technologies
Join us on Google News, Twitter, Facebook, VKontakte, YouTube and RSS to stay up to date with the latest news from the world of future technologies.
AKKet.com Telegram channel
Receive notifications about new materials directly in the messenger - on iOS, Windows, Android and Linux. AirPodsAppleBluetoothHeadphones
Make sure your headphones are not broken
The most obvious reason. It is quite possible that nothing happened to the headphones, and the problem is not with them. This can be easily checked. simply by connecting the headphones to another device. Not necessarily to a smartphone, it can be a laptop, TV or any other device with a 3.5 mm jack on board.
If you can't hear sound when you use your headphones with another device, then you've identified a problem.
Just replace your headphones. In case they work with another device, the reason is something else. This means you need to try one of the other solutions listed below.
It is also recommended to connect another pair of headphones to your smartphone to make sure they work. While this is rare, there is still a possibility that they may not be compatible with your smartphone for some reason but work with various other devices.
For example, 5-pin headphones may not work in smartphones that have a 3-pin mini-jack connector.
Poor sound quality
All leading manufacturers of Bluetooth headphones are trying their best to bring their sound quality closer to the level of wired ones, but this is very difficult to achieve. Sound transmitted through the air somehow loses its quality. In good expensive headphones this is almost unnoticeable, but if you bought mid-price headphones, then the noise, lack of bass and low frequencies will be noticed even by a person far from music.
There is no point in talking about cheap headphones at all. In most cases, the music coming out of them is more reminiscent of continuous grunting with words than a pleasant song.
Wireless headphones are great for conversations, but if your goal is to listen to music with pleasure, you will either have to fork out a lot or buy regular ones.
Cardboard will help
How to tie your headphones so they don't get tangled in a table or pocket or bag? You will need the most ordinary cardboard, but it is better to take a thicker one; you probably have a box somewhere for equipment or even for phone accessories. Cut a small piece out of it in the form of a bone, that is, make a recess in the middle; you can make a hole for the earbuds and plug so that they do not dangle.
Insert the wire all the way into the hole for the earbuds to secure the headphones themselves, and wrap the wire around the middle, in the recess, so that it does not slide off the cardboard. When there is just a little bit of wire left to the plug, place it in its proper place. Depending on where you made the hole for it. Rolling up the headphones in this way is convenient and safe for them.
Steps
Part 1
How to determine where the breakdown is located
Prepare the necessary tools.
Depending on what needs to be fixed, you may need the following tools:
- soldering iron and solder;
- knife or scissors;
- heat-shrinkable tubes;
- wire stripper;
- multimeter
Make sure the problem is with your headphones.
Take your other work headphones and connect them to your device (for example, the headphone jack on your computer); If there is no sound, it is most likely the headphone jack that is broken, not the headphones themselves.
To check this, plug your headphones into a different jack and listen for sound.
Find out if the cable is broken.
Connect headphones to the audio input, play a tune, and then bend and unbend the cable. If you hear intermittent sound from your headphones, go to .
Determine if the plug is broken.
If you hear a sound from your headphones when you press or twist the plug (in the jack), go to .
Try repairing headphones that go over your ears.
If the headphone cable comes loose (as with most Bluetooth headphones), try connecting it to other headphones - if that doesn't work, the problem is likely with the headphones themselves. ; To do this, read the instructions for them to find out how to make repairs.
Cut off the old plug.
Place the knife or scissors approximately 1 cm above the junction of the cable and the plug, and then cut the cable.
Some cables have removable plugs. Keep in mind that most plug problems are caused by frayed wires inside the cable.
Strip the insulation (3 cm) from the end of the cable.
Do this using a wire stripper. You'll see wires for the right and left headphones, as well as at least one ground wire.
If you find two ground wires, you will have to solder them.
Sort the wires by color.
Typically, the red wire is for the right earphone, the white (or green) wire is for the left earphone, and one or two black or bare copper wires are for ground.
Strip the insulation (1 cm) from the end of each wire.
If the wires are enamel, skip this step.
Twist wires of the same color.
If you find two ground wires, twist their bare ends together.
If wires of the same color are different, be sure to twist the bare ends of the frayed wires together.
Remove the enamel from the ends of the wires.
If the wire is insulated with enamel, burn it by touching the soldering iron to the end of each wire.
Skip this step if you see bare copper on the ends of the wires.
Place the housing of the new plug onto the cable. In this case, the thread inside the housing should be directed towards the exposed ends of the wires
(Please note that the metal plug unwinds into two parts - the housing and the plug itself.)
There should be two contacts at the end of the plug. If you only see one pin, it's a mono plug, not a stereo plug.
Apply a little solder to the bare end of each wire.
This is called "tinning" the wires; it is necessary to solder the wires to the plug.
Let the solder cool completely before continuing.
Sooner or later, every person will be faced with the fact that their phone headphones (or one earphone) stop working and will think about the question: “How to fix the headphones?” For this simple process you need to stock up on time, knowledge and the necessary tools.
Repair of in-ear headphones
Wired in-ear headphones are very popular these days. Low price, small size and acceptable sound quality make them indispensable for use in headphones for mobile devices.
Because headphones are used on the go, the wires are constantly bent and then frayed after a while, usually at the phone input, rarely at the jack.
The location of the wire break is usually obvious; the sound in one of the phones begins to disappear from time to time when the wire is moved. In this case, even without instruments, it becomes clear where the wire wear is occurring. Here is an example of self-repairing HTC headphones in a channel.
In this headset, the wire at the input of one of the phones wears out. To fix it, you need to open the case. To do this, insert the blade of a knife into the space between the body halves and twist it slightly to separate the halves.
Typically, the phone halves fit together tightly, thanks to a groove at one end and a raised shoulder at the other, so they pull apart smoothly.
After disassembling the phone, it was clear that one of the pairs of wires was broken, and some of the wires in the second wire were also broken. Considering that the wire at the entrance to the earphone is also worn out, it is necessary to remove all the unusable part.
So the wires were released from the phone, the cable was cut a couple of inches and the wires were stripped of their insulation. The mounting bracket was then removed and crimped onto the cable in its new position. The position was chosen based on the fact that when pulling the cable, the soldered conductors would have poor pull.
What remains is tin and solder, observing polarity, wires to the headphone transmitter. The pliers were used as a third hand. The handles of the pliers were equipped with rubber bands, which provided easy clamping of the phone.
All that remains is to put the halves together and test the headset in action. During the repair, I also resoldered the wires of the second headset, since they will fail in the near future.
Color wiring of wires
The cable coming from the plug contains several wires of different colors. High-quality cables use tinsel, in which thin wires are braided with nylon or linen wire, which increases the mechanical strength when stretching and bending the wire.
There is no international standard for color-coded wires. Therefore, manufacturers solder wires to the connector pins in accordance with their internal documentation.
But from practice we can conclude that ordinary GND wire is not painted by all manufacturers and has the color of copper coated with insulating paint.
The headphone wire broke. How to fix it?
Is it possible to repair headphones if the cable is broken?
- First of all, if the headphones do not work, you need to take care of removing the insulation and protective winding. To do this you will need special wire cutters (or a knife). It is enough to clear only 1.25 centimeters, and then continue the cut in the desired direction in order to find the place where the wires are broken or broken.
- It should be taken into account that headphones from a telephone usually consist of two wires that are connected together. For each wire, there is also an insulated (signal) and bare (ground) wire.
- Now it's time to cut the headphone wire. It must be cut exactly in half. It may happen that the wire splits. To avoid electrical damage to the cord, shorten both halves of the cord to the same length.
- If only one wire is broken, then you can proceed to soldering without cutting and splicing. This will reduce the time, but the result will be the same.
- After the manipulations, you need to put on the heat-shrinkable tube. It's similar to headphone isolation.
- After this, it is necessary to cut off the protective winding.
- Twist the wires.
- Solder all connections.
- Heat the heat shrink tube with a hairdryer to shrink it in size.
Buy GripStick
If DIY fixes don't work for you, it may be time to consider a professional solution. The GripStick is the result of a successful Kickstarter campaign, designed specifically for removing damaged headphone plugs.
The GripStick can be purchased online from the manufacturer's website nightek.com for $24.95. Although this is expensive, it is much less than paying a professional to remove a lost headphone jack. Likewise, if your phone is under warranty or on a smartphone, it may be inconvenient to send it in for repair (this usually is the case). Purchasing a GripStick will avoid this problem.
Using GripStick is easy. Insert the cylinder into the headphone jack, push it into place and pull it out again using the ring. The lost piece will be held by the GripStick and your headphone jack will be free to use again!
[Tips] How to extend the life of your headphones
Do not expose the headphones to sudden temperature changes. In winter, run the wire under clothing.
Do not insert or remove headphones while the source is running. This does not mean that the device needs to be turned off completely, but it does mean that the music needs to be paused. The design of the headphone jack and its jack in a player or phone is such that when you connect headphones to a working device, the first signal is sent to the left channel, that is, the entire output power of the device goes to one left channel, to the left driver. For example, the total power of the player is 40 mW - there should be 20 mW per channel and the headphones are designed for this, but when connected, all the power - 40 mW - goes to one left channel. Due to frequent such loads, the efficiency of the membrane may drop, which is why the channel will begin to produce severe distortion, loss of volume, etc. up to membrane destruction.
Headphone plug repair
headphones KB EAR Opal cable
How can I repair a headphone plug? Interesting? Read on...
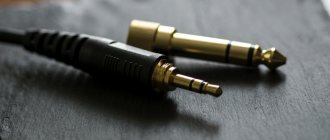
Modern gadgets designed for playing sound files always have a headphone jack. The plugs used in such sound systems are called TRS or Jack. They are of the following types:
- Micro-jack 2.5 mm
- Mini-jack 3.5 mm
- Jack 6.3 mm
Micro-jack connector with a diameter of 2.5 mm is used in the smallest devices designed for sound reproduction. These are electronic toys, miniature players and photographic equipment. It has two slats and transmits the sound signal in monophonic mode.
Rarely used in modern devices. All household equipment and mobile communication devices are equipped with sockets for connecting a Mini-jack connector with a diameter of 3.5 mm. It has three slats - left channel, right channel and ground. A universal headset consisting of headphones and a microphone connects to devices via a four-pin adapter. The 6.3 mm jack is used in professional audio equipment.
How to fix headphones without a soldering iron
Unfortunately, you won’t be able to solder the headphones without a soldering iron. Of course, if you wish, you can solder with a hot nail. But to do this you already need to know how to solder. So we'll forget about soldering.
We need an AUX cable. AUX cable is now sold in any stall or passage for absolutely ridiculous money. It is used to connect your audio device to a subwoofer or car radio and looks like this:
But how nice it is to repair headphones with your own hands without a soldering iron, and you can survive the lack of buttons.
Thanks to the Chinese brothers, now there are quite tolerable laces starting from $0.5. The wire used in the article cost about a dollar. Well, I think every house has a paper knife, a lighter and some scotch tape lying around in closets.
So we scraped the bottom of the barrel, found all the tools, took them to the stall for beer with a string, what next?
Repair of a headset with a sound boost function and a microphone
Headphones equipped with a microphone do not differ fundamentally from the standard system. However, to know how to make them work, you need to understand some of the nuances of their operation. The causes of problems in such a headset, as in conventional headphones, can be broken wires, failed plugs or broken headphone membranes that require replacement.
Sometimes exotic breakdowns occur in the form of stretched wires. This situation is not typical, since in ordinary life wires are more likely to be crushed than stretched. In this case, the damaged section of the cable can be easily felt - a strong thinning of the core will be noticeable in this section. You can fix the damage using your usual soldering iron. Remove the insulation and protective varnish from the wire. Experts say that this can be done with a candle or lighter. After this, their ends are tinned and reliably soldered - the DIY headphone repair is complete.
Repairing broken headphone wires is easier than it seems, but it will take some time. Stock up on all the necessary materials so as not to interrupt the process and not leave exposed parts unattended. Be careful with small wires, because they are very easy to damage with wire cutters or a knife.
Read also: Do-it-yourself gasoline wood splitter
Regardless of the cost of the headphones, they may become unusable as a result of improper handling or force majeure circumstances. Sometimes you need to carry out repairs right away, and in most cases without having the necessary tools at hand. To do this, it is enough to know how to repair headphones without a soldering iron.
How to twist headphones so they don't get tangled
The method is very simple and any child can master it, and now we will show you step by step how to make sure that the headphones do not get tangled, how to fold them
them correctly.
1. We fold our fingers like a goat and put a loop of wires on it, as shown in the picture.
2. Now, holding the tip, we wrap them on two fingers crosswise or in a figure eight.
3. At the end, you need to leave a small piece of tablets and carefully remove them from your fingers.
4. We wrap the remaining end around the center of our figure eight and thread the “ears” into one of the loops.
This is one of the easiest ways to tie headphones so they don’t get tangled, how to wrap them
them efficiently and quickly. There is more, but this is the best, so there is no point in loading you with unnecessary information and offering other options, because it has no competitors.
Now you know what you can do to prevent your headphones from getting tangled, how to assemble and make
them
so as not to get confused
, and finally, detailed video instructions.
Identification of the rupture zone
To repair damaged headphones, you first need to find a break, and this can be done by probing or using a multimeter. Probing the cable to detect a breakdown is the easiest way
You need to connect the headphones to the sound source, start the music and begin to carefully bend the wire in the direction from the plug to the speakers, without missing a single centimeter. If in some place the music begins to be interrupted, a crackling sound or other noise appears - this is the place where the wire breaks
Using a multimeter is a professional and more accurate way to detect cable damage. It is necessary to turn on the measuring device, set the sound diagnostic mode, and then connect the probes correctly: black to the COM connector, red to mA
Now you need to carefully make notches near the plug and the earphone itself, and then install the probes in them. If the device beeps, this means that the wire is intact, and the problem needs to be looked for elsewhere
If the multimeter is silent, you need to make a cut in the middle, and then check both halves of the cable one by one. Where the wire is intact, the device will beep. The tester is silent on the damaged part of the cable. In this area you also need to find the middle and make a cut again. In this way, you should check the cable until there remains a faulty section a couple of centimeters in size.
Causes and diagnosis of malfunctions
With regular deformation of the connecting cables, the wires inside them fray and may break. The areas of greatest risk are the connection between the cable and the speaker or plug.
However, with a mechanical impact such as a strong blow (the fall of a heavy angular object - a box, for example) or compression (squeezing between the door and the jamb), this can happen to any place.
Diagnostics without special tools begins with probing the cable. Bend the wire at a right angle with your thumb. Move down and listen to the sound in your headphones. If at some point a sound appears or becomes louder, then this is the fracture site. Try twisting the plug and speakers using the same logic.
If you have a tester, then do the same, looking at the resistance values. If the wire is not damaged anywhere, then the readings will not change regardless of its position.
Basic rules for using headphones
The user can protect the headset from damage if they follow a number of important rules:
- Do not wash dirty tips without removing them from the headphones. Water that gets inside the case will damage the speakers. Do not clean the plug, connector and earphone mesh with a needle or other sharp metal object.
- Avoid blow-drying your hair while wearing headphones. Sudden immersion in cold has a similar negative effect. Due to the temperature difference, condensation forms inside the case, destroying the speakers.
- Do not remove the plug from the phone socket without stopping the playback of the music file.
- To store the headset, use a hard case, and the plug is removed from the connector of the player or phone.
- The earphone is removed from the ear by the housing, and the wire is secured to the clothing with a clip.
The rules for using the headset are simple and should be followed.
Headphone device diagram
Telephone headphones consist of the following parts:
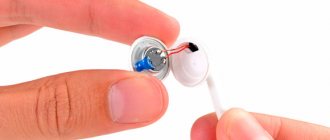
- Plug. It is a metal (usually copper) pin with a diameter of 3.5 mm. Divided into 3 or 4 parts using polymer spacers. This separation is necessary to ensure separate signal transmission for the second channel and microphone. On the back side there are seats for soldering wires leading to the speakers.
- The wire. Three or four wire wire. The wires are soldered to the plug seats on one side, and to the speakers on the other. If we are talking about a four-wire wire, the 4th wire and ground are also soldered to the microphone.
- Speakers. They are dynamic heads that are designed to reproduce an audio signal coming from a plug along the wire cores. They consist of a metal body, a permanent magnet, a coil and a membrane. Current is supplied to the coil. Since it is located inside a permanent magnet, this results in opposing magnetic fields. The coil is pushed out of the magnet and pulls the membrane along with it. It creates air vibrations and thereby generates sound waves. The speakers are hidden in plastic housings that are inserted into the ears.
- Microphone unit. Allows you to answer calls using headphones. Consists of a microphone, a response board with a button, and a protective housing. It is connected to the plug using a separate core, as well as a common “ground” wire.
Schematic representation of a headphone device without a microphone unit.
Connecting wires by soldering
Once a damaged section of the cable has been identified, it is recommended to cut it out completely, rather than looking specifically for the break point. Next, you need to remove the outer insulation from the wire by about one and a half to two centimeters. Under it you will find several wires (from three to five, if the headphones have a microphone), which also need to be cleaned of protective insulation, if present. These steps will need to be repeated for the second piece of cable.
Next, you need to firmly connect the wires of the same color, and then apply a layer of solder on top with a soldering iron. After the solder has cooled, you need to put pieces of heat shrink on the exposed wires and heat them with a hairdryer so that the tube shrinks and wraps them tightly. This is necessary so that the wires do not touch each other and cause a short circuit. Next, the insulated pieces of cable need to be assembled together, a piece of heat shrink of a larger diameter must be put on them and heated. This way they will not dangle, and the repair site itself will look beautiful.
Cable break near the plug
If one ear does not work, and diagnostics of the break point showed that the cable at the plug or the element itself is damaged, it is recommended to replace it with a new one. To do this, you first need to purchase another plug, and then cut off the old one along with a couple of centimeters of wire. Next, the new plug is unscrewed, and the insulation and braiding are removed from the cable by about 1.5-2 cm.
After completing the work, you need to assemble the plug, and it is important to make sure that the wires are not connected to each other. Otherwise the headphones will not work
Read more about this in our article “how to repair a headphone plug.”
Break near the speaker
If, upon inspection of the accessories, it is discovered that they are torn at the speaker, you will need to disassemble the earphone to repair it. It is usually connected with latches, screws, or glue.
The wire inside is almost always tied in a knot to prevent it from being pulled out during careless movement. It needs to be cut off, the insulation removed, a safety knot made again and soldered to the contact with a soldering iron
After the repair, you need to reassemble the earphone. Other reasons why one earphone does not work are in our material.
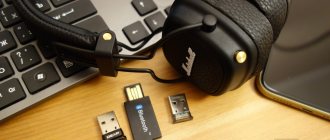
Home repair of wireless headset and headphones
There can be many reasons why a Bluetooth headset may not work: inability to charge, fewer working hours than expected, or lack of audibility in one of the audio outputs. To eliminate any of these problems, you will need to disassemble and detect the malfunction.
The good quality of the headphones can be determined during the disassembly process by the density of the insulation and soldering of the contacts. The problem is mainly associated with the failure of the batteries.
To disassemble the wireless headphone housing, you need to remove both housings from the speakers, then remove the screws to get to the circuit board and battery. First select the desired model of the battery to be charged and solder the old one to the new one. See an example of dismantling Bluetooth headphones in this video.
Connecting wires without a soldering iron
If the user wants to do without a soldering iron to repair torn headphones, he can use solder paste, solder, or make a reliable twist.
Solder
You can fasten wires with solder without the help of a soldering iron. For this you need a small metal container. You need to put a small amount of solder in it and also add rosin. Now you should light the stove, place the dishes on it and melt its contents.
Next, you need to lower wires of the same color one by one into the solder and run them along a wooden block so that the substance is distributed evenly. You can perform the same steps and remove excess solder using a simple rag. Next, the wires are connected together, after which you need to wait until the material hardens. After this, the exposed sections of the wire must be insulated using heat shrink tubing or electrical tape.
In the same way, you can solder a wire if it breaks at the plug or near the earphone. In this case, you need to pour crushed solder and a little rosin onto a flat surface (contacts), and then heat it so that the substance melts. After this, the material is evenly distributed with any convenient object and the prepared wire with applied solder is applied to it.
Another convenient way to solder two wires together without a soldering iron is to use foil. The action diagram is as follows. It is necessary to remove the top braid from the cable, and then remove the insulation from the contacts (usually varnish with thread). Next, you need to cut strips from the foil along the width of the exposed wires. They are used to make grooves into which contacts twisted in pairs are placed separately. Solder and rosin are poured on top of them and distributed evenly along the surface. Now you need to wrap the foil tightly around the wire so that there are no gaps, and heat until the solder melts
Next, the foil is removed, and the wires are tightly compressed with pliers, but this must be done carefully so as not to damage them. Excess solder can be easily removed with fine sandpaper
Solder paste
Solder paste is more often used than regular solder to repair broken wires without a soldering iron. This process is faster and easier than working with solder and rosin.
To repair headphone wires, you need to coat the exposed contacts with paste, connect them together and heat them over an open fire or in any other way. With this connection, soldering occurs deep between the wires, so its strength is significantly higher than when using solid solder.
Twist
Twisting the cable is the simplest solution. You need to take two identical wires with a length of 2 to 4 cm, connect them together and braid them, after which you need to put a heat-shrinkable tube on top or wrap electrical tape. The connection should be very strong, but do not tug the cable too much during operation. If everything is done correctly, the headphones will last for a long time.
Use inside biro
Here's a fun fact: the pipe running up the inside of your bio (like a Bic or Paper Mate) is almost exactly the same diameter as the headphone jack. With a little force and adjustment, this can be used to remove a broken connector from your device.
To do this, remove the inner pipe. This is a piece with ink in it, and is almost always removed by pulling the pen nib. At the bottom of the tube, opposite the tip, you should find that there is no ink there. You can use this part of the tube to remove a broken plug. Simply insert it firmly into the headphone jack and remove. The tube should grab the broken part and pull it out.
If this doesn't work the first time, you have a few options. First, slightly widen the tube with a nail to ensure a tight seal against the plug. Alternatively, you can quickly heat the end of the tube to soften it and then insert it into the socket. Leave it for a moment, then walk away.
Also, if you have a very steady hand, try hot glue or super glue in a very small amount on the end of the tube before inserting. The video above demonstrates a similar approach using chewing gum.
Finally, you can skip some pressure. If you can, cut a tube two inches long (or find something similar in size, such as tubing from a can of lubricating oil), then insert it into the headphone jack. Then tap it with something hard (like a shoe or shoe) to make sure the missing part is pinched. When you're happy that the handset is holding it, remove it from the phone.
What and what factors influence shelf life?
The manufacturer sets a warranty period for headphones. In most cases, this period is 1 year, calculated from the moment the consumer purchased the product. During the stated period, the manufacturer undertakes to comply with the conditions under which the user will be able to use the accessory for its intended purpose and bears responsibility in the event of defects in the product sold.
If the headphones break down ahead of schedule, the consumer is given the right to repair and maintain the device, as well as to eliminate any identified deficiencies free of charge.
The shelf life of such a device is determined by many influencing factors. Long-term performance of the headphones is possible with strong fastening of the cups, a high-quality cable, careful handling and listening at low volume.