4.8 / 5 ( 35 votes)
In today's article we will tell you how to connect a microphone to a computer via:
- audio jack;
- Bluetooth;
- USB port;
- adapter;
- external sound card;
- decoder-transmitter.
And for laptop owners - how to connect a microphone to a laptop via:
- audio port;
- USB;
- Bluetooth.
We’ll separately look at how to connect your phone’s microphone to a computer.
Connectors on the sound card
To set up a microphone - First you need to connect it correctly, of course.
Typically, on a sound card, the microphone jack (can also be used for speakers) is colored pink and has a microphone label on it. You can also say “Line up.” .
Microphone jack
After connecting the microphone, you need to configure it in Windows. How do you do it?
External devices
The above connectors are always present in discrete sound cards - both those connected via a PCI slot and those adapted for USB. However, this is not limited to this matter - there can be more of them, up to 6 connectors. What is this for?
p, blockquote 5,0,0,0,0 —>
For connecting a speaker system with a large number of satellites - for example, 5.1 format. Such sockets are marked as follows:
p, blockquote 6,0,0,0,0 —>
- Gray (Side) – side speakers in 8.1 systems;
- Black – rear speakers in quad systems;
- Lime or green (Front) – front speakers in systems with the number of satellites from 4;
- Orange – central monitor or subwoofer in systems with 6 or more speakers.
Connecting a microphone for Windows 10
Some beginners who have never used a microphone before may have difficulty connecting it. The difficulty is that the microphone connector in the system unit coincides with the connector for speakers and other audio headsets. But despite the same shape, the functions of these connectors are very different. If you connect a microphone to the speaker jack and speakers to the microphone jack, neither the speakers nor the microphone will work.
To properly connect the microphone to your computer, follow these steps:
Step 1. Locate the microphone jack on the back of the system unit.
For the record! It is important not to confuse this with the speaker jack. The color difference is that the microphone jack is pink, while the jack for speakers and other audio devices is green.
Find the microphone connector on the back of the system unit
Sometimes these connectors may be located on the front panel of the system unit (at the bottom where USB ports are usually located), but this is not always the case.
The connectors are located on the front panel of the system unit.
Step 2. Insert the microphone plug into the pink jack. On new computers, in addition to the color, the logo of the corresponding device is displayed (in this case, you will see the microphone logo).
Insert the microphone plug into the pink jack
Microphone connected
Step 3: Verify that the connection was successful. To do this, find the sound icon on the taskbar and right-click on it.
Find the sound icon in the system tray and right-click on it.
Step four. Select the "Recorders" menu. .
Select the Voice Recorders menu.
Step 5: Review the list of devices to find your microphone. If it appears there, you have connected it correctly.
Browse the list of devices, if there is an icon with the name of our microphone, it means the connection is established correctly
Driver check
First you need to make sure that the microphone is working properly and is detected by the system. The first sign that the device is recognized by the computer is the corresponding sound when plugged into the connector. However, this is not a guarantee that the system was able to correctly install the driver and configure it. To check this, do this:
- Right-click on the “Computer” icon and select “Properties” from the menu.
- Now go to the “Device Manager” section.
- We expand the subsection “Sound, video and gaming devices”. A list of sound devices that are detected by the system is displayed here. In most cases, these are High Definition Audio, Realtek and similar solutions. There should be no yellow exclamation marks near the icons.
We also advise you to pay attention to whether the Device Manager sees unidentified devices. It is quite possible that one of these is an external microphone with a built-in audio card, especially if we are talking about a USB connection.
If you have lost the “Computer” shortcut from your desktop, then you can open “Device Manager” in a different way. To do this, go to the Start menu and write the name of the application in the search bar:
To check whether the driver is installed correctly on your audio device, you need to follow these steps:
- In the same window, right-click on the device to open an additional window. The “General” tab displays the current state of Windows 7. If you see the inscription from the screenshot, then everything is fine with the driver.
In the “Driver” tab, if you click on the “Update” button, a utility will launch to search for new driver versions.
- You can trust the search to your computer or specify the path to the file manually if you downloaded it in advance.
- After completing the procedure, close the window with the marked button.
After any actions with drivers, you must constantly restart your computer - remember this rule!
If we are talking about the built-in microphone in a laptop with a licensed OS, then the driver must be installed by default before purchasing the device. Otherwise, you will have to download proprietary programs from the laptop manufacturer's website. The microphone is connected, the driver is installed, the device is detected by the computer correctly - now we move on to configuration using standard Windows 7 tools.
How to connect a microphone on Windows 7
Each user independently chooses which operating system to use. But systems may differ from each other in interface, speed, and various functions. As a result, settings may differ between systems.
To properly configure the microphone in Windows 7 so that it works smoothly, it is best to update the audio driver.
If you have Realtek hd installed on your device, you just need to update it, hence the audio driver will be updated along with it. You can check the presence or absence of a program as follows:
- Go to "Control Panel"
- Select "Hardware" then the "Recording" tab where you will find "Microphone"
- Right-click on “Microphone” and its properties will be available,
- In properties, select "Layers" and move the wheel to o.
- When headphones are connected, the level should be set to “60” or “70”,
- Then you need to adjust the “Gain” by selecting the decibel level “+20”,
- Save the updated settings.
Disabling Monopoly
It is possible that the microphone refuses to record sound because it is already being used by some program. By default, monopoly is enabled, and you can disable it in the microphone properties described in the “Using Standard Windows Tools” section.
Close all applications that may be associated with the micron, and then open one. There is a chance that some program did not close completely, but went into the background, taking away the rights to the microphone. Therefore, it is better to restart your computer to ensure that all running applications are completed.
Alternative connection method (for laptop)
Some laptops do not have a dedicated pink microphone jack. They only have a speaker or headphone jack, which is painted in the green color of the system units. In addition, such laptops are equipped with a built-in microphone, but its quality is quite mediocre (this is normal for Skype communications, but not for high-quality audio recording).
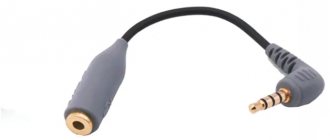
If you are not satisfied with the quality of the built-in microphone, you need a special adapter that will allow you to connect any microphone to your laptop. These adapters come in two types:
- splitter cableThe headphone jack connects directly to the headphone jack;
Splitter cable for connection to headphone audio jack - USB arresterThe USB port is connected to the USB port.
A USB splitter that connects to the USB port of a laptop.
You can buy such a splitter at any hardware store or order it online. It is not expensive. To connect a microphone to a laptop with an adapter, follow the instructions below:
- Connect the adapter to the headphone jack (or an available USB port if you have a Type 2 adapter).
Connect the adapter to the headphone audio jack - Insert the microphone into the appropriate jack on the splitter. Not all splitters have these connectors in the green and pink colors that you are used to seeing on system units. Quite often they are the same color as the entire divider chassis. Therefore, you should pay attention to logos - their meaning is intuitive. We will show you these logos on the USB connector adapter as an example.
Microphone and headset logo on USB adapter - Check if the microphone is connected to the handset. The verification process is described in the previous instructions.
Via an adapter if you have a headset jack
In many laptops, there is a single connector for both external acoustics and a microphone (it is also called a “headset”). Inside, the pinout of the contacts has been partially changed. Therefore, to connect audio recording devices you will need to use an adapter. This is not necessary for headsets (as well as lavaliers) - there, by default, the device should be detected normally without any additional settings.
But before you connect an external microphone to the combo jack of the laptop, you must enable automatic detection of recording devices in the audio card settings (required, for example, if you are using a DAC from Conexant or Via HD).
Settings
The last step in connecting a microphone is to adjust the sound. Having called up the “Control Panel” screen, you need to enter the “Sounds and Devices” menu. Then the Audio section opens with Record Audio and finally the Volume tab. Click on the word "Microphone" to increase the playback volume to the desired level. As a general rule, you should set it to maximum for quality use. After applying the Enhance function, you must save your changes. In the same menu, you can also eliminate sound defects and noise using the Noise Reduction function.
If the microphone is connected to a Windows 7 computer, it is recommended that you also update the audio driver during installation. The easiest way to do this if Realtek hd is present on your system is by installing an update that will automatically update the required driver. The next microphone configuration is as follows. In the “Control Panel”, select “Hardware”, and then the user follows the chain “Recording” - “Microphone”. By right-clicking on the word "Microphone" you can see its possible properties.
After opening the “Levels” section, the video should be raised to “100”, but if headphones are already connected, leave it at “60-70”.
“Gain” is usually set to a level of “20” in decibels. All updated settings will be saved.
Microphone settings in Windows 10 are carried out using a different algorithm. By right-clicking on the volume icon, you should find the “Recording Device” section. The Recording tab opens Microphone Properties and then displays the Advanced section. The Default Format checkbox is selected and the Studio Quality option is applied. The changes you make are applied or simply saved.
In the microphone settings menu, no matter what system you're using, you'll find roughly the same settings and functions. After examining the contents of the “General” tab, the user will be able to change the microphone icon, its icon and name, as well as find information about available drivers. This tab also disconnects the microphone from the main unit. The Listen tab allows you to hear the sound of your voice, which is necessary to control the microphone.
The “Levels” tab can bring the greatest benefit to the user. Here you adjust the volume and, if necessary, connect the gain. Typically, volume is kept at 20-50, although quieter devices will require a setting of 100, as well as additional gain. In addition, the recording format, monopole setting and signal processing are determined for the microphone, which is usually only required for studio recording. You should always finish changing settings by clicking Apply to save it.
How to check if the connection is correct
If you follow the instructions, and when the equipment is in working order, notifications on the screen will indicate the fact of connection. You can also check through Device Manager. There, in the “Audio Outputs” or “Sound Devices” tab, the connected device should appear.
If everything is in order with the physical installation, check the functionality:
- Click “Start” – “Control Panel” – “Hardware” – “Sound”.
- Go to the “Record” tab.
- The connected model will be displayed. If everything is normal with the drivers, there will be a green arrow on the left indicating an active connection.
- They say something into the microphone - if the scale fills up, then everything is working.
If the scale remains in place, this indicates a hardware malfunction or a weak signal. How to improve communication:
- Open the “Recording” tab, select the device with the mouse, and click “Properties”.
- Go to the “Levels” tab, where you adjust the volume and gain (recommended value is 20 dB).
- To save the changes, click “Ok”.
You can check your equipment using special sound recording programs, and even in Skype by going to the settings, “Sound and Video” tab.
Connecting a wireless microphone to a PC
If you don't want to worry about adapters and wires, buy a wireless microphone that works via Bluetooth.
- Charge the device or insert batteries.
- Turn on the wireless microphone and Bluetooth on the handset. To do this, use the Fn + F key combination.
- Right-click on the context menu of the Bluetooth icon in the system tray (where the watch is located) and select "Add device...".
There is an alternative method in Windows 10: press Win + I, visit "Devices" and turn on Bluetooth in the window.
- Click "Add Bluetooth or...".
- Specify the device type.
- After scanning and detecting the microphone, select it from the list.
If successful, a message indicating that the wireless speaker is ready will appear on the screen.
If Bluetooth does not turn on (the switch is not active) or the interface icon is missing in the tray, check whether the RF transceiver driver is installed and whether the module itself is activated on the handset and microphone.
- Open Device Manager via Win + I menu.
- Expand the "Bluetooth" section to make sure the driver is there.
If this option is not listed or has a yellow icon next to it, reinstall the Bluetooth software from your laptop's installation disc or PC support site.
Suddenly a gray downward pointing arrow appears on the radio icon, right click and select Enable Device.
The following steps will also help return the icon to the tray:
- Press Win + R and execute the command “ncpa.cpl”.
- Call up the Bluetooth connection properties.
- On the second tab, click on the “Settings...” link.
- Select the checkbox to display the Bluetooth icon in the notification area.
- Save the changes with the “OK” button.
The microphone will work.
Useful information for installing and configuring a microphone
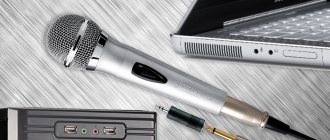
What do the audio outputs look like in the system unit on the motherboard?
The picture below shows standard “Jack” connectors (they are typical for personal computers with built-in sound cards).
Standard jack connectors
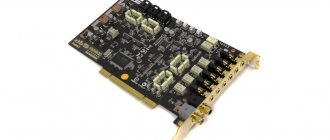
Next picture. So-called separate connectors.
This arrangement system may vary slightly, but this does not play a big role. The main feature of separate sound outputs is the ability to separately connect headphones and a microphone .
Next, it is worth considering the installation of various system equipment.
Headphone plugs can be connected to the above-mentioned connectors on the motherboard. However, combined devices can only be connected through a separate adapter. If you do not use it, the microphone will not turn on.
How to tell if a microphone has been found
To do this, go to the Control Panel of the Windows operating system (type “Control Panel.” ). On a par. “ Setting options ” select the “ Hardware and Sound ” item. Next press "Sound". and the sound settings will open.
In the window. "Settings". Click on the “Record” icon. to search for available devices. Here you can check for yourself whether the microphone is working in the Recording tab. .
Microphone properties
You can find and install the device in this list, then click the "Property" button. to change settings (recording volume).
Microphone recording volume level
If you can hear yourself in the headphones when the microphone is connected, this can be solved !
What to do if the sound when recording or talking is very quiet
You can adjust the microphone sound volume using system tools in Windows 7, Windows 10. To do this, you need to go to the recording device settings window, as shown above. Here you just need to select the name of the model you are using with the left mouse button and click the Properties button. It is located in the lower right corner of the window.
In the device properties, sensitivity levels are adjusted on the tab of the same name. Having switched to it, you should use the slider to set the acceptable sound volume. To save the settings, just click OK and close the settings window.
Connecting a microphone to a laptop is sometimes very difficult. We are talking about old devices - their connector does not meet modern standards. Therefore, to use a very old microphone, you cannot do without qualified assistance. The device must be taken to a workshop or electronics specialist to re-solder the wires to a modern interface. Only after this can you connect the microphone to the laptop using one of the methods described above.
USB connector instead of a plug
After the described steps for setting up a device with a regular connection, many wondered what to do if I have a USB connector.
In fact, there are fewer problems with it than with the previous one. Connect the device through the appropriate input, wait for the drivers to install automatically and check its operation. That's all. Quite simple, fast and without problems.