- Let's say the speakers have 2 RCA inputs (tulips), then the connection is made using a Mini jack audio cable
(3.5 mm jack) to 2 RCA. Mini jack connects to the sound card (green output) if you want to use them as front speakers or as a stereo pair. Or using an audio cable 2 RCA - 2 RCA and a mini jack adapter to 2 RCA inputs.
- There are 2 terminals on the columns. In this case, a cable from any headphones with a mini Jack 3.5 mm will suit you. Cut off the speakers and carefully strip the wire. Connect the stripped ends to the terminals, and the mini Jack plug to the sound card.
- Buy an inexpensive stereo amplifier, especially if you want to use speakers from a formerly decent music center, it will be worth the cost.
PS Special sound volume using this method of connecting speakers to a computer
you can’t achieve it, the output power will be several watts, since passive speakers require an amplifier, but at least save your speakers from the fate of ending up in the trash.
How to connect 5.1 speakers to a computer (active acoustics)
Connecting an active speaker system for a PC is a fairly simple task, so I won’t go into this topic, but many people still have questions.
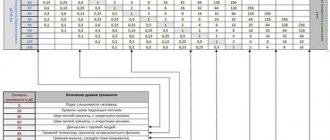
You need to figure out how many outputs or sockets your computer’s sound card has. As a rule, modern built-in sound cards allow you to use 7.1 acoustics (marked with colored sockets on the motherboard).
Green output - front (front) speakers
Orange output - center channel and subwoofer
Black output - rear (rear) speakers
Gray output - side speakers (surround speakers)
Blue - line input (electric-acoustic guitar, player, etc.)
Pink - microphone.
Depending on this, you will be able to connect the speakers to your computer. If you decide to connect 5.1 speakers, then several sockets will be used (green, orange, black). Connect the cable with the green plug to the audio output connector (green) on the rear panel of the system unit, etc. Connect the cables to the appropriate connectors (refer to the colors) on the sound card control module; when you connect the cable to the sound card, the program will show which type of speaker serves a specific socket. As a result, all 3 above-mentioned connectors on the module must be used. The speakers and subwoofer are connected with an RCA - RCA cable (tulip - tulip), one end of the cable into the subwoofer (since it most often contains an amplifier), and the other end to the corresponding speaker. On the subwoofer, each RCA output is labeled according to the type of speaker, so you can't go wrong.
Set up your computer by selecting 6-channel mode in the sound card driver application and in the Windows Sound Control Panel. If you have a 7.1 speaker system, then you will have to additionally use the gray connector on the motherboard for the side speakers. As a last resort, use the instructions for the motherboard, especially when connecting the headphone and microphone jacks on the front panel of the system unit of your PC.
How to find 60 GB of native voice in Windows files
One of the problems with modern computers is the modest capacity of solid-state drives, or, in other words, SSDs. Even 256GB drives quickly become filled with games and applications. Imagine my surprise when space began to leak on the system disk. An attempt to clear it using standard means showed that I have almost 60GB of temporary files. And after cleaning, nothing changed - these files were not deleted after a sort of ongoing cleaning. But no viruses or errors were found on the computer, which made me look askance at Windows itself.
So in C:WindowsTemp
58GB of audio recordings in WAW format were discovered with names like
sam_ref_DATE_TIME.waw
- looks more than suspicious, don’t you think?
Six months of conversations on Skype and other types of telephony, and sometimes just recording random conversations between me, my girlfriend, and my son. The first thought is this:
But you and I know that big brother doesn’t give a damn about me, just like everyone else. In fact, it was not Windows that was being monitored, but the sound control panel, the Realtek driver, where microphone filters were enabled in the settings (they are enabled by default, so if you have Realtek, check). One of them was designed to improve the sound during online conversations; disabling it should solve the problem. This explains that the craziest files (3-5 gigabytes each) were initiated by calls from Skype, Slack, etc. There is a lot of situations in the network and the main problem is that your Skype conversations with colleagues, even if you are discussing nasty things about colleagues (or trade secrets), are stored directly on your disk without a hint of encryption. And they never go anywhere.
Disabled microphone filters. I'll see if it helps.
PS. Something didn’t help, you’ll have to turn off the microphone.
Connecting speakers to a computer via S/PDIF (digital output)
When connecting 5.1 speakers via SPDIF, you will need an SPDIF cable (optical or coaxial).
The inputs and outputs of coaxial SPDIF are made on RCA type connectors. The digital signal is transmitted via a regular cable with appropriate connectors. In coaxial SPDIF, data is transmitted in the form of electrical pulses over ordinary wires, which are subject to all kinds of interference. In the receiving device, all these noises are filtered out, but the possibility of losing some data is still present.
Optical SPDIF uses an optical cable to transmit data. Its inputs and outputs are made on Toslink type connectors, which are closed with plugs, by which it is very easy to recognize this type of interface. Also in Creative and other sound cards there is an optical interface that uses a mini Toslink cable. An optical cable does not respond to magnetic fields at all, since data is transmitted in the form of light pulses. Therefore, it is believed that the optical digital data transmission interface is much better protected from external influences than the coaxial one. Satellite receivers use the optical type of the SPDIF interface.
The type of connection will depend on what type of interface for connecting external signal sources is available on the amplifier housing of your speaker system. You simply connect the cable to the digital output of your motherboard and connect it to the corresponding digital input connector on the speaker system (amplifier or subwoofer speaker system with built-in amplifier). It is necessary to change the signal output port in the audio card interface from analog to digital (unless, of course, the driver itself determines the connection to the digital output). The connection diagram for the speakers itself remains the same as described above. Games output sound directly without various compressions, so you still won’t be able to get more stereo sound from the game via S/PDIF. To correct this drawback, you must have a sound card that supports Dolby Digital Live or DTS Connect. These technologies allow multi-channel audio from a 5.1 or 7.1 game to be encoded on the fly into Dolby Digital or DTS and transmitted directly via S/PDIF. In practice, when one of these technologies is enabled, all audio played on the analog outputs will be re-encoded and sent to digital S/PDIF , however, often in order for the sound to be played on the analog output, you will have to set the analog outputs of the sound card as the default device in the Windows sound settings panel, and for many applications simply select analog outputs manually. For example, in normal mode, in the sound settings panel in Windows, selected S/PDIF as default device. The music player also lists S/PDIF. Now, to get 5.1 sound from any source you should:
- select one of the 5.1 audio encoding technologies Dolby Digital Live or DTS Connect in the sound card settings;
- in the Windows sound settings panel, select the analog outputs of the sound card as the main device;
Software settings
Audio settings provided by the speaker manufacturer's software include volume controls for each speaker, tone controls, equalizer, and surround settings. In the program, you can also select the type of speaker system, which implies a particular number of speakers. In this section, select “5.1 Sound”. The main window of the program displays the location of the speakers in the area of the sound receiver, that is, the listener. Each of the speakers can be placed as it stands in real life. By clicking on the icon of a particular speaker, a volume control appears. Thus, it is possible to adjust the overall sound of the system so that the sound seems evenly distributed in space.
Please note that any specific system speaker volume setting can be saved. This is convenient if you often rearrange the room by swapping speakers. After adjusting the volume, check the surround sound quality. For this purpose, there is a button, when pressed, some standard stereo sound is heard. You can also check that all speakers in the system are correctly connected to a common node by double-clicking on each of them in the sound setup program. You will hear the sound from this speaker and can check the match.
User Misconceptions:
Misconception #1
. When you are finished playing you should switch everything back for correct operation. If you keep one of the on-the-fly encoding technologies always on, you will not be able to view and listen to files with multi-channel audio, since they are already encoded and require output directly to S/PDIF.
Solution:
you don’t need to switch anything, watch a movie in stereo - it’s laid out at 5.1, watch a video with a DTS or Dolby track - the sound is perfectly laid out across channels. This can be seen even on a player that can switch audio tracks, for example, The KMPlayer.
Misconception #2
. On-the-fly encoding of stereo sound from an mp3 file using Dolby Digital Live or DTS Connect will be several times inferior to hardware decomposition of such sound on speakers or a receiver.
Solution:
If acoustics of similar quality are connected to the receiver, the difference will not be so significant. The main thing in the settings of THX Studio Pro (or a similar “improver” of the sound card) is not to forget to disable the options that create various effects: for example, it makes the voice stand out from the general sound background. Much depends on the sound card; Creative Titanium HD copes with this with a bang.
Real and “virtual” multi-channel audio
A true multi-channel audio track puts voice into the center channel and effects and music into the rear and front speakers. Or - in accordance with the distribution during recording (in some multi-channel audio standards).
“Virtual” multi-channel audio is distributed according to the spectral characteristics of the reproduced sound. Software and hardware parse the signal into components according to predetermined algorithms, and distribute sounds around the listening point, creating surround sound.
How to connect speakers to a TV (active)
- Through 2 RCA-RCA cables (tulip - tulip), one ends are in the L and R outputs, the other in the speakers, if the speakers have RCA inputs on the rear panel.
- If only a cable with a mini Jack at the end comes from the speakers, then connect it to the headphone jack on your TV.
- If you are going to connect a full music center, then using RCA-RCA cables to the L and R outputs of the TV, set the AUX mode on the music center and connect the RCA cable to the AUX input on the back panel of your center. If your TV has a sound output in the form of a mini Jack socket (black, as a rule), then you will need a mini Jack to 2 RCA adapter cable.
So, you have become the proud owner of 5.1-channel computer speakers (AC/acoustic system/acoustics) and have correctly connected them to the sound card. What's next? In this article, I will tell you in detail and “pictures” point by point how to correctly and quickly configure sound in Windows 7 using the Control Panel
) and
Realtek HD
. In the last paragraph I will also mention the rating South Korean media player. For those who are interested, read further after the button of the same name.
1.
We’ll start our short delving into the settings by calling the “windowed” control panel (“
Start
” → “
Control Panel
”).
Let’s find and open the parameter (applet) “ Sound
” → then, on the main tab “Playback”, designate the playback device “
Speakers
” (“
Speakers
”) → at the bottom left, click on the “
Configure
” button (screenshot).
In the window that opens, in the “Sound Channels” list, select “ Surround Sound 5.1”
“, after which we don’t forget to click on the “
Check
” button (of course, all speakers should produce sound). After passing the test, we will move on to the next settings, where you need to specify which speakers will be wideband, rear, etc.
2.
Having properly configured the speakers and clicking on “
Done
”, we will return to our multi-tab window “Sound” → selecting “
Speakers
” again, look at “
Properties
” → in the “Properties: Speakers” window on the “
Enhancements
” tab, check the box next to the “
Environment
”
, confirming the change with the “ OK
” button. This completes our manipulations with the “Sound” applet.
3.
Now let’s open the
Realtek
audio (see the “
Realtek HD
” option in the Windows Control Panel).
On the “ Speakers
” tab, select the “
5.1 speakers
” configuration → also check that the “
Virtual Surroundings
” and “
Bass Control Connection
” items are activated.
Let's close the dispatcher with the " OK
" button, and the control panel - of course, with a "cross".
4.
If media files on your system are opened not by the built-in (Windows Media Player), but by a third-party player, then the final “digging” will be changing the channel settings from stereo to “5 + 1”.
For example, for the winner of “ Choosing the best media player for Windows OS...
“
Daum PotPlayer”
“digging” is as follows: when the program is running, press “
F5
” (“Settings”) → on the “
Audio
” tab in the “Speakers” setting, change “2.0 stereo” to “
3/0/2 + LFE – 5.1 channels
” → "
OK
".
Actually, that’s all – it’s not too difficult and time-consuming. All that remains is to appreciate the surround sound by launching your favorite Dolby Digital (DTS) movie!
Dmitry dmitry_spb
Evdokimov
If you haven't used multi-channel audio before, this type of audio system will greatly enhance your experience when watching movies and playing games. The 5.1 mark means that we will have as many as 6 speakers: 2 front, 2 rear, center and a subwoofer (especially for lower frequencies). However, there are even more advanced builds, such as 7.1. Below we will talk about how to connect such acoustics.
OS Settings
First of all, after connecting a multi-component speaker system, you need to set the correct settings in the computer operating system. As you know, this speaker system has three output connectors that connect to the microphone input, line input and linear output of the system unit. Thus, it is necessary to convert the input jacks to the output signal. Moreover, changes in the functioning of the connectors must be made in such a way that they produce the correct signal for the speaker system, because in the case of using a 5.1 system, the overall sound signal is divided into components associated with one or another part of the speaker system.
Open your computer's control panel. Go to the Hardware and Sound section. Next, click on the “Manage audio devices” button. In the window that opens, you will see the device of the computer speakers. Select this device and click on the “Configure” button. Select 5.1 Surround Sound. Now the audio signals will be distributed correctly between the audio ports.
How to connect 5.1 acoustics - how to start speakers
First of all, it’s worth finding out whether our motherboard supports six-channel audio. All modern builds can do this, but there are exceptions. In addition, it is necessary to keep in mind what type of speaker systems the devices in question belong to. Analogue speakers connect to a PC in the same way as any others, while digital speakers operate via the SPDIF connector. Since analog audio systems are the most common, we will focus on them. Digital devices, among their advantages, are connected to the system unit with only one wire, emitting much less background noise. The sequence of working with a 5.1 audio system looks like this:
We unpack and examine the devices to determine where and how to place them. For example, it is logical to install modules with controls on a table in order to have quick access to sound settings. A subwoofer with “lows” can be conveniently installed under the table.
The connection diagram may vary depending on the design of the acoustics, but in general, connecting the plugs from the speakers should correspond to the labels on the sound card connectors. The subwoofer is designated by the abbreviation SW), the front left and right speakers are FrontLeft (FL) and FrontRight (FR), the two rear speakers are RearLeft\Right, or SurroundLeft/Right (RL/RR, SL/SR, respectively). The central column is CEN.
The physical connection is made using a “paired tulips – jack 3.5” cable. They will go like this:
- a pair of “tulips” from the front speakers, jack to the green sound card socket;
- a pair from the rear speakers - into a black connector (depending on the manufacturer, the wire or “socket” may be painted blue);
- pair of subwoofer and center - to orange (similar to the previous point - or yellow);
- do not forget to connect the entire system to the network;
- Pay close attention to which section the “tulips” are located in; it should be labeled “Audio Input 5.1”, but not “Audio Output”.
Another connection option is possible if the PC does not have enough connectors to connect a second pair of speakers and a subwoofer\center. In this case:
- connect the front speakers to the green socket;
- rear – to blue or black;
- subwoofer and central device - to the pink input intended for a microphone (as a result, if a microphone is needed, the sub must be turned off).
How to connect 5.1 speakers on a PC
Some settings need to be made on the computer:
- go to “Control Panel” -> “Hardware and Sound”;
- select the section “Sound” -> “Speakers”;
- click “Configure”;
- find the item “5.1 surround sound” and click on it;
- the audio system will be activated.
It is also convenient to use Realtek Audio Manager:
- go to the program;
- on the “Speaker Configuration” tab, select 5.1 from the drop-down list;
- Save the changes with the “OK” button.
To connect the speakers to a DVD player, TV or other equipment, you will need an adapter (for example, mini jack - stereo RCA).
Different acoustic types are recommended for use depending on the purpose. So, the most common option for watching movies are 5.1 speakers. The six-channel system allows you to provide the highest quality sound covering the entire frequency range. It is this kind of kit that is recommended to be used when purchasing home theaters and wanting to listen to pure music from different directions. True, the price for such a kit is already significantly higher than for simplified options.
Method 2. (Digital) Optical -> Multichannel Analog
This is why this article was started. I often get asked questions like: “How do I connect my home theater to my new TV? It doesn't have analog audio outputs!
Mine only has a two-channel mini-jack and optical Toslink. For the time being before purchasing new acoustics, I connected the old 5.1 set using this Chinese converter.
Hidden inside the device is a rather primitive digital-to-analog converter and DSP processor.
— a chip responsible for mixing, equalizing and effects.
The application is very simple - we connect an acoustic system to the analog RCA outputs, on the other hand we supply an audio signal through a coaxial or optical connector and external power from the included power supply.
If the signal corresponds to the number of connected acoustic channels, it passes without mixing and processing. As it is.
That is, if the film has a 5.1 channel audio track
, and we use the appropriate audio system - the sound quality will be the same as the original.
If a two-channel track is fed to it, then the signal is converted using “virtual” mixing in the processor and distributed to all speakers.
Of course, this is very different from real 5.1-channel sound, but still, it sounds nicer than regular stereo. Unless, of course, we are talking about films.
This way you can connect the speakers to other devices
- for example, through the usual headphone output of a laptop, tablet or player.
But the output will only be virtual 5.1-channel sound, even if the original track is multi-channel. You won't be able to get anything else out of the stereo jack.
If necessary, the converter allows you to reproduce any incoming audio signal into two channels. Convenient for 2.1
, as well as in cases where the DSP converter plays the track incorrectly.
System components 5.1
The configuration of the 5.1 system means that it includes five speakers and one subwoofer. The speakers included are the same, but they are used for different purposes depending on where they will be installed. So, they are divided into:
- frontal (includes two speakers, installed in front so that the sound goes to the viewer);
- side (also include two speakers, which are placed on the sides to enhance the surround sound);
- central (the remaining column is the voice channel, distributing sound waves between the remaining elements of the system).
A subwoofer is a device that converts low frequencies. The human ear is unable to recognize the direction from which the sound is coming from a subwoofer, so it can be installed anywhere in the room. At the same time, it is he who adds color to the special effects due to bass and outgoing vibration.
Stereo 2.0:
- The recommended distance between speakers is at least one and a half meters. In addition, they must be parallel to each other. In order for the user to get the desired sound, the speakers must “look” at the listening position, for example, on a sofa or desk. The placed satellites should visually resemble a triangle.
- Placing devices in the corners of the room is a mistake, due to which the low bass is noticeably lost.
- For the “correct” sound, it is recommended to use stands that are positioned so that the satellites are 40-50 cm from the floor. The ideal location is at ear level.
- The acoustic system should not be blocked by furniture or installed in niches. This will disrupt the movement of the sound wave and result in loss of sound quality.
- It is also not recommended to place speakers close to the wall, as this upsets the frequency balance.
Advice for owners of 2.1 systems: do not place the subwoofer in the center - you will end up with a sound mess. Read more about subwoofer placement below.
Multichannel 5.1 audio
- A pair of “fronts” is installed identical to a stereo pair 2.0, as described above.
- A pair of rear speakers should ideally be a mirror image of the front stereo pair.
- The central - speech - channel is installed as close as possible to the monitor, which makes it possible to comfortably and holistically perceive dialogues and vocal parts.
- The subwoofer is installed on the floor. You should not place it in the center, as the powerful bass will drown out other frequencies, and the low frequencies will be too saturated. You can experiment when choosing the optimal location based on a specific room.
Connecting 5.1 systems
The 5.1 system includes six speakers; as a result, they will require more connectors than a stereo pair or 2.1 system. It will not be possible to combine all the speakers with one cable and connect the entire system to one line output on the sound card.
Connecting a surround sound system to your computer
Both discrete and modern integrated sound cards are capable of splitting sound into multiple channels. A typical analog sound card designed to connect 5.1 speakers will have several outputs with a diameter of 3.5 mm:
- for front speakers;
- for the central speaker and subwoofer;
- for rear speakers.
Paired speakers will be combined by connecting to a common socket. In total, therefore, you will need 3 connectors, each of which will have a corresponding color marking. Additionally, the sound card may have an output for satellites, a microphone jack and a line input, but in this situation you will not need them.
To connect all components into a single system, you will need a set of RCA - mini-jack cables. Connection is carried out in the following order:
- All speakers are connected to the sound control module - all connectors on it are labeled, so it’s almost impossible to get confused. The only important point is that you need to connect to a block of sockets labeled Audio Output.
- Cables from the three colored jacks go to the corresponding connectors on the sound card - front speakers to green, rear speakers to black, subwoofer/center to yellow.
With digital audio, everything is simpler - after combining the speakers in the control module, only one cable goes to the computer - coaxial or optical S/PDIF.
Connecting 5.1 speakers to your TV
As a rule, connecting such a system to a TV is done in one of three ways:
- an HDMI cable going to the receiver that combines the speakers;
- optical cable;
- coaxial cable;
- via one of the analog interfaces.
In any case, before connecting the speakers to the TV's sound card, they must be combined. To do this, use either an AV receiver or an audio amplifier. On its surface you can find many RCA connectors - thus, an analog signal always goes to the speakers, which is converted from digital using the digital-to-analog converter built into the receiver.
Just like with a computer, you will need a lot of cables. All of them are inserted at one end into the connectors on the speakers, and at the other into the corresponding outputs on the receiver. The digital interface on the receiver is then connected to the corresponding connector on the TV body.
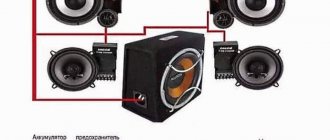
Acoustics 5.1 active
Active acoustics 5 1 occupies a special place in the niche of audio systems intended for installation in a car. Today, passive acoustics compete with active acoustics, and in our article we will find out the difference between them. In addition, we will conduct a review where the test will be 5 1 active acoustics, the choice of which is a difficult task for many. This is not surprising, because there are dozens of similar products on the modern market.
Connecting Bluetooth speakers
Correctly connecting Bluetooth speakers to your computer is as easy as shelling pears. Everything that is required from the user is described in the table.
| Synchronizing PC with speakers | 1. Turn on the speakers. |
| 2. Press the key that activates the search for a device for subsequent synchronization. | |
| 3. Open the control panel on your computer or laptop. | |
| 4. In it, open: Hardware and Sound → Devices and Printers → Bluetooth Devices → Add Device. | |
| 5. Select the device to be connected and click “Next”. | |
| Designate the connected device as the device from which audio will be played by default |
|
| |
|
In addition: How to choose speakers for a computer and laptop: 3 selections of the best systems
It is not difficult to correctly connect stereo speakers, as well as a 5.1 multi-channel speaker system to a computer. The main thing is to connect all the cables correctly and set up sound reproduction in the PC itself. The instructions are suitable for both Windows 7 and the tenth version of this OS. True, the names of the tabs may differ slightly. However, the difference is so insignificant that it will not raise any questions.
What is the difference between active and passive speakers
First, let’s find out what the difference is between active and general, and what advantages and disadvantages both have.
Amplifier
This element plays an important role in any acoustic system, whether active or passive. An amplifier is often called a receiver, because it is through this component that the sound goes directly to the speakers. Sound amplification is carried out in the following ways:
- The sound of the speaker itself is amplified. Such amplification is often found in computer speakers or expensive car speakers.
- First, the sound passes through the amplifier, and only then goes to the speakers.
Passive speaker and its disadvantages
The topic of the amplifier was raised for good reason. It is this component that makes the difference between the two speakers. Let us now consider the disadvantages of a passive speaker system:
- In passive speakers, most of them are equipped with an amplifier of average power (see). The sound produced by different speakers is neither good nor bad.
- The second option for installing an amplifier in passive systems already involves the use of a good and powerful amplifier, but one that only works with certain models. This is easy to explain, because the manufacturers of such an amplifier cannot know in advance what kind of acoustics it will work with.
- It’s no secret that during speaker operation, all electronics heat up, including the crossover, since the output power is concentrated on it. The amplifier loads the speaker electronics, which causes the sound quality in passive speakers to suffer.
- Another disadvantage of passive speakers involves the selection of a powerful amplifier. As is known, in order for passive speakers to cope with the incoming power of the amplifier at critical moments, the power of the second must be less than the power of the speakers themselves. There is no feedback from the amplifier to the speakers in a passive speaker. So it turns out that this is a big drawback, because the amplifier, in fact, cannot monitor the load and when it needs to send less power.
Active acoustics
It is advisable to choose her. Now let's find out why:
- The design of this speaker provides feedback between the amplifier and speakers. There is a unique opportunity to change the load on the speakers at moments of maximum concentration of the entire system. This prevents damage to the speakers and lasts much longer.
Note. Even if the active speaker is small, it will have good acoustic output. This can be explained by the fact that the amplifier is connected directly to the speakers, due to which maximum efficiency is achieved.
- The crossover in active speakers, unlike passive ones, does not heat up. This component is capable of filtering the signal for a long time, thereby eliminating the problem of the amplifier-to-speaker ratio. In this case, the amplifier can simply be configured as required.
- Active speakers provide very high sound quality.
- The active speakers are not affected by long distances, because the speakers can be arranged as you please.
- Active speakers are capable of operating under heavy loads and for a very long time.
What is active acoustics 5 1
We figured out the difference between active and passive acoustics. Now let’s find out what active 5 1 acoustics are:
- Speakers that have a built-in amplifier, as mentioned above, are called active acoustics. It is enough to just connect them to a sound source, turn on the power and they will start working.
- Set 5 1 is a ready-made set of 5 satellites and a subwoofer (see). In this case, the control unit and amplifier are a priori built into the subwoofer housing. The subwoofer is the main element here and the switching connectors are located at the rear of its housing.
Note. In most cases, on the back of the active acoustics subwoofer 5 1 there are several stereo inputs and a multi-channel analog input for connecting a DVD player, car radio or other device.
What models of acoustics 5 1 are most popular:
- The greatest interest for buyers today are mid-price acoustic sets, the price of which does not exceed $250. The speakers of this system have a wooden frame. As for the dynamic heads of the speakers, they are more or less made with high quality. This also applies to the rubber suspension of the midrange driver and the dome fabric tweeter.
- There are also cheaper models of this speaker, which are more of a decorative value and are chosen by buyers because of their beautiful appearance from photographs.
Note. Of course, there is an alternative to ready-made acoustic sets 5 1. In this case, the set is assembled from individual components, such as a multi-channel AV receiver, speakers and an active subwoofer. In this case, the costs will increase significantly and you will have to count on an amount of at least $400.
- It is worth noting that the advantage of 5 1 acoustics, which consists in a set of miniature heads that supposedly provide full-fledged sound, is erroneous. The fact is that the small size of the diffuser is in no way capable of producing a full-fledged strong sound. Full sound cannot be provided by decorative speakers, because there are restrictions imposed by the laws of physics. For this reason, it is better to purchase 5 1 acoustics with large speakers.
- Full-frequency speaker systems 5 1 with normal speaker sizes will make it possible to install higher quality heads and use separate speakers for high frequencies and mid/low ranges. The volume of air mass, among other things, which is collected inside the housing, can be used to enhance low frequencies if a bass-reflex acoustic design is used.
- Obviously, the dimensions of the speakers alone are not capable of ensuring quality. Today on the market you can find sets of inexpensive full-size acoustics, the quality of which is not far from decorative small speakers.
Review of the most popular models of active acoustics 5 1
Let's now move on to testing the most popular models of these acoustics.
Genius SW-HF5.1 5000
So:
- Genius SW-HF5.1 5000 has the following satellite dimensions: 14x21.5x15.5.
- Diffuser diameter – 9.
- The tweeter is equipped with a Mylar driver.
- The subwoofer is equipped with a resonant chamber.
- There is no equalizer.
- Approximate price: $155.
This system plays with pronounced coloration in the mid-frequency region. If this fact is considered a disadvantage, then it will be expressed in a noticeable timbral change in the sound of various musical instruments precisely at mid frequencies. There is also a compression effect, leading to rapid hearing fatigue. But the subwoofer of this system plays well. The resonance chamber produces a characteristic hum-like sound.
Edifier S 5.1
So:
- A more expensive model with satellite dimensions of 15x23x16.
- The diffuser diameter is the same – 9.
- The tweeter is already in the form of a fabric dome.
- Subwoofer circuit - FI.
- Availability of 6.1 amplifier.
- Approximate price: 260 dollars.
This system lacks high frequencies. As for the mid frequencies, they have a pronounced strong color.
Microlab H-500
- The dimensions of the satellites are 13x22x18.
- Diffuser size – 8.
- Polymer suspension material.
- The tweeter is a fabric dome.
- Availability of external control unit.
- Approximate price: 280 dollars.
The sound is comfortable. There is no color like Genius.
Sven HA-1410T
- The dimensions of the satellites are 15.5x28x20.
- Rubber suspension material.
- Fabric dome tweeter.
- Bass reflex subwoofer circuit.
- Availability of Hi-Fi speakers in satellites.
- Cost about 300 dollars.
More detailed sound than other models. Full sound at all frequencies.
Of the models listed above, which are collected in our article in the form of a hierarchical ladder as their cost increases, the very first speaker system has excellent price/quality indicators. You need to choose based on this parameter, and not just on price or quality. You can install the purchased speaker system in your car yourself. It is enough to use step-by-step instructions using photos and video materials. As shown above, the cost of models varies and you need to choose not as usual, but based on the price/quality parameter.